Thanksgiving always pulls me toward slower, hands-on projects.
There is something relaxing about shaping a plain lump of air dry clay into decorations that stay around long after dinner is over.
These Thanksgiving clay projects aren’t just another afternoon craft either.
They become little keepsakes that remind everyone of family traditions, laughter, and messy creative moments.
Whether you’re planning kids craft activities, decorating your holiday table, or simply looking for fresh air dry clay craft inspiration, these beginner-friendly ideas are simple enough to follow yet unique enough to feel different from the usual Thanksgiving decorations.
Choose Your Clay Type For These Projects
Air Dry Clay | Polymer Clay
Affiliate Disclaimer: Some of the links in this post may be affiliate links, which means I may earn a small commission if you choose to make a purchase through them – at no extra cost to you. I only share products that genuinely fit this project and can help make your ceramic mug clay craft process easier and smoother. Your support helps keep ideas like this coming.
1. Woodland Turkey Place Card Holder
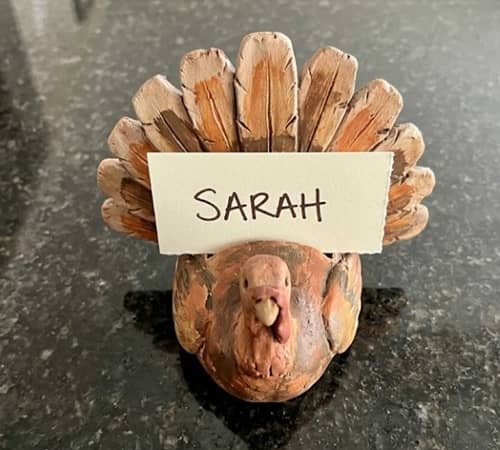
Instead of making another ordinary turkey, why not create one that actually serves a purpose? I love using these on the Thanksgiving table because every guest gets a personalized seat while the decoration becomes part of the centerpiece.
Supplies
- Air dry clay
- Acrylic paints (brown, cream, orange, red, mustard yellow)
- Small sculpting tool or butter knife
- Wooden toothpick
- Rolling pin
- Fine sandpaper
- Matte varnish (optional)
Step-by-Step Instructions
Start with a ball of clay roughly the size of a golf ball.
Roll it gently between your palms until the surface feels smooth.
Flatten only the bottom slightly so it stands without wobbling.
Roll another smaller ball for the turkey’s head.
Press it gently onto the body using a tiny dab of water as clay glue.
Blend the seam with your fingertip instead of leaving a visible line.
Now comes the fun bit. Roll six tiny teardrop shapes for feathers.
Don’t worry if every feather isn’t identical. Actually, they looks better when each feather has its own little personality.
Arrange the feathers behind the turkey one by one. Slightly overlap each feather before pressing it into place.
Use a toothpick to scratch delicate feather lines from top to bottom. These shallow grooves catch paint beautifully later.
Roll an even smaller orange triangle for the beak.
Add two tiny clay dots for eyes.
Roll a thin sausage of red clay and attach it beside the beak to create the wattle.
Now make the card holder. Roll a short cylinder and gently flatten the top.
Carefully cut a narrow slit across the center using a butter knife. Make sure the slit is deep enough to accommodate cardstock without causing the clay to break.
Leave everything to dry for at least 24 to 48 hours.
Once dry, lightly sand rough edges before painting. Use warm earthy shades instead of bright cartoon colors. Finish with a matte sealer if desired.
This project also works wonderfully beside Thanksgiving salt dough decorations or rustic wooden centerpieces, giving your table a cozy handmade look.
2. Pumpkin Pie Slice Trinket Dish
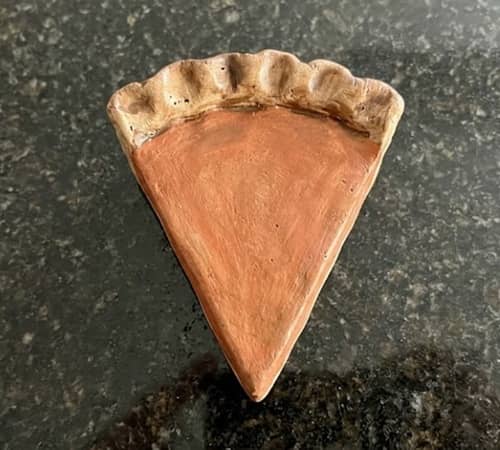
Everybody makes pumpkins. Very few people make pumpkin pie.
That tiny twist instantly makes this one feel different.
Supplies
- Air dry clay
- Rolling pin
- Round bowl
- Craft knife
- Acrylic paints
- Clear matte varnish
Step-by-Step Instructions
Roll your clay until it reaches roughly 6 mm thick.
Place a small bowl over the clay and cut out a circle.
Cut the circle neatly into six equal wedges.
Choose one wedge to become your pie slice.
Lift it carefully and place it over a folded towel so the sides curve upward naturally.
This creates the dish shape without needing special molds.
Smooth every edge using a damp finger.
Roll a thin rope of clay.
Attach it around the crust edge, gently pinching random sections to imitate flaky baked pastry.
The filling should remain perfectly smooth.
Paint the filling a rich pumpkin orange with hints of cinnamon brown around the edges once it has fully dried.
Dry brush the crust using cream and tan paint for realistic baked texture.
Seal the finished dish.
I use this little tray for rings, earrings and even wrapped chocolates during Thanksgiving day dinner. Guests always ask where it came from.
3. Acorn Keepsake Pocket Stones
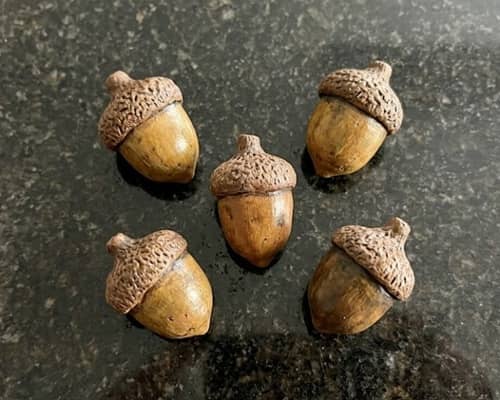
Sometimes the smallest crafts become everyone’s favorite.
These fit perfectly inside a pocket, lunchbox or gratitude basket.
Supplies
- Air dry clay
- Aluminum foil
- Brown acrylic paint
- Beige paint
- Tiny ball stylus
- Matte sealer
Step-by-Step Instructions
Roll small egg-shaped pieces of clay.
Press one end slightly flatter.
Cover the upper third with dozens of tiny stylus impressions to imitate an acorn cap.
The lower portion should stay smooth.
For extra realism, crumple aluminum foil into a loose ball and gently press it over the cap texture. This creates dozens of tiny natural dents.
Allow the clay to dry fully.
Paint the cap deep walnut brown.
Paint the lower half warm beige before softly blending darker brown toward the top.
If you like, write one gratitude word underneath each acorn using a fine paint pen.
Words like Hope.
Family.
Joy.
Home.
Peace.
These become wonderful conversation starters during dinner and fit beautifully into your DIY Fall clay crafts collection.
4. Harvest Wagon Mini Shelf Decor
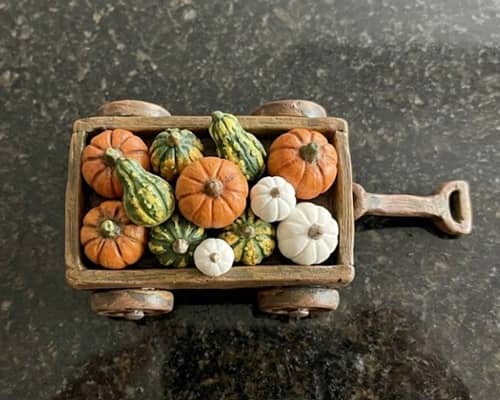
I wanted something that felt like farmhouse décor instead of classroom crafts.
This little wagon checks every box.
Supplies
- Air dry clay
- Rolling pin
- Circle cutter
- Sculpting knife
- Acrylic paint
- Wooden skewer
Step-by-Step Instructions
Roll clay into an even slab.
Cut a rectangle for the wagon body.
Fold the long edges upward to form shallow sides.
Blend each corner until smooth.
Cut four identical circles for wheels.
Use a wooden skewer to press wheel hubs into the center.
Attach each wheel securely.
Roll tiny pumpkins, miniature corn, apples and gourds.
Place them inside the wagon.
Keep everything slightly oversized so each item remains visible after painting.
Before drying, lightly score wooden plank lines onto the wagon body.
Paint the wagon aged brown using dry brushing techniques.
Paint each harvest vegetable individually using muted autumn shades.
There are dozens of Thanksgiving ceramics ideas, but making one entirely from air dry clay keeps the project approachable for beginners without sacrificing charm.
5. Corn Husk Inspired Candle Ring
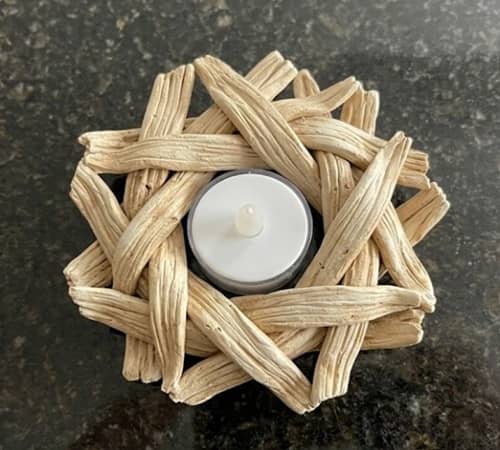
This one looks surprisingly elegant despite being incredibly easy.
Honestly, nobody believes its made from clay.
Supplies
- Air dry clay
- Rolling pin
- Craft knife
- Veining tool
- Acrylic paints
- Tea light candle
Step-by-Step Instructions
Roll several long leaf shapes.
Use a veining tool to create delicate center lines and smaller side veins.
Curve each leaf gently over a rolled towel while still soft.
Allow partial drying for about an hour.
Arrange the leaves into a circular wreath shape around a tea light.
Blend every connection carefully.
Add tiny clay berries between several leaves.
Paint using soft wheat, golden tan and muted olive shades.
Highlight raised veins with dry brushing.
After sealing, place a battery-operated tea light inside.
This pairs beautifully with many Thanksgiving air dry clay ideas, especially rustic centerpieces using natural colors.
6. Gratitude Feather Hanging Ornament
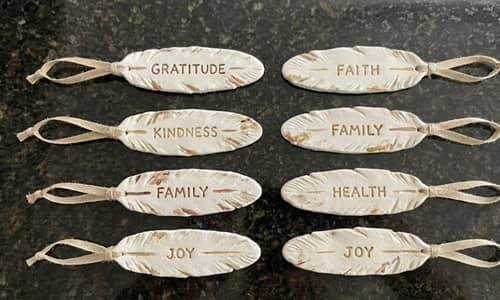
Every Thanksgiving table tells a story.
This ornament lets every family member add their own sentence.
Supplies
- Air dry clay
- Rolling pin
- Feather template
- Toothpick
- Ribbon
- Acrylic paint
- Permanent marker
Step-by-Step Instructions
Roll your clay evenly.
Cut several feather shapes using a paper template.
Smooth every edge.
Press a center line from top to bottom.
Add tiny angled feather grooves on both sides.
Poke a hole near the top using a straw.
Let each feather dry completely.
Paint soft cream, ivory or muted sage.
Lightly dry brush darker paint across the grooves to enhance texture.
Thread ribbon through each hole.
Now invite everyone to write one thing they feel thankful for on the back before hanging the feathers on a decorative branch.
It turns a simple decoration into a family tradition that grows year after year.
These also fit perfectly alongside other clay turkey decorations and creative Thanksgiving craft ideas, especially if you’re planning meaningful kids craft activities during the holiday weekend.
7. Thankful Leaf Story Garland
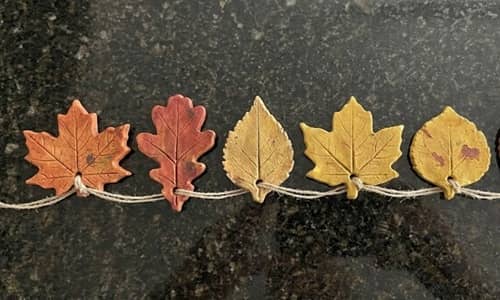
This project starts as a decoration but quietly turns into a family memory.
Every leaf holds a short message, and by the end of dinner you’ve got a garland full of little moments worth keeping.
Supplies
- Air dry clay
- Rolling pin
- Maple, oak, or birch leaves (real leaves work best)
- Drinking straw
- Twine or jute string
- Acrylic paints (burnt orange, olive green, mustard, deep red)
- Matte varnish (optional)
Step-by-Step Instructions
Roll your clay until it’s about 5 mm thick. Try to keep the thickness even because thin areas dry much faster than thicker ones.
Place a real leaf on top of the clay.
Use the rolling pin with very gentle pressure to press the veins into the surface.
Lift the leaf carefully. You should see every tiny detail left behind.
Cut around the outline with a craft knife.
Smooth the edges using a damp fingertip.
Use a straw to punch one hole near the stem.
Repeat until you have six to ten leaves.
Leave them to dry on a completely flat surface. Turning them over after about twelve hours helps reduce curling.
Paint each leaf differently instead of making them identical.
Autumn rarely repeats the exact same colors, and neither should your project.
Once dry, write one thankful memory or family tradition on the back of each leaf using a paint marker.
Thread them onto twine, spacing each leaf a few inches apart.
Hang the finished garland above a fireplace, across a window, or along your Thanksgiving buffet.
It don’t need fancy lettering to look beautiful. Honest handwriting gives it far more personality.
8. Turkey Feather Trinket Bowl
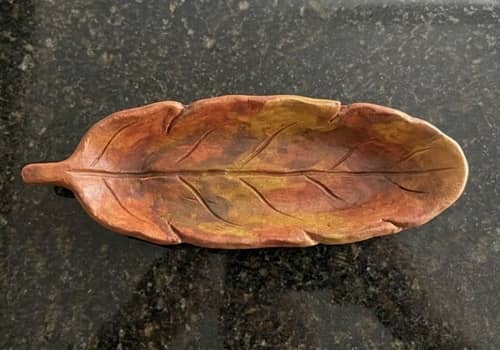
Most turkey crafts focus on the whole bird. I wanted something that hinted at Thanksgiving without looking overly playful.
Supplies
- Air dry clay
- Small bowl
- Rolling pin
- Feather template
- Sculpting tool
- Acrylic paints
- Matte sealer
Step-by-Step Instructions
Roll out the clay evenly.
Cut five large feather shapes.
Use a sculpting tool to carve a center vein followed by smaller angled feather lines.
Overlap the feathers slightly so they form a flower-like shape.
Blend the overlapping sections gently until they become one solid piece.
Now place the entire shape inside a small bowl.
Press lightly so the feathers curve upward naturally, forming a decorative dish.
Leave it inside the bowl until mostly dry.
Remove carefully and allow it to finish drying completely.
Paint each feather using warm Thanksgiving shades like rust, amber, burgundy and cream.
Dry brush lighter paint across the raised texture to highlight every carved detail.
Once sealed, this becomes a beautiful catch-all dish for jewelry, wrapped candy or table favors.
Projects like this blend nicely with both Thanksgiving ceramics projects and modern air dry clay crafts because they look elegant without requiring a kiln.
9. Pumpkin Gratitude Tokens
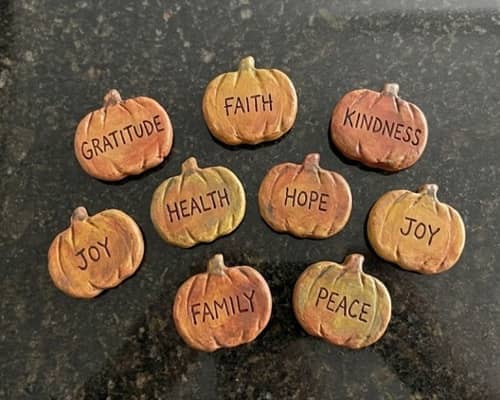
Sometimes kids lose interest halfway through bigger crafts.
These little tokens finish quickly, which makes them perfect for younger creators.
Supplies
- Air dry clay
- Pumpkin-shaped cookie cutter
- Wooden skewer
- Acrylic paints
- Fine paint pen
Step-by-Step Instructions
Roll your clay about half a centimeter thick.
Use a pumpkin cookie cutter to cut several pumpkins.
Smooth each edge with your finger.
Use the wooden skewer to press gentle vertical grooves from top to bottom.
Make a tiny stem using a short clay cylinder.
Attach it using a dab of water.
Allow every pumpkin to dry completely.
Paint them with slightly different shades of orange instead of one solid color.
Paint the stems dark brown.
When everything has dried, write one thankful word on the back of every token.
Place all the pumpkins inside a basket.
Invite everyone to choose one before dinner and read it aloud.
This turns simple kids craft activities into something everyone joins in, even adults.
These little pumpkins also pair beautifully beside Thanksgiving salt dough ornaments if you’re creating a mixed handmade display.
10. Cozy Pumpkin Mug Ornament
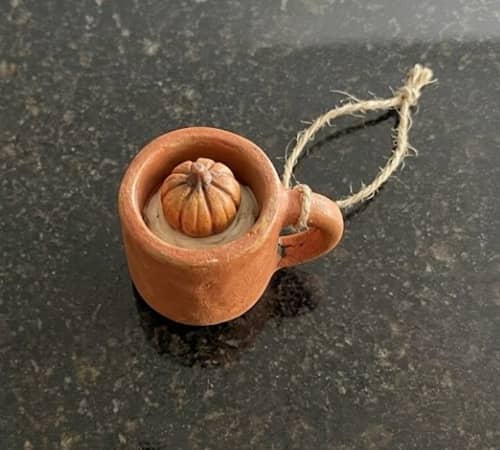
This one always makes people smile because it combines two Thanksgiving favorites – pumpkins and warm drinks.
Supplies
- Air dry clay
- Sculpting tool
- Toothpick
- Acrylic paints
- Ribbon
Step-by-Step Instructions
Roll a ball of clay roughly the size of a walnut.
Flatten it slightly.
Press your thumb into the center to create the mug opening.
Shape the walls evenly using your fingers.
Roll a tiny rope of clay.
Attach it as the mug handle.
Now sculpt a miniature pumpkin sitting inside the mug.
Use the toothpick to add pumpkin grooves.
Poke a hanging hole through the handle area before drying.
Allow the ornament to dry fully.
Paint the mug cream or soft beige.
Paint the pumpkin bright orange with a brown stem.
Add tiny white dots around the mug if you like a cozy farmhouse style.
Thread ribbon through the hole.
I wasn’t expecting this to become one of my favorites, yet somehow it always does.
This project fits nicely among other air dry clay ideas for Fall, especially if you’re decorating a Thanksgiving tree or seasonal display shelf.
11. Harvest Vegetable Fridge Magnets
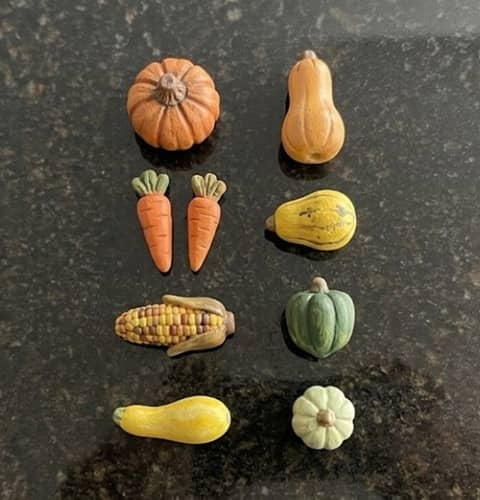
Tiny vegetables somehow become impossible to stop making.
You finish one carrot…then suddenly you’re making twelve.
Supplies
- Air dry clay
- Magnet discs
- Acrylic paints
- Craft glue
Step-by-Step Instructions
Shape miniature vegetables including pumpkins, corn, carrots, squash and beets.
Keep every vegetable around two inches long so they remain lightweight.
Add texture where needed.
Score corn kernels using the end of a paintbrush.
Press shallow pumpkin grooves.
Scratch carrot lines lightly with a toothpick.
Dry everything thoroughly.
Paint each vegetable realistically using muted harvest colors.
After sealing, glue strong magnets onto the back.
Leave the glue untouched until fully cured.
Arrange the magnets together on the refrigerator during Thanksgiving week.
They creates a playful little harvest collection without taking much time to make.
This is one of my favorite DIY Fall clay crafts because every family member naturally picks a different vegetable to sculpt.
12. Thanksgiving Blessing Pebble Set
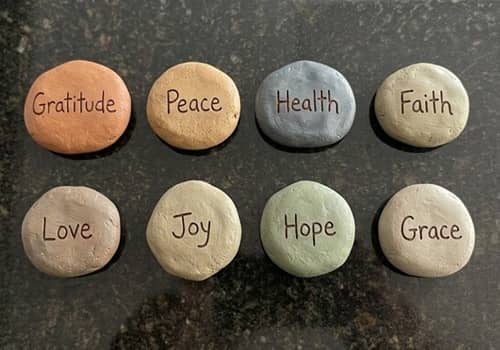
This is probably the simplest project in the collection.
Oddly enough, it’s also the one people keep for years.
Supplies
- Air dry clay
- Smooth stone (optional for texture reference)
- Acrylic paints
- Paint marker
- Matte varnish
Step-by-Step Instructions
Roll small pieces of clay into smooth oval pebbles.
Flatten them only slightly.
Keep the edges rounded.
Allow them to dry on parchment paper.
Sand lightly if needed.
Paint each pebble using warm neutral shades like sandstone, ivory, cocoa or soft gray.
After the paint dries, use a paint marker to write one meaningful word on every pebble.
Ideas include:
- Gather
- Grace
- Family
- Hope
- Kindness
- Thankful
- Harvest
- Joy
Place the finished pebbles inside a wooden bowl near the dining table.
Invite every guest to choose one before the meal begins and share why that word feels important.
Final Thoughts
The best handmade decorations rarely come from expensive supplies or perfect techniques.
They usually come from conversations around the table, tiny fingerprints left in the clay, and projects that everyone contributes to in their own way.
That’s what gives Thanksgiving clay projects their lasting value.
Whether you’re exploring your very first air dry clay craft, introducing children to creative kids craft activities, or simply collecting fresh Thanksgiving air dry clay ideas, remember this… small imperfections often become the details people remember most.
Years from now, nobody will notice a crooked feather or uneven pumpkin.
They’ll remember who made it, who laughed while making it, and why it found a permanent place in the family’s Thanksgiving tradition.