Looking for clay keychain craft ideas that feel fresh instead of the same old hearts and flowers? You’re in the right place.
I love making small clay craft projects because they use very little material, finish quickly, and turn into gifts that people actually carry every day.
The best part? Most of these also work as useful clay craft ideas for beginners who are still learning simple shaping, texturing, and painting techniques.
Grab your favorite clay, a keyring, and a little patience.
Let’s make tiny creations that look handmade in the best possible way, with easy-to-follow steps anyone can finish at home.
Choose Your Clay Type For These Projects
Air Dry Clay | Polymer Clay
Affiliate Disclaimer: Some of the links in this post may be affiliate links, which means I may earn a small commission if you choose to make a purchase through them – at no extra cost to you. I only share products that genuinely fit this project and can help make your ceramic mug clay craft process easier and smoother. Your support helps keep ideas like this coming.
1. Tiny Secret Pocket Letter Keychain
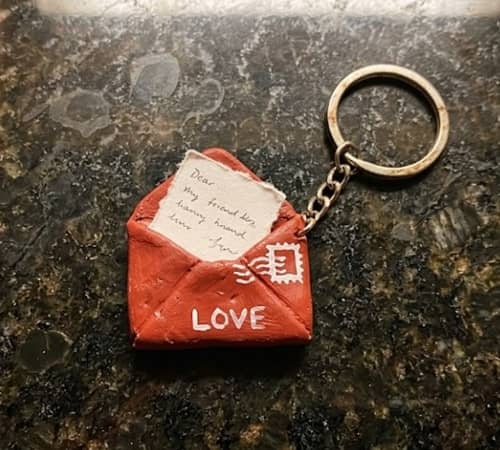
Instead of a normal letter charm, create a tiny folded envelope that hides a miniature message inside.
It’s playful, personal, and honestly people don’t expect it.
Materials
- Air dry clay or polymer clay
- Rolling pin
- Craft knife
- Toothpick
- Small jump ring
- Keyring
- Acrylic paint
- Fine paintbrush
- Matte or gloss varnish
- Tiny paper strip
- Glue
Instructions
Start by kneading the clay until it feels soft and smooth.
If you’re using an air dry clay key chain, keep unused clay wrapped so it doesn’t dry while you’re working.
Roll the clay about 2 mm thick. Cut a small rectangle roughly 4 cm by 3 cm. This becomes your envelope.
Fold each side inward exactly like folding a paper envelope. Don’t rush this step because soft clay bends differently than paper.
Trim the flap neatly with a craft knife. Gently press the seams using a silicone tool or your fingertip.
Now here’s the fun part.
Roll an extremely tiny strip of clay into a miniature letter.
Flatten it slightly and make tiny fold marks with the edge of your knife.
It dont have to be perfectly even because handmade always feels nicer.
Before baking or drying, insert a jump ring through the top corner of the envelope.
Bake polymer clay according to package directions, or let the air dry clay craft cure completely.
Paint the envelope cream, sage green, dusty blue, or soft pink. Add tiny faux postage stamps using paint pens.
Write a real message on a tiny paper strip. Roll it tightly and slide it inside after everything dries.
Seal with varnish before attaching the keyring.
2. Mini Plant Pot With Hanging Leaves
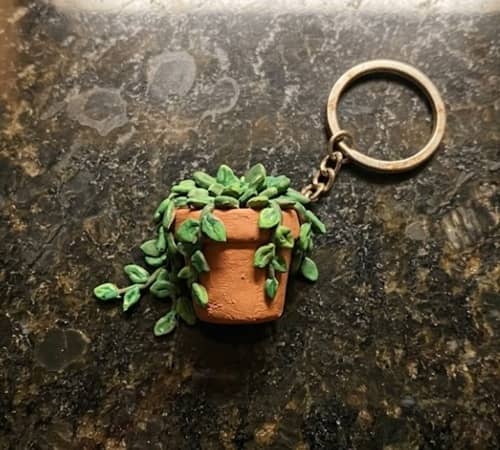
Who says a clay keychain has to be flat? Make a tiny hanging planter with cascading leaves.
Materials
- Air dry clay or polymer clay
- Toothpick
- Ball stylus
- Green acrylic paints
- Brown paint
- Jump ring
- Keyring
- Varnish
Instructions
Roll a marble-sized ball of clay.
Press your thumb into the center while rotating it slowly. This creates a miniature flower pot.
Thin the rim slightly using your fingertips.
Roll several tiny teardrop shapes for trailing leaves.
Use a toothpick to press a center vein into every leaf.
Attach each leaf individually around the rim. Blend only the base so the leaf tips stay lifted.
It looks tiny already, doesn’t it?
Texture the flower pot using a dry toothbrush. This creates a realistic ceramic effect.
Insert the jump ring before curing.
Bake or air dry completely.
Paint the pot terracotta brown. Mix several greens instead of using one shade for the leaves. That little variation makes a surprising difference.
Finish with matte varnish for the pot and gloss only on the leaves.
This makes a wonderful useful clay craft idea because it adds personality without making your keys bulky.
3. Mini Pancake Stack Food Charm
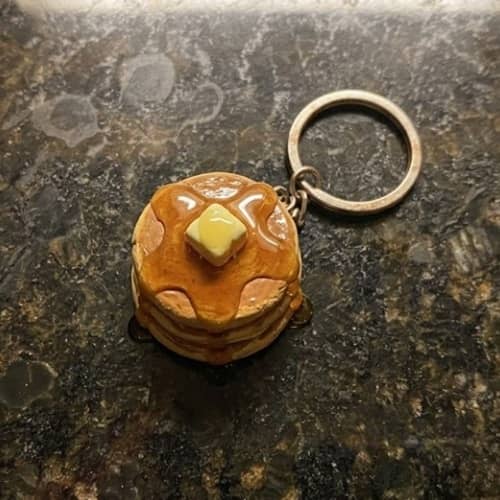
Tiny breakfast charms never really goes out of style.
Materials
- Polymer clay or air dry clay
- Beige, brown and yellow paint
- Needle tool
- Dotting tool
- Jump ring
- Keyring
- Gloss varnish
Instructions
Roll four tiny discs about the size of a coin.
Flatten each gently while keeping the edges rounded.
Stack them carefully.
Use a needle tool to poke tiny random holes around the sides. Pancakes aren’t perfectly smooth.
Roll an extra tiny square for butter.
Place it slightly off-center.
Roll a thin snake of clay for dripping syrup.
Attach it so it slowly flows down one side.
Insert your jump ring into the top pancake.
Bake or dry completely.
Paint the pancakes warm golden brown. Dry brush darker edges to imitate toasted spots.
Paint the butter soft yellow.
Apply thick gloss varnish over the syrup only. Suddenly the pancakes look fresh.
This doubles as one of those adorable food charms people instantly recognize.
4. Tiny Compass Adventure Keychain
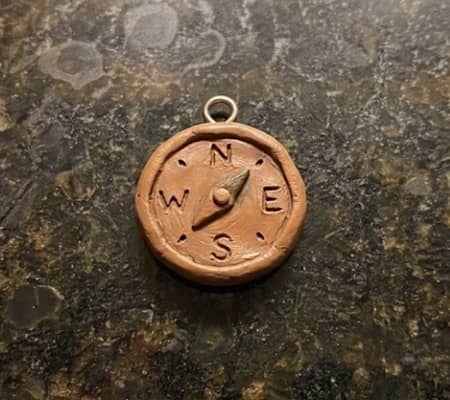
Perfect for travel lovers.
Materials
- Clay
- Circle cutter
- Needle tool
- Black and gold acrylic paint
- Jump ring
- Keyring
- Fine brush
- Varnish
Instructions
Roll clay evenly.
Cut a small circle.
Smooth every edge with your fingertip.
Press a smaller circle into the middle using a bottle cap.
Lightly engrave north, south, east and west lines using a needle.
Don’t carve too deeply.
Add tiny triangle arrows pointing toward each direction.
Create a raised center pointer.
Insert the jump ring before drying.
Bake or air dry.
Paint the background matte black.
Dry brush metallic gold across the raised compass details.
Seal with satin varnish.
This project teaches simple engraving techniques, making it one of the nicer beginner clay projects before attempting more detailed sculptures.
5. Puzzle Piece Friendship Keychain
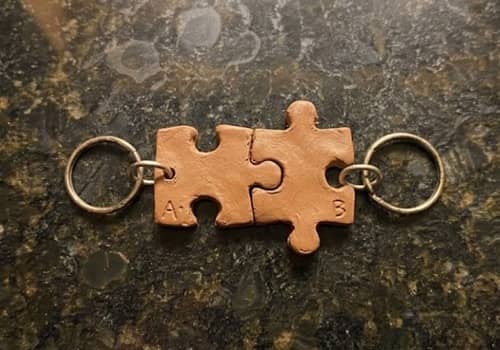
Instead of buying matching keychains, make two puzzle pieces that actually fit together.
Materials
- Clay
- Craft knife
- Circle cutter
- Jump rings
- Keyrings
- Acrylic paints
- Letter stamps
- Varnish
Instructions
Roll clay about 4 mm thick.
Sketch a simple puzzle shape with a pencil.
Cut two connected pieces.
Separate them gently.
Test the fit before drying.
Adjust edges using a damp finger.
Stamp initials, tiny dates or short words.
Maybe “Always” on one side and “Here” on the other.
Insert jump rings.
Bake or dry.
Paint both pieces different colors or create matching gradients.
Finish with gloss varnish.
These make thoughtful gifts because each person carries half the design. It were surprisingly satisfying watching the two halves click together.
A keychain maker can easily customize colors for birthdays, anniversaries, or friendship gifts.
6. Layered Mountain Landscape Keychain
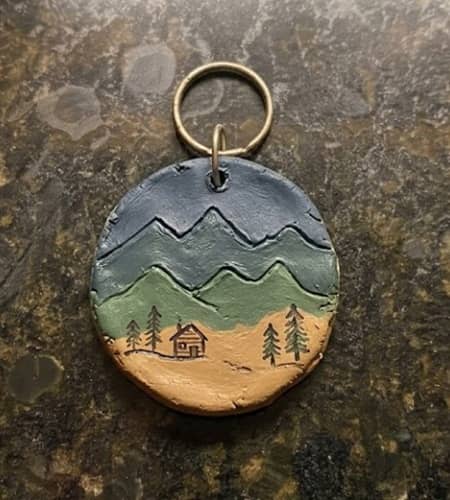
This one creates depth without needing advanced sculpting.
Materials
- Clay
- Circle cutter
- Craft knife
- Acrylic paints
- Sponge
- Toothpick
- Jump ring
- Keyring
- Matte varnish
Instructions
Roll clay into several thin sheets.
Cut matching circles.
Create three mountain layers from separate pieces.
Stack them carefully, starting from the farthest mountain.
Blend only where layers touch.
Leave the front edges raised.
Add tiny pine trees using a toothpick.
Texture the mountains lightly.
Insert the jump ring.
Bake or allow to dry.
Paint the sky dusty blue.
Use slightly lighter blues for distant mountains and darker gray for the front layer.
Dry sponge white paint onto mountain peaks for snow.
Seal with matte varnish.
7. Tiny Paint Palette Keychain
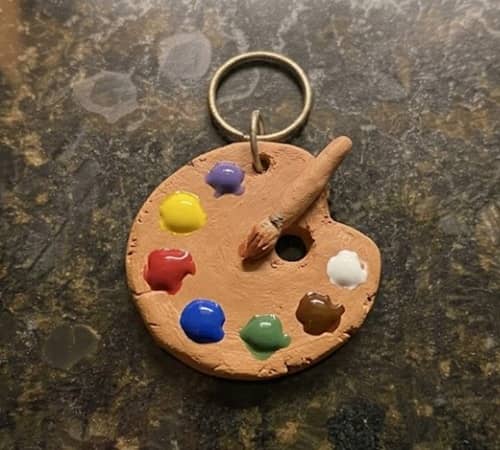
If you enjoy painting, this little palette becomes more than a decoration.
Every colorful dot reminds you to create something, even on busy days. Sounds cheesy? Maybe. But it works.
Materials
- Air dry clay or polymer clay
- Rolling pin
- Craft knife
- Ball stylus
- Acrylic paints (red, yellow, blue, white, green, black)
- Fine paintbrush
- Jump ring
- Keyring
- Gloss varnish
Instructions
Start by conditioning your clay until it becomes smooth and flexible. Roll it to about 4 mm thick.
Sketch a traditional artist’s paint palette shape. It should look slightly asymmetrical because real palettes rarely look perfectly balanced.
Cut the outline carefully using a craft knife.
Create the thumb hole by pressing the rounded end of a paintbrush into one side. Rotate it gently until the hole becomes clean.
Smooth every edge using your fingertip dipped in a tiny amount of water if you’re using air dry clay.
Next comes the colorful part.
Use a ball stylus to make six shallow circular dents around the top of the palette. These become the paint blobs later.
Don’t press too deep or the clay can become weak.
Insert a jump ring at the narrow end before baking or drying.
Once cured, paint the palette a warm wood tone or creamy beige.
Fill each little indentation with thick acrylic paint. Slightly overfill them so the colors appear like fresh paint sitting on the palette.
Apply gloss varnish only over the paint blobs while keeping the palette itself matte. That tiny contrast makes everything feel surprisingly realistic.
This is an excellent easy DIY keychain idea because it introduces shaping, texturing, and painting without requiring advanced sculpting skills.
8. Cozy Mushroom Cottage Keychain
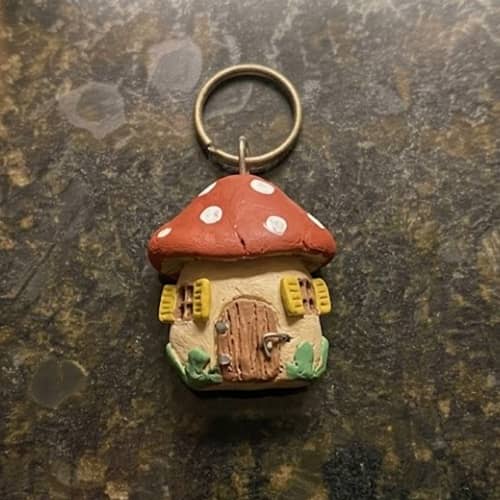
Instead of making a simple mushroom, turn it into a tiny little home hiding in the forest. That’s where it gets interesting.
Materials
- Air dry clay or polymer clay
- Ball stylus
- Needle tool
- Acrylic paints
- Small paintbrush
- Jump ring
- Keyring
- Matte varnish
Instructions
Roll one medium-sized ball for the mushroom cap.
Create a thick cylinder for the stem.
Attach both pieces together and blend the joint gently.
Now flatten one side slightly so the cottage stands straight while you work.
Use your needle tool to carve a tiny rounded doorway.
Above it, add two miniature windows.
Roll tiny ropes of clay to create window frames.
Add an even thinner rope above the door as a miniature roof ledge.
Texture the mushroom cap using a toothbrush. Keep the pressure light.
Roll several tiny balls and attach them across the cap to form mushroom spots.
Insert the jump ring into the top before curing.
Bake polymer clay or allow air dry clay to cure completely.
Paint the stem a warm cream color.
Use rich red for the mushroom cap.
Paint the tiny windows pale blue, then add black outlines for depth.
Finish with matte varnish.
It almost looks like something from a fairy tale, except you actually made it yourself. Thats always satisfying.
9. Mini Sewing Kit Keychain
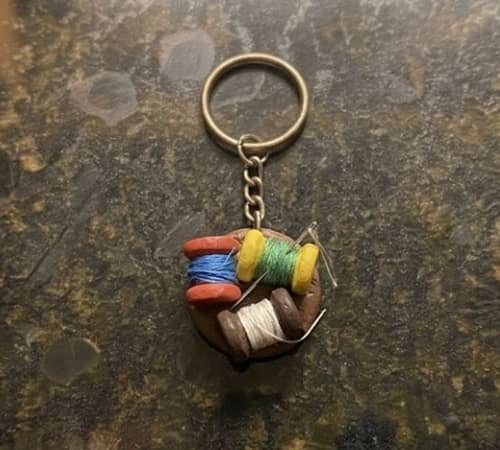
Here’s a design that doesn’t get enough attention.
A miniature sewing kit makes a thoughtful gift for anyone who loves handmade projects.
Materials
- Clay
- Craft knife
- Needle tool
- Acrylic paints
- Fine brush
- Jump ring
- Keyring
- Gloss varnish
Instructions
Roll a rectangle of clay about 5 mm thick.
Round the corners slightly so it resembles a tiny storage box.
Score a lid line across the top using your craft knife.
Roll several tiny thread spools no larger than a grain of rice.
Yes, they’re tiny.
Create an even smaller needle by rolling an extremely thin clay strand.
Place everything neatly on top of the box.
Use a needle tool to engrave a stitched border around the edges.
Insert your jump ring before baking or drying.
After curing, paint the box soft mint, navy, mustard, or dusty pink.
Use silver paint for the miniature needle.
Paint each thread spool a different bright color.
Seal everything with satin varnish.
This clay keychain craft feels different from the usual flowers and animals, making it a memorable handmade gift.
10. Vintage Camera Keychain
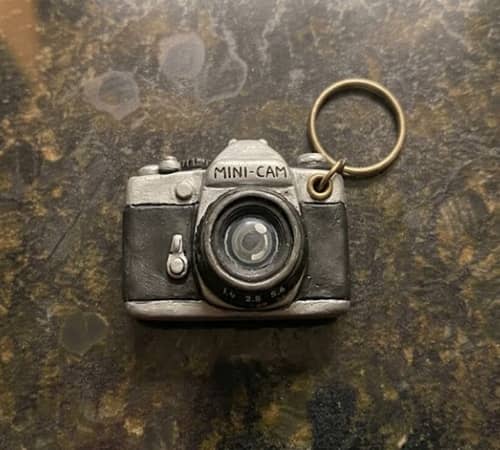
Retro cameras have so many tiny details, yet the shape stays beginner friendly.
Materials
- Polymer clay or air dry clay
- Rolling pin
- Circle cutter
- Needle tool
- Acrylic paints
- Jump ring
- Keyring
- Gloss varnish
Instructions
Roll clay about 5 mm thick.
Cut a rectangle for the camera body.
Roll a medium-sized circle for the camera lens.
Place it slightly off-center just like many classic cameras.
Roll tiny snakes of clay for buttons across the top.
Use your needle tool to engrave lens rings.
Create a miniature shutter button using a tiny clay dot.
It don’t need to be perfectly symmetrical because vintage cameras often have lots of quirky details anyway.
Insert the jump ring before curing.
Paint the camera black or dark charcoal.
Dry brush silver over the edges.
Paint the lens with dark gray circles before adding a gloss coat only to the glass area.
If you enjoy collecting miniature accessories, this also pairs beautifully with a polymer clay keyring collection inspired by hobbies.
11. Little Weather Jar Keychain
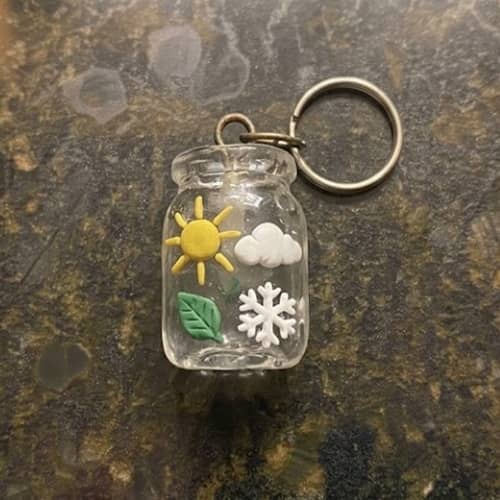
Capture four seasons inside one tiny jar. Sounds impossible? Not really.
Materials
- Clay
- Ball stylus
- Needle tool
- Acrylic paints
- Jump ring
- Keyring
- Gloss varnish
Instructions
Shape a small rounded jar using a ball of clay.
Flatten the bottom so it sits steadily.
Create a raised rim around the lid.
Divide the front into four equal sections using shallow engraved lines.
In the first section, sculpt a tiny sun.
Next comes a fluffy cloud.
Then a maple leaf.
Finish with a snowflake.
Use simple raised shapes instead of carving deeply.
Insert the jump ring before baking or drying.
Paint each section using colors that represent the season.
Yellow for summer.
Blue for rainy skies.
Orange for autumn.
White with pale blue for winter.
Seal with gloss varnish.
Kids especially enjoys pointing out their favorite season whenever they see this keychain.
This project combines multiple miniature icons into one compact design, making it an unusual useful clay craft idea.
12. Tiny Book With Opening Cover Keychain
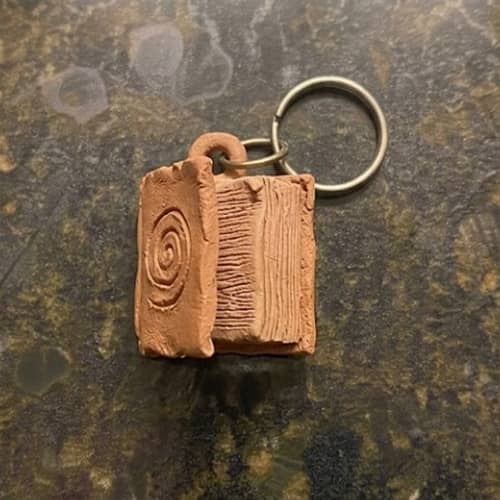
Books already tell stories. Why not let the keychain tell one too?
Materials
- Air dry clay or polymer clay
- Craft knife
- Needle tool
- Acrylic paints
- Fine marker
- Jump ring
- Keyring
- Matte varnish
Instructions
Roll two identical rectangles for the front and back covers.
Roll a thinner rectangle for the pages.
Stack them together while keeping one edge slightly free so the cover can open just a little after curing.
Score page lines using a needle tool along three sides.
Don’t make every line identical. Small irregularities make miniature books feel believable.
Create a tiny bookmark ribbon from a thin clay strip.
Attach it between the pages.
Insert the jump ring through the spine.
Bake or air dry.
Paint the cover your favorite color.
Write a tiny title using a fine marker. Funny titles work surprisingly well.
Dry brush cream paint over the page edges.
Seal using matte varnish.
Whether you use it as a clay charms keychain, a personalized fimo keychain, or simply another addition to your growing collection of beginner clay projects, this miniature book always starts conversations.
Final Thoughts
The most interesting thing about making clay keychain craft ideas is that the smallest projects often teach the biggest skills.
A tiny keychain can introduce layering, sculpting, engraving, color blending, texture work, and finishing techniques without requiring a huge amount of clay or hours of effort.
That’s why many experienced makers still return to miniature projects even after years of crafting.
If you’re new to clay craft, don’t focus on perfection. Focus on repetition. The tenth keychain will almost always look better than the first one.





