Halloween decorations don’t have to come from a store.
Some of my favorite projects started with a small lump of air dry clay, a rolling pin, and an hour that I didn’t even plan for.
If you’re searching for unique halloween clay wall art that feels handmade instead of mass-produced, you’re in the right place.
These clay craft ideas are beginner-friendly, packed with personality, and easy enough that almost anyone can make them at home.
Some are creepy, others are playful, and a few sit somewhere delightfully in between. Ready to make your walls look haunted…in the best possible way?
Choose Your Air Dry Clay Type
Regular Air Dry Clay | Cornstarch Clay | Homemade Clay
Affiliate Disclaimer: Some of the links in this post may be affiliate links, which means I may earn a small commission if you choose to make a purchase through them – at no extra cost to you. I only share products that genuinely fit this project and can help make your ceramic mug clay craft process easier and smoother. Your support helps keep ideas like this coming.
1. Floating Ghost Portrait Wall Plaques
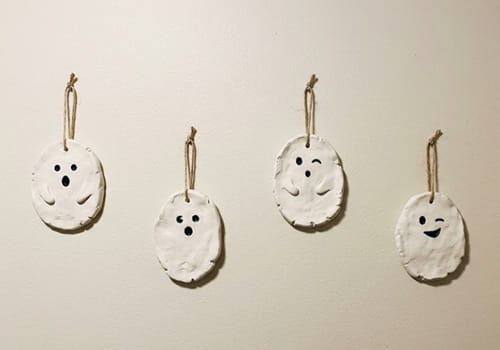
Forget flat ghost cutouts. Instead, make tiny ghost portraits with different expressions and hang them in a gallery-style arrangement.
Every ghost becomes its own little character.
You’ll Need
- White air dry clay
- Acrylic paint (black, gray)
- Small rolling pin
- Craft knife
- Fine sandpaper
- Clay glue (optional)
- Small eye pins or picture hanging hooks
- Matte varnish
Step-by-Step Instructions
Start by kneading the clay for around three minutes.
Soft clay is easier to shape and develops fewer cracks later. It don’t need to be perfect.
Roll the clay until it’s roughly 5 mm thick. Use a glass or circular cookie cutter to cut several circles between 3 and 5 inches wide.
Flatten the edges gently using your fingertip. Sharp edges often crack while drying, so rounding them slightly helps.
Now comes the fun part.
Roll tiny ghost bodies separately. Make each one slightly different. One could look surprised.
Another might be sleepy. One could even be covering its face. Tiny personality changes make the whole display feel alive.
Attach the ghosts onto each plaque by lightly scratching both surfaces with a needle tool.
Add a few drops of water before pressing them together. This creates a much stronger bond.
Use a ball stylus to gently press shallow folds into each ghost sheet.
The cloth flows thanks to these gentle creases without appearing overly intricate.
Create tiny eyes using the rounded end of a paintbrush. Add a tiny smile or leave some expressionless for an eerie effect.
Before the clay dries, push a small eye pin into the top backside so the plaque can hang directly on the wall.
Allow everything to dry for 24 to 48 hours depending on humidity.
Once dry, sand rough edges gently.
Paint only the ghost eyes and mouths black while dry brushing soft gray around the edges of each plaque for subtle shadows.
Finish with matte varnish.
Arrange several plaques in uneven spacing across a clean wall.
It instantly becomes a charming piece of spooky wall art instead of a single decoration.
2. Moonlit Bat Circle
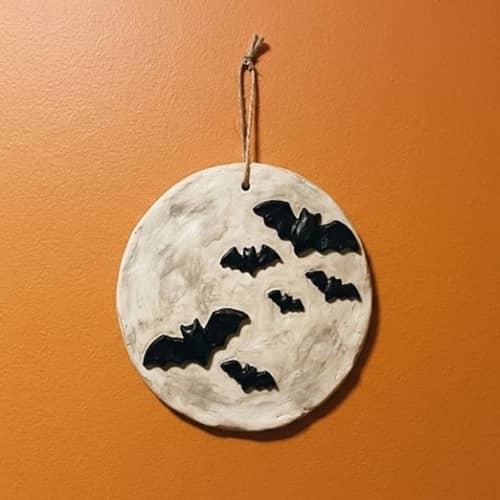
Instead of making separate bats, create one large full moon with dozens of tiny bats flying across its surface.
Materials
- Gray air dry clay
- Black acrylic paint
- White paint
- Rolling pin
- Craft knife
- Pencil
- Hanging hardware
Instructions
Roll the clay into an even slab around 6 mm thick.
Trace a dinner plate to create one large circle.
Smooth the edge using a damp finger.
Sketch tiny flying bats directly onto the clay with a pencil. Vary every wing position. Symmetry actually makes bats look less realistic.
Cut each outline carefully using a precision knife.
Lift only the inside sections while leaving the bats attached at their wings.
This creates shallow raised silhouettes instead of complete cutouts.
Texture the moon using crumpled aluminum foil pressed lightly over the surface.
Leave everything flat to dry.
Paint the entire piece charcoal gray.
Dry brush white over the moon texture.
Finally paint the raised bats matte black.
The contrast is simple, dramatic, and surprisingly elegant.
It also pairs beautifully beside a halloween bat garland without competing with it.
3. Vintage Potion Bottle Wall Tiles
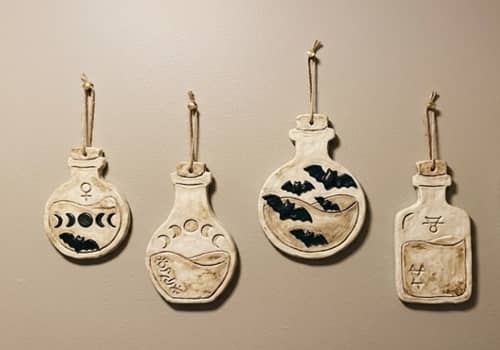
This one almost feels like old apothecary artwork.
Create rectangular clay tiles featuring potion bottles with strange labels and tiny decorative details.
Supplies
- Air dry clay
- Wooden ruler
- Clay carving tool
- Acrylic paints
- Matte varnish
Instructions
Roll your clay to about 5 mm thick.
Cut several rectangles roughly postcard sized.
Lightly sketch potion bottle outlines.
Now carve around each bottle instead of carving inside it. The bottle should stand raised above the background.
Add tiny labels like:
- Moon Dust
- Bat Tears
- Spider Ink
- Witch Fog
Scratch subtle woodgrain texture into the background.
Press tiny stars around the bottle.
Dry completely.
Paint the background dark olive or charcoal.
Paint the bottle pale green, purple or smoky blue.
Highlight raised edges with nearly dry white paint.
Every tile looks different, which makes the finished arrangement feel collected over many years rather than made all at once.
4. Cute Clay Monster Nameplates
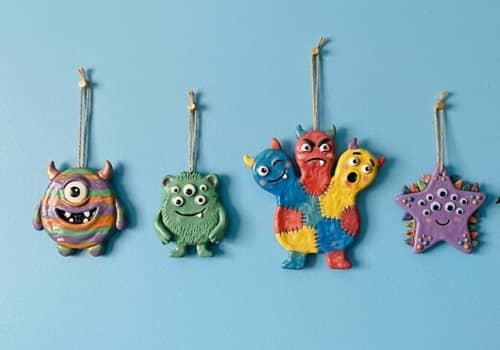
Not every Halloween decoration has to be spooky.
These cheerful little monsters fit beautifully into a family room or children’s play area.
Materials
- Colored air dry clay
- Rolling pin
- Dotting tool
- Clay glue
Instructions
Roll brightly colored clay into oval plaques.
Shape funny monsters separately.
Give every monster oversized eyes.
Some should have three eyes.
Others can have one huge eye.
Add tiny horns, crooked teeth, floppy ears or silly tongues.
This is where cute clay monsters really shine.
Texture the fur using a sewing needle pulled repeatedly across the clay.
Attach every part carefully.
Create hanging holes before drying.
Let dry slowly.
Paint details only if needed.
One monster don’t even have to look scary. Sometimes the funniest ones become everyone’s favorite.
Mix different colors so every plaque feels unique instead of identical.
These also work as personalized bedroom signs.
5. Haunted Window Relief Panel
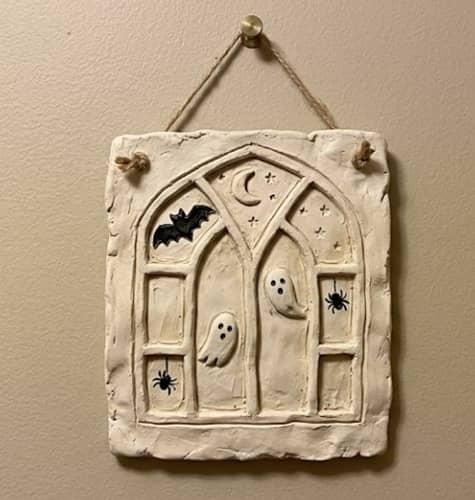
This project creates incredible depth without becoming difficult.
You’ll Need
- Air dry clay
- Wooden skewer
- Black paint
- Gray paint
- Sponge
Instructions
Roll one rectangular slab.
Frame the outer edge by attaching thin clay strips.
Inside the frame, create a broken haunted window.
Behind the window sculpt tiny crooked trees.
Add a crescent moon.
Make several tiny flying bats.
Leave empty openings between branches so shadows naturally form after painting.
Texture the wood frame with deep scratches.
Dry flat.
Paint everything matte black first.
Then dab gray paint over raised areas using a sponge.
The layered texture suddenly looks like aged carved wood.
It honestly surprises people because they think it’s carved from timber rather than clay.
6. Skeleton Hand Holding Wildflowers
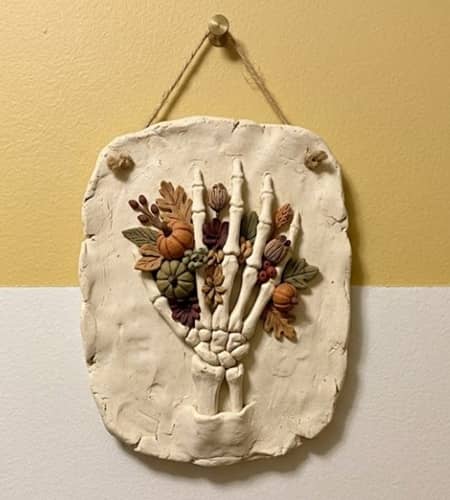
A little creepy.
A little beautiful.
That’s exactly why it works.
Supplies
- White air dry clay
- Floral wire
- Acrylic paint
- Needle tool
Instructions
Sketch a life-sized hand on paper first.
Roll clay slightly thicker than usual.
Transfer the outline.
Cut carefully.
Separate each finger with shallow grooves.
Shape realistic knuckles by gently pressing with your thumb.
Texture tiny bone joints.
Now sculpt several tiny flowers.
Daisies, lavender and tiny roses all work beautifully.
Insert short floral wires into both flowers and hand before drying.
Attach the flowers after partial drying for better support.
Paint the skeleton an aged ivory color.
Add soft gray shading between every finger joint.
Paint the flowers using muted autumn shades instead of bright summer colors.
Hang it alone on a blank wall so every detail gets noticed.
It isn’t loud, but people always walks closer to look.
7. Layered Raven Silhouette Wall Art
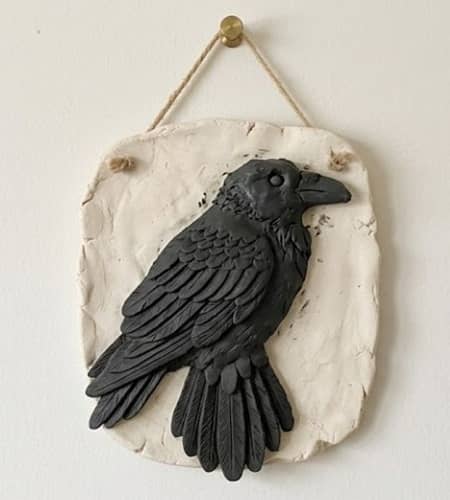
Ravens instantly make Halloween feel mysterious, but instead of sculpting one thick bird, build it in layers.
The extra depth catches shadows and makes the finished piece look far more expensive than it really is.
You’ll Need
- Air dry clay
- Rolling pin
- Craft knife
- Pencil
- Black, charcoal, and silver acrylic paint
- Matte varnish
- Hanging hook
Step-by-Step Instructions
Roll your clay into two slabs about 5 mm thick.
Sketch a raven with folded wings on paper first. Keeping the wings folded makes the silhouette easier for beginners.
Cut one complete raven from the first slab.
Now cut individual feather sections from the second slab. Think of them like puzzle pieces that sit on top of the body.
Lightly scratch both surfaces before attaching each feather layer with a tiny bit of water.
Don’t line every feather perfectly. Slight overlaps create much nicer shadows.
Use a needle tool to carve soft feather lines that all flow toward the tail. Random scratches usually looks messy.
Shape a pointed beak and tiny raised eye.
Allow the entire sculpture to dry on a completely flat surface.
Paint the whole raven matte black.
Dry brush charcoal across the feather edges, then add the smallest touch of silver only to the beak and eye.
Hang it against a plain wall where side lighting can create dramatic shadows.
This project fits beautifully with other Halloween air dry clay ideas, especially if you’re creating a spooky gallery wall.
8. Gothic Pumpkin Relief Plaque
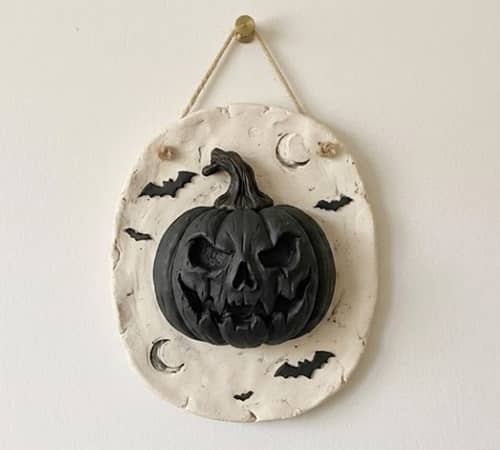
Pumpkins are everywhere during Halloween, but a gothic version feels completely different.
Instead of carving a smiling jack-o’-lantern, make an old weathered pumpkin wrapped with twisting vines and tiny thorn details.
Materials
- Air dry clay
- Clay sculpting tools
- Toothpick
- Acrylic paint
- Matte sealer
Instructions
Roll out a thick oval slab.
Shape a large pumpkin directly onto the center.
Press deep vertical grooves using your thumb and a rounded sculpting tool.
Create an uneven stem with small cracks.
Roll very thin clay ropes to become twisting vines.
Wrap those vines naturally around the pumpkin.
Now sculpt tiny thorny leaves. They shouldn’t all match because real plants never do.
Add miniature spiders hiding between the vines if you want extra detail.
Leave everything to dry slowly.
Paint the pumpkin using muted orange mixed with brown instead of bright orange.
Shade every groove with diluted dark brown paint.
Highlight raised sections using dry brushing.
The finished plaque feels aged instead of cartoonish, and that makes all the difference.
9. DIY Ghost Floral Wreath Plaque
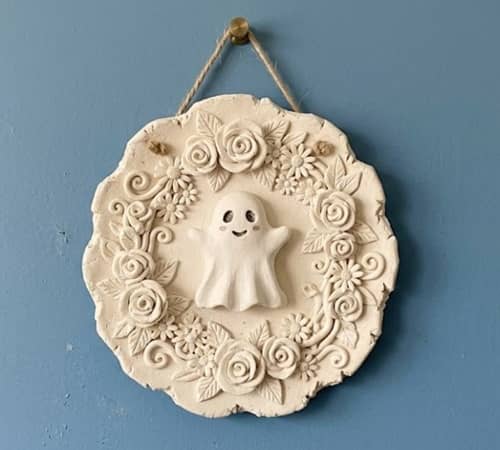
This combines a DIY ghost with dried-looking flowers for something that’s both sweet and spooky.
Supplies
- White air dry clay
- Floral sculpting tools
- Rolling pin
- Black acrylic paint
- Beige and sage green paint
Instructions
Roll one circular plaque.
Create a small ghost standing in the center.
Around the ghost, sculpt tiny flowers, leaves, berries and curling vines.
Instead of making perfect flowers, pinch each petal separately.
Small imperfections make handmade projects feel much warmer.
Use a dotting tool for flower centers.
Press tiny veins into every leaf.
Before drying, poke a hanging hole into the top.
After drying completely, paint only the ghost’s eyes black.
Paint the flowers with soft earthy shades.
Keep everything slightly faded.
Too many bright colors takes away the vintage Halloween feeling.
Hang it beside neutral-colored furniture where the textures become the main attraction.
10. Clay Monster Sculpture Wall Masks
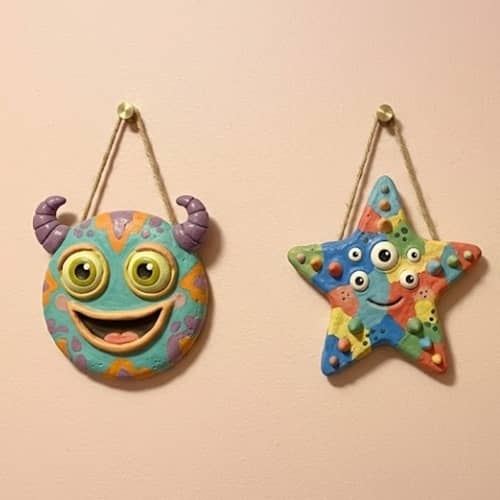
If you’re looking for weird clay ideas, this one is impossible to ignore.
Instead of frightening monsters, create expressive faces that look funny, confused, sleepy or surprised.
Materials
- Air dry clay
- Sculpting tools
- Rolling pin
- Acrylic paint
- Hanging wire
Instructions
Start with an oval base about half an inch thick.
Build facial features separately.
Attach oversized noses.
Make crooked smiles.
Add different eyebrow shapes.
Give one monster huge ears while another gets tiny horns.
This project naturally turns into a miniature clay monster sculpture collection because every face develops its own personality.
Texture the skin with a sponge to remove perfectly smooth surfaces.
Allow the masks to dry for two full days.
Paint each monster differently.
Muted greens.
Dusty blues.
Soft purples.
Finish with darker shading inside wrinkles.
Mount three masks together rather than hanging only one.
Odd numbers almost always looks more balanced.
11. Celestial Haunted Mirror Frame
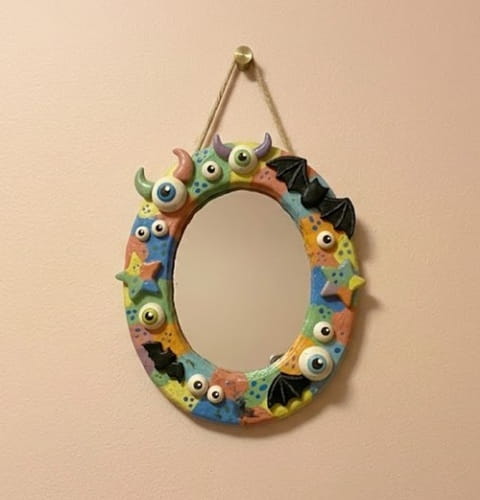
Who says the mirror isn’t part of the decoration?
Instead of decorating around it, decorate the frame itself with clay.
You’ll Need
- Small inexpensive mirror
- Air dry clay
- Sculpting tools
- Acrylic paint
- Strong glue
Instructions
Measure the mirror frame first.
Roll long clay strips that fit each side.
Decorate them with tiny crescent moons, stars, clouds, mushrooms, little ghosts and miniature bats.
Keep the decorations shallow.
Bulky decorations become fragile once mounted vertically.
Press everything together firmly.
Dry every strip flat before gluing them onto the mirror frame.
Paint the entire frame matte black.
Dry brush metallic bronze across the raised decorations.
Seal with matte varnish.
When hung on a blank wall, the frame itself becomes the artwork instead of the mirror.
It feels elegant without trying too hard.
12. Witch’s Spell Tile Collection
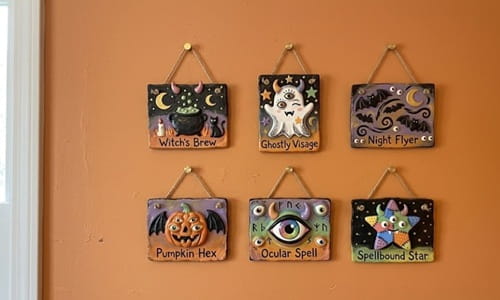
Instead of one large artwork, create several small tiles that tell a tiny Halloween story.
Materials
- Air dry clay
- Rolling pin
- Craft knife
- Acrylic paint
- Matte varnish
Instructions
Roll clay into a large slab.
Cut six square tiles around four inches each.
Each tile should feature one object.
Ideas include:
- Witch hat
- Crystal ball
- Broom
- Black cat
- Spell book
- Crescent moon
Keep every object raised above the background.
Texture the background lightly using rough fabric before the clay dries.
Carve tiny stars around the edges.
Allow all six tiles to dry.
Paint the background charcoal gray.
Paint each object with muted earthy colors.
Add tiny white highlights only where light would naturally hit.
Arrange the finished tiles with uneven spacing instead of a perfect grid.
That relaxed layout feels more like an art installation than a craft project.
Pair them with a nearby halloween bat garland for even more visual movement across the wall.
Final Thoughts
The best halloween clay wall art isn’t the one that looks factory perfect.
It’s the piece that has tiny fingerprints, slightly uneven lines, and little details that remind you someone actually made it.
That’s where the charm lives. Try mixing several projects instead of filling your wall with matching decorations, because different textures and sizes naturally create more visual interest.
Once you get comfortable working with air dry clay, you’ll probably start spotting inspiration everywhere – from old storybooks to vintage Halloween postcards and even weathered architecture.
That’s when a simple Halloween clay craft quietly becomes your own signature style, and honestly, that’s the fun part that most people misses.





