There’s something satisfying about making something beautiful that also earns its place around the house.
That’s exactly why making functional clay craft projects has become one of my favorite ways to spend a weekend.
Instead of creating decorations that sit on a shelf, I love making pieces that solve little everyday problems.
Whether you’re experimenting with air dry clay, testing useful polymer clay ideas, or simply searching for useful clay craft ideas, these beginner-friendly projects are practical, fun, and surprisingly easy to customize.
Most require only basic tools, plenty of patience, and a willingness to embrace handmade imperfections.
Choose Your Clay Type For These Projects
Air Dry Clay | Polymer Clay
Affiliate Disclaimer: Some of the links in this post may be affiliate links, which means I may earn a small commission if you choose to make a purchase through them – at no extra cost to you. I only share products that genuinely fit this project and can help make your ceramic mug clay craft process easier and smoother. Your support helps keep ideas like this coming.
1. Minimalist Magnetic Key Holder Tray
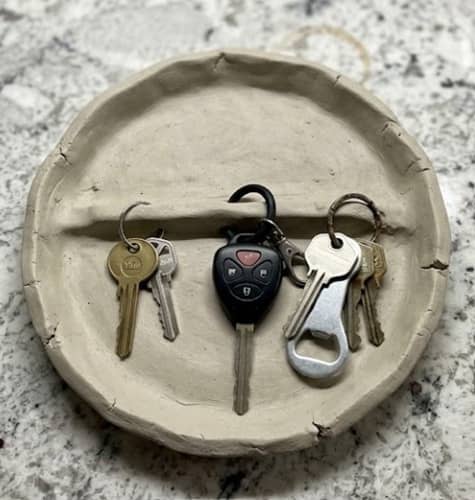
Nothing disappears faster than house keys. I learned that the hard way.
This project combines a catch-all tray with hidden magnets underneath, so your keys stay exactly where you leave them.
It looks clean, works brilliantly, and takes very little experience to build.
Materials
- Air dry clay or polymer clay
- Acrylic rolling pin
- Craft knife
- Small rare-earth magnets
- Strong craft glue (for air dry clay)
- Fine sandpaper (220 and 400 grit)
- Acrylic paint (optional)
- Matte or satin sealer
Step 1: Roll the clay
Roll the clay until it’s about ¼ inch thick.
Don’t rush this part. Uneven thickness often causes warping later.
Step 2: Cut the tray
Use a dinner plate, square template, or simply trim freehand.
Aim for roughly 6 to 8 inches across.
Perfect symmetry isn’t really needed here.
Step 3: Shape the edges
Lift each side gently.
Raise the edges around ½ inch.
Smooth every corner with slightly damp fingertips.
Tiny cracks may appear. That’s okay – they smooth out easily.
Step 4: Create magnet pockets
Flip the tray upside down.
Press the magnets lightly into the base to mark their locations.
Remove them before drying.
Create shallow recessed pockets instead.
If using polymer clay, the magnets shouldn’t go inside the oven.
Step 5: Dry or bake
Air dry clay usually needs 24 to 48 hours.
Turn the tray every few hours during the first day.
That helps reduce curling.
Polymer clay should be baked according to the manufacturer’s temperature instructions.
Step 6: Sand everything smooth
Start with 220-grit.
Finish with 400-grit.
The smoother it feels now, the more professional it’ll look later.
Step 7: Finish the tray
Paint it if you’d like.
Seal with two thin coats.
Glue magnets into their pockets after everything cures.
Now your keys practically snap into place.
I honestly didn’t expect it works this well.
Beginner Tip: Add a tiny stamped word like “HOME” before drying. It gives the tray personality without making it look cluttered.
2. Stackable Herb Garden Plant Labels
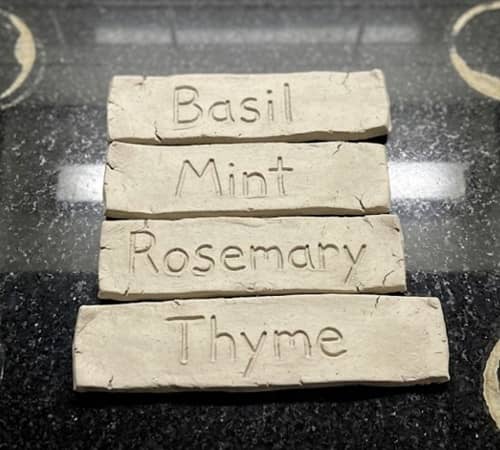
Plastic markers fade.
Wood eventually rots.
Clay lasts much longer and adds character to every planter.
This is one of those useful air dry clay projects that looks surprisingly elegant.
Materials
- Air dry clay
- Letter stamps or toothpick
- Wooden skewer
- Acrylic paint
- Waterproof outdoor sealer
Step 1: Roll the clay
Roll to around ⅛ inch thick.
Thinner labels dry faster but can become fragile.
Step 2: Cut rectangles
Each should measure around
- 4 inches long
- 1 inch wide
Round the corners slightly.
Sharp corners chip easier.
Step 3: Write plant names
Stamp or carve words like
- Basil
- Mint
- Rosemary
- Thyme
Go slowly.
Crooked letters actually make handmade crafts feel more charming.
Step 4: Create the stake
Roll a thin cylinder separately.
Attach it firmly behind the label.
Blend the joint thoroughly.
This part is very important.
Otherwise it can break later.
Step 5: Dry slowly
Lay them flat.
Avoid direct sunlight.
Mine dried faster near a fan, but don’t overdo it.
Step 6: Paint
Highlight the letters using a fine brush.
Seal generously since these will sit outdoors.
Beginner Tip: Use different shapes for different herb families.
It makes identifying plants much easier from above.
3. Cable Organizer Pebbles
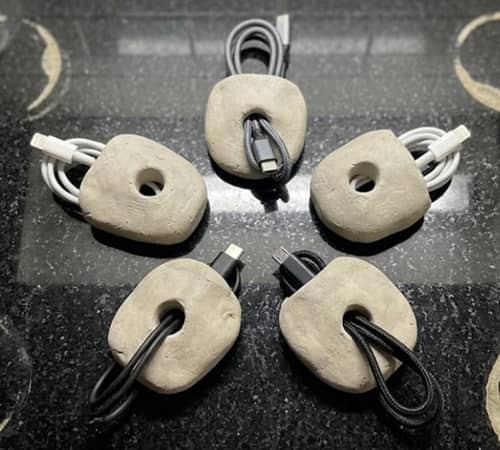
Chargers have a habit of becoming spaghetti.
These little holders fix that problem in minutes.
They’re one of my favorite functional clay crafts because I use them every single day.
Materials
- Polymer clay or air dry clay
- Drinking straw
- Sculpting tool
- Sandpaper
- Rubber feet (optional)
Step 1: Roll small balls
Each should be about golf-ball sized.
Flatten them slightly.
Step 2: Shape into pebbles
Avoid making perfect circles.
Natural stone-like shapes actually look nicer.
Funny enough, mine looked terrible at first.
Step 3: Create the cable slot
Press a straw halfway through.
Cut one side open with a craft knife.
Smooth every cut edge carefully.
Step 4: Add texture
Lightly dab with aluminum foil.
It creates a realistic stone texture.
Step 5: Cure
Dry or bake.
Let everything cool completely.
Step 6: Finish
Sand smooth.
Seal if needed.
Attach rubber feet underneath if the organizer slides around.
Beginner Tip
Make different slot widths for USB-C, Lightning, and thicker charging cables.
You’ll thank yourself later.
4. Tea Bag Rest With Steam Pattern
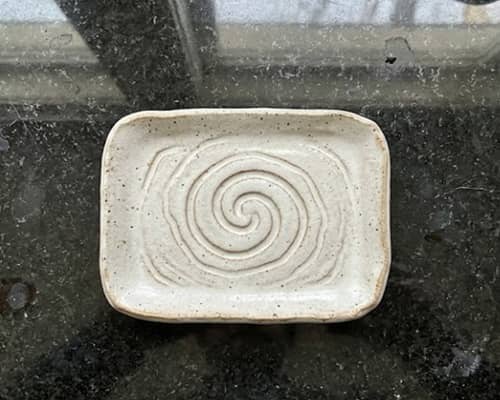
It’s tiny.
Yet you’ll use it almost every morning.
Instead of balancing a wet tea bag on the counter, give it its own resting spot.
Materials
- Air dry clay
- Small bowl
- Toothpick
- Rolling pin
- Acrylic paint
- Food-safe sealer if required for decorative use only (not direct food contact)
Step 1: Roll the clay
Aim for about ¼ inch thickness.
Step 2: Cut a circle
Around 4 inches works nicely.
Step 3: Form the dish
Press gently into an upside-down bowl.
Leave it there until partially firm.
Step 4: Decorate
Carve tiny steam swirls.
Add little tea leaves if you’d like.
Simple designs often age better.
Step 5: Dry
Allow full drying.
Don’t remove it too early.
It may lose its shape.
Step 6: Finish
Sand.
Paint.
Seal lightly.
Now it catches drips beautifully.
Beginner Tip: Make two matching dishes. Guests always appreciate little thoughtful details.
5. Fridge Memo Clip Magnets
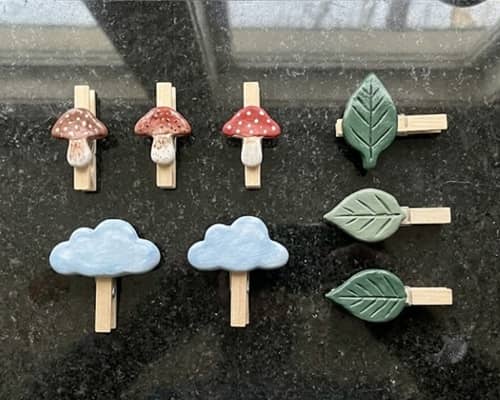
Sticky notes deserve better.
These clips combine magnets with clay shapes to create cheerful memo holders.
They’re one of those cool things to make with air dry clay that are genuinely practical.
Materials
- Air dry clay
- Wooden clothespins
- Magnets
- Acrylic paint
- Strong glue
Step 1: Shape decorations
Create simple shapes like
- Clouds
- Mushrooms
- Tiny houses
- Leaves
Keep them about 2 inches wide.
Step 2: Dry completely
Patience matters here.
Half-dried clay breaks easier than you’d think.
Step 3: Paint
Choose soft earthy colors.
Or go bold.
There isn’t really a wrong choice.
Step 4: Assemble
Glue clay onto clothespins.
Glue magnets behind.
Allow full curing before use.
6. Modular Desk Pen Dock With Hidden Phone Slot
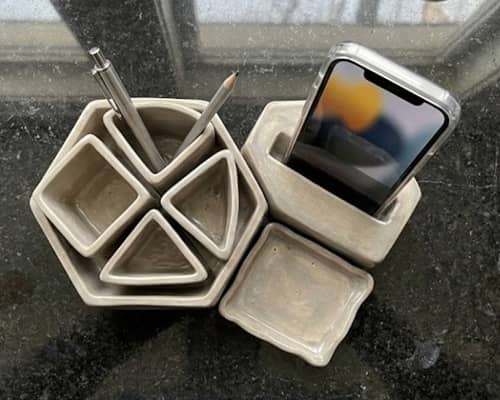
Here’s a project I wish I’d made years ago.
It stores pens, paper clips, and secretly supports your phone while charging.
That’s why it’s one of my favorite practical polymer clay craft builds.
Materials
- Polymer clay
- Wooden block (optional support)
- Sculpting tools
- Acrylic roller
- Sandpaper
- Felt pads
Step 1: Sketch first
Draw where
- pens go
- phone rests
- clips sit
Five minutes of planning saves an hour later.
Step 2: Build the base
Roll thick slabs.
At least ½ inch works well.
Step 3: Create compartments
Use marker caps to form pen holes.
Angle the phone slot about 70 degrees.
Test using your actual phone.
It fits better that way.
Step 4: Reinforce walls
Blend every seam thoroughly.
Weak joints crack after curing.
Ask me how I know.
Step 5: Bake
Follow package instructions.
Allow slow cooling.
Step 6: Sand
Round every edge.
Add felt underneath.
Your desk won’t scratch.
7. Wall-Mounted Mail Pocket With Key Hooks
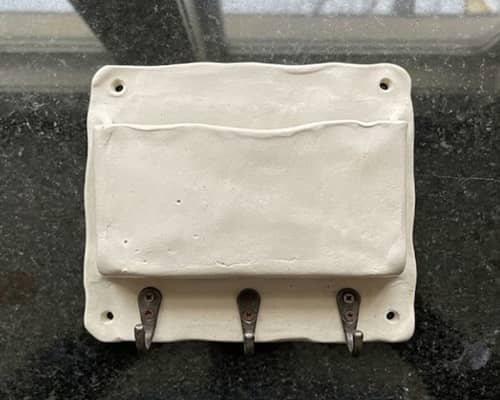
Mail has a funny way of piling up on the kitchen counter. I finally got tired of it.
This project creates one tidy landing spot for letters, receipts, and keys without taking up valuable table space.
It’s one of those functional clay craft projects that feels custom-made once it’s hanging on your wall.
Materials
- Air dry clay or polymer clay
- Acrylic rolling pin
- Wooden board (optional backing)
- Metal key hooks
- Craft knife
- Sculpting tool
- Sandpaper (220 and 400 grit)
- Strong adhesive or screws
- Acrylic paint or mineral pigments
- Matte varnish
Step 1: Roll the main slab
Roll the clay to roughly ¼ inch thick.
Don’t make it paper thin. A thicker slab supports the pocket much better.
Step 2: Cut the shape
Make a rectangle around 9 inches tall and 7 inches wide.
Round every corner.
Sharp corners chip easier than people expect.
Step 3: Build the pocket
Roll another rectangle for the front.
It should cover the lower two-thirds.
Score both joining edges deeply.
Brush on a little water for air dry clay or liquid polymer clay if using polymer clay.
Press the pieces together firmly.
Blend the seam using a sculpting tool.
This joint needs to be solid.
Step 4: Add hooks
Mark where each hook will sit.
Leave enough room for large keyrings.
Don’t crowd them together because keys swing around.
Step 5: Create hanging holes
Cut two keyhole slots near the top before drying or baking.
Double-check they’re level.
Otherwise the organizer hangs crooked. Mine did once.
Step 6: Dry or bake
Allow air dry clay to cure slowly over 48 hours.
Flip it halfway through.
Polymer clay should be baked according to package directions.
Step 7: Finish
Sand lightly.
Paint using muted earthy shades or leave it natural.
Seal everything.
Attach the metal hooks after curing.
8. Adjustable Cookbook Page Holder
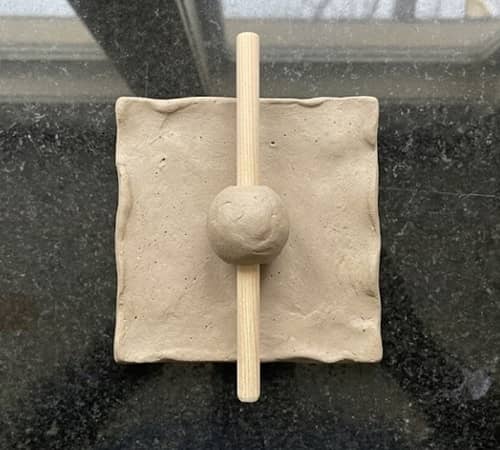
Ever tried cooking while a cookbook keeps closing itself?
Yeah…not fun.
This useful clay craft is surprisingly simple and makes baking much less frustrating.
Materials
- Polymer clay
- Thin wooden dowel
- Small wooden bead
- Sculpting tools
- Sandpaper
- Acrylic paint
- Felt pads
Step 1: Shape the base
Create a flat oval about 7 inches long.
Keep it fairly thick.
Weight is what keeps it stable.
Step 2: Insert the dowel
Push the dowel into one side before baking.
Remove it.
Bake the base.
Glue the dowel back afterward.
Step 3: Create the sliding bead
Bake a clay bead with a hole slightly larger than the dowel.
It should slide smoothly.
Step 4: Assemble
Glue the dowel permanently.
Slide the bead onto it.
The bead gently presses cookbook pages open.
Simple, but honestly it works really good.
Step 5: Finish
Sand.
Seal.
Stick felt underneath.
Your countertop stays scratch free.
9. Drainage Soap Dish With Raised Pebble Base
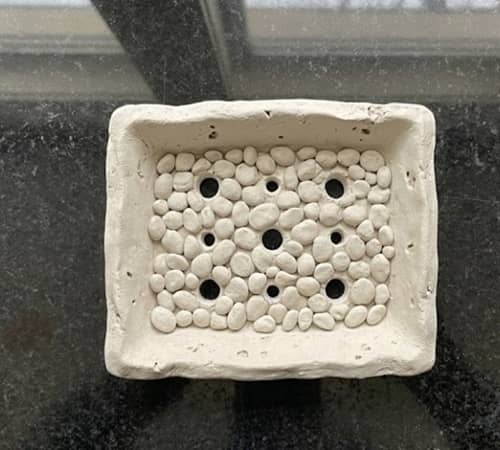
Soap melts into mush when water has nowhere to go.
This little project fixes that problem while looking much nicer than plastic trays.
It also introduces beginners to creating practical texture, making it one of my favorite functional clay crafts.
Materials
- Air dry clay
- Rolling pin
- Craft knife
- Small ball stylus
- Drinking straw
- Waterproof sealer
Step 1: Roll the base
Roll clay about ¼ inch thick.
Cut an oval roughly 5½ inches long.
Step 2: Shape the rim
Lift the edges gently.
Only raise them about ¼ inch.
Step 3: Add drainage holes
Use a drinking straw.
Space each hole evenly.
Water needs somewhere to escape.
Step 4: Build the pebble surface
Roll tiny balls.
Flatten them slightly.
Attach them across the center.
These keep the soap above standing water.
Looks nice too.
Step 5: Dry slowly
Avoid heaters.
Fast drying creates cracks sometimes.
Step 6: Sand and seal
Smooth rough spots.
Apply several coats of waterproof sealer.
Let each coat cure completely.
10. Clip-On Plant Watering Funnel
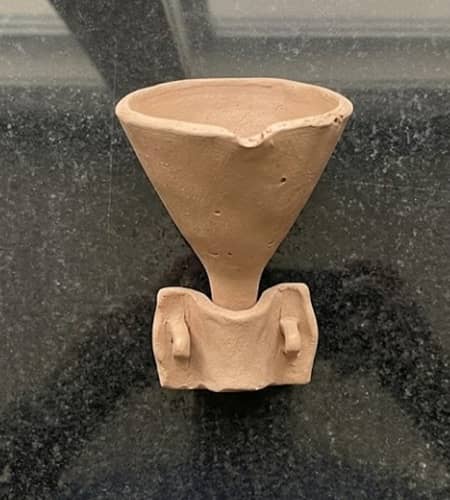
Here’s one people rarely think about.
Small pots are difficult to water without making a mess. This funnel clips onto the edge of the planter so water goes exactly where the roots need it.
It’s one of those cool things to make with air dry clay that actually saves cleanup time.
Materials
- Air dry clay
- Sculpting tool
- Wooden skewer
- Fine sandpaper
- Waterproof outdoor sealer
Step 1: Shape the funnel
Roll a cone.
Cut the tip slightly.
Smooth the inside using your finger.
Step 2: Build the clip
Create a curved C-shaped hook.
Test it on an actual flowerpot.
Adjust before drying.
Every planter is a little different.
Step 3: Join both pieces
Score deeply.
Blend the joint until seamless.
This connection takes most of the weight.
Step 4: Dry
Allow full curing.
Flip occasionally.
Step 5: Seal
Apply waterproof sealer inside and outside.
Don’t skip this step.
Water finds every tiny opening.
11. Cord Wrap for Kitchen Appliances
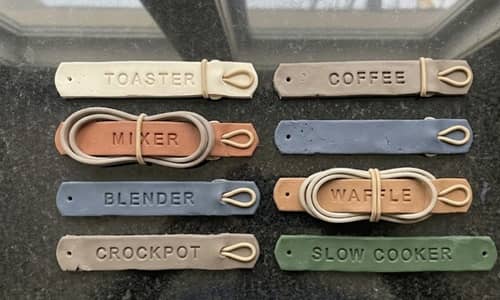
Blenders.
Mixers.
Toasters.
Their cords always seem determined to become tangled.
This little wrap is one of my favorite useful polymer clay ideas because it solves such an annoying everyday problem.
Materials
- Polymer clay
- Craft knife
- Small snap fastener or elastic loop
- Sandpaper
Step 1: Roll the clay
Roll to about ⅛ inch.
Step 2: Cut a strap
Make it roughly
- 5 inches long
- 1 inch wide
Round the ends.
Step 3: Add the fastening system
Create two holes if using elastic.
Or build a snap attachment after baking.
Step 4: Decorate
Press tiny geometric textures into the surface.
Keep decorations shallow.
Thick designs catch on cords.
Step 5: Bake
Follow package instructions carefully.
Let cool naturally.
Step 6: Assemble
Attach the elastic or snap.
Wrap around appliance cords.
Done.
Funny enough, you’ll probably end up making several more.
12. Modular Interlocking Drawer Dividers
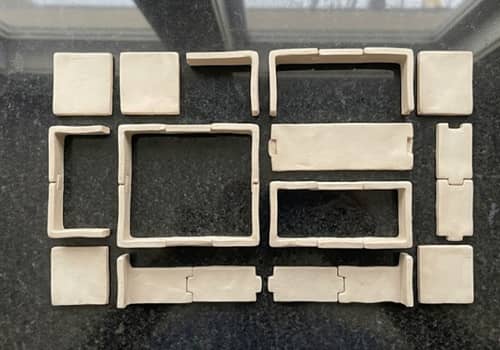
Drawer organizers never seem to fit.
So why not make your own?
This project lets every divider connect together like building blocks, creating one of the most customizable practical polymer clay craft ideas I’ve ever made.
Materials
- Polymer clay
- Acrylic roller
- Craft knife
- Metal ruler
- Sandpaper
- Felt pads
Step 1: Plan the layout
Measure your drawer first.
Seriously.
Guessing rarely ends well.
Step 2: Roll thick strips
Around ⅜ inch thick works nicely.
Cut multiple lengths.
Step 3: Create interlocking slots
Cut halfway through each divider.
Alternate top and bottom slots.
Everything slides together later.
Test fit before baking.
Its much easier fixing mistakes now than afterward.
Step 4: Bake
Bake flat.
Allow slow cooling.
Step 5: Sand
Smooth every edge thoroughly.
Sharp edges scrape drawer interiors.
Step 6: Assemble
Slide every divider together.
Adjust compartment sizes whenever needed.
That’s the best part.
Final Thoughts
The best part about making functional clay craft projects isn’t just saving money or creating something by hand.
It’s learning how everyday objects are designed and realizing you can improve them to fit your own routine.
A simple tray can become a charging station, a soap dish can drain better than a store-bought one, and a desk organizer can be built around the tools you actually use.
That’s what makes clay craft so rewarding. As your confidence grows, you’ll naturally start combining ideas and creating your own useful clay craft ideas instead of following tutorials step by step.
Before long, you’ll look around your home and spot dozens of opportunities to turn a small block of air dry clay or polymer clay into something practical, personal, and genuinely useful every single day.





