What happens when a tiny ghost decides it doesn’t want to look spooky anymore? It becomes a ballerina, of course! This air dry clay ballerina ghost disguise craft is my playful take on a Halloween clay project, combining a soft ghost shape with a little dancer’s costume.
I wanted this one to feel different from the usual ghost crafts, so instead of making a plain ghost, we’re giving it a swirly skirt, tiny ballet shoes and a sweet dancing pose.
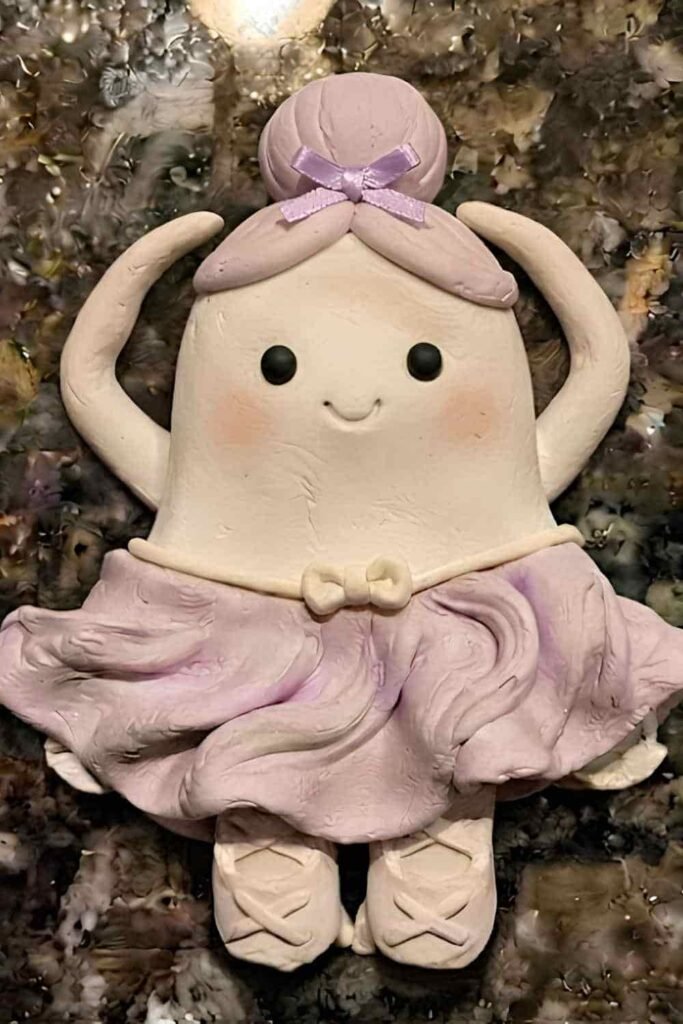
It is an easy kids craft with no oven or complicated equipment needed. Ready to build a ghost that looks like it wandered straight out of a miniature Halloween dance class?
What Makes This Air Dry Clay Ballerina Ghost Different?
The fun part is the disguise.
Rather than making a traditional sheet-style ghost, we’re shaping the ghost as a tiny standing character and then hiding part of its body beneath a clay ballerina costume.
The white ghost becomes the “dancer,” while the little skirt and ballet details create the disguise.
I also like giving the skirt an uneven, hand-pinched edge.
It makes the finished piece look handmade rather than factory-perfect, which is exactly what I want from a fun air dry clay craft.
For a slightly different clay feel, you can use Padico Premier Air Dry Clay or Crayola Model Magic if you already have either at home.
For young children, choose a soft, lightweight clay that little fingers can comfortably flatten, roll and press.
Choose Your Air Dry Clay Type
Regular Air Dry Clay | Cornstarch Clay | Homemade Clay
Affiliate Disclaimer: Some of the links in this post may be affiliate links, which means I may earn a small commission if you choose to make a purchase through them – at no extra cost to you. I only share products that genuinely fit this project and can help make your ceramic mug clay craft process easier and smoother. Your support helps keep ideas like this coming.
Materials Needed To Make Air Dry Clay Ballerina Ghost Disguise
- White air dry clay
- A small amount of pink, lavender or pale purple clay
- A tiny amount of black clay
- A tiny amount of another color for ballet shoes
- A clean piece of shiny granite or another smooth work surface
- Rolling pin or smooth bottle
- Blunt clay modeling tool, optional
- Toothpick only if an adult is handling it
- Small bowl or cup for shaping
- Paper towel
Keep the color palette small. White, pink and one darker accent already gives this little ghost plenty of personality.
No glue gun, sharp blade, wire or baking is needed.
Step 1: Make the Ghost’s Soft Body
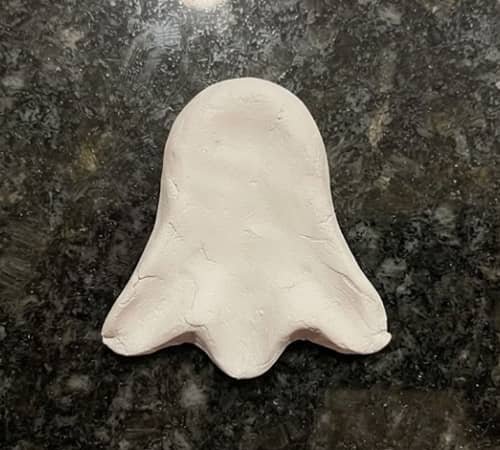
Start with a piece of white air dry clay about the size of a large walnut.
Warm it between your palms for a minute. Don’t rush this part. Softer clay is much easier for small hands to shape.
Roll it gently into a smooth ball.
Now place the ball on your work surface and slowly pull the lower half downward with your fingers.
You’re aiming for a rounded ghost body that is slightly wider at the bottom and narrower near the top.
Don’t make the bottom perfectly flat. Instead, pinch three or four tiny rounded points around the lower edge. These will become the ghost’s wavy “floating” hem.
Keep the body fairly chunky. A very thin ghost can crack while drying.
Step 2: Give the Ghost a Tiny Dancing Pose
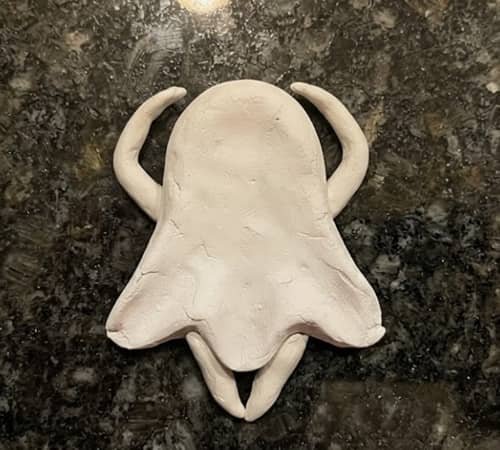
Now let’s make it look like a ballerina instead of a plain ghost.
Take two small pieces of white clay for the arms.
Roll each into a short, thin sausage. Keep them chunky enough that they don’t become fragile.
Attach one arm slightly upward and outward.
Curve the other arm gently across the front of the body, almost as if the ghost is finishing a ballet pose.
Press the clay together at the attachment points using your fingertip. Blend the joins softly.
For the legs, use two slightly smaller pieces of white clay. Roll them into short tapered shapes and attach them beneath the body.
Angle one leg slightly sideways.
There you go. It already looks like a little dancer.
Step 3: Add the Ballerina Shoes
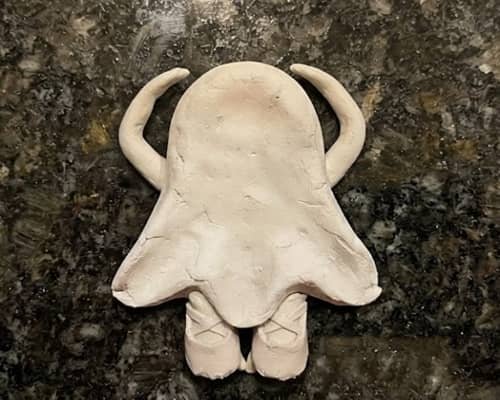
Here’s where the disguise starts becoming obvious.
Take two tiny pieces of pink, lavender or black clay.
Flatten each one slightly between your fingers. Shape them into tiny oval ballet slippers.
Place one slipper at the end of each leg.
If you want a more recognizable ballet look, pinch the front of each shoe into a very small rounded point. Don’t make the shoes paper-thin.
You can also add a tiny clay strap across each shoe.
Roll an extremely thin piece of colored clay, place it across the slipper and gently press it down.
Kids may find this part fiddly, so imperfect shoes are perfectly fine. Actually, those tiny uneven shoes make the final character feel more homemade.
Step 4: Make the Swirly Ghost-Ballerina Skirt
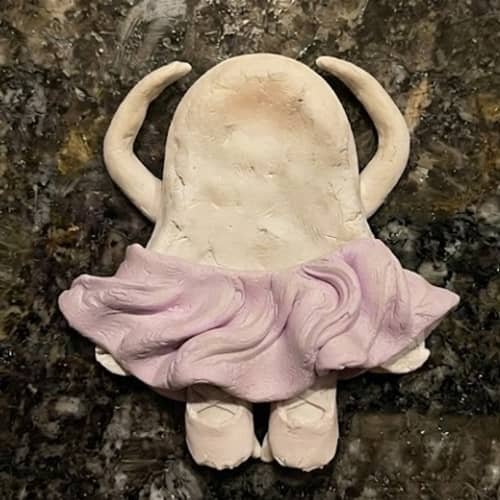
This is my favorite part.
Take a small piece of pink or lavender clay and flatten it into a thin disk using your fingers or a smooth rolling tool.
It doesn’t need to be perfectly round.
Now place the disk around the ghost’s waist area. Gently gather a few sections upward with your fingertips so the skirt develops little folds.
Instead of making a straight tutu, give the lower edge a slightly swirling shape. Pull two or three sections outward.
This creates the illusion that the ghost is spinning.
Press the upper part of the skirt against the body just enough to hold it. Don’t squash the ghost underneath it.
The skirt should cover the upper part of the legs but leave the tiny ballet shoes visible.
Step 5: Add a Tiny Waist Ribbon
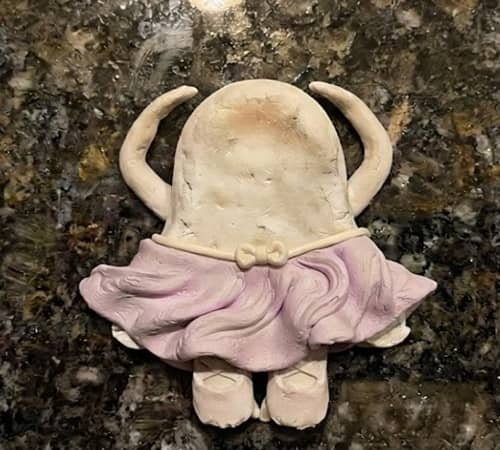
Want to make the costume feel more like a real disguise?
Roll a very thin strand of pink, purple or contrasting clay.
Wrap it gently around the ghost’s waist where the skirt meets the body.
Keep the ribbon simple.
For a tiny bow, make two miniature loops and one small center dot. Attach them to the front of the waist.
Don’t worry if the loops aren’t identical. Mine wouldn’t be either!
This small detail helps separate the white ghost body from the colorful ballerina costume.
Step 6: Give the Ghost a Ballerina Face
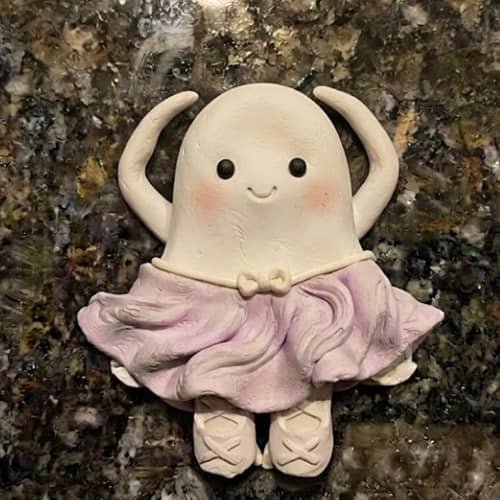
Now comes the personality.
Use two tiny pieces of black clay for the eyes.
Roll them into little balls and flatten them slightly. Place them evenly on the ghost’s face.
For the mouth, use a very small curved piece of black clay.
Keep the expression cheerful rather than scary.
You could even add two tiny pink clay dots for cheeks.
If the eyes are not perfectly level, leave them alone. A slightly wonky face can make a super simple ghost look surprisingly cute.
And that’s a good lesson for kids too: handmade doesn’t mean perfectly symmetrical.
Step 7: Add the Disguise Detail
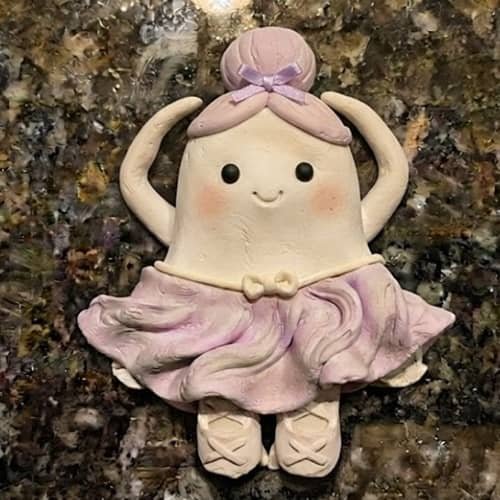
Here is the little twist that makes this more than another ghost figurine.
Make a very small lavender or pink clay mask-like shape, but don’t cover the eyes.
Instead, shape it like a tiny decorative ballerina face accessory and place it above the eyebrows or slightly to one side like a theatrical costume piece.
Another option is a tiny clay hair bun.
For the bun, roll a pea-sized piece of pink clay, flatten it slightly and place it behind the top of the ghost’s head.
Add a tiny clay ribbon around it.
Now our ghost isn’t simply pretending to be a ballerina. It looks like the ghost has gone all-in on the disguise.
Step 8: Let Your Ballerina Ghost Dry
Give the finished figure enough time to dry according to the clay manufacturer’s instructions.
Place it somewhere clean and undisturbed.
Don’t move it around repeatedly while the clay is still soft. That’s how tiny arms and skirts can get accidentally squashed.
Air dry clay normally becomes firmer as moisture leaves the material, so patience matters here.
For thicker pieces, drying can take longer than expected. Let the ghost dry completely before displaying it.
Once hardened, you can use it as a tiny shelf decoration, Halloween desk ornament or part of a miniature spooky season decor display.
Easy Variations Kids Can Try
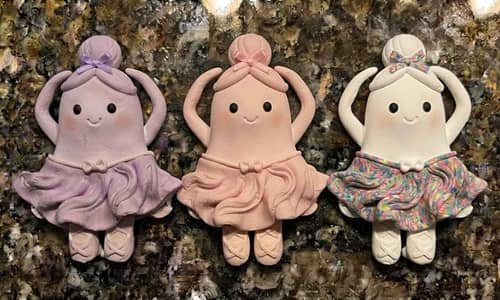
Once the basic character is finished, don’t stop there.
Try making a purple ballerina ghost, a pink ghost or even a completely white version with only a colorful tutu.
You can also create a tiny ghost dance troupe. Give one ghost a raised arm, another a sideways leg and another a little bow.
For younger children, skip the miniature accessories and focus on the body, skirt and face. That keeps this clay activity manageable.
Older kids can experiment with different skirt shapes, costume colors and poses.
You could even make one ghost look like it is doing a twirl while another looks like it just finished a ballet jump.
That’s where this DIY clay project using air dry clay becomes much more fun. There isn’t really one “correct” ballerina.
A Few Beginner Tips
Don’t use too much water: Excess moisture can make some air dry clays sticky and harder to control.
Keep thin parts thicker than you think: Tiny clay arms can break if they’re made extremely thin.
Blend joins carefully: Pressing an arm onto the body isn’t always enough. Smooth the connection with your fingertip.
Let the ghost dry naturally: Avoid trying to speed-dry it with a hot appliance.
Make the costume before the body becomes completely hard: The skirt and accessories need a slightly soft surface to grip properly.
And remember, this is a kids craft, not a sculpting competition. Little fingerprints and uneven edges are part of its charm.
Final Thoughts
I think the best thing about this air dry clay ballerina ghost disguise craft is that it gives kids a reason to invent a character instead of simply copying a shape.
The ghost has a little story now. Maybe she’s hiding from Halloween because she wants to join a dance recital.
Maybe she is the tiny star of a haunted ballet. Who knows? That storytelling is where clay activities become more valuable than just making something cute.
Once your child understands how a simple body can become a character through a costume, pose and facial expression, they can start creating their own miniature clay world.
And honestly, those slightly imperfect little creations are usually the ones worth keeping.





