A good lamp base can completely change the mood of a room, and that is exactly why I love making a clay table lamp base craft.
Clay gives you something that ordinary wooden or metal bases simply cannot: personality.
You can sculpt curves, add texture, build tiny details, or leave the surface slightly imperfect.
And honestly, those little imperfections make the finished lamp feel handmade.
These ideas work beautifully for bedrooms, living rooms, cozy house corners, and even as selling crafts.
Most can be made with Air dry clay, while stoneware clay is an option if you have access to a kiln. Ready to make a lamp that doesn’t look store-bought?
NOTE: If you don’t want DIY and are looking for ready-made options, check out the ready-made clay lanterns for bedroom here.
Choose Your Air Dry Clay Type
Regular Air Dry Clay | Cornstarch Clay | Homemade Clay
Affiliate Disclaimer: Some of the links in this post may be affiliate links, which means I may earn a small commission if you choose to make a purchase through them – at no extra cost to you. I only share products that genuinely fit this project and can help make your ceramic mug clay craft process easier and smoother. Your support helps keep ideas like this coming.
1. Sculpted Pebble Stack Lamp Base
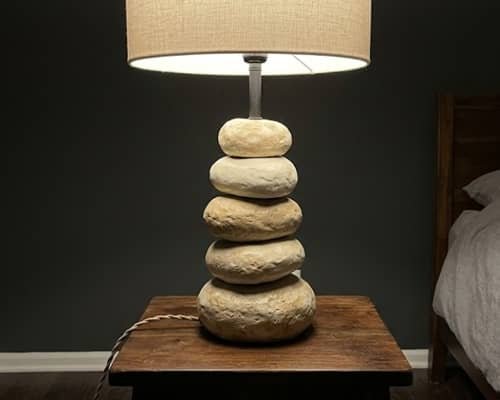
Forget the perfectly symmetrical lamp base for a minute. Try stacking several oversized, rounded clay forms to create a sculptural pebble effect.
How to make it
Start with a sturdy wooden or metal lamp stem and socket kit designed for a table lamp.
For a beginner project, I recommend building the clay around a separate internal support rather than expecting the clay itself to carry the entire electrical assembly.
Roll Air dry clay into 4 to 6 uneven oval shapes. Keep each piece thick enough to remain strong after drying.
Press the pieces gently against one another while they are still soft.
Use a little water or clay slip between the joins, then blend only part of each seam. Don’t smooth everything out.
A few visible transitions make the base look more like a hand-sculpted clay sculpture.
Make a central opening through the stack for the lamp stem.
Use a straw, dowel, or appropriately sized tube to maintain the channel while the clay dries.
Once completely dry, lightly sand sharp edges. Paint the base in warm ivory, muted beige, terracotta, or charcoal.
Add two thin washes of diluted brown paint into the creases to emphasize the stacked forms.
2. Twisted Rope Clay Lamp Base
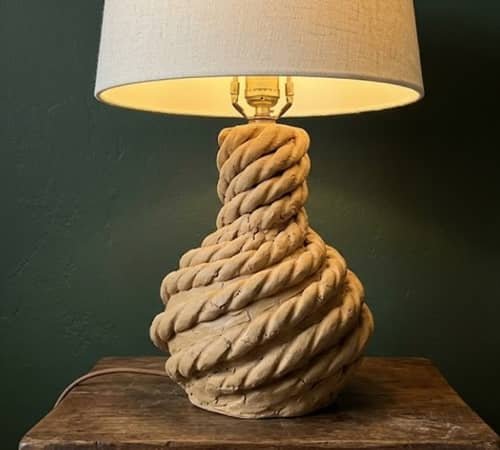
Want something with a little movement? Build a rope-inspired base that spirals upward instead of staying perfectly straight.
How to make it
Condition your clay until it is soft and flexible. Roll several long clay ropes with your palms.
Try to keep them similar in thickness, but don’t worry if they’re not identical.
Create a thick central cylinder first. Then wrap one clay rope around it from bottom to top like a loose spiral.
Press the rope gently against the cylinder so it bonds. Blend the inner edge while leaving the outer ridge visible.
Keep the bottom wider than the top. This gives the lamp better visual balance.
Insert your lamp stem channel before drying. Support the sculpture with a box or foam blocks if it starts leaning.
After drying, paint it one solid color. A matte sandstone finish looks especially good, but deep brown or muted olive can also work.
3. Ribbed Column Lamp Base
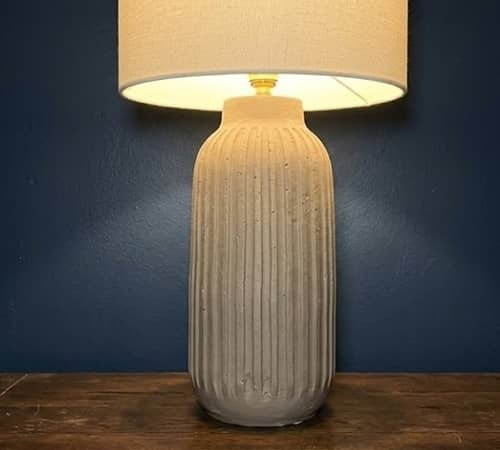
This one looks architectural without being difficult. The secret is repetition.
How to make it
Build a basic thick clay cylinder using slabs or coils. Keep the bottom slightly wider than the upper section.
Next, roll thin clay strips and attach them vertically around the outside.
Space them evenly. You can use a ruler to mark the surface first if you want a cleaner finish.
Blend the strips at the top and bottom but leave the middle sections raised. This creates long vertical ribs.
Make the opening for the lamp hardware while the clay is still workable. Let everything dry slowly.
Once cured, sand lightly and paint the entire base in chalky white or warm greige. Add a darker wash into the grooves and wipe the raised areas clean.
It gives you that expensive pottery-lamp feeling without needing a pottery wheel.
4. Organic Arch Lamp Base
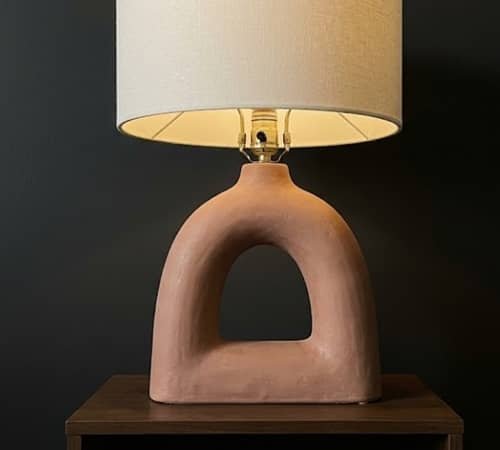
Here is where a basic clay lamp becomes a small piece of modern sculpture.
How to make it
Roll a thick clay slab about 1 to 1.5 cm thick. Cut two identical curved side pieces and one wide base.
Join the pieces using scoring and slip. Score both surfaces with a fork or clay tool, add slip, then press together.
Use small clay coils to reinforce every inside seam. Blend them carefully.
The arch should remain open in the center. That opening is decorative, not a light enclosure.
Add the lamp socket support through the upper section using a suitable lamp hardware assembly.
Let it dry slowly to reduce cracking. After drying, smooth only the roughest edges.
Paint it a warm clay pink, cream, or muted brown. A single-color finish makes the unusual silhouette stand out.
5. Textured Linen-Effect Clay Base
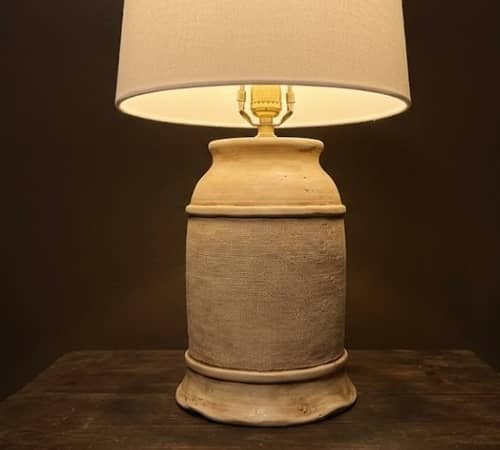
This is one of my favorites when I want a softer, cozy house feeling.
How to make it
Create a simple tapered cylinder from clay slabs.
Before the clay dries, press a piece of coarse fabric gently onto the surface. Remove it carefully.
Don’t press too hard. You want the impression of woven material rather than a deep pattern.
Leave a smooth band around the bottom and top.
Once dry, paint the entire base in creamy beige. Mix a slightly darker beige wash and brush it lightly over the textured areas.
Wipe the raised parts with a clean cloth before the wash completely dries.
The result feels almost like linen-covered pottery, but it is actually a textured clay lamp.
6. Minimal Face Sculpture Lamp Base
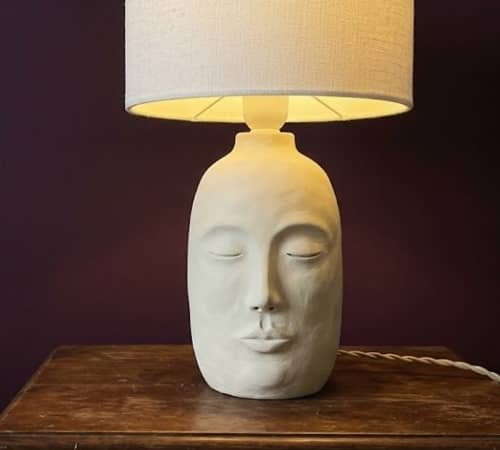
Why not turn the base into a tiny piece of art?
How to make it
Make a rounded vertical clay form, slightly wider at the bottom.
Keep the front relatively flat. Press shallow facial features into the clay using a pencil or rounded modeling tool.
Create closed eyes with two simple curved lines. Add a small nose and abstract lips.
Don’t make the face too detailed. The charm is in the minimal sculpture.
Leave the back plain and create the lamp hardware channel through the center.
After drying, paint the sculpture matte cream. Add very subtle blush-colored paint to the cheeks if you want warmth.
This makes a beautiful bedroom table lamp craft, especially beside a bed or dressing table.
7. Clay Arch-and-Dot Lamp Base
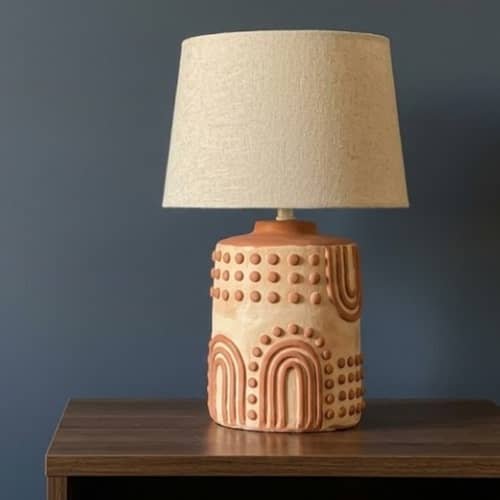
This design mixes geometry with handmade texture.
How to make it
Start with a solid tapered clay cylinder.
Roll tiny clay balls and flatten them slightly. Arrange them in rows around the front of the base.
Above the dots, add two curved clay strips forming a simple arch motif.
Press every decoration firmly into place. If the clay is drying, add a tiny amount of slip beneath each piece.
Once dry, paint the whole base one color.
For a more handmade pottery appearance, lightly dry-brush a second shade across the raised decorations.
The small dots can also be replaced with tiny leaves or geometric shapes if you’re making the piece as a selling craft.
8. Mushroom-Inspired Clay Lamp Base
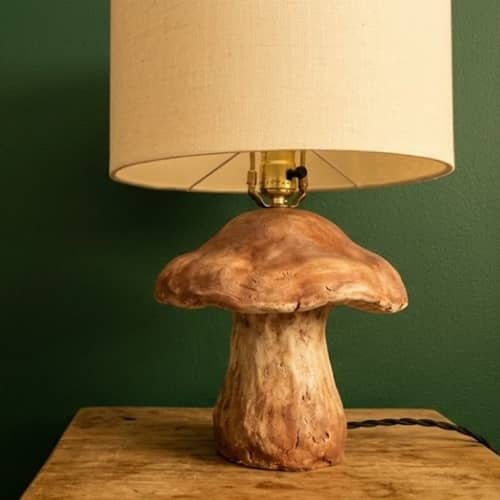
A mushroom shape works surprisingly well as a table lamp because the broad lower form naturally feels grounded.
How to make it
Build a rounded stem using clay coils. Keep the lower portion thick and gradually narrow it toward the top.
Create a shallow mushroom-cap shape separately using a clay slab or flattened clay disk.
Join the cap to the stem with slip and reinforcement coils underneath.
The cap should support the lampshade or lamp hardware rather than acting as a lantern.
Add subtle vertical texture to the stem using a wooden tool.
Paint the stem warm cream and the cap muted rust, brown, or soft green.
For a more sophisticated look, keep the colors muted rather than making it cartoon-like.
9. Fluted Flower-Pot Lamp Base
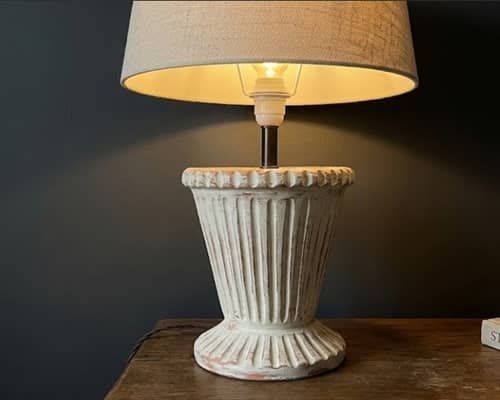
This one borrows the silhouette of a classic planter but turns it into a proper table lamp base.
How to make it
Make a slightly tapered clay cylinder with a broad bottom.
Create vertical flutes using a rounded modeling tool. Run the tool from top to bottom while keeping the pressure consistent.
Don’t make the grooves too deep.
Create a separate decorative rim around the upper section.
Make the central hardware opening before the clay becomes too firm.
After drying, paint the base creamy white. Add a soft terracotta wash around the grooves.
The shape works particularly well with a simple white or oatmeal-colored lampshade.
10. Stacked Disc Clay Lamp Base
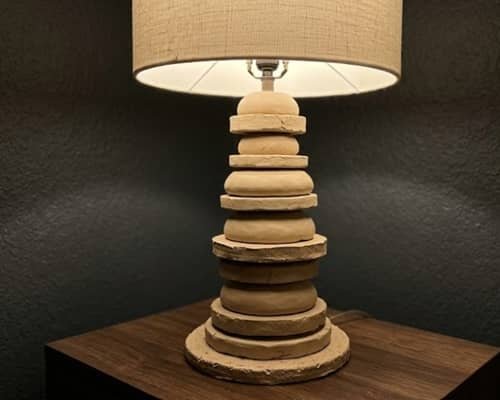
This design looks complicated, but it is basically a series of clay discs.
How to make it
Roll clay to an even thickness.
Cut several circles in different sizes. Make the bottom disc the widest and gradually reduce the diameter as you move upward.
Create a small center opening through every disc.
Stack them using slip and gently compress the joins.
Alternate between flat discs and slightly domed discs to create a more sculptural profile.
Let the complete base dry slowly.
Paint the edges slightly darker than the faces. This makes every layer visible without needing complicated decoration.
If you use stoneware clay, this silhouette can become a beautiful pottery lamp after kiln firing and glazing.
11. Botanical Relief Clay Lamp Base
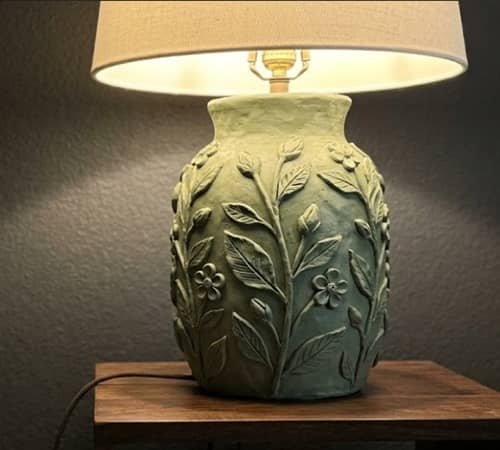
Instead of painting flowers onto the lamp, sculpt them directly into the clay.
How to make it
Make a simple cylindrical or slightly tapered base.
Roll tiny clay ropes for stems. Flatten small pieces of clay and shape them into leaves.
Press the stems onto the body first. Add leaves along the stems.
For flowers, use tiny five-petal shapes made with a small cutter or your fingers.
Attach everything with slip and lightly blend the attachment points.
Let the relief dry completely before painting.
A single muted color works beautifully here. Try dusty sage, warm ivory, or soft clay pink.
If you enjoy botanical clay activities, this same technique can also be adapted for wall plaques and decorative pottery.
12. Chunky Totem Clay Lamp Base
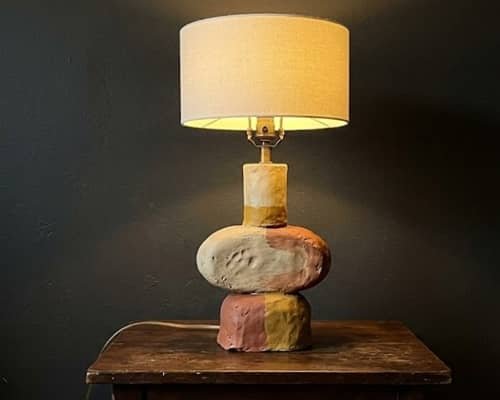
For the final idea, go bold. Build the base like a little abstract totem sculpture.
How to make it
Create three or four separate clay shapes: one rounded block, one flattened oval, one narrow cylinder and one larger base.
Dry the individual pieces until they are firm but still slightly workable.
Join them vertically using strong scoring and slip. Add small clay coils around the joins and blend them into the structure.
Keep some edges sharp and others rounded. This contrast is what makes the sculpture interesting.
Create the lamp hardware channel before the clay fully dries.
Once cured, paint the entire sculpture in one main shade. Add two or three small painted sections in rust, mustard, cream, or brown.
This is also a fun direction if you’re thinking about selling crafts because every base can have a different personality.
Final Thoughts
What makes these lamp bases interesting isn’t perfect pottery technique.
It is the silhouette. A simple clay cylinder can become an entirely different table lamp when you add ribs, botanical relief, stacked forms or an unusual sculptural profile.
That is also where the opportunity for selling craft products becomes interesting.
Instead of producing identical pieces, you can create small collections around one shape, then change the texture, color and lampshade.
Think three mushroom-inspired bases, five botanical designs, or a series of abstract totems.
Even pottery lamps can feel fresh when the base has a recognizable handmade identity.
Start with one form, photograph it honestly, and let the little imperfections become part of its character.





