Small spaces need smart storage, but honestly, storage does not have to look boring.
I love the idea of turning a simple wall hook into a tiny piece of handmade decor, especially when the hook itself becomes part of the room.
These air dry clay wall hook ideas are designed around that thought.
Each one uses clay in a slightly different way, from tiny sculpted shapes to textured backplates and playful mini designs.
They work nicely for entryways, bedrooms, kids’ rooms, craft corners and even rental-friendly spaces.
And because air dry clay is easy to shape without a kiln, you can experiment with these clay craft projects right at home.
Important: Air dry clay is decorative and can be brittle. For a functional wall hook, I recommend using a small wooden peg, metal hook, screw, or other sturdy hardware as the load-bearing part. The clay should decorate and surround the hardware rather than carry heavy weight by itself.
Choose Your Air Dry Clay Type
Regular Air Dry Clay | Cornstarch Clay | Homemade Clay
Affiliate Disclaimer: Some of the links in this post may be affiliate links, which means I may earn a small commission if you choose to make a purchase through them – at no extra cost to you. I only share products that genuinely fit this project and can help make your ceramic mug clay craft process easier and smoother. Your support helps keep ideas like this coming.
1. Mini Arch Wall Hook
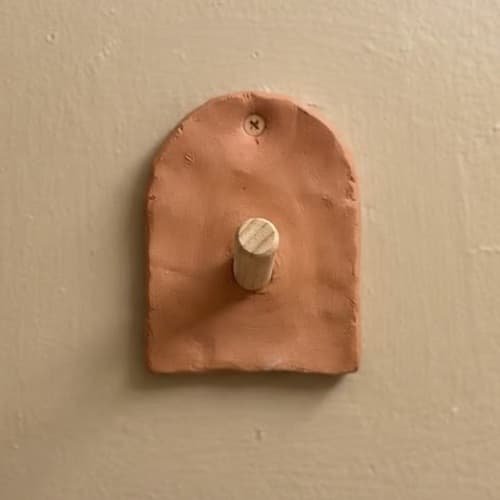
This one is probably where I’d start if you want something simple but still a little different.
Instead of making the usual round clay plaque, create a small arch-shaped backplate.
The curved top gives it a softer architectural look, and it can become one of those subtle unique wall decorations that also has a job to do.
What you’ll need
- Air dry clay
- Rolling pin or smooth glass bottle
- Craft knife
- Small ruler
- Sandpaper
- Acrylic paint
- Small wooden peg or lightweight metal hook
- Strong adhesive suitable for the hardware
- Optional clear matte sealer
How to make it
- Knead a piece of air dry clay for a few minutes until it feels smooth and flexible. Don’t rush this part because dry pockets can make the finished piece crack.
- Roll the clay to roughly 6 to 8 mm thick. I prefer keeping the backplate fairly chunky because an ultra-thin clay plaque can break much easier.
- Cut a rectangle around 7 to 9 cm tall and 5 to 6 cm wide.
- Round the two upper corners, then carefully trim the top into a shallow arch. You can use a small bowl or bottle cap to help create an even curve.
- Smooth the edges with a slightly damp fingertip. Don’t soak the clay. Too much water makes the surface mushy.
- While the clay is still soft, mark the centre point where your wooden peg or metal hook will sit later.
- Leave the piece completely flat and let it dry according to your clay manufacturer’s instructions. Turn it occasionally if the packaging recommends doing so.
- Once fully dry, lightly sand the edges. I actually like leaving a few tiny handmade marks because it stops the project looking factory-perfect.
- Paint the arch in a muted shade such as dusty pink, cream, olive, terracotta or charcoal.
- After the paint dries, attach a small wooden peg or lightweight hook to the marked centre using an appropriate adhesive.
- For a stronger installation, attach the completed piece to the wall with a suitable wall anchor or screw system rather than relying only on the clay.
Small-space twist: Make three arches in slightly different heights and arrange them vertically beside a desk or doorway. That’s a very easy way to turn storage into wall decor ideas without taking up floor space.
2. Pebble Hook With a Hidden Wooden Peg
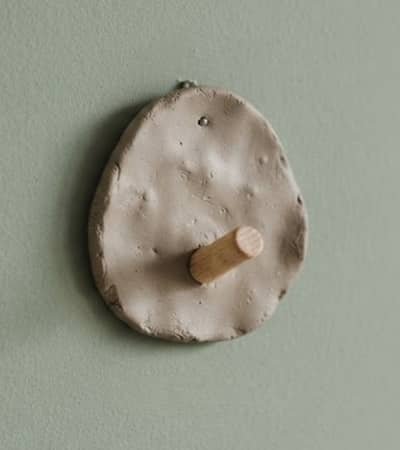
Want something that feels almost like a little stone found on a beach?
Make an irregular pebble-shaped clay plaque, then let a wooden peg become the actual hook.
The result looks organic without needing complicated sculpting.
Materials
- Air dry clay
- Rolling pin
- Craft knife
- Fine sandpaper
- Acrylic paint
- Small wooden peg
- Strong suitable adhesive
- Wall-mounting hardware
Instructions
- Take enough clay to create a plaque around 7 to 10 cm wide.
- Knead it well, then roll it into a slab about 7 to 9 mm thick.
- Cut a deliberately uneven pebble shape. Don’t try to make both sides identical. A little wonkiness is exactly what makes this air dry clay project charming.
- Round and smooth the perimeter using your fingers.
- Press the centre lightly with your thumb to create a very shallow natural-looking depression. Keep it subtle.
- Leave the plaque to dry completely on a flat surface. If your clay tends to warp, place it between two pieces of baking paper with very light flat weights nearby, but don’t press directly on wet clay.
- When dry, sand any sharp edges.
- Paint the plaque in a stone-inspired shade. Try warm grey, mushroom, sand or muted sage.
- For extra texture, dry-brush a slightly lighter colour across the raised areas.
- Attach a small wooden peg near the lower-middle section of the plaque. Let the adhesive cure fully before mounting.
- Fix the plaque securely to the wall using hardware appropriate for your wall surface.
This is one of my favourite functional air dry clay ideas because it doesn’t scream “storage hook.” It just looks like a small handmade object that happens to hold something.
And yes, you can make several in different pebble shapes.
3. Tiny Moon Wall Hook
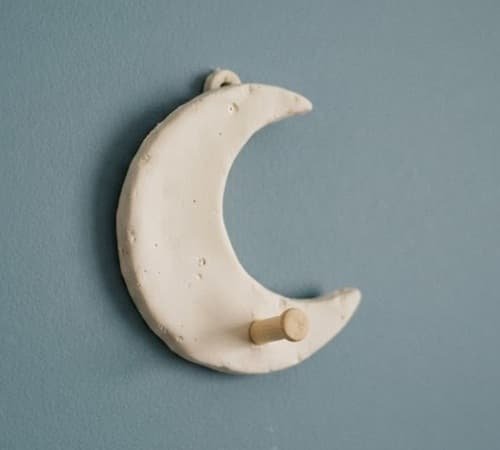
A moon-shaped hook can be surprisingly practical in a child’s room, reading corner or bedroom.
The trick here is not to make the clay itself carry weight.
Instead, use the crescent as a decorative backplate and add a small sturdy peg to it.
You’ll need
- Air dry clay
- Small moon or crescent template
- Rolling pin
- Craft knife
- Sandpaper
- Acrylic paint
- Small wooden peg
- Suitable adhesive
- Wall mounting hardware
Step-by-step
- Draw a crescent moon shape on paper first. Keep it fairly chunky rather than making a very thin crescent.
- Roll your clay to about 8 mm thick.
- Place the paper template over the clay and cut around it carefully.
- Smooth the outside and inside curves with your fingertip.
- Add a few tiny dots or shallow lines if you want a handmade celestial texture. Don’t make deep cuts because they can become weak points.
- Let the crescent dry fully.
- Sand the perimeter very gently.
- Paint it cream, pale blue, dusty yellow or even a deep matte navy.
- Add the wooden peg toward the lower section of the moon. Check the position before gluing because you want whatever you hang to sit comfortably.
- Once the adhesive has cured, mount the piece securely.
For a child’s room, I’d use it for lightweight items such as a small fabric accessory, soft toy strap or lightweight decoration rather than a loaded school bag.
You could also make three tiny moons and stars together.
Suddenly, you’ve got room decor ideas using clay rather than just a hook.
4. Terracotta Leaf Hook
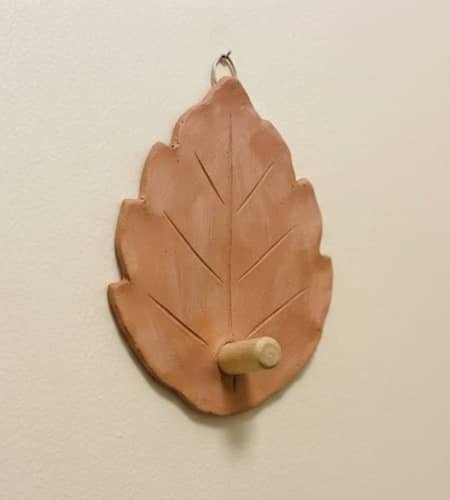
This idea borrows the shape of a leaf but gives it a much more useful purpose.
Rather than sculpting an entire three-dimensional leaf, make a flat clay leaf plaque and add a sturdy peg across the lower portion.
That keeps the project beginner-friendly and reduces the chance of the clay snapping.
Materials
- Air dry clay
- Rolling pin
- Real leaf for reference
- Craft knife
- Wooden skewer
- Sandpaper
- Terracotta or earthy acrylic paint
- Small wooden peg
- Suitable adhesive
- Wall hardware
How I make it
- Choose a fairly simple leaf. Avoid extremely detailed leaves with lots of thin points.
- Roll the clay to around 7 to 8 mm thick.
- Cut a broad leaf silhouette using your reference leaf.
- Use a wooden skewer to gently draw the central vein.
- Add a few side veins, but keep them shallow.
- Round the edges instead of leaving sharp points.
- Let the clay dry completely on a flat surface.
- Once hardened, sand the perimeter lightly.
- Paint the entire leaf terracotta. Let some of the natural clay texture show through.
- Add a darker wash into the veins and wipe the excess away. This gives the leaf more depth without complicated painting.
- Attach a small wooden peg close to the bottom third.
- Allow the adhesive to cure completely before mounting the hook.
This would look lovely near a small entryway.
It is also one of those things to make with air dry clay that can be repeated in different leaf shapes without making the room feel like a craft shop.
5. Mini Rainbow Hook
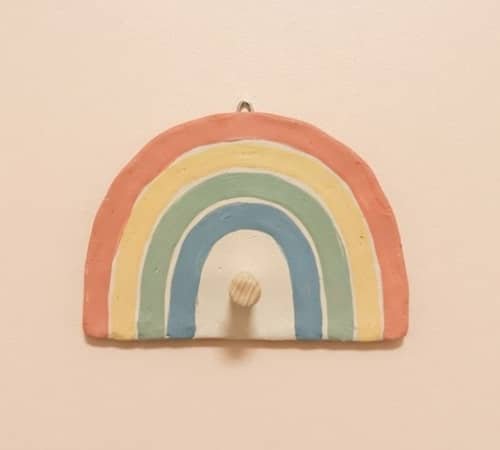
Here’s a fun one for a child’s bedroom or a cheerful little craft corner.
The rainbow shape gives you plenty of room to play with colour, but I would keep the actual clay form relatively flat.
The hook underneath does the practical work.
Materials
- Air dry clay
- Rolling pin
- Paper rainbow template
- Craft knife
- Acrylic paints
- Small wooden peg
- Adhesive
- Fine sandpaper
- Wall mounting hardware
Instructions
- Draw a simple chunky rainbow with three or four bands.
- Roll your clay to approximately 8 mm thick.
- Cut the outer rainbow curve first.
- Cut the inner curve carefully. Keep enough clay between both curves so the rainbow doesn’t become fragile.
- Smooth every edge with your fingertip.
- Add two small cloud shapes at the ends if you like, but don’t make them extremely thin.
- Leave the entire piece to dry naturally.
- Once dry, sand the edges lightly.
- Paint each rainbow band in different muted colours. I like dusty coral, pale yellow, sage and soft blue rather than extremely bright shades.
- Attach a small wooden peg underneath the centre or lower portion.
- Let the adhesive cure fully.
- Mount it securely to the wall.
Keep the hook for lightweight items. A tiny scarf, fabric hairband or decorative string works better than anything heavy.
And if you’re making diy clay gifts, a little rainbow hook could be surprisingly cute as part of a handmade room-decor set.
6. Speckled Clay Button Hook
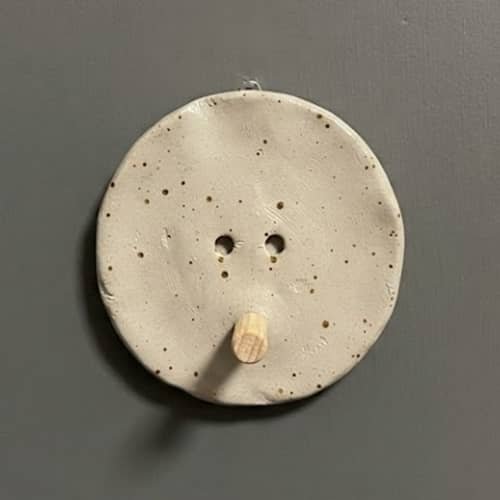
This one looks a little more grown-up.
I make the backplate resemble an oversized handmade ceramic button, then add a wooden peg through the visual centre.
It works especially well beside a tiny desk, dressing area or narrow hallway.
Materials
- Air dry clay
- Rolling pin
- Round cookie cutter or small bowl
- Straw or clay tool
- Acrylic paint
- Fine sandpaper
- Small wooden peg
- Strong suitable adhesive
- Wall-mounting hardware
Step-by-step instructions
- Roll a clay slab about 8 mm thick.
- Cut a circle roughly 7 to 8 cm wide.
- Smooth the circular edge carefully.
- Use a straw or rounded tool to make two shallow decorative holes near the upper-middle area, just like a large button. Don’t make them too close to the edge.
- Let the clay dry completely.
- Sand the outer edge once hardened.
- Paint the circle an off-white or warm greige.
- While the paint is still slightly workable, add tiny darker speckles using the end of a stiff brush or a small sponge.
- Let everything dry.
- Attach a small wooden peg at the lower centre. The “button holes” remain decorative and don’t need to be functional.
- Once the adhesive has completely cured, mount the hook firmly to the wall.
The speckles make this feel closer to handmade pottery, even though you’re working with air dry clay.
I think that little illusion is what makes it stand out from typical easy molding clay ideas.
For a narrow wall, make two or three button hooks at slightly different heights. It gives you useful storage without visually filling the entire wall.
7. Wavy Checkerboard Wall Hook
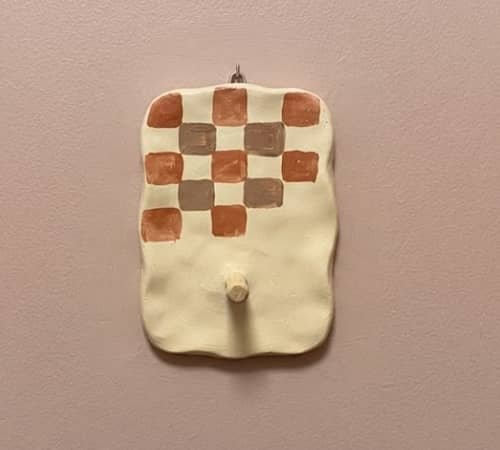
If you like playful decor but don’t want your walls looking too childish, this wavy checkerboard hook is a nice middle ground.
The backplate starts as a simple irregular slab.
The personality comes from the soft wavy edges and tiny painted squares.
I’d use this one in a bedroom, craft room or beside a compact study desk.
Materials
- Air dry clay
- Rolling pin
- Craft knife
- Small ruler
- Pencil
- Fine sandpaper
- Acrylic paint
- Small wooden peg or lightweight metal hook
- Suitable adhesive
- Appropriate wall-mounting hardware
How to make it
- Knead the clay until it becomes soft and evenly conditioned.
- Roll it into a slab approximately 7 to 9 mm thick. I wouldn’t go much thinner because the wavy perimeter can become fragile.
- Cut a roughly rectangular piece about 8 cm wide and 10 cm tall.
- Instead of making straight sides, gently cut small waves along the left and right edges. Keep the curves broad and shallow.
- Smooth the entire perimeter with your finger.
- Let the clay dry completely on a flat surface.
- Once hardened, use fine sandpaper to soften any rough spots.
- Paint the base a warm cream shade.
- After it dries, use a pencil and ruler to lightly mark a small checkerboard section. You don’t need to cover the whole plaque. A partial checkerboard looks much more unusual.
- Paint alternating squares in terracotta, brown, sage or another muted shade.
- Let the paint dry completely.
- Attach a small wooden peg toward the lower half of the plaque.
- Give the adhesive enough time to cure before installing it.
- Mount the finished piece with appropriate hardware for your wall.
My small-space trick
Don’t make this hook huge. Around 8 to 10 cm is plenty.
A few small hooks grouped together can provide useful storage while becoming wall decor ideas at the same time.
I’d hang lightweight items such as a small fabric pouch, scrunchie holder or decorative cord.
8. Little House-Shaped Hook
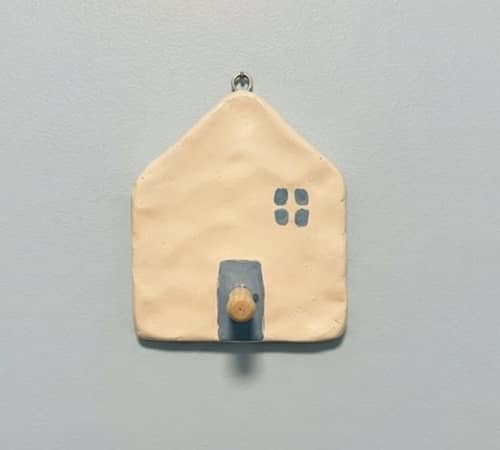
This one has a surprisingly useful advantage.
A house-shaped plaque gives you a recognizable silhouette without requiring advanced sculpting.
I’d especially use it in a kid’s room or a tiny entryway where you want storage to feel cheerful.
What you’ll need
- Air dry clay
- Rolling pin
- Paper house template
- Craft knife
- Wooden skewer
- Acrylic paint
- Small wooden peg
- Adhesive
- Sandpaper
- Wall hardware
Step-by-step
- Draw a simple house silhouette on paper. Make the walls fairly wide and the roof reasonably thick.
- Roll your clay to approximately 8 mm thick.
- Place the template over the clay and carefully cut around it.
- Don’t add very thin chimneys or tiny roof details. They can snap once the clay dries.
- Smooth the edges with your fingertips.
- Use a wooden skewer to draw a simple door and one or two windows. Keep the lines shallow.
- Leave the piece to dry completely.
- Once dry, sand the perimeter very lightly.
- Paint the house a soft cream, pale blue, terracotta or muted mustard.
- Add the door and windows using a contrasting paint colour.
- Attach the small wooden peg around the lower-middle portion.
- Let the adhesive cure fully.
- Install it with suitable wall hardware.
I wouldn’t use this as a coat hook for heavy jackets. Think small and light. A fabric bag, lightweight cap or decorative item is more suitable.
Could you make a little neighborhood from these? Absolutely. Three different houses lined up across a narrow wall would look adorable.
9. Clay Sunburst Hook
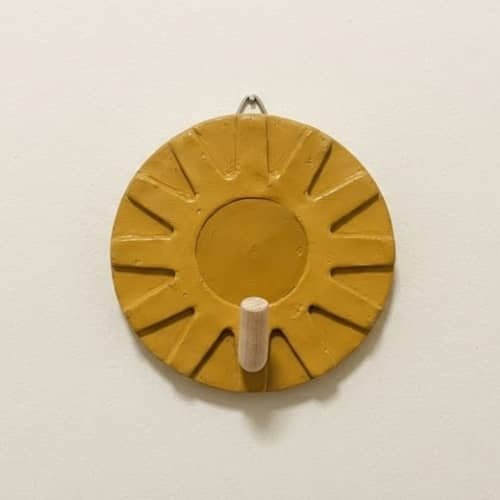
Here’s where I’d go if you want something that feels more decorative than utilitarian.
The sunburst shape turns a small hook into a miniature focal point.
It works beautifully on a narrow blank wall where a full-sized artwork would feel too bulky.
Materials
- Air dry clay
- Rolling pin
- Paper template
- Craft knife
- Clay tool or wooden skewer
- Acrylic paint
- Small wooden peg
- Strong suitable adhesive
- Sandpaper
- Wall hardware
Instructions
- Sketch a small circle with short, chunky rays around it.
- Keep the rays fairly wide. Very thin points are more likely to break.
- Roll the clay to around 8 mm thick.
- Cut the outer sunburst shape carefully.
- Smooth every ray with your fingertip.
- Use a clay tool to press a shallow circle around the central area. This creates a little dimensional separation.
- Let the piece dry completely.
- Sand only the roughest edges.
- Paint the centre a warm mustard or ochre.
- Paint the rays slightly lighter or darker for contrast.
- Let the paint dry.
- Attach a small wooden peg to the lower portion.
- Allow the adhesive to cure before mounting.
One thing I really like here is the balance between decoration and function. It isn’t just another hook stuck onto a wall.
It becomes a small piece of unique wall decorations that happens to hold something.
For the cleanest look, I’d make two suns rather than five.
Small spaces usually look better when you give handmade objects a little breathing room.
10. Half-Moon Pocket Hook
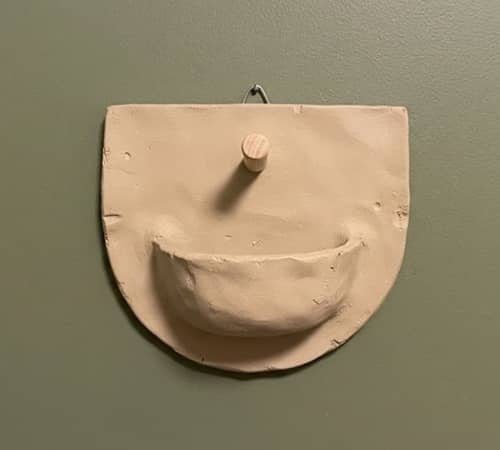
This one is a little different because the clay isn’t just acting as a decorative plaque.
It creates a tiny shallow pocket beneath the hook. Think of it as a miniature catch-all for something very light.
Materials
- Air dry clay
- Rolling pin
- Craft knife
- Small bowl or curved object
- Wooden skewer
- Acrylic paint
- Small wooden peg
- Suitable adhesive
- Sandpaper
- Wall mounting hardware
How to make it
- Roll a slab of clay around 8 to 10 mm thick.
- Cut a half-moon shape around 9 cm wide.
- Smooth the curved and straight edges.
- Roll another small piece of clay into a thinner strip.
- Curve that strip gently to create the front edge of a tiny pocket.
- Score and lightly dampen the joining surfaces before attaching them. This gives the clay a better mechanical bond while it is still wet.
- Press the pieces together carefully and smooth the join.
- Don’t make the pocket deep. Around 1 to 2 cm is enough for a decorative catch-all.
- Allow the entire piece to dry slowly and completely.
- Once dry, inspect the join. If you notice a tiny hairline crack, fill it with a small amount of compatible clay or filler and let it dry again.
- Sand gently.
- Paint the pocket and backplate the same colour or use two closely related shades.
- Attach a small wooden peg above the pocket.
- Let everything cure properly before mounting.
What can you keep in it?
Keep it very lightweight. A fabric hair tie, tiny note or decorative paper tag is fine.
Don’t treat the clay pocket like a key bowl. That’s asking a small air-dried clay project to do too much.
This is one of my favourite functional air dry clay ideas for a tiny bedside wall because it combines two jobs in a very small footprint.
11. Terrazzo-Style Clay Hook
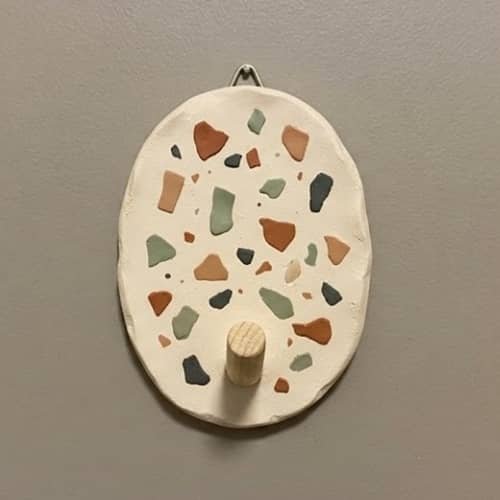
You don’t actually need real terrazzo to get the look.
Tiny pieces of contrasting air dry clay can create a convincing terrazzo-inspired surface.
It’s also a clever way to use leftover scraps from other things to make with air dry clay.
Materials
- Air dry clay
- Small leftover pieces of dried or semi-dry clay
- Rolling pin
- Craft knife
- Round cutter
- Acrylic paint
- Small wooden peg
- Suitable adhesive
- Sandpaper
- Wall hardware
Instructions
- Take small leftover pieces of coloured clay.
- Break or cut them into tiny irregular chips.
- Roll a fresh piece of clay to around 8 mm thick.
- Scatter the clay chips across the surface.
- Roll over them gently with your rolling pin.
- Keep rolling until the chips become partially embedded. Don’t completely flatten the surface.
- Cut out a simple round or oval plaque.
- Smooth the outside edge without disturbing the embedded pieces.
- Let it dry completely.
- Sand the edge once hardened.
- If you want a more polished look, lightly sand the front surface too. Stop before you remove the decorative chips.
- Seal the surface with a compatible matte or satin sealer if desired.
- Attach a small wooden peg to the lower centre.
- Allow the adhesive and sealer to cure fully.
This is an excellent project when you’ve got little clay leftovers sitting around.
Why waste those tiny scraps?
The random pattern also means you don’t need perfect placement. In fact, trying to make every chip identical would defeat the point.
12. Tiny Mushroom Hook
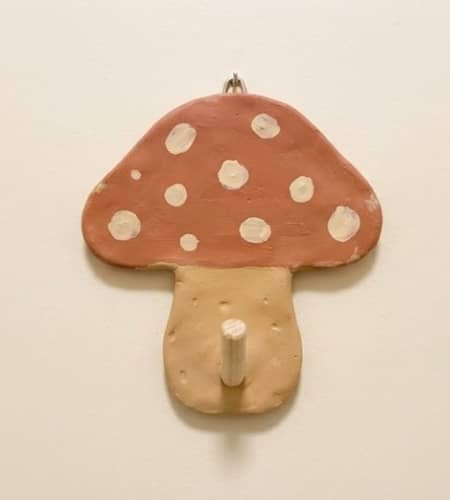
I wanted to finish with something that feels a bit unexpected.
A little mushroom hook brings a handmade woodland feeling without requiring you to sculpt a complicated three-dimensional mushroom.
The trick is to keep the mushroom as a flat plaque.
Materials
- Air dry clay
- Rolling pin
- Paper mushroom template
- Craft knife
- Wooden skewer
- Acrylic paint
- Small wooden peg
- Suitable adhesive
- Fine sandpaper
- Wall-mounting hardware
Step-by-step
- Draw a mushroom silhouette with a broad cap and sturdy stem.
- Roll your clay to approximately 8 mm thick.
- Cut the mushroom shape carefully.
- Keep the stem fairly wide. A thin stem is more likely to become a weak spot.
- Smooth the entire perimeter.
- Add a few shallow dots to the mushroom cap using the end of a pencil or clay tool.
- Let it dry completely.
- Once hardened, lightly sand the edges.
- Paint the cap in muted terracotta, dusty red or brown.
- Paint the stem cream or warm beige.
- Add tiny cream spots to the cap if you want a classic mushroom look.
- Attach a small wooden peg around the lower portion of the mushroom.
- Allow the adhesive to fully cure.
- Mount the piece securely to the wall.
This would be especially cute in a child’s room, reading nook or creative workspace.
And because the shape is so recognizable, you don’t need much extra decoration around it. The hook itself becomes the decor.
If you’re collecting air dry clay wall hook ideas for a gallery-style arrangement, I’d combine this mushroom with the leaf and pebble designs rather than making twelve matching hooks.
Final Thoughts
The interesting thing about making clay wall hooks is that the best designs aren’t necessarily the most complicated ones.
A flat clay shape can look beautiful once you give it a strong silhouette, thoughtful texture and one practical hardware detail.
I also think there’s a useful lesson here for small-space decorating: don’t make storage compete with the room.
Make it part of the room. Keep the clay decorative layer light, let the wooden or metal hardware handle the actual load, and always choose wall anchors based on your wall type.
Once you understand that basic construction principle, you can turn almost any small clay shape into a personalized hook.
That’s where these air dry clay wall hook ideas become much more than another weekend craft.





