If you’ve been searching for bottle painting ideas that don’t all look the same, you’re in the right place.
I wanted projects that actually feel handmade instead of looking like factory-made decor.
Some are colorful. Others are wonderfully imperfect, and honestly, that’s what makes them charming.
Whether you’re decorating a glass bottle, trying new bottle craft ideas, planning kids craft activities, or simply looking for fresh things to do with glass bottles, these beginner-friendly bottle painting tutorials walk through every step without assuming you’ve painted before.
Grab an empty bottle, clear a little workspace, and lets make something you’ll actually want to keep on the shelf.
1. Wildflower Meadow Bottle
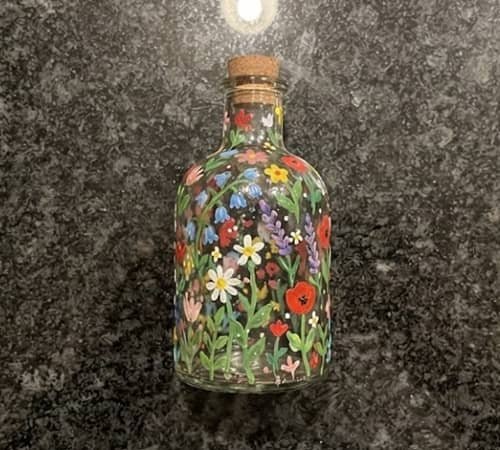
This design wraps tiny flowers all around the bottle instead of placing them in neat rows.
The scattered blooms create movement, making every angle look different.
It feels soft, cheerful, and works beautifully as a vase or simple bottle decoration.
Materials
- Clear glass bottle
- White acrylic primer or gesso
- Acrylic paints (white, yellow, pink, lavender, green)
- Medium round brush
- Small detail brush
- Makeup sponge
- Palette
- Water cup
- Matte sealer
Step-by-Step Instructions
Use dish soap and warm water to thoroughly clean the glass bottle.
Remove every trace of glue from the label because leftover adhesive prevents paint from sticking evenly. Let the bottle dry completely.
Apply a thin coat of white primer using the makeup sponge.
Dabbing works better than brushing because it leaves fewer streaks.
Don’t rush this stage. The smoother the base becomes, the cleaner your flowers will appear later.
Paint the bottle with a soft cream or pale sky-blue background.
Two thin coats always beat one thick coat. Wait until the first coat no longer feels cool before adding the second.
Now comes the fun part.
Using the detail brush, paint tiny green stems that curve gently upward.
Don’t make every stem identical. Flowers in nature ain’t perfectly lined up anyway.
Create five-petal flowers using little dots instead of brush strokes.
Press the tip of the brush lightly to form each petal.
Add yellow dots in the center while the petals are still slightly damp so everything blends naturally.
Scatter miniature flower buds between larger blooms. This tiny detail fills empty spaces without making the design feel crowded.
Add a few darker green leaves near the stems. Make them point in different directions.
That’s what gives the bottle a relaxed, meadow-inspired look.
Once dry, seal everything with two thin coats of matte varnish.
The finished bottle looks lovely on a bookshelf with dried baby’s breath or cotton stems.
It also makes a thoughtful handmade gift. Honestly, every bottle turns out slightly different, which is kinda the whole point.
2. Midnight Galaxy Bottle
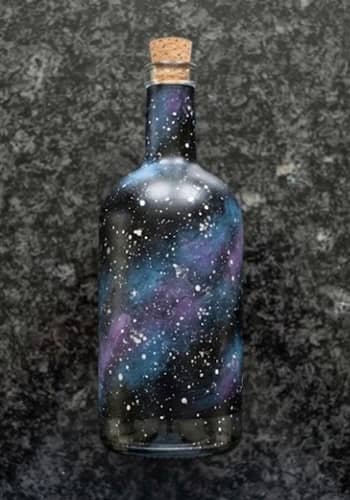
Instead of painting stars on a blue background, this version builds layers that create surprising depth.
The finished project almost looks three-dimensional when light hits it.
Materials
- Dark glass bottle or clear bottle
- Black acrylic paint
- Navy blue paint
- Purple paint
- White paint
- Metallic silver paint
- Cosmetic sponge
- Toothbrush
- Old toothbrush cover or cardboard
- Gloss sealer
Step-by-Step Instructions
Paint the entire bottle black. Let it dry fully before adding anything else.
Using a makeup sponge, dab navy blue around random sections. Avoid covering the whole bottle.
Leave patches of black showing through because darkness creates contrast.
Next, lightly sponge purple over a few areas where blue meets black. Blend the colors gently. There isn’t any strict rule here.
Mix tiny amounts of white with blue and softly dab highlights into selected areas. This creates glowing nebula clouds.
Dip an old toothbrush into diluted white paint.
Run your thumb across the bristles to splatter tiny stars across the bottle.
Test the splatter on scrap paper first because too much paint creates blobs instead of stars.
Add a few larger stars with a detail brush. Some can have tiny four-point sparkles.
Paint one or two miniature shooting stars sweeping across the bottle. Keep them subtle.
Finish by adding a few silver dots for extra brightness.
Seal with gloss varnish to enhance the illusion of depth.
Every galaxy bottle looks different, so there’s no pressure to copy someone else’s design exactly. Thats honestly the nicest part.
3. Lemon Orchard Kitchen Bottle
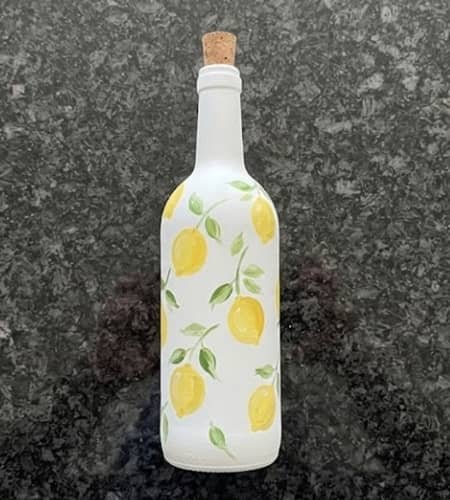
Fresh lemons instantly brighten a kitchen, but this version keeps everything loose and painterly rather than hyper-realistic.
Materials
- Clear bottle
- White primer
- White acrylic paint
- Yellow paint
- Green paint
- Brown paint
- Detail brush
- Flat brush
- Satin sealer
Step-by-Step Instructions
Prime your bottle and paint it white.
Sketch light curved branches using diluted brown paint. Don’t press hard. They should almost disappear beneath the lemons later.
Paint round yellow circles in clusters of two and three. Let them dry before adding highlights.
Mix a tiny amount of white into yellow and add curved highlights to each lemon.
Paint deep green leaves with quick brush flicks instead of outlining every leaf.
Add tiny white blossoms wherever branches look empty.
Use a very fine brush to paint small dots around some lemons, giving the bottle a playful illustrated appearance rather than a botanical drawing.
Seal using satin varnish for a soft finish.
This one looks wonderful holding fresh herbs or wooden cooking spoons.
It also fits nicely into decor project collections inspired by farmhouse kitchens.
4. Rainy Window Bottle
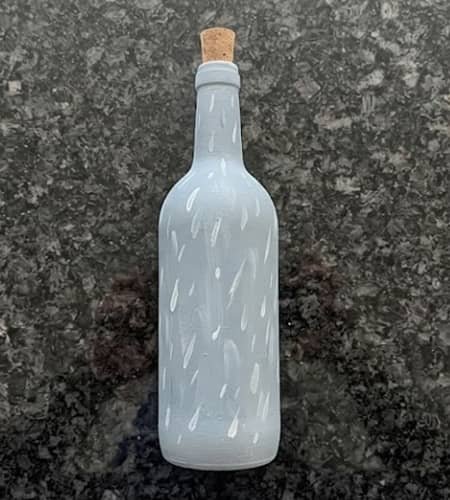
Here’s something you almost never see among ordinary bottle painting ideas.
Instead of painting objects, you’re painting atmosphere.
Materials
- Glass bottle
- White primer
- Pale grey paint
- Blue paint
- White paint
- Small sponge
- Fine liner brush
- Gloss medium
Step-by-Step Instructions
Prime the bottle and apply a pale grey base.
Blend soft blue patches randomly using a damp sponge.
While still damp, soften edges until everything fades smoothly together.
Using white paint mixed with gloss medium, create tiny vertical raindrops. Make some long, others short.
Paint blurry outlines of distant buildings near the bottom using muted grey.
Don’t overwork them. They’re meant to look out of focus.
Finally, add a few tiny birds flying far away.
Seal with gloss varnish so the raindrops catch reflections beautifully.
This design feels peaceful instead of loud. Some days that’s exactly what a shelf needs.
5. Tiny Village Story Bottle
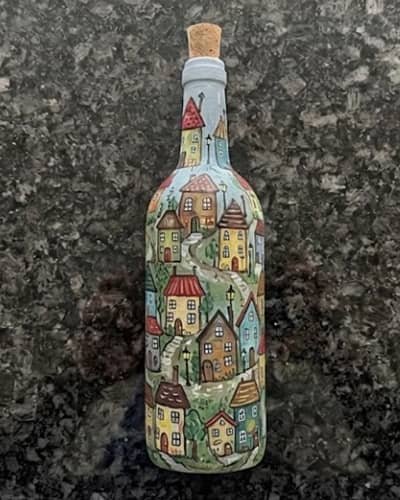
Rather than painting one landscape, wrap a complete miniature village around the bottle so the scene changes as you rotate it.
Materials
- Glass bottle
- Beige acrylic paint
- Blue paint
- Brown paint
- White paint
- Black liner pen (paint-safe)
- Fine brushes
- Matte varnish
Step-by-Step Instructions
Paint the bottle with a warm beige background.
Draw a light horizon around the bottle using pencil.
Paint tiny houses one by one. Change roof heights and window sizes so every home feels unique.
Leave tiny gaps between houses for little trees.
Add miniature pathways connecting homes.
Paint smoke curling from two chimneys.
Use tiny dots for windows instead of outlining every frame.
Once dry, outline selected buildings with a paint-safe liner for extra definition.
Seal everything with matte varnish.
Rotate the bottle slowly after finishing.
Every turn reveals another little story, which makes this one especially fun for kids craft inspiration and family bottle craft afternoons.
6. Pressed Leaf Silhouette Bottle
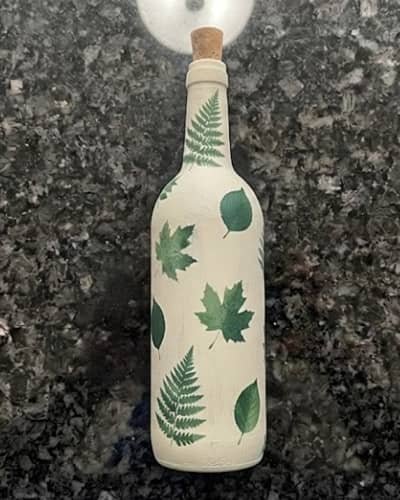
Instead of painting detailed leaves, use real leaves as temporary stencils. The result feels modern, elegant, and surprisingly easy.
Materials
- Glass bottle
- Spray adhesive (temporary)
- Fresh or artificial leaves
- Olive green paint
- Sage green paint
- Cream paint
- Sponge
- Fine brush
- Matte sealer
Step-by-Step Instructions
Paint the bottle cream and let it dry overnight if possible.
Lightly spray the backs of several leaves with temporary adhesive.
Press them firmly onto the bottle.
Using a sponge, dab olive and sage green around the leaf edges. Build color slowly rather than applying thick paint all at once.
Carefully peel away each leaf before the paint fully dries.
You’ll reveal crisp leaf silhouettes underneath.
Use the fine brush to add tiny veins inside a few silhouettes.
Leave others plain. Mixing detailed and simple leaves keeps the design balanced.
Add a few scattered paint speckles around empty spaces.
Seal with matte varnish.
This project pairs beautifully with rustic shelves and makes one of those DIY projects using bottles that looks far more advanced than it really is.
You don’t need fancy tools, just patience and a little curiosity.
7. Faux Stained Glass Mosaic Bottle
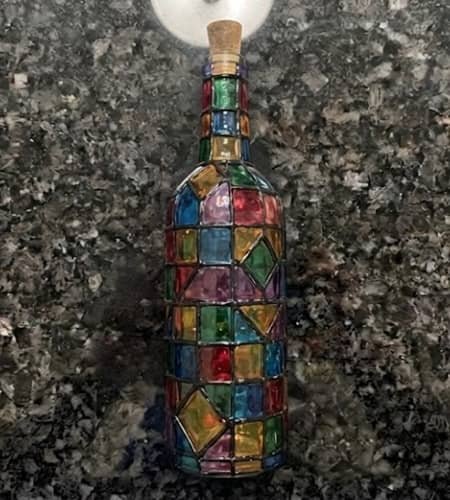
Most stained glass bottles rely on transparent paints.
I wanted something anyone can make with regular acrylic paint while still capturing that colorful mosaic look.
The black outlines do most of the heavy lifting here, making even simple color blocks appear surprisingly elegant.
Materials
- Clear glass bottle
- White acrylic primer
- Black acrylic paint
- Fine liner brush
- Acrylic paints (turquoise, teal, coral, mustard, emerald, lavender)
- Round brush
- Gloss varnish
Step-by-Step Instructions
Start by washing the bottle thoroughly. Fingerprints and dust can make paint peel later, so don’t skip this step.
Apply a thin coat of white primer and let it dry completely.
Using a pencil, lightly sketch random geometric shapes all over the bottle.
Mix triangles, diamonds, uneven rectangles and curved sections.
Avoid making everything symmetrical because stained glass rarely looks perfectly uniform.
Paint every section a different color. Try not to place similar colors directly beside each other. The contrast makes every section stand out.
Allow all the colors to dry before moving on.
Now use a fine liner brush and black paint to carefully trace every dividing line.
These bold outlines instantly transform the design into a stained-glass effect.
Some lines will wobble a little. Thats perfectly okay because handmade art should still feel handmade.
Add tiny white highlights inside just a few colored sections to create the illusion of reflected light.
Finish everything with two coats of gloss varnish.
The finished bottle catches room lighting beautifully and works as both a centerpiece and a unique bottle decoration.
If you’re exploring bottle painting ideas for older children or teens, this project is also a fantastic introduction to color theory.
8. Koi Pond Watercolor Bottle
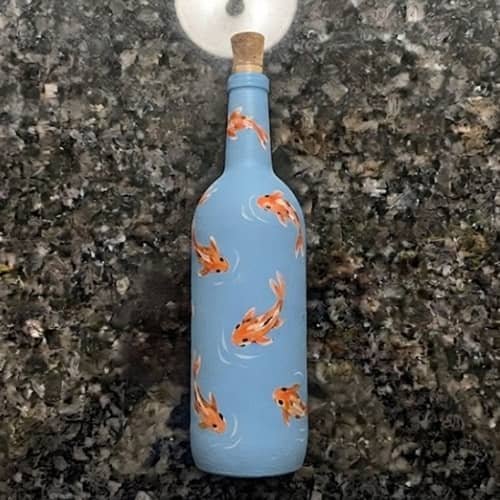
This project creates the feeling of looking into a peaceful pond from above.
Instead of covering the entire bottle with fish, leave plenty of negative space so the design can breathe.
Materials
- Glass bottle
- White primer
- Pale blue paint
- White paint
- Orange paint
- Black paint
- Gold paint
- Flat brush
- Detail brush
- Gloss sealer
Step-by-Step Instructions
Prime the bottle first.
Paint a very light blue background using broad horizontal strokes.
While the paint remains damp, gently blend small amounts of white to imitate moving water.
Don’t overblend.
The slight streaks actually help create a watery appearance.
Sketch tiny koi fish using soft pencil lines. Keep them swimming in different directions instead of lining them up.
Paint each koi orange first.
After drying, add black patches across some fish while leaving others mostly orange. Every koi naturally has unique markings.
Use white paint to add subtle highlights on the backs of the fish.
Around each koi, paint thin curved white ripples that gradually fade into the background.
Finally, add tiny floating lily pads and one or two pink water lilies near the shoulder of the bottle.
Seal with gloss varnish for a fresh wet appearance.
The finished piece almost tells a story without saying anything. I could stare at it for way longer than I probably should.
9. Faux Embroidered Floral Bottle
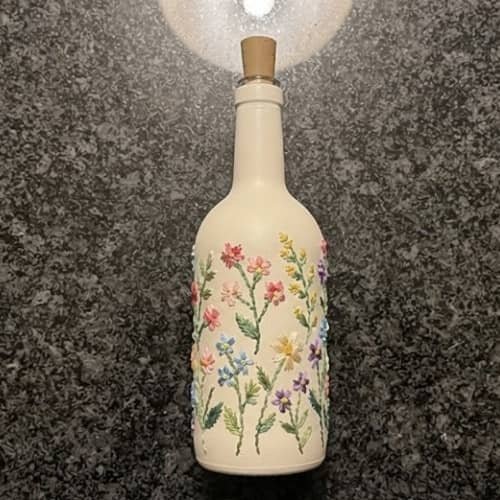
Here’s a twist most people don’t expect.
Instead of making the flowers look painted, you’ll make them appear stitched like embroidered fabric.
Materials
- Glass bottle
- Cream acrylic paint
- Fine detail brush
- Acrylic paints (rose pink, burgundy, olive green, mustard)
- White paint
- Matte varnish
Step-by-Step Instructions
Paint the entire bottle cream.
Allow it to dry fully.
Sketch simple flowers using pencil. Don’t draw large bouquets. Smaller scattered flowers actually create a prettier embroidered effect.
Paint every petal using tiny short brush strokes instead of smooth lines.
Each stroke should resemble a thread.
Paint leaves using dozens of tiny flicks rather than filling them completely.
Outline selected petals with darker shades to create depth.
Using white paint, add little stitched dashes around several flowers.
Repeat these miniature dash marks across stems and leaves as well.
It takes patience, but not difficult.
Stand back every few minutes instead of constantly looking up close. From a distance the painted strokes suddenly resemble embroidery.
Seal using matte varnish.
This design looks especially lovely beside woven baskets or linen table runners.
It also blends beautifully with farmhouse-inspired decor project themes.
10. Night Sky Constellation Lantern Bottle
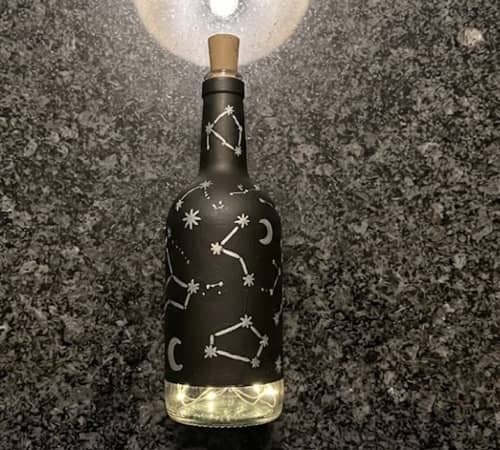
This project looks beautiful during the day, but becomes magical once tiny fairy lights are placed inside the bottle.
Materials
- Glass bottle
- Black acrylic paint
- Navy paint
- White paint
- Metallic silver paint
- Cotton swab
- Fine brush
- Battery fairy lights
- Gloss varnish
Step-by-Step Instructions
Paint the bottle black.
Before it dries completely, sponge a little navy around random areas to soften the darkness.
Dip the end of a cotton swab into white paint.
Stamp dozens of tiny stars across the bottle.
Some stars should stay tiny while a handful become slightly larger.
Choose two or three real constellations and connect their stars using very thin silver lines.
Avoid covering the whole bottle with constellation maps.
Leave open sky between them.
Paint one crescent moon near the upper neck of the bottle.
Add tiny silver dots around the moon for extra sparkle.
Insert battery-operated fairy lights once the bottle has completely dried and been sealed.
When evening comes, the constellations gently glow from inside. Kids absolutely loves seeing the stars light up.
This also works well during seasonal kids craft activities with adult supervision.
11. Vintage Postage Stamp Travel Bottle
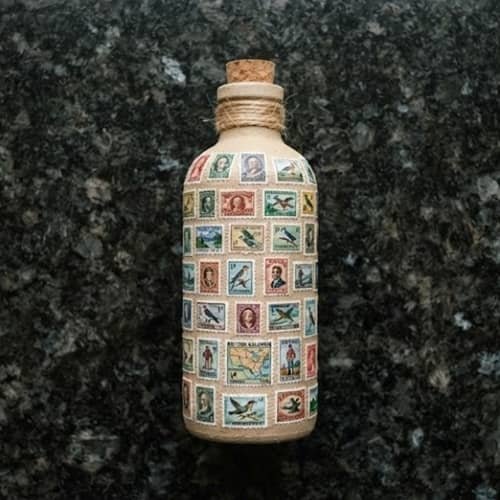
Instead of painting landscapes, paint tiny illustrated postage stamps wrapping around the bottle like souvenirs collected from imaginary adventures.
Materials
- Glass bottle
- Beige acrylic paint
- Brown paint
- Navy paint
- Green paint
- Fine liner brush
- White paint
- Matte varnish
Step-by-Step Instructions
Paint the bottle warm beige.
Using pencil, divide the bottle into small rectangles resembling postage stamps.
Inside every rectangle, paint something different.
Ideas include:
- Tiny lighthouse
- Mountain cabin
- Palm tree
- Bicycle
- Hot air balloon
- Forest trail
- Sailboat
- Snowy village
Paint dotted borders around each stamp using tiny black dots.
Write small numbers or pretend country names with the liner brush.
Don’t worry if the handwriting isn’t perfect. Old postage rarely looked flawless anyway.
Lightly sponge brown paint around some edges for a slightly aged appearance.
Seal using matte varnish.
This becomes an instant conversation starter because every side reveals another tiny destination.
It’s one of my favorite DIY projects using bottles simply because no two travel bottles will ever look alike.
12. Layered Mountain Sunrise Bottle
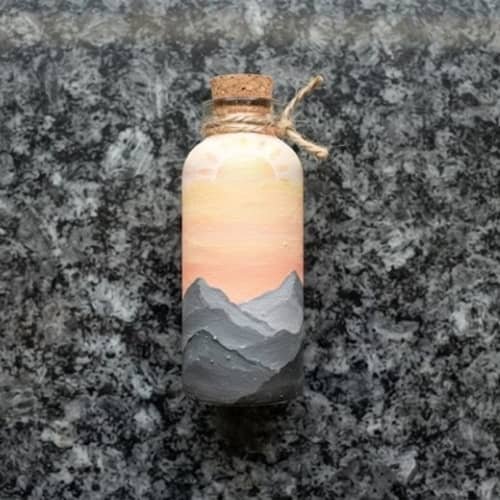
Let’s finish with something peaceful.
This design creates depth by stacking mountains instead of trying to paint every little detail.
Materials
- Glass bottle
- White primer
- Peach paint
- Coral paint
- Pale yellow paint
- Grey paint
- Dark charcoal paint
- Flat brush
- Detail brush
- Matte sealer
Step-by-Step Instructions
Prime the bottle first.
Blend pale yellow near the top.
Slowly transition into peach, then coral toward the middle of the bottle.
Keep your brush moving horizontally to avoid harsh lines.
Allow the sky to dry.
Paint the furthest mountain using the lightest grey.
Below it, paint another mountain using a slightly darker shade.
Repeat this process until the closest mountain becomes dark charcoal.
Each mountain should overlap the previous one.
Use a nearly dry brush to soften the upper edges of distant mountains.
Paint tiny pine trees only on the nearest mountain range.
Leave the distant layers plain.
Finally, add one small glowing sun disappearing behind the tallest peak.
Seal with matte varnish.
This relaxing project proves that beautiful bottle craft ideas don’t always require complicated artwork.
Sometimes fewer details create a much stronger visual impact.
Its one of those projects people often assume took hours, even though the process stays wonderfully beginner friendly.
Final Thoughts
The best bottle painting ideas aren’t the ones that copy someone else’s finished design.
They’re the ones that leave room for your own little mistakes, unexpected color choices, and tiny creative decisions.
That’s what gives handmade projects their personality.
Whether you’re repurposing a glass bottle, experimenting with plastic bottle crafts, borrowing ideas from a mason jar painting craft, or introducing children to kids craft sessions, each painted bottle becomes more than recycled décor… it becomes a snapshot of the moment you made it.
Start simple, paint often, and don’t throw away a bottle before asking yourself one question… What could this become instead?





