Valentine’s Day doesn’t always need red hearts, glitter, and store-bought decorations.
I actually love the idea of making something small that feels a little imperfect and personal. These clay candle holders for valentines day are exactly that kind of project.
They can be shaped with air-dry clay, painted in soft romantic colors, and turned into sweet little table decorations without needing complicated pottery skills.
Better still, many of these ideas work as simple clay activities for kids with adult supervision.
I’ve also added a few designs that could work beautifully if you’re interested in selling crafts at a school fair, craft market, or Valentine’s pop-up.
Safety note: For kids, use battery-operated LED tea lights only. Do not put real flames in children’s clay projects. Adults should handle any cutting, sealing, drilling, or candle-related heat.
Choose Your Air Dry Clay Type
Regular Air Dry Clay | Cornstarch Clay | Homemade Clay
Affiliate Disclaimer: Some of the links in this post may be affiliate links, which means I may earn a small commission if you choose to make a purchase through them – at no extra cost to you. I only share products that genuinely fit this project and can help make your ceramic mug clay craft process easier and smoother. Your support helps keep ideas like this coming.
1. Puffy Heart Tea-Light Holder
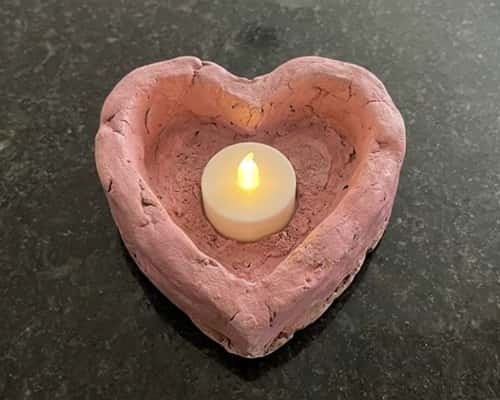
This is probably where I’d start with younger kids. It looks adorable, but the construction is surprisingly simple.
How to make it
- Knead a handful of air-dried clay until it becomes soft.
- Roll it into a ball and flatten the bottom slightly so the holder can stand.
- Roll another piece into a thick rope.
- Bend the rope into a heart shape.
- Press the bottom of the heart gently onto the clay base.
- Smooth the joins with a damp fingertip.
- Make a shallow circular depression in the center of the base.
- Let the entire piece dry completely.
- Paint it pink, dusty rose, red, cream, or lilac.
- Add tiny white dots around the heart if you want a handmade ceramic look.
For kids, skip sharp tools and simply press the LED tea light into the shallow depression after everything has dried.
2. Love Letter Clay Candle Dish
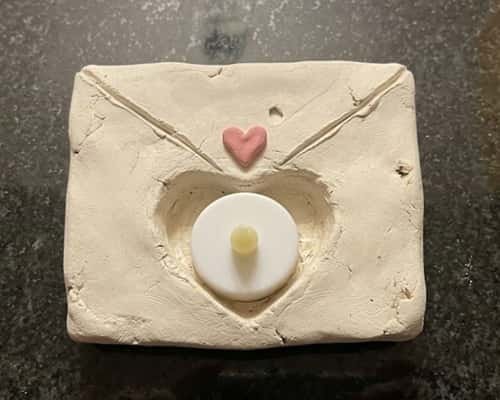
What if your candle holder looked like a tiny love letter?
This one is flat, cute and much easier than it first appears.
How to make it:
Roll air-dry clay into a slab around 5–7 mm thick. Cut or shape it into a small rectangle with slightly rounded corners.
Pinch two opposite corners gently upward. This gives the piece that folded-envelope appearance.
Create a shallow round cavity in the middle for an LED tea light. Don’t make it too deep because the candle should sit securely without disappearing inside the clay.
Add a tiny clay heart to the front. You could even press the word “LOVE” into the clay using a blunt craft stick.
Leave it somewhere dry and undisturbed. Air-dry clay can crack when the outside dries much faster than the inside, so avoid placing thick pieces directly beside a heater.
Once completely dry, paint the envelope ivory and the heart pink.
3. Mini Heart Candlestick Holder
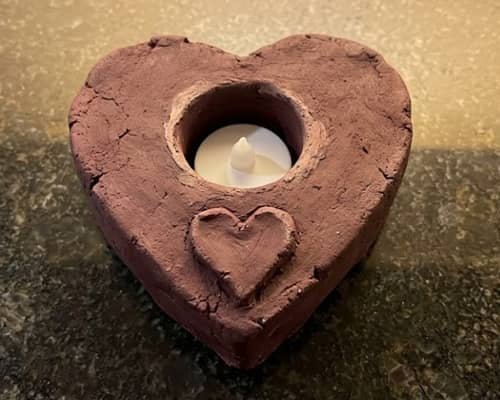
Want something that feels more like actual pottery? Try a tiny heart candlestick holder.
How to make it:
Start with a thick clay coil about the width of your finger.
Form it into a short cylinder. Flatten the bottom so it stands properly.
Now make a second, thinner clay rope and shape it into a heart. Press the heart onto the front of the cylinder.
For the candle opening, gently press an LED tea light into the top while the clay is still soft. Remove it before drying so you have a neat cavity.
Smooth only some areas. I actually prefer leaving a few tiny ridges because that handmade surface is what makes these diy clay candle holders interesting.
Paint the holder burgundy, blush pink or muted mauve.
4. Four Hearts Hugging a Candle
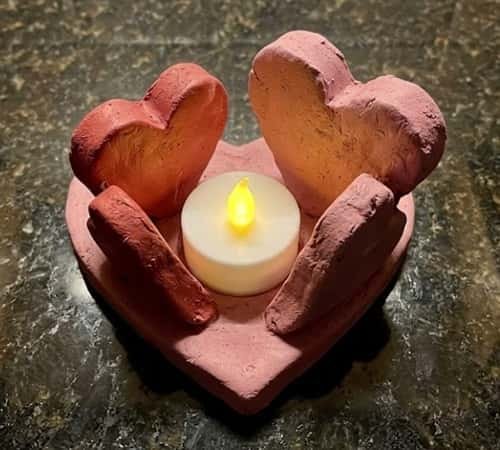
This one has a cute little story built into the design.
Make two small heart shapes from air-dry clay. Keep them fairly thick so they don’t snap while drying.
Create a low circular clay base. Position both hearts on opposite sides of the base, leaning slightly inward.
Join them with small amounts of soft clay.
Leave a circular opening between the hearts for an LED tea light.
The trick is keeping the hearts thick enough to support themselves. Thin clay looks delicate but can become frustrating for beginners.
Paint one heart pink and one red. Or keep everything the same color for a softer Valentines decor aesthetic.
5. Clay Rose Ring Candle Holder
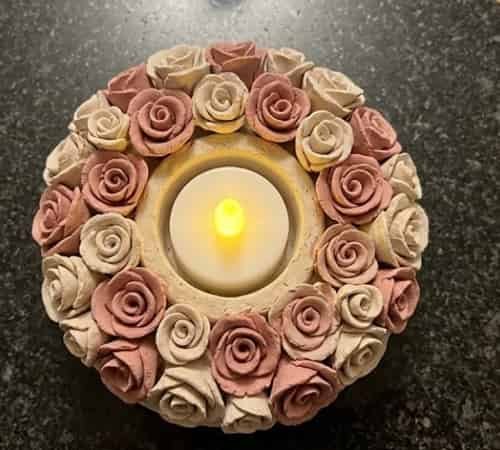
This one is slightly more decorative but still beginner friendly.
How to make it
Roll several tiny clay balls.
Flatten each one between your fingers.
Arrange the flattened pieces in an overlapping circle to create a simple rose. Don’t worry about making perfect petals.
Make three or four small roses.
Now create a thick circular clay ring and attach the roses around the outside.
Keep the center open for the LED candle.
After drying, paint the flowers slightly darker than the base. A cream holder with dusty pink roses looks particularly pretty.
This could make a lovely Valentines table inspo piece because it looks decorative without needing much else around it.
6. Conversation-Heart Clay Holder
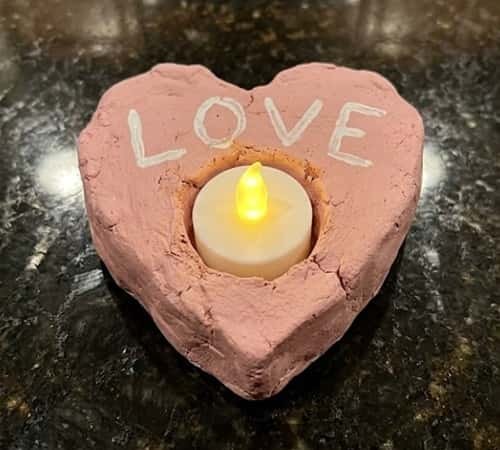
Remember those little candy conversation hearts?
Turn that idea into a clay project.
Shape a chunky heart from air-dry clay. Flatten the bottom.
Press a shallow circular cavity into the top.
Once dry, paint the heart pale pink, yellow, lavender or white.
Then add a tiny “LOVE” or “XOXO” using acrylic paint or a fine-tip marker suitable for cured clay.
For younger children, skip the lettering and let them decorate the heart with dots or tiny painted marks.
It becomes a fun diy valentines day clay craft without requiring complicated sculpting.
7. Clay Cupid Heart Holder
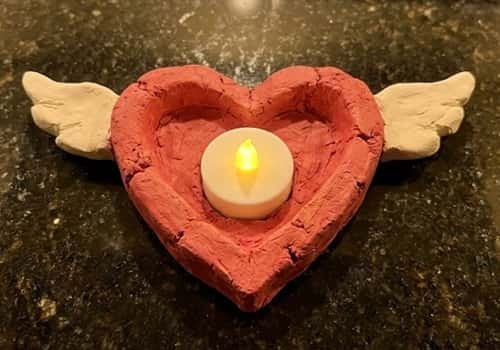
Cupid doesn’t need to look complicated.
Make a simple heart-shaped base and add two tiny clay wings behind it.
You can make the wings by flattening small pieces of clay and pressing shallow lines into them with a blunt tool.
Keep the wings chunky rather than thin. Thin clay pieces are more likely to break.
Add a shallow candle cavity to the center.
Paint the heart red and the wings cream.
That contrast gives you a charming little piece for Valentines home decor.
Quick Disclaimer on Next 5 Clay Crafts: These should be made with kiln-fired, candle-safe pottery clay and a suitable glaze, not ordinary air-dry clay. Air-dry clay and many craft clays are not designed for direct flame, heat, or hot wax. The instructions below assume proper pottery clay, kiln firing, and a candle-safe glaze. For a completely beginner/no-kiln project, use a commercially made heat-safe candle cup and decorate around it with clay rather than putting a flame directly against craft clay.
8. Simple Heart Pocket Candle Holder
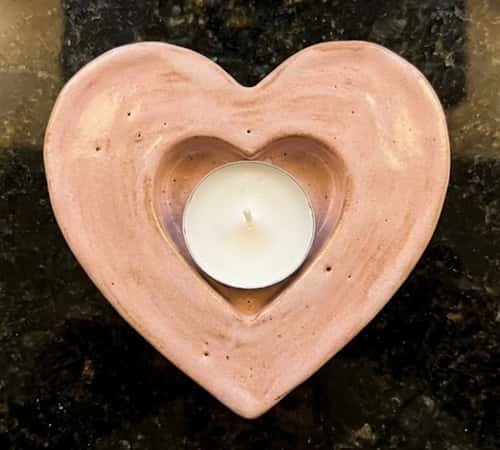
This is probably the easiest romantic design I’d make as a gift. It looks handmade but still feels like a proper little pottery piece.
What you need
- Candle-safe pottery clay
- Small wax tealight
- Rolling pin or clay roller
- Heart-shaped cutter or paper template
- Small round cutter
- Water
- Sponge
- Pottery slip
- Kiln
- Candle-safe glaze
How to make it:
Start by conditioning a small piece of pottery clay until it feels soft and workable.
Roll it into a slab around 8 mm thick. I prefer keeping this slightly thicker for a candle holder because it gives the finished piece some weight and stability.
Cut out a large heart shape.
Now cut a smaller heart from the center, but don’t cut all the way through the clay. Instead, press down gently to create a shallow recessed pocket.
This pocket should eventually be deep enough to comfortably hold a small wax tealight.
Smooth the edges with a damp sponge.
Here’s the important part: make the bottom completely flat. Put the piece on a flat surface and gently press the base until it doesn’t rock.
You can add two tiny clay hearts on the front, but I’d stop there. Too many decorations can make the holder look busy.
Allow it to dry slowly according to the clay manufacturer’s instructions.
Bisque-fire it, apply a suitable candle-safe glaze, then fire it again according to the clay and glaze manufacturer’s specifications.
Once finished, place a small wax tealight into the recessed pocket.
The result? A chunky little heart that feels like a handmade Valentine keepsake.
9. Two Hearts Around a Tealight
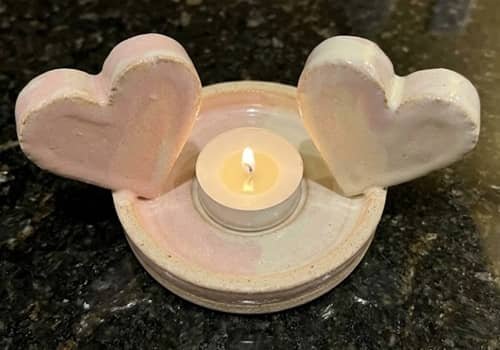
This one has a lovely romantic idea behind it. Two clay hearts sit opposite each other and create a little frame around the candle.
What you need
- Pottery clay
- Small wax tealight
- Clay roller
- Basic heart cutter
- Slip
- Sponge
- Kiln
- Candle-safe glaze
How to make it
Roll a slab approximately 8 mm thick.
Cut a simple circular base around 10 cm wide.
Don’t make it huge. A smaller holder feels more like a personal gift and is easier to handle.
Next, make two chunky hearts.
You can cut these using a paper heart template, but don’t make the hearts paper-thin. Aim for around 8 mm thickness.
Score and slip the bottoms of both hearts.
Place them on opposite sides of the circular base.
Press the joints together gently.
Now create a shallow circular recess in the middle.
The recess should be wide enough to accommodate your chosen wax tealight.
Smooth the inside of the candle cavity carefully. You don’t want rough clay directly surrounding the candle.
Let the entire piece dry slowly.
After the first firing, use a soft pink or ivory glaze. A glossy glaze on the inside with a slightly less glossy exterior can look especially pretty.
Once completely fired and confirmed suitable for candle use, place the wax tealight between the two hearts.
The candlelight will shine through the gap between them, which gives this design its charm.
10. The Sweetheart Taper Candle Holder
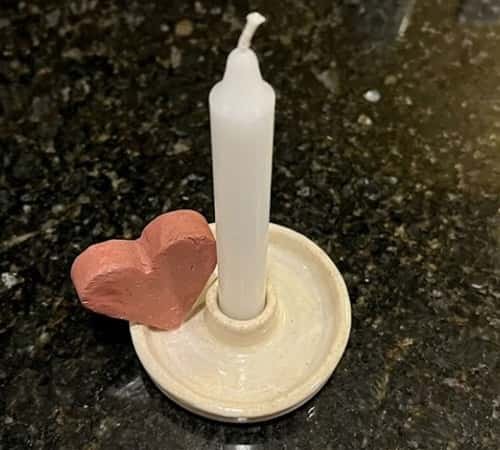
This is the one I’d make when I want something romantic but not overly decorated. It has a simple pottery base with one raised heart wrapping around the bottom of a tall candle.
What you need
- Candle-safe pottery clay
- One tall taper candle
- Clay roller
- Small heart cutter
- Slip
- Sponge
- Kiln
- Candle-safe glaze
How to make it
Start with a fairly generous lump of pottery clay.
Knead it until it becomes smooth and workable.
Roll the clay into a slab around 10 mm thick. I recommend going slightly thicker here because a tall candle needs a stable base.
Cut a round base around 9 cm wide.
Keep the base relatively low. You don’t want to make a tall cup. The visual focus should remain on the vertical candle.
Now create a small cylindrical socket in the center.
One easy way is to roll a thick clay coil and form it into a short ring. Attach this ring to the center of the base using scoring and slip.
The inside diameter should be appropriate for your taper candle. Ideally, make a test socket using scrap clay first.
A candle that is too loose can wobble, while one that is too tight can be difficult to insert.
Next, make a chunky clay heart.
Instead of simply sticking it onto the front, cut the heart slightly so that it appears to rise from the base and lean toward the candle socket.
Score and slip the heart into place.
Blend the bottom of the heart into the base.
Don’t over-smooth everything. A few handmade marks give it character.
Once the holder is leather-hard, check the base again. Place it on a flat surface and make sure it doesn’t rock.
Allow it to dry slowly.
Bisque-fire it, glaze it, and complete the final firing according to your clay and glaze manufacturer’s instructions.
A soft ivory base with a dusty-red heart would make this feel more like a romantic handmade gift than a children’s craft.
11. Love Knot Taper Candle Stand
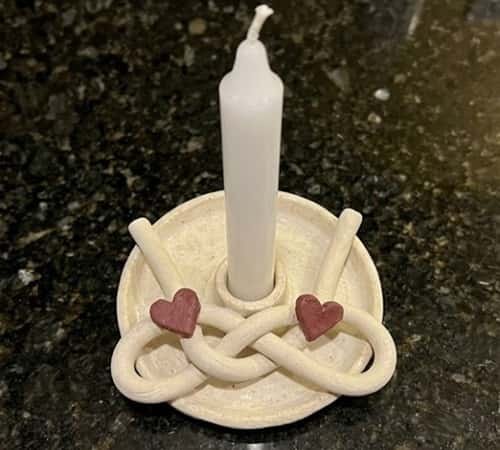
This one has a completely different look.
Instead of putting a heart on the front, we’re going to create two clay strands that appear to wrap around the base of the candle.
It has a slightly sculptural feel without becoming difficult.
How to make it:
Begin with a thick circular clay base.
Roll a slab around 10 mm thick and cut a circle approximately 9–10 cm across.
Smooth the edges.
Make a short, sturdy candle socket in the middle using a clay coil.
Attach it firmly to the base with scoring and slip.
Now make two long clay coils.
Keep them approximately the same thickness. They don’t have to be perfect.
Place the first coil around one side of the socket.
Bring it upward slightly.
Place the second coil from the opposite side.
Cross the two coils once near the front of the holder.
This creates the appearance of a simple clay knot.
Don’t actually wrap the coils tightly around the candle opening. The candle needs its own clear socket.
Blend the ends of the coils into the base.
Then make two very small hearts and attach one near each end of the crossed clay strands.
This is where I’d stop.
You don’t need flowers, lettering, beads or additional decoration. The crossed clay itself is the feature.
Let it dry slowly before firing.
After bisque firing, use a soft blush, cream or muted burgundy glaze.
The tall candle will rise from the center while the clay “love knot” remains low around its base.
12. Heart Garden Taper Candle Holder
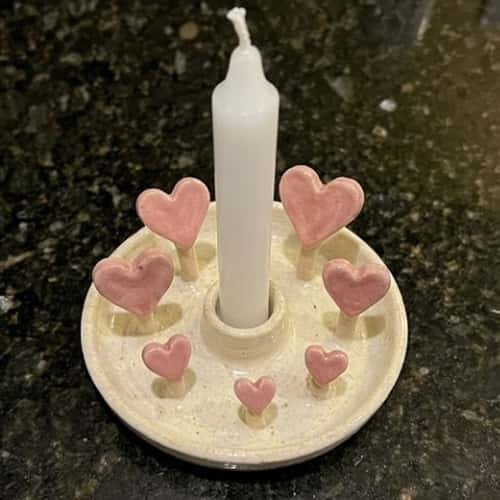
This one is slightly more playful, but it can still look beautiful enough to give as a Valentine’s gift.
Think of it as a tiny clay garden surrounding one tall candle.
What you need
- Pottery clay
- Tall taper candle
- Small heart cutter
- Clay roller
- Slip
- Sponge
- Kiln
- Candle-safe glaze
How to make it
Start by making a wide, low circular clay base.
Roll the clay around 10 mm thick and cut a circle approximately 10 cm across.
The wide base is important. Tall candles create more leverage if they are bumped, so I wouldn’t make this holder narrow or top-heavy.
Make a short central candle socket.
Attach it securely using scoring and slip.
Now make five or six small hearts.
Keep them relatively thick. Around 6–8 mm is plenty.
Create tiny clay stems by rolling very thin coils.
Attach one stem to each heart.
Then position the hearts around the central candle socket.
Some can stand slightly higher than others.
Don’t arrange them perfectly.
One leaning left, another slightly lower and another pointing outward can make the whole thing look much more natural.
Blend each stem into the base.
Keep the area immediately around the candle socket clear. You want the flame and candle itself to remain unobstructed.
Once the clay has reached leather-hard stage, inspect all the joins.
If a heart feels loose, reinforce the connection with a little slip and fresh clay.
Allow the entire holder to dry slowly.
Bisque-fire it.
Then glaze it in a soft color such as ivory, pale blush, muted pink or deep wine.
For a particularly romantic finish, you could glaze the base ivory and use pink glaze on the hearts.
Once fully fired and confirmed suitable for candle use, insert the taper candle into the central socket.
A small stability rule for all three vertical candle holders
For tall vertical candles, I would make the base wider than the candle is tall, rather than creating a narrow decorative tower.
Keep the center of gravity low, make the candle socket snug for the intended candle, and check that the finished holder sits completely flat.
For children’s versions, I’d still use LED taper candles.
For real flames, these should be treated as adult pottery projects using properly fired, heat-suitable clay and glaze.
13. Melted-Look Clay Heart Holder
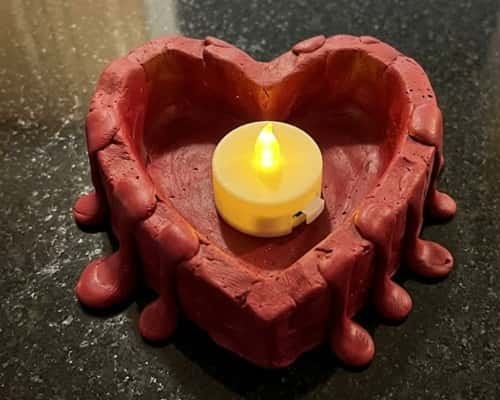
Want something that looks a little strange in a good way?
Make a thick clay heart, then gently stretch and flatten sections of its sides so they look as though the heart is melting.
Add a round candle cavity to the middle.
Don’t make the “drips” too thin. They should remain chunky enough to dry without snapping.
Paint it deep pink or cherry red.
This is one of my favorite ideas for older kids because it turns basic clay sculpture into something more creative.
It also has potential for selling crafts, especially if each piece has its own unusual shape.
Could You Sell These?
Absolutely, some designs could translate into small handmade products.
The key isn’t making hundreds of identical holders. Try creating small themed sets – three mini heart holders, a Cupid pair, or a pink-and-cream Valentine collection.
When selling crafts, presentation matters almost as much as the clay sculpture itself.
Give each piece a slightly different handmade character instead of trying to make every imperfection disappear.
You could even offer personalized colors or initials.
That turns a simple diy clay valentines day clay craft into something with a little more perceived value.
Final Thoughts
The interesting thing about Valentine’s clay projects is that they don’t have to look professionally manufactured.
A tiny fingerprint, uneven heart or slightly wobbly edge can actually make the piece feel more personal. That’s especially useful if you’re making these with children.
Let them experiment with shapes rather than correcting every little mistake.
For a valentines table inspo setup, group three or four different holders together instead of making everything match perfectly.
And if you’re thinking about selling crafts, keep notes on which shapes are fastest to make, easiest to repeat and most fun to customize.
Those little details can tell you more about a product’s potential than simply making the prettiest prototype.





