What if a turkey decided it absolutely did not want to look like a turkey this Thanksgiving? That is the fun idea behind this clay dog turkey disguise craft for kids.
Instead of making a regular paper turkey with dog ears, we are going to disguise a Turkey as a dog using air dry foam clay and turn it into a small, front-facing puppy sculpture.
The finished piece has floppy ears, a rounded snout, paws, a collar and just enough turkey detail peeking through to make the disguise believable.
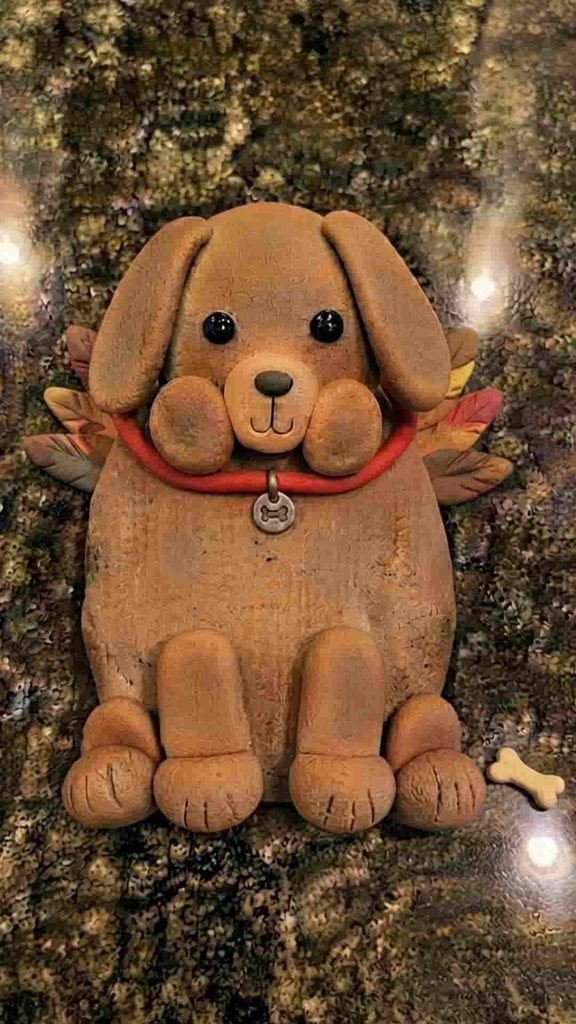
It works nicely as a Fall, Autumn or November school project, and kids can make their own funny puppy character with very simple clay shapes.
What Makes This Clay Dog Turkey Disguise Craft Different?
I wanted this project to have a little more personality than the typical turkey disguise activity.
The idea is simple: the turkey is hiding inside a dog costume.
Instead of covering the entire turkey with random decorations, we build a recognizable puppy from basic pieces of air dry foam clay.
The turkey’s rounded body becomes the puppy’s body. The face gets transformed with a dog muzzle and nose.
Floppy ears hide the turkey’s head shape, while a colorful collar makes the disguise even more convincing.
And here is the fun part.
A small fan of turkey feathers can remain visible behind the puppy’s head and shoulders.
This creates the illusion that the turkey is trying to camouflage itself as a dog but did not quite manage it.
That tiny detail makes the finished clay craft tell a story.
Choose Your Air Dry Clay Type
Air Dry Foam Clay | Cornstarch Clay | Homemade Clay
Affiliate Disclaimer: Some of the links in this post may be affiliate links, which means I may earn a small commission if you choose to make a purchase through them – at no extra cost to you. I only share products that genuinely fit this project and can help make your ceramic mug clay craft process easier and smoother. Your support helps keep ideas like this coming.
Materials Needed To Make Turkey Disguised as Dog
You don’t need a huge craft supply box for this project.
- Air dry foam clay
- Small amount of cardboard or thick paper for a temporary work guide, if needed
- A smooth work surface
- Craft ruler
- Toothpick or blunt clay tool for details
- Small rolling pin or smooth bottle
- Optional: tiny amounts of black, white, pink, brown and red foam clay
- Optional: clear craft glue for reinforcing pieces after drying
About the Clay
I recommend air dry foam clay because it is lightweight, soft and easy for little fingers to shape.
Unlike traditional modeling clay, air-dry foam clay is designed to harden when exposed to air.
It is especially useful for small decorative sculptures because you don’t need an oven.
For younger children, adults should handle any tools that have sharp edges.
Better still, skip sharp tools completely and use a blunt clay tool or the end of a paintbrush.
Step 1: Make the Turkey’s Main Body
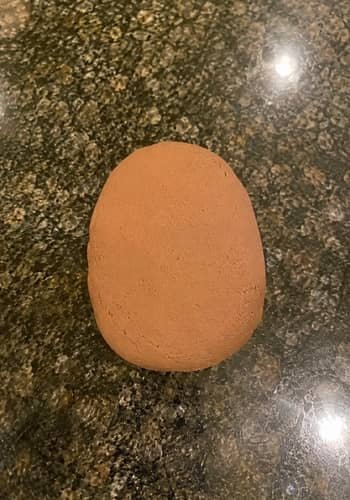
Start with a generous handful of brown air dry foam clay.
Roll it gently between your palms until it becomes a smooth ball. Don’t worry if it isn’t perfectly round.
A slightly handmade shape actually gives this project its charm.
Now flatten the ball very gently.
You want a shape that resembles a rounded, slightly squat oval. This becomes the main body of your disguised turkey.
Keep it fairly thick. If you flatten it too much, there won’t be enough depth for the dog face and paws later.
Place the body flat on your shiny granite work surface and check it from the front.
Does it look like a little rounded animal body?
Good.
Don’t add the face yet.
Step 2: Give the Turkey a Puppy Head
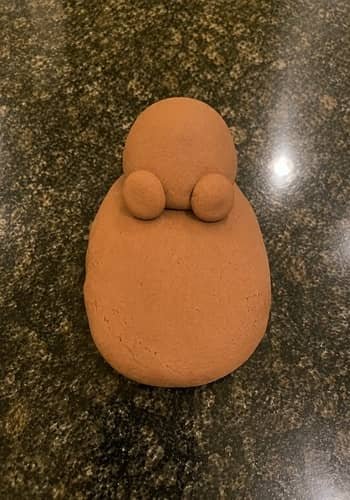
Take another piece of brown foam clay, slightly smaller than the body.
Roll it into a ball first.
Then gently press the lower portion so the shape becomes a little wider near the cheeks.
This is going to be the dog’s head.
Place it over the upper-middle section of the body and press very lightly so it sticks.
Don’t squash the head completely into the body. We want a small raised puppy face.
Now take two tiny pieces of brown clay and make them into flattened oval cheeks.
Attach one on each side of the lower face.
The head should now have a cute, slightly oversized puppy proportion.
That oversized head is intentional because it makes the finished project more kid-friendly and cartoon-like.
Step 3: Add the Floppy Dog Ears
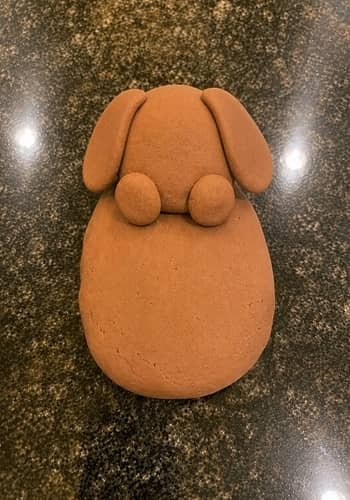
Now the turkey really starts becoming a dog.
Take two pieces of brown foam clay.
Make each piece into a short teardrop or leaf shape using your fingers.
Flatten them slightly.
For a floppy puppy look, make the ears wider at the top and narrower toward the bottom.
Attach one ear to each side of the head.
Let the lower part of each ear hang slightly downward.
Press the top section firmly enough to attach it, but avoid flattening the entire ear.
Want a more playful puppy?
Make one ear slightly more bent than the other.
Kids love this little asymmetry, and it also makes the sculpture feel genuinely handmade rather than factory perfect.
Step 4: Build the Dog Muzzle
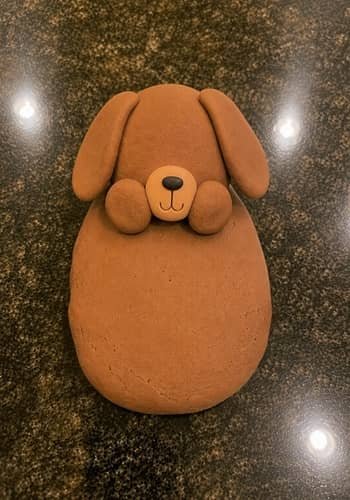
Take a small piece of a lighter color such as tan, beige or light brown foam clay.
Roll it into a tiny ball.
Flatten it slightly into a rounded oval.
Place this oval in the lower center of the puppy’s face.
This becomes the muzzle.
Now take an even smaller piece of black clay.
Roll it between your fingers and flatten it into a tiny oval or rounded triangle.
Place it at the center of the muzzle.
That is the puppy’s nose.
Don’t make the nose huge. A small nose keeps the face balanced.
Next, use a blunt clay tool or toothpick to gently press a short vertical line below the nose.
Add two tiny curved marks on either side if you want a smiling puppy expression.
There you go. The turkey is starting to disappear under its dog disguise.
Step 5: Add the Puppy Eyes
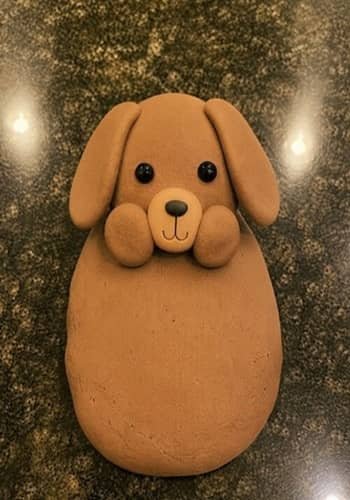
For the eyes, use two very small pieces of black foam clay.
Roll them into matching balls.
Try to keep them roughly the same size.
Place them above the muzzle, leaving enough space between them so the puppy doesn’t look cross-eyed.
Press them gently into place.
For a softer expression, add two tiny white clay dots inside the black eyes.
The white dots are optional, but I really like this detail because it gives the little dog some personality.
Don’t overwork the eyes. Tiny details are easier to control than complicated facial features.
Step 6: Make Four Simple Puppy Paws
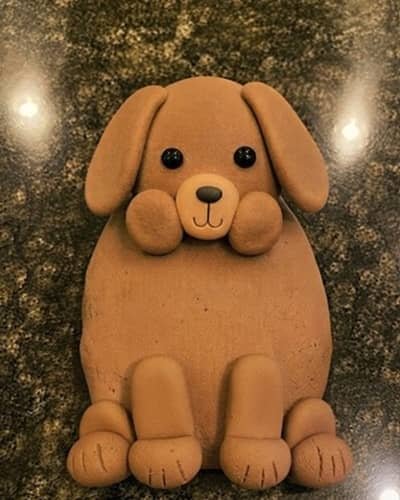
Now let’s give our disguised turkey some dog legs.
Take four small pieces of brown foam clay.
Roll each piece into a short cylinder.
Flatten one end slightly.
Place two pieces along the lower left and lower right sides of the body to represent the front paws.
The other two can sit slightly behind or beside them to suggest the back paws.
Because we’re making a front-facing sculpture, don’t worry about creating realistic legs.
Think cartoon puppy.
Add three tiny lines on each visible front paw with a blunt tool.
Those little marks suggest toes without making the project complicated.
Make sure the paws touch the body firmly.
Step 7: Add the Dog Collar
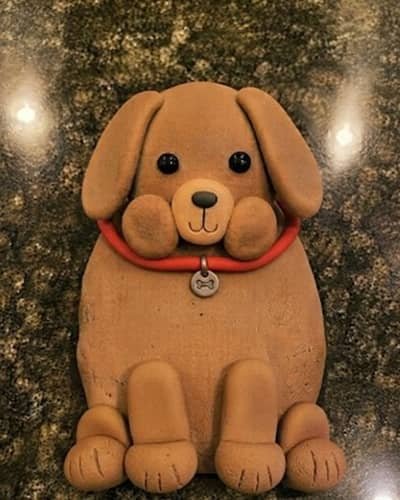
Here is where the disguise becomes much more convincing.
Take a thin strip of red, blue, yellow or any color foam clay.
Roll it gently between your fingers until you have a long, narrow clay rope.
Wrap it across the lower part of the puppy’s neck.
Because the sculpture is front-facing, you only need to show the front portion of the collar.
Press it gently into place.
Now make a tiny yellow or gold clay circle.
Flatten it slightly.
Place it in the middle of the collar as a dog tag.
You can even add a tiny letter or dot using a blunt tool.
The collar doesn’t need to be perfect. Mine would probably be a little uneven too, and that’s perfectly fine for a handmade kids’ project.
Step 8: Let the Turkey Reveal Itself
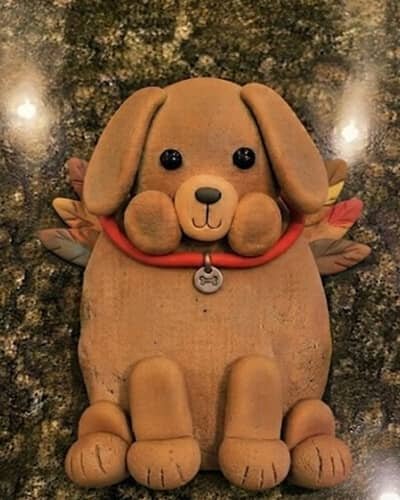
This is my favorite part.
Remember, this isn’t supposed to become an ordinary clay dog.
It is a turkey disguised as a dog.
Take a few small pieces of orange, red, yellow and brown foam clay.
Flatten each into a tiny feather-like shape.
Arrange several of them behind the upper portion of the puppy body so only the tips are visible around the sides of the dog’s head.
Don’t create a giant feather fan.
The feathers should look as though they are accidentally poking out from behind the costume.
That is what makes the camouflage joke work.
You can use three to five feathers.
Keep them small and simple.
Now anyone looking at it should first see a puppy, then notice the turkey feathers hiding behind it.
Step 9: Add One Funny Dog Detail (Optional)
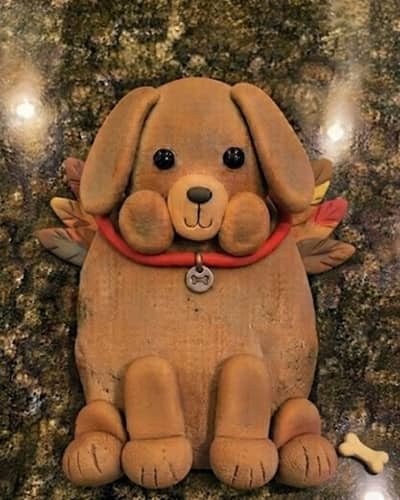
The main sculpture is finished, but I like adding one tiny feature that gives the character its own identity.
Choose just one.
You could add a tiny clay bone beside one paw.
Or make a little white spot on the puppy’s forehead.
Another option is a small brown patch on one ear.
For a Thanksgiving school project, I prefer the tiny bone because it instantly reinforces the dog disguise without covering up the turkey clues.
Make the bone from a very small piece of white or cream foam clay.
Roll it into a thin little tube.
Flatten both ends and pinch each end into a simple rounded bone shape.
Place it near one front paw.
Keep it attached if you want it to remain part of the sculpture.
Few Things You Must Consider
Before moving it, gently inspect every attachment point.
Are the ears secure?
Do the eyes sit properly?
Are the feathers attached enough to stay in place?
If something feels loose, press it gently back into position.
Now leave the sculpture somewhere clean and undisturbed so the air dry foam clay can harden according to the clay manufacturer’s instructions.
Don’t seal or paint it immediately.
Give the clay enough time to dry completely first.
Drying time varies depending on the brand, thickness and room conditions. A thicker sculpture can take considerably longer than thin clay pieces.
Once fully dry, you can add a tiny amount of craft glue to any delicate decorative piece if needed.
And that’s it.
Your turkey has successfully attempted the world’s most adorable puppy disguise.
Helpful Tips for Working With Air Dry Foam Clay
Air dry foam clay is forgiving, but there are a few things worth knowing.
Keep unused clay covered while you’re working. Foam clay can start losing moisture when left exposed for too long.
Use small pieces for details. Tiny eyes, noses and tags are much easier to control when you don’t use too much material.
Don’t make the ears extremely thin. Very thin pieces can be more fragile after drying.
Press attached pieces together gently rather than aggressively squashing them.
If a piece won’t stick, slightly roughen the contact area and press it together again.
Most importantly, don’t rush the drying stage.
A sculpture can feel dry on the outside while thicker sections are still soft inside.
Final Thoughts
I think the best part of a turkey disguise project is not making the prettiest sculpture.
It is making the disguise believable enough that someone has to look twice.
The little turkey feathers hiding behind the puppy are especially useful because they preserve the original character of the project instead of turning it into just another dog sculpture.
Air dry foam clay also gives children room to experiment with shape, size and texture without needing complicated equipment.
If a child’s ears are uneven or the paws don’t match, leave them that way.
Those small imperfections are actually evidence that a child made the artwork, and that is what makes a handmade Thanksgiving craft worth keeping.





