Halloween crafts don’t have to stop at pumpkins, ghosts, and paper bats.
With a little clay, you can build an entire scene that feels like something happened inside a tiny box.
These halloween clay diorama craft projects combine miniature sculpture, storytelling, and simple clay techniques into small scenes beginners can actually make at home.
Think crooked haunted houses, tiny graveyards, potion shops, spooky forests, and creatures hiding behind miniature doors.
The fun part? You aren’t just making a clay figure… you’re creating a Tiny clay world with its own mood and details.
Grab some clay and let’s make these halloween clay diorama crafts wonderfully weird.
1. Crooked Haunted House at Midnight
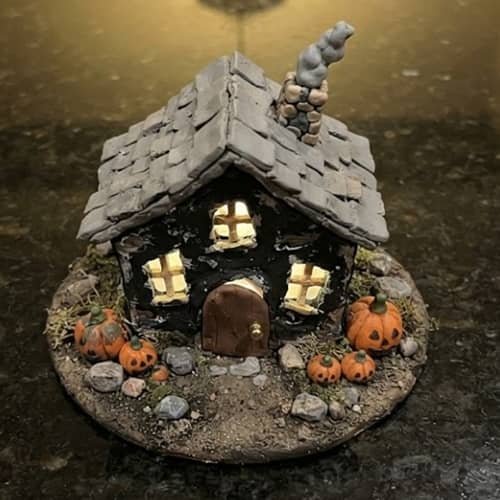
What if a haunted house looked slightly too crooked to be trusted?
For this scene, make a tiny haunted cottage sitting on a dark oval base.
The intentionally uneven shape gives it personality, and you don’t need advanced sculpting skills to pull it off.
What you’ll need:
- Black, gray, brown and white air-dry clay
- A small piece of cardboard or thick clay for the base
- Acrylic paint, if desired
- Craft glue
- Toothpick or blunt sculpting tool
- Small ball tool or the rounded end of a pencil
How to make it:
Start with the base.
Roll dark clay into a ball, flatten it into an oval about 10 to 12 cm wide, and keep it around 5 to 8 mm thick.
For the house, form a chunky rectangular block.
Don’t make it perfectly square; gently lean one side inward so the cottage looks old and slightly unstable.
Flatten a piece of black clay and cut two tiny rectangles for the windows.
Add white or pale yellow clay behind them to imitate an eerie glow.
Now create the roof from two flattened pieces of gray clay. Join them at the top and press the edges gently against the house.
Make a miniature door from brown or black clay.
Add a tiny round clay doorknob and score three or four shallow lines across the door.
For the chimney, roll a small rectangular clay column and place it on one side of the roof.
Add a few thin clay strips around the top for a rough brick effect.
Finally, surround the cottage with tiny gray stones, crooked grass-like clay strips and a miniature pumpkin.
Let the entire piece dry according to the clay manufacturer’s instructions before painting or gluing additional decorations.
Make it unique: Add one tiny window that is slightly open, with a miniature white ghost face peeking through. It turns a basic clay Sculpture into a scene with a story.
2. Mini Graveyard With One Open Grave
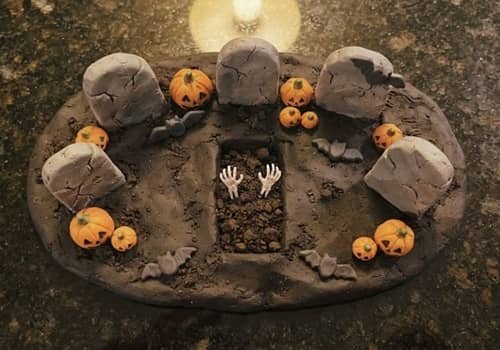
A graveyard is classic Halloween territory, but here’s the twist… make one grave look freshly opened.
Shape a low black or dark-gray clay base first.
Press it flat and keep the surface uneven rather than perfectly smooth.
Create five or six tombstones from flattened gray clay. Cut them into different silhouettes… rounded, pointed and slightly crooked.
Press tiny names, cracks or symbols into the clay with a toothpick.
For the open grave, form a shallow rectangular depression in the base before it dries.
Build a small pile of dark clay around the edges to represent loose soil.
Add two tiny skeletal hands emerging from the opening using thin white clay pieces.
Keep the fingers simple: thin strips divided with tiny cuts work surprisingly well.
Make miniature pumpkins from orange clay by shaping small balls and pressing several vertical grooves into them.
A few tiny black clay bats hovering above the scene can be attached to a thin clay backdrop if your diorama has one.
Make it unique: Instead of filling the cemetery with decorations, leave plenty of empty ground. That negative space makes the open grave the visual focus.
3. Witch’s Potion Shop
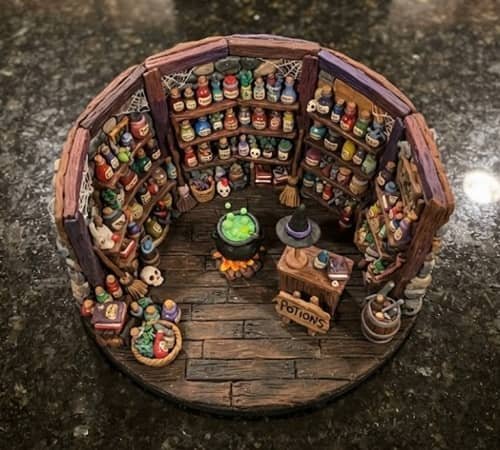
This one feels like a miniature shop from a strange little Halloween village.
Begin by making a rectangular dark clay floor.
Build a tiny shop wall from brown or purple clay, keeping the structure shallow so the front remains visible.
Create a crooked wooden sign using a thin slab of brown clay.
Score wood-grain lines into it and add a tiny clay symbol resembling a moon or star.
Now make potion bottles. Roll tiny colored clay balls, flatten the bottoms and pinch the tops slightly. Add little corks using beige clay.
For bubbling cauldrons, make a tiny black clay bowl by pressing your thumb into a small ball.
Fill the opening with green clay and add several tiny round bubbles.
Create shelves from thin strips of brown clay.
Attach the miniature bottles only after the main clay pieces have dried if you’re using an adhesive that works with your clay.
A tiny witch hat on the counter completes the scene.
Make it unique: Give the shop one oversized potion bottle compared with everything else. It creates a fun visual focal point.
4. Pumpkin Patch With a Tiny Scarecrow
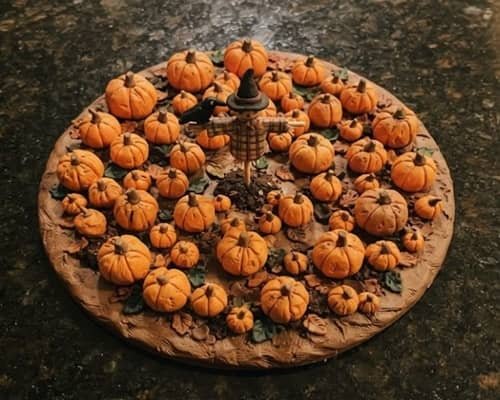
Pumpkin patches become much more interesting when the pumpkins aren’t identical.
Flatten a brown clay base into an irregular oval. Add several orange clay pumpkins in different sizes.
For each pumpkin, roll a ball and gently flatten it.
Use a toothpick to press vertical grooves from top to bottom. Add a tiny brown or green stem.
For the scarecrow, make a small torso from tan or brown clay and attach two thin arms.
Add a tiny head, then press a few shallow lines into it to suggest a straw texture.
The hat is simply a flattened black clay circle topped with a small cone.
Place the scarecrow slightly behind the largest pumpkin. Add three or four tiny clay leaves around the base.
Want more atmosphere? Add a miniature black crow made from two simple clay shapes.
Make it unique: Give one pumpkin a goofy carved expression rather than making every pumpkin spooky.
5. Ghost Hiding Behind a Tiny Door
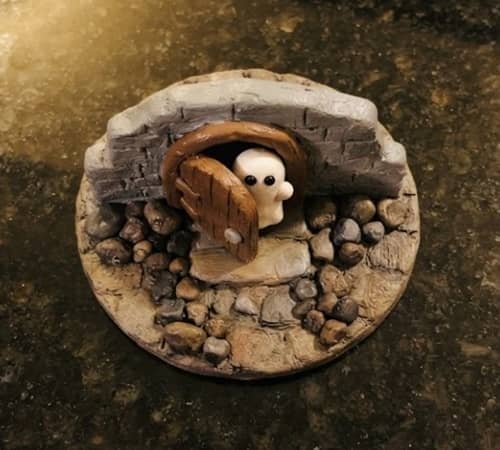
This is a smaller, simpler scene and a great weekend kids craft.
Make a flat rectangular wall from gray or off-white clay. Before it dries, cut a small arched doorway into it.
Create the door separately from brown clay. Score vertical wood lines and add a tiny round knob.
For the ghost, form a small white clay ball and pull the lower section downward.
Gently pinch three or four uneven points along the bottom so it looks like a floating sheet.
Use tiny black clay dots for the eyes.
Position the ghost partially behind the door, as if it is trying not to be noticed.
Add a miniature step beneath the doorway and a few tiny stones around the wall.
Make it unique: Only show half the ghost. The suggestion of something hiding is often creepier than showing the entire character.
6. Spooky Forest With a Glowing Pumpkin
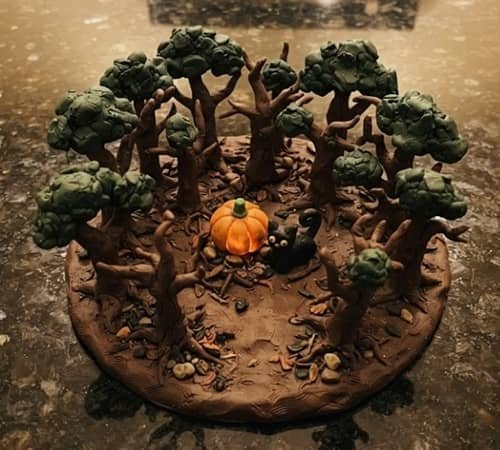
For this scene, the trees matter more than the characters.
Create a dark green or brown clay base. Roll three uneven clay cylinders for tree trunks and press them into the base.
Make branches by splitting thin clay strips and attaching them near the top.
They don’t need to be botanically accurate… the crooked shapes actually look better.
For foliage, pinch small pieces of dark green clay into rough leaf clusters.
Now make one orange pumpkin at the center.
Add a small pale-yellow clay circle or paint the inside of a carved opening to suggest a glow.
Place a tiny black cat beside it.
The cat can be made from a small oval body, round head, four tiny legs and a thin tail. Keep the proportions chunky and simple.
Make it unique: Make the trees lean toward the pumpkin, almost as though the forest is surrounding it.
7. Vampire’s Tiny Castle Entrance
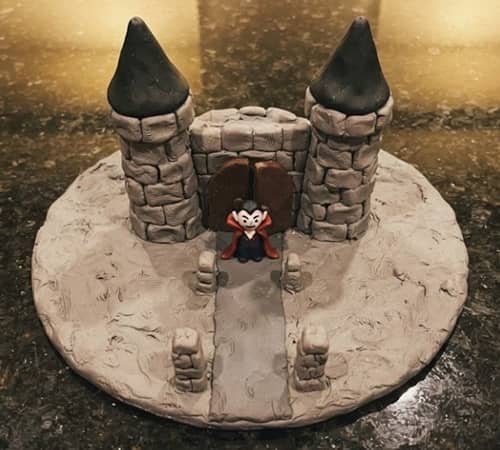
Forget making an entire castle. Just build the dramatic entrance.
Create two chunky gray clay towers and connect them with a central wall. Add a pointed black clay roof to each tower.
For the doorway, press a tall arch into the center wall. Add a dark door behind it.
Make a tiny vampire standing outside using simple clay shapes: black torso, pale face, black hair and a red cape.
The cape can be a thin triangular slab of red clay gently curved behind the figure.
Add two miniature stone pillars at the entrance and a narrow gray pathway.
Tiny cracks pressed into the castle walls make the structure look older without requiring complicated sculpting.
Make it unique: Tilt the vampire’s head slightly instead of making the figure perfectly symmetrical. Small asymmetries make figurative sculpture feel more handmade.
8. Black Cat Sitting on a Moonlit Roof
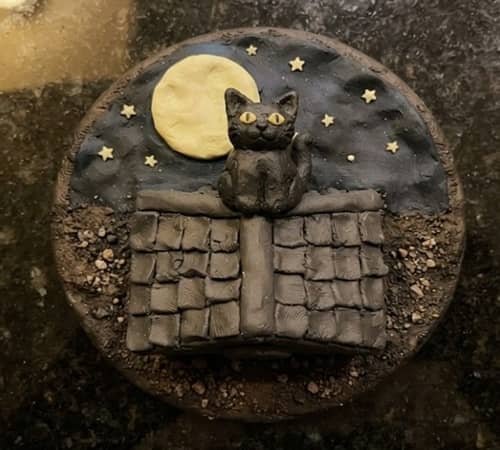
Here’s a scene that uses very few components but still feels atmospheric.
Make a small dark gray rectangular rooftop base.
Add slightly raised clay tiles by pressing thin strips across the surface.
Create a chunky black cat from a small oval body and rounded head.
Add four tiny legs, a tail and two triangular ears.
For the moon, flatten yellow or off-white clay into a circle and position it behind the cat.
If your diorama has a vertical backing, attach the moon there after everything has dried.
Add two tiny yellow eyes to the cat.
A few miniature stars made from tiny clay dots finish the composition.
Make it unique: Make the cat much darker and simpler than the moon so the silhouette does most of the visual work.
9. Tiny Haunted Carnival Booth
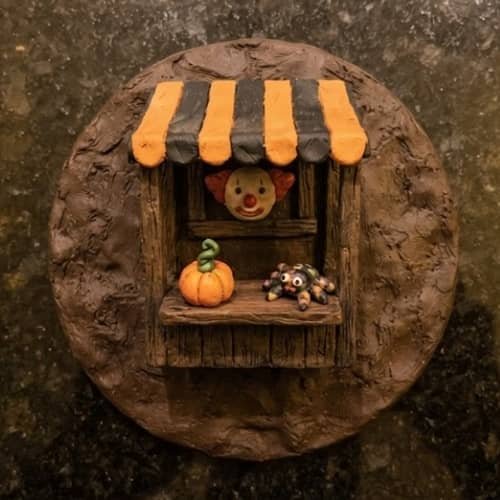
Why should Halloween always happen in a graveyard?
Build a miniature carnival booth from a dark clay rectangular base and two side pillars.
Add a striped roof using alternating strips of orange and black clay.
Create a tiny prize counter with miniature pumpkins, a skull and a few strange little clay toys.
For a creepy carnival sign, flatten a small piece of clay and press letters or symbols into it.
Add one miniature clown head if you like, but keep it deliberately simple: pale face, tiny dark eyes and a crooked smile.
The booth doesn’t need dozens of details. Three or four recognizable objects will make it readable.
Make it unique: Give the booth a “closed” feeling by leaving the counter empty except for one lonely prize.
10. Monster Under the Bed
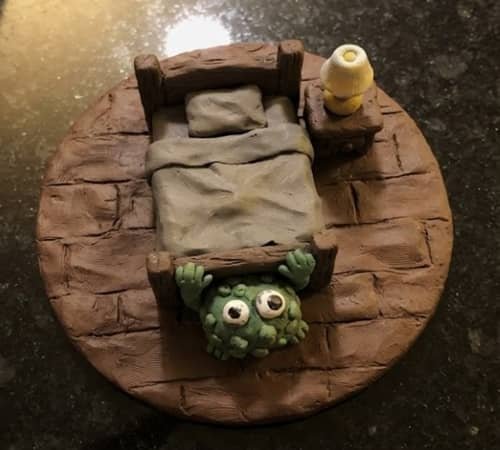
This one turns an ordinary bedroom into a miniature Halloween story.
Make a thin rectangular floor from light brown or gray clay.
Add a miniature bed using four chunky legs, a simple mattress slab and a small pillow.
Keep the bed uncomplicated because the monster needs to be visible.
Create the monster using a rounded body, oversized eyes and tiny arms. Bright green, purple or blue clay works well.
Push the monster partly underneath the bed so only its head, eyes and hands are visible.
Add a tiny bedside table with a miniature lamp made from a clay cylinder and cone.
A couple of small clay stars on the wall can suggest a child’s room.
Make it unique: Make the monster look more curious than frightening. A slightly goofy expression gives the scene personality.
11. Skeleton Digging in a Witch’s Garden
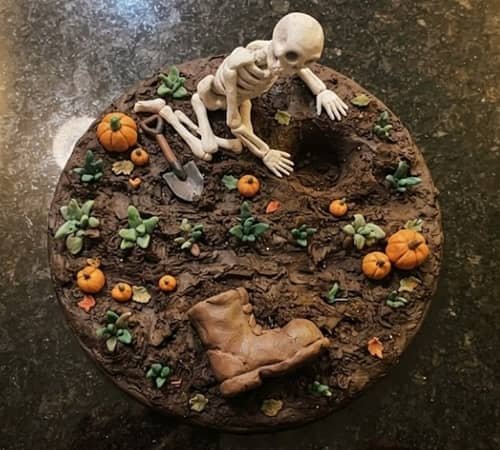
This scene combines a garden and a spooky character without requiring complicated anatomy.
Create a dark brown clay garden bed as the base. Add three or four small clay plants using green stems and simple leaves.
Make a miniature skeleton using white clay.
Keep the body stylized rather than anatomically complicated… round skull, thin torso, two arms and two legs.
Use a toothpick to score simple eye sockets and a tiny mouth.
Position the skeleton leaning forward beside a small hole in the garden.
For the “tool,” avoid adding realistic sharp objects; instead, make a tiny clay gardening spade from a brown handle and gray flattened blade.
Add two orange pumpkins near the plants.
This makes a playful figurative sculpture while keeping the construction beginner friendly.
Make it unique: Give the skeleton one oversized gardening boot. Tiny mismatched details can make handmade scenes much more memorable.
12. The Tiny Monster Bakery
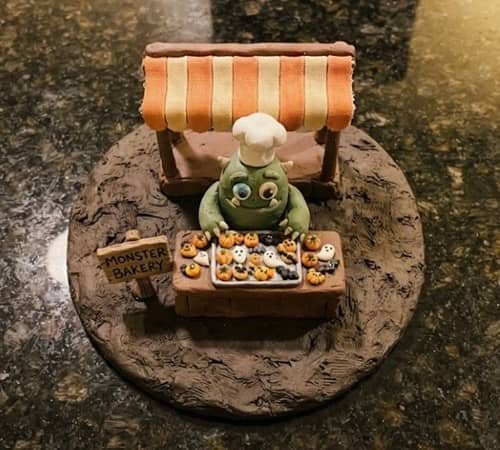
And finally, let’s make Halloween cute.
Create a tiny bakery counter from brown clay. Add a miniature awning made from alternating orange and cream clay strips.
Make small clay cupcakes, cookies and pumpkin-shaped pastries.
Keep them chunky rather than trying to make them perfectly realistic.
For the baker, form a simple monster with a round body, two eyes and a tiny chef hat made from white clay.
The chef hat is easy: make a small white cylinder for the lower band and place a soft, uneven white clay puff on top.
Add a tiny sign above the counter and perhaps one miniature tray of pastries.
If you’re using glue crafts to attach fully dried clay components, choose an adhesive appropriate for your clay type and allow it to cure completely.
Make it unique: Give every pastry a tiny Halloween detail – a bat, pumpkin, ghost or spider… rather than decorating the entire bakery with unrelated objects.
Final Thoughts
The secret to memorable halloween clay diorama crafts isn’t making the most complicated miniature.
It is giving the scene one detail that makes somebody stop and wonder what happened there.
Maybe a ghost is hiding behind a door, a skeleton is gardening, or a monster is quietly baking pumpkin cookies.
That tiny story becomes more important than perfect proportions. If you’re making these as kids craft activities, let the shapes stay wonky… those imperfections are part of the charm.
And remember, clay can shrink or crack depending on its type and thickness, so thin pieces should be handled gently and allowed to dry thoroughly.
Your best Halloween scene might be the one that looks a little strange, a little handmade, and completely yours.





