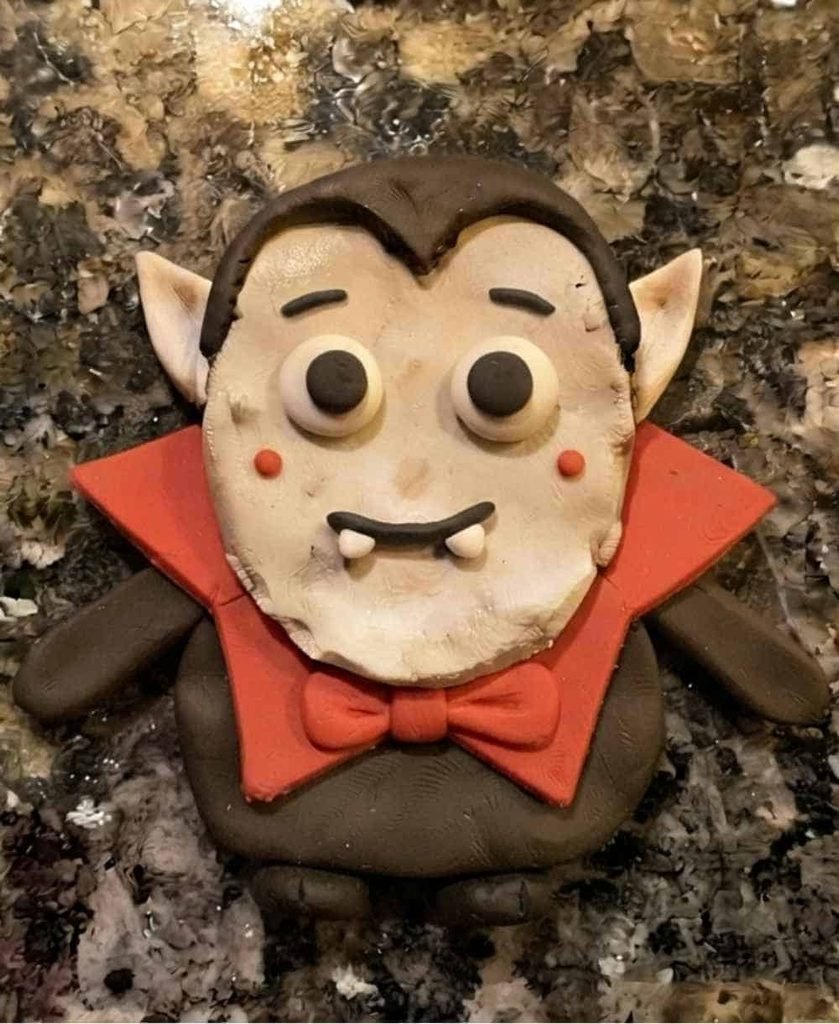
Looking for a Halloween project that feels a little different from the usual paper cutouts? This air dry clay vampire craft is a fun way to turn a simple vampire character into a tiny handmade clay figure.
The result is slightly imperfect, colorful and very kid-friendly.
There are no complicated tools or dangerous materials involved.
Kids can roll, flatten, pinch and press the clay with their fingers. So, ready to make a little Dracula-style character for your October crafts?
What Makes This Clay Vampire Craft Different?
Instead of making a traditional three-dimensional vampire with a large body, we are creating a small, flattened clay character.
That is important.
The attached paper design has a very simple silhouette, so making a bulky clay figurine would completely change its personality.
I would rather preserve the original look and let the clay texture become the interesting part.
Think of it as turning a paper craft into a tiny handmade clay plaque.
The vampire will have:
- A pale oval face
- Two pointed ears
- Black swept-back hair
- Large simple eyes
- Tiny vampire fangs
- A black-and-red outfit
- A small red bow/tie detail
- A slightly flattened body
- Handmade fingerprints and tiny imperfections
This makes it suitable for vampire crafts for kids, Halloween arts and crafts, and even simple preschool Halloween crafts with adult supervision.
Materials Needed To Make Clay Vampire
You don’t need a huge craft box for this.
Clay
Use kid-friendly air dry clay in:
- White or very light gray
- Black
- Red
- Small amounts of pink
- Tiny amount of another light color for the eyes, if needed
Choose a non-toxic, child-friendly air-dry clay suitable for the child’s age.
Other Supplies
You can also keep these nearby:
- A clean plastic mat or smooth work surface
- Small cup of water
- Rolling pin or smooth bottle
- Toothpick only if an adult is handling it
- Blunt clay tool, if available
- Pencil for an adult to help with tiny markings
- Paper towel
For younger children, skip sharp tools completely. Most of this DIY clay project using air dry clay can be done with fingers.
How To Make An Air Dry Clay Vampire
Step 1: Make The Basic Vampire Head
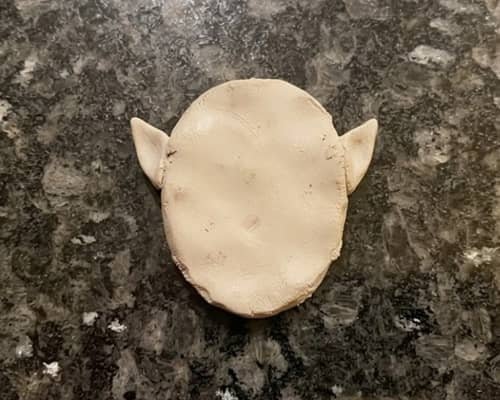
Start with the face because everything else will be built around it.
Take a piece of white or very light gray air dry clay. Roll it gently between your palms until you have a smooth ball.
Now place the ball on your work surface.
Press it down carefully with your fingers.
Don’t flatten it completely. We want a slightly thick oval shape, around the thickness of a small cookie.
Use your fingers to stretch the top and bottom slightly until the face becomes an upright oval.
Here’s a little trick I like: don’t try to make it perfectly symmetrical. A tiny difference between the two sides actually makes the finished vampire look more handmade.
Add The Ears
Take two tiny pieces of the same clay.
Roll each into a small ball, then pinch one end to create a triangle.
Each upper side of the cranium should have one triangle attached to it.
Press the clay gently where the ear meets the face. Blend the connection with your fingertip.
The ears should point diagonally upward.
Step 2: Build The Black Vampire Hair
Now comes one of my favorite parts.
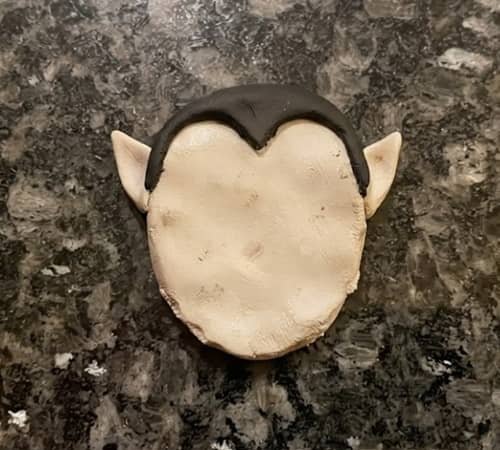
Take black air dry clay and roll it into a thin piece.
You don’t need a perfectly smooth sheet. A little roughness actually works beautifully here.
Flatten it with your fingers or a small rolling pin.
Cut or pinch the clay into a simple hair shape that is wider at the top and slightly uneven along the bottom.
Place it over the upper portion of the vampire’s head.
Leave the lower half of the pale face visible.
For the hairstyle, create a small pointed section in the middle of the forehead. This gives the character that instantly recognizable vampire look.
Press the black clay gently against the white clay.
Don’t push too hard or the hair will lose its shape.
Step 3: Add The Eyes And Face
Time for the personality.
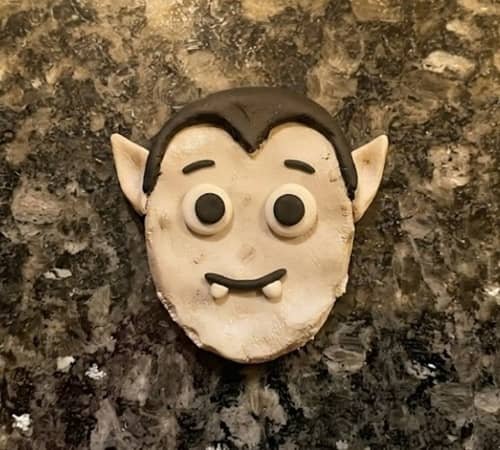
Take two tiny pieces of white clay and flatten them into little circles or slightly oval shapes.
Place them on the face.
Then add two smaller black clay dots in the centers.
Press them gently.
Keep the eyes fairly large. This makes the vampire look cute instead of scary.
For the eyebrows, use extremely thin black clay pieces.
Add a small mouth using a thin black clay strip.
The mouth doesn’t need to be perfectly straight.
Actually, don’t make it too perfect.
A slightly wonky smile gives this air dry clay vampire craft its handmade character.
Add The Fangs
Take two tiny pieces of white clay.
Roll each into a very thin cone.
Flatten the top slightly and attach the two tiny fangs underneath the mouth.
Keep them small and rounded at the tips.
We want a cute Halloween vampire, not sharp-looking teeth.
Step 4: Make The Black Body
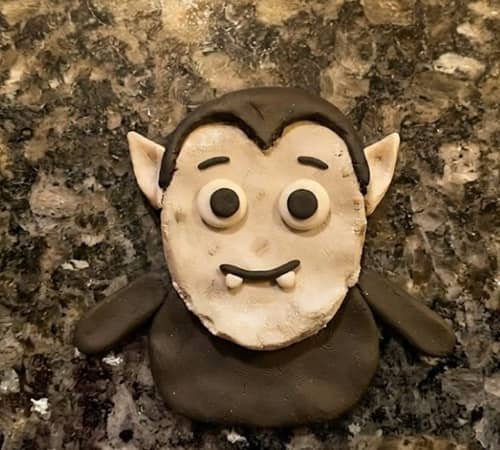
The body is much easier than it looks.
Take black air dry clay and roll it into a ball.
Flatten it between your fingers.
Shape it into a simple rounded trapezoid.
The shoulders should be slightly wider than the bottom.
Place the body underneath the head.
Press the two pieces together lightly.
Don’t completely flatten the head into the body. We want the head to remain visually separate.
Now create two small black clay arms.
Roll two short pieces of clay into little sausages.
Flatten them slightly.
Put one arm on each side of the body.
Make the arms point downward or slightly outward.
That keeps the character close to the shape of the original paper vampire.
Step 5: Add The Red Vampire Collar
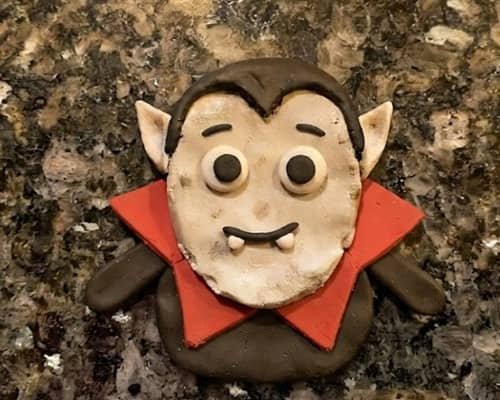
This is where the character really starts looking like a vampire.
Take red clay and flatten it into a thin sheet.
Pinch or cut two small triangular pieces.
Place one triangle on either side underneath the vampire’s chin.
These become the dramatic red collar.
Press the top edges gently against the black body.
Leave the bottom edges pointed.
You can make one side slightly larger than the other. That’s completely fine.
In fact, that tiny imperfection makes the craft look much more believable as a child’s clay craft.
Note: You can either make the collar first, then attach it to the face and then attach the body or follow this sequence, but in this case I had to attach the collar first and then the body so that the fitting looks nice.
Step 6: Create The Red Bow Or Tie
Take a tiny piece of red clay.
Split it into two equal pieces.
Flatten both.
Shape each into a small rounded triangle or bow loop.
Place them beside each other in the center of the black body.
Add an even smaller ball of red clay in the middle.
Press gently.
If your child finds this difficult, don’t worry about creating a perfect bow. A simple red clay circle in the center works too.
The important thing is that there is a bright red detail against the black outfit.
Step 7: Give The Vampire His Final Details

Let’s add a few tiny details without making the project complicated.
Use a very thin piece of black clay to create tiny shoe shapes at the bottom.
Or simply add two small flattened black ovals.
You can also add two tiny red dots to the cheeks if you want a slightly friendlier vampire.
I wouldn’t add too many details.
Why?
Because the charm of this design comes from its simplicity.
If you’re doing this as one of your October crafts, this is also a good point to let children personalize their vampire.
Maybe he gets a purple bow. Maybe his hair is blue. Maybe he has a tiny pumpkin beside him.
That’s where an ordinary vampire craft becomes their craft.
Step 8: Let The Clay Vampire Dry
This part needs patience.
Place your finished vampire on a clean, flat surface.
Let it dry according to the instructions provided with your particular air-dry clay.
Don’t put it in an oven unless the clay manufacturer specifically says that it is oven-safe and designed for baking. Most air-dry clay simply needs time exposed to air.
Try not to move the vampire around while the clay is drying.
If the figure is thicker than expected, it may take longer to dry in the center.
Check it only after the recommended drying period.
Once completely dry, the clay should feel firm rather than cool and soft.
A Few Kid-Friendly Tips
Don’t overwork the clay
Air-dry clay can become difficult to handle when repeatedly squeezed and reshaped.
Make the basic shape first.
Then add details.
Keep the pieces fairly flat
This design works best as a shallow clay character rather than a thick figurine.
It also makes drying easier.
Don’t worry about fingerprints
Normally we’d try to remove fingerprints.
Here, I wouldn’t.
Those little marks are part of the charm.
Use a tiny amount of water
If your clay allows it, slightly damp fingers can help smooth rough edges. But don’t soak the clay. Too much water can make the surface mushy and weaken small details.
Adult help for tiny details
Younger children can do almost everything with their fingers. If a tool is needed for a tiny mark, have an adult handle it.
Final Thoughts
What I like most about this air dry clay vampire craft is that it doesn’t depend on perfect sculpting skills.
The original character is simple enough that children can concentrate on basic clay techniques – flattening, pinching, rolling and joining pieces – rather than trying to sculpt a complicated figurine.
That’s actually useful for beginners because they learn how different clay thicknesses behave while drying.
Keeping the vampire relatively flat also reduces the problem of heavy pieces pulling away from the face or body.
And those little fingerprints? Keep them. For a kids’ October craft, the slightly uneven surface is proof that a child actually made it, and that handmade quality is often far more charming than a flawless store-bought finish.





