Halloween crafts have this amazing way of turning an ordinary afternoon into something creative and memorable.
If you’re looking for an air dry clay bat craft that’s beginner friendly, budget friendly, and surprisingly fun to make, you’re in the right place.
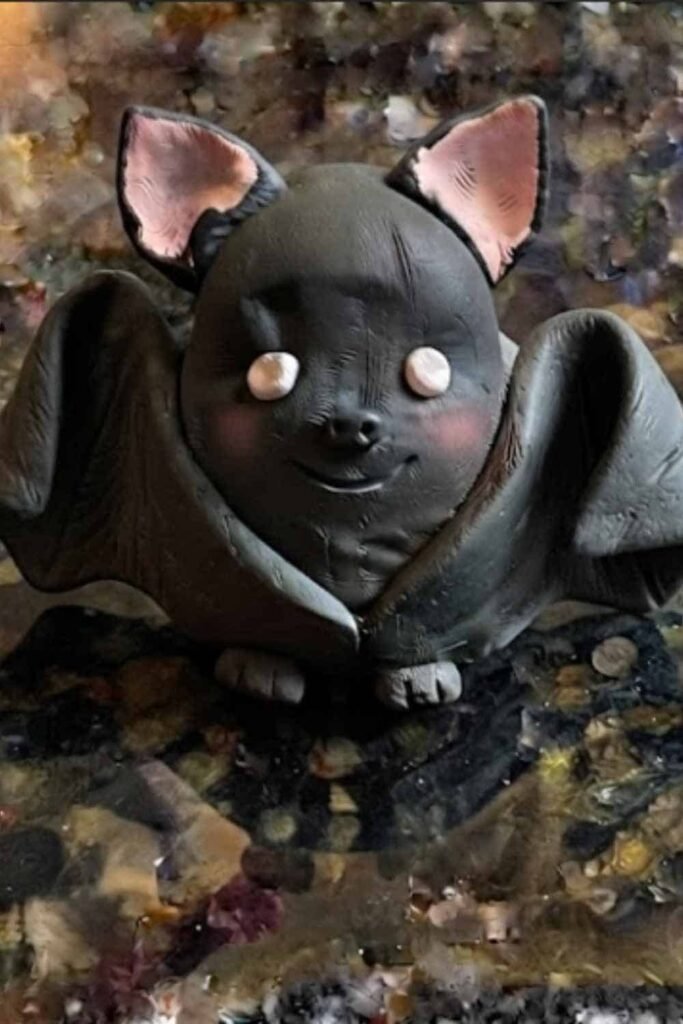
This little bat doesn’t need fancy sculpting skills or expensive tools.
Just a handful of supplies, a bit of patience, and you’ll have a charming little bat that’s perfect for Halloween decorations, shelf displays, or even handmade gifts.
Whether you’re crafting with kids, planning Halloween craft ideas, or simply love experimenting with air dry clay, this tutorial walks through every tiny detail so you can create a bat you’ll actually be proud of.
Materials Needed To Make Air Dry Clay Bat
Keep everything within reach before you start. It makes the entire project smoother.
- Black air dry clay (or white clay if you plan to paint it)
- Small amount of white air dry clay (optional for eyes)
- Acrylic paint (black, white, pink)
- Fine paintbrush
- Clay sculpting tool or butter knife
- Ball stylus or rounded pen cap
- Toothpick
- Small bowl of water
- Soft paintbrush
- Sandpaper (600 to 800 grit)
- Matte acrylic sealer (optional)
- Non-stick work mat
Step 1: Shape the Bat’s Round Body
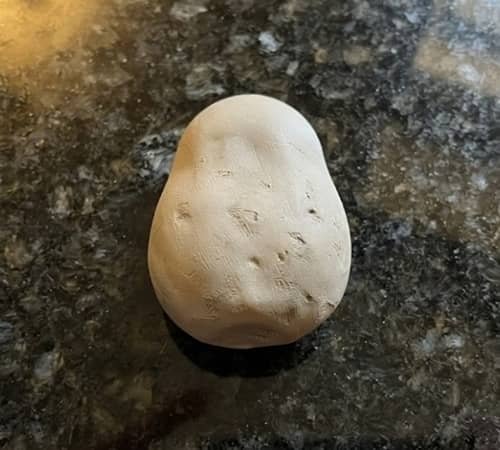
Start with a ball of air dry clay roughly the size of a golf ball.
Roll it between your palms until the surface feels smooth with no visible seams.
Now gently roll only one end against your work surface while applying very light pressure. You’re creating a soft teardrop instead of a perfect sphere.
Stand it upright.
The wider section becomes the body.
The narrower rounded end becomes the head.
Avoid making the head too pointed. Real bats have surprisingly rounded faces, and keeping those curves makes your finished air dry clay bat craft look much friendlier instead of scary.
Now press very gently around the middle using your fingertips. This creates a subtle shoulder area where the wings will later attach.
Take your sculpting tool and lightly mark a vertical center guideline from forehead to belly. Don’t carve deeply. It’s simply there to help keep every feature symmetrical.
Look from every direction.
Turn it.
Rotate it again.
Does one side look fatter?
Fix it now instead of later because once the wings go on, reshaping becomes much harder.
Spend another minute smoothing every fingerprint with a damp finger.
Those sixty seconds really pays off later.
Step 2: Create the Face That Gives Your Bat Personality
This is where everything changes.
A few tiny details can completely change the bat’s expression.
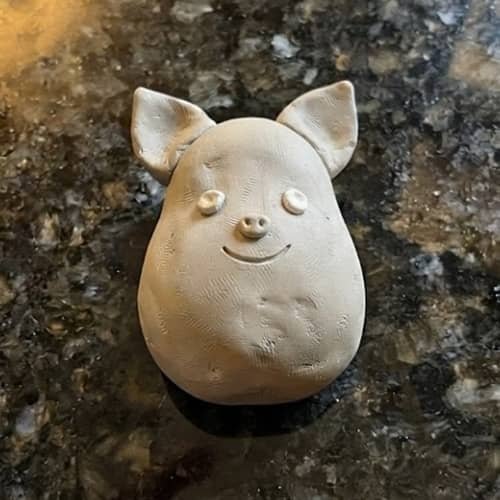
Using your thumb, gently flatten the front of the head just a little. This creates a face without making it look squashed.
Next, use a rounded stylus to press two shallow eye sockets. Keep them evenly spaced. They shouldn’t be deep holes. Just enough to seat the eyes.
Roll two tiny balls of white air dry clay.
Really tiny.
About the size of peppercorns.
Place one inside each socket and gently press until secure.
Roll two even smaller black clay balls for pupils.
If you don’t have black clay, you’ll paint them later.
For the nose, roll one tiny oval.
Flatten it slightly.
Attach it in the middle below the eyes.
Using a toothpick, poke two little nostrils.
That’s honestly enough.
Don’t overwork the nose.
Smile?
Absolutely.
Use the edge of a sculpting tool to draw a tiny curved smile beneath the nose. Keep it shallow. Deep cuts can widen while drying.
Now let’s add ears.
Roll two equal clay balls.
Shape each into a soft triangle.
Pinch only the top corner.
Leave the base thick.
Brush a tiny bit of water onto each attachment point and blend the base into the head with your fingertip. The transition should look natural instead of pasted on.
Finally, press a very gentle indentation inside each ear using your stylus.
Suddenly it looks alive.
That’s always my favorite moment during any clay craft.
Step 3: Build the Wings Without Making Them Too Heavy
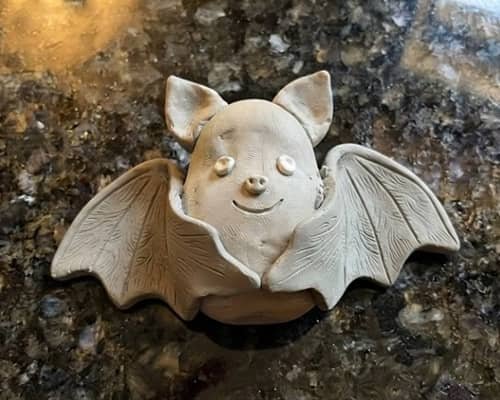
The wings are what make this air dry clay bat craft instantly recognizable.
They also happen to be the easiest part to accidentally overdo. Thin wings look elegant, but paper-thin clay can crack.
Extra-thick wings, on the other hand, make the bat look bulky. Aim for something right in the middle.
Take a fresh piece of air dry clay about the size of a large walnut.
Roll it into a smooth ball first.
Now flatten it gently with your palm until it’s about ⅛ inch (3 mm) thick.
If you have an acrylic roller, use it. If not, a smooth drinking glass works surprisingly well.
Using your sculpting knife, divide the clay into two equal halves. These become the left and right wings.
Each half should resemble a rounded triangle.
Don’t worry about getting them perfect immediately.
Place one wing beside the body and imagine how a resting bat folds its wings around itself.
Instead of stretching them completely outward, let them curve slightly downward.
This creates a softer, cuter silhouette that’s much more beginner friendly.
Now create the signature bat wing shape.
Starting from the outer edge, cut three smooth scallops. Think of drawing gentle “U” shapes instead of sharp zigzags.
Rounded curves look cleaner and are much less likely to chip after drying.
Next comes a tiny detail that makes a huge difference.
Using the blunt edge of your sculpting tool, lightly press three thin lines from the top of the wing toward each scallop.
These become the wing membranes. Don’t cut into the clay. You’re simply suggesting the structure rather than carving it deeply.
Brush a very small amount of water where the wings will attach.
Press one wing against each shoulder.
Now blend only the front edge into the body using your fingertip or silicone tool.
Leave the outer portion free.
That slight lift creates natural depth and makes the bat appear much less flat.
Look straight down.
Do both wings angle the same way?
If not, adjust them before the clay starts drying.
This little pause saves you from staring at a lopsided bat later wondering how it happened.
Step 4: Add Tiny Feet and Give the Bat More Character
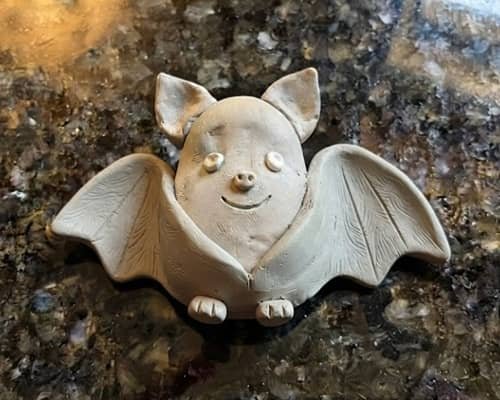
At this stage, your bat already looks recognizable.
Now we’re adding the details that quietly make people stop and take a second look.
Roll two tiny clay balls.
Really tiny.
About the size of dried peas.
Shape each into a short teardrop.
Flatten one side slightly so it sits comfortably against the bottom of the body.
Using your sculpting knife, make three tiny cuts at the wider end.
Those become little toes.
Pinch each toe just enough to create miniature claws without making them needle sharp.
Attach both feet underneath the body with a touch of water.
The bat should still sit upright without wobbling.
If it rocks from side to side, gently flatten the underside before the clay firms up.
Now let’s add a little personality.
Roll an extremely thin clay snake, roughly the thickness of spaghetti.
Cut a short piece and curve it beneath the smile.
This creates slightly puffier cheeks.
It’s subtle.
Most people won’t even notice why the face feels cuter.
They’ll just know it does.
Want an even more playful look?
Lift one wing just a little higher than the other before the clay dries. It gives the impression that the bat is about to wave.
Small imperfections actually helps handmade crafts feel more charming, so don’t chase machine-level perfection.
Finally, dip a soft paintbrush in clean water and gently glide it across the entire sculpture.
This blends tiny seams, softens fingerprints and smooths transitions without removing the sculpted details you’ve worked so hard to create.
Set the bat aside on a flat surface for 24 to 48 hours, turning it over once after the first day if needed so both sides dry evenly.
Drying time may vary depending on your room’s humidity and the thickness of the clay.
Your air dry clay Halloween craft is finally beginning to look complete.
It’s amazing how a few tiny additions completely transform the project.
Step 5: Let It Dry, Then Paint Every Little Detail
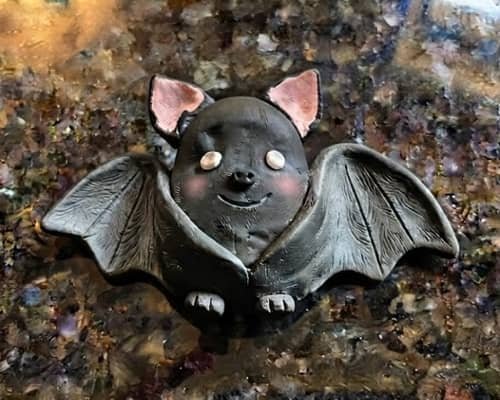
You’ve done the sculpting. Nice work.
Now comes the part that really brings your air dry clay bat craft to life.
Don’t paint it yet if the clay still feels cool to the touch.
That’s usually a sign there’s still moisture trapped inside. Painting too early can seal that moisture in, which may lead to tiny cracks later.
Once the bat is completely dry, gently run your fingers across the surface.
Feel any rough spots?
Use a piece of 600-800 grit sandpaper and lightly smooth those areas.
You don’t need to sand the entire bat… just the places that need a little attention. Brush away the dust with a soft, dry paintbrush.
If you used white air dry clay, begin with a thin coat of black acrylic paint.
Thin coats always beat one thick coat because they preserve all those tiny details you spent time sculpting.
Let the first coat dry completely.
Then apply a second coat if needed.
Now for the fun part.
Paint the inside of the ears a muted pink instead of bright bubblegum pink. It feels much more natural.
Add tiny white highlights to each eye.
Seriously, don’t skip this.
Those tiny dots instantly make the bat look awake and full of personality.
If you’d like a softer Halloween look rather than a spooky one, dry-brush a little dark gray across the wings.
Dip a nearly dry brush into gray paint, wipe most of it off on a paper towel, then lightly brush across the raised wing lines. The texture suddenly pops.
Want to make it extra cute?
Use a tiny amount of blush pink on the cheeks.
Just enough.
Not clown cheeks.
If you’re making this with kids or using it as one of your favorite clay projects for kids, let everyone customize their bat with different eye shapes, tiny bows, miniature pumpkins, or even little witch hats. Each bat will end up with its own personality, and that’s half the fun.
When every painted layer is completely dry, brush on a thin coat of matte acrylic sealer.
This helps protect the finish from dust and light scratches. It’s especially useful if the bat will sit on a shelf every Halloween.
Step 6: Display Your Bat or Turn It Into Something Useful
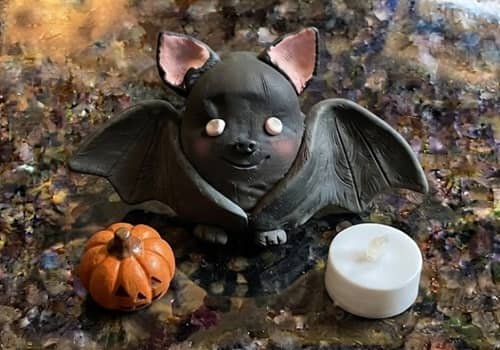
Your bat is finished.
But don’t stop there.
A handmade piece like this deserves a purpose beyond sitting in a drawer until next October.
Glue a small magnet to the back and you’ve got a Halloween refrigerator magnet that people will actually notice.
Attach a ribbon loop before sealing it and it becomes a lightweight tree ornament for a Halloween display.
Making several?
Create a whole colony using slightly different ear sizes, wing positions, and facial expressions.
One could be sleepy. Another could have tiny fangs. A third might be holding a miniature pumpkin made from orange clay.
If you’re decorating for Halloween, place the finished bats on floating shelves alongside faux moss, battery-operated candles, and small wooden haunted houses.
Keeping the color palette mostly black, charcoal, and muted orange creates a cleaner display than filling every corner with bright decorations.
These also make adorable handmade gifts for classmates, teachers, or neighbors.
If you’re crafting with a preschool group, simplify the project by preparing the bodies ahead of time and letting children attach the ears, wings, and eyes themselves.
The finished bats will still feel personal while keeping the activity manageable.
You can even use the same sculpting method to create a tiny fondant bat for cake inspiration… not with air dry clay, of course, but the shapes and proportions translate beautifully if you ever work with edible decorating materials.
One thing I love about this DIY project is how adaptable it is. Change one little detail and suddenly you’ve created a completely different bat without learning a brand-new sculpting technique.
Final Thoughts
One of the best things about working with air dry clay is that every small fingerprint, gentle curve, and tiny imperfection quietly tells the story of the person who made it.
That’s something a factory-made decoration can never copy.
Once you’ve learned how to build this bat, you’re also learning the foundation for dozens of DIY air dry clay Halloween ideas… from owls and ravens to ghosts, pumpkins, and black cats.
Instead of chasing perfection, focus on understanding simple shapes and proportions.
Those skills stay with you long after Halloween is over, and they’ll make every future spooky craft feel a little easier and a lot more rewarding.





