I love craft projects that look a little magical but don’t need a huge pile of supplies. This air dry clay moon phase wall hanging is one of those projects.
Instead of simply lining up seven moons, we’re turning the phases into a small celestial display with texture, a blue full moon, tiny stars and a soft hanging cord.
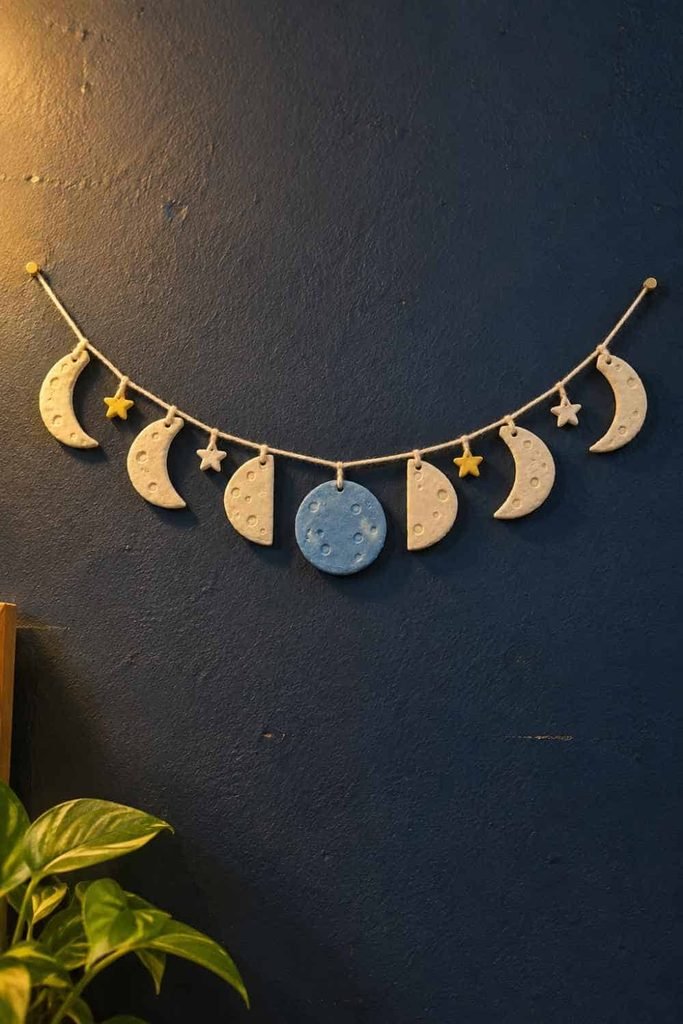
It feels handmade, slightly imperfect and honestly much more interesting than store-bought wall decor.
Kids can make most of it with very little help, making it a lovely weekend kids craft or one of those relaxing clay activities for a rainy afternoon.
What Makes This Air Dry Clay Moon Phase Wall Hanging Different?
The fun twist is the “night-sky story” layout.
Rather than making seven identical flat pieces, we’ll give each moon phase its own tiny character.
The waxing moons get subtle crater marks, the full moon becomes a soft blue moon craft, and small clay stars sit between a few phases.
The finished piece can work as:
- A kids room decoration
- A celestial aesthetic decor piece
- A classroom astronomy craft
- A handmade gift
- A piece of clay wall decor
- A simple product idea for selling crafts
And yes, it can even become a cute DIY crescent moon dreamcatcher variation if you replace the hanging layout with a circular hoop.
Choose Your Air Dry Clay Type
Regular Air Dry Clay | Cornstarch Clay | Homemade Clay
Affiliate Disclaimer: Some of the links in this post may be affiliate links, which means I may earn a small commission if you choose to make a purchase through them – at no extra cost to you. I only share products that genuinely fit this project and can help make your ceramic mug clay craft process easier and smoother. Your support helps keep ideas like this coming.
Materials Needed To Make Air Dry Clay Moon Phase Wall Hanging
Keep the supplies simple. That is part of the charm.
For the clay
- Air dry clay
- Blue air dry clay, or white clay with child-safe blue paint
- Small amount of yellow, white or cream clay for stars
- Rolling pin or smooth bottle
- Baking parchment or a clean plastic sheet
- Plastic drinking straw
- Blunt plastic modeling tool
- Pencil
- Small piece of cardboard for templates
- Ruler
For decorating and hanging
- Child-safe acrylic or poster paint, if your clay needs painting
- A small paintbrush
- White paint or a white paint marker suitable for the finished clay
- Cotton yarn or soft craft cord
- Glue suitable for crafts
- Pencil or skewer substitute for making holes, used by an adult if the tool is sharp
Safety note: Choose air-dry clay that is specifically labeled suitable for children. Follow the manufacturer’s drying and handling instructions. Younger children should have an adult handle anything sharp and supervise painting and gluing. Don’t use tiny beads or other loose miniature decorations around very young children.
Step 1: Plan the Moon Phase Layout
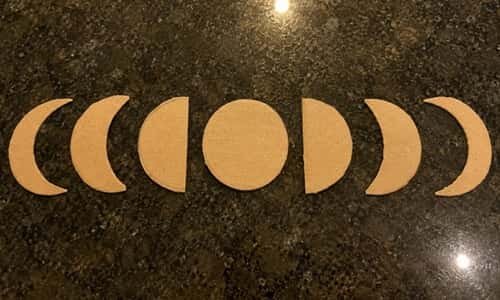
Before touching the clay, decide how your finished hanging will look.
For beginners, I recommend making seven moon pieces representing the familiar sequence:
- New Moon
- Waxing Crescent
- First Quarter
- Waxing Gibbous
- Full Moon
- Waning Gibbous
- Last Quarter
You don’t need to make the New Moon as a completely invisible piece. Instead, make a small dark circular clay disc and decorate it very minimally.
Draw seven circles on cardboard. Keep them around 4 to 5 cm wide.
They don’t have to be perfectly round. In fact, a little variation will make the finished piece feel handmade.
Now arrange the cardboard circles on your work surface before making anything.
Step 2: Roll Out the Air Dry Clay
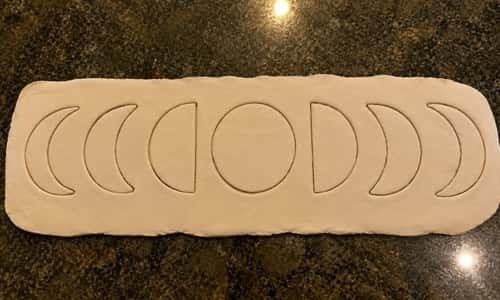
Take a manageable piece of air dry clay and knead it gently between your hands.
Don’t overwork it.
Place it on parchment or another clean non-stick surface and roll it until it is roughly 5 to 7 mm thick.
Try to keep the thickness fairly even because very thin clay can become fragile after drying.
If the edges crack while rolling, gently press them together with your fingertips.
That little crack isn’t a disaster.
Use the cardboard circle as a guide and gently mark seven circles into the clay.
Leave enough space between each shape so they can be separated without stretching the clay.
Cutting isn’t necessary for kids. An adult can help separate the pieces, or children can use a blunt plastic modeling tool designed for clay.
Step 3: Create the Seven Moon Shapes
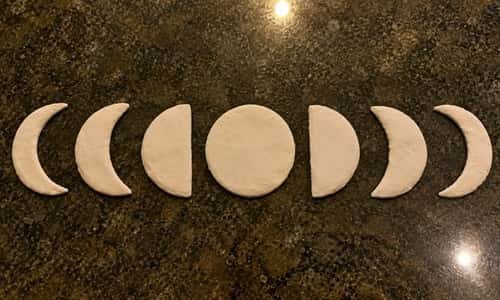
Now comes the most interesting part.
Remove the excess clay around your circles. Keep the seven round pieces on the work surface.
For the new moon, keep the circle almost plain.
For the crescent, gently remove one curved section from one side.
For the quarter moon, keep approximately half of the circle.
For the gibbous moon, remove a smaller curved section.
For the full moon, leave the complete circle.
You don’t need mathematical perfection here. The goal is to create recognizable phases, not make seven pieces that look factory-made.
Lay them back in order.
Check them from left to right.
Does the moon appear to be growing toward the middle and shrinking afterward? Perfect.
Step 4: Add the Handmade Crater Texture
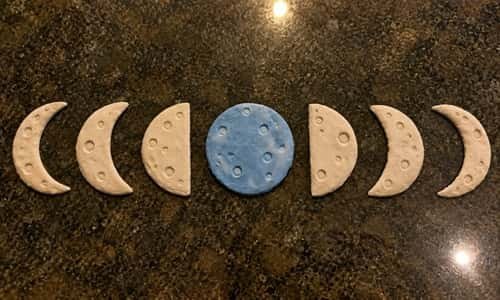
This is where I like to make the craft look less flat.
Take a blunt modeling tool or the rounded end of a suitable child-safe clay tool and press small shallow dents into the moon surfaces.
Don’t make perfect circles.
Some should be tiny. Some can be slightly larger. A few can overlap.
For the blue full moon, add a few deeper-looking impressions around the surface. Keep them shallow so they don’t weaken the clay.
The little dents makes each moon look much more interesting once the light hits it.
Don’t cover everything with texture. Leave plenty of smooth clay showing.
And here’s my favorite part.
Instead of making every moon white, turn the full moon into a muted blue moon craft.
If you’re using white air dry clay, wait until it is dry before painting it. If you’re using colored clay, simply use the blue clay for this particular moon.
Don’t choose an extremely bright blue. A soft dusty blue, muted navy or slightly gray-blue gives it a more celestial feel.
Once dry, add a few small pale marks to the blue moon’s surface.
You can use white paint to highlight two or three crater areas.
Now it becomes the visual center of the hanging.
It almost looks like a tiny moon photographed through a bedroom window.
Step 5: Make Tiny Clay Stars
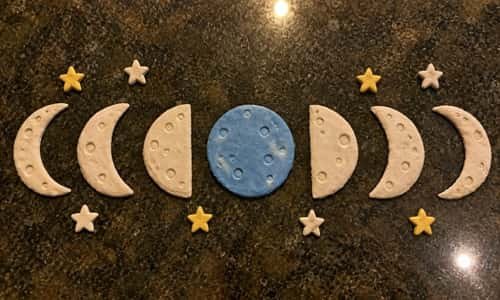
We don’t need dozens of stars.
Make around five or six tiny star shapes from yellow or cream clay.
For children, the easiest method is to flatten a tiny ball and gently pinch four or five points with fingers. They don’t need to look like perfect cartoon stars.
Make two slightly larger stars and several smaller ones.
Keep them reasonably sized so they are not fragile.
Flatten the back of each star slightly. This will help them sit against the hanging cord later.
Step 6: Add Hanging Holes Before the Clay Dries
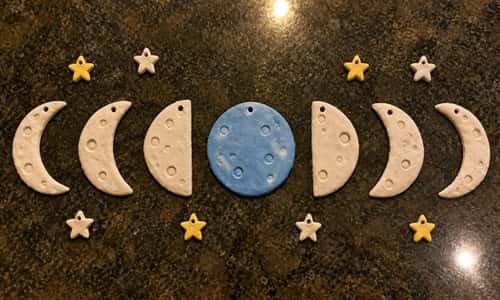
This step is important.
Before the clay completely hardens, make one small hole near the top of each moon.
Don’t place it too close to the edge. Leave roughly 5 mm of clay around the hole.
For the stars, you can either make tiny holes or glue them onto the cord later.
I prefer gluing the stars because it keeps the project easier for little fingers.
If the clay has already become hard, don’t force a hole through it. That can crack the piece. Instead, glue the finished moon pieces to a stronger backing cord arrangement.
Let everything dry completely according to the clay manufacturer’s instructions.
Drying time varies depending on the clay, thickness and room conditions.
Step 7: Build the Celestial Hanging Cord
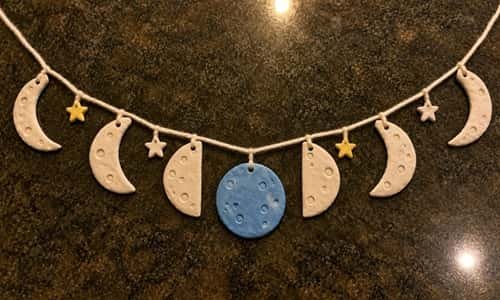
Once everything is fully dry, cut one longer piece of soft cotton yarn for the main hanging line.
Then cut seven shorter pieces.
Tie one moon phase onto each shorter cord.
Keep the full blue moon slightly lower than the others. This creates a gentle crescent-shaped visual flow rather than a rigid straight line.
I like the arrangement to look slightly uneven.
The first and last moons can sit higher. The center moon can hang lower. The smaller stars can sit between two moon pieces.
This creates movement when the wall hanging is displayed.
For the knots, an adult can add a small amount of craft glue to the back once everything is positioned.
Step 8: Hang It
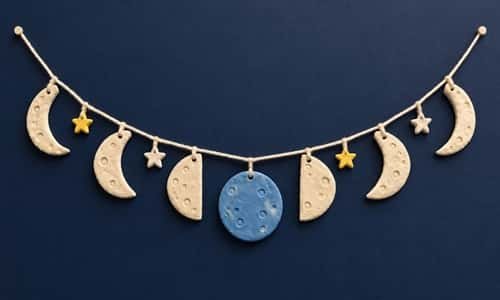
Once you are done with the 7 easy steps mentioned above, it’s time to hang this masterpiece on the wall and see which wall looks great with this decor.
Hang it to the wall of your choice and you are done.
Tips If You Want to Sell These Crafts
If you’re thinking about selling crafts, don’t simply make the same seven moons everyone else is making.
Create a recognizable collection.
One could have a blue full moon. Another could use earthy neutral colors. A third could include tiny stars. Another could feature personalized initials.
You can also offer different sizes.
Most importantly, photograph the finished pieces in a way that shows the handmade quality.
Slightly uneven edges aren’t necessarily a weakness. For handmade buyers, those little imperfections can communicate that an actual person made the item.
Just make sure the cord, knots and glued elements are secure before selling.
If you want to sell these crafts organically, I highly recommend you read this Pinterest Blueprint Guide which teaches you how to get potential customers from Pinterest.
Final Thoughts
What I like most about this project is that the finished piece can quietly teach something without looking like an educational model.
Children learn the sequence of lunar phases while rolling, shaping and decorating clay with their hands.
That’s the real strength of air dry clay craft – the learning happens almost accidentally. If you’re making it for home, let the imperfections stay.
If you’re making it for selling crafts, turn those imperfections into a consistent handmade style instead of trying to make every piece identical.
And if your child starts asking why the Moon changes shape, stop and explore that question together.
Sometimes the best part of a craft project starts after the glue has dried.





