Outdoor lighting can completely change the character of a patio or garden, but you don’t always need expensive store-bought pieces to get that effect.
I love the idea of making small handmade lanterns because every piece can look slightly different.
These Outdoor clay lanterns for patio and garden combine simple clay techniques with useful outdoor decor, from pierced luminaries to hanging designs and miniature garden lanterns.
They also work beautifully as clay activities for older kids with supervision, weekend DIY clay crafts, or even small handmade pieces for selling crafts.
The best part? You can adapt almost every design to your own garden style.
Choose Your Air Dry Clay Type
Regular Air Dry Clay | Cornstarch Clay | Homemade Clay
Affiliate Disclaimer: Some of the links in this post may be affiliate links, which means I may earn a small commission if you choose to make a purchase through them – at no extra cost to you. I only share products that genuinely fit this project and can help make your ceramic mug clay craft process easier and smoother. Your support helps keep ideas like this coming.
1. Pebble-Texture Clay Garden Lantern

This one has a deliberately imperfect surface that makes it look like a little stone sculpture rather than a typical lantern.
What you need
- Air dry clay
- Rolling pin
- Small LED tea light
- Craft knife
- Pebble or textured object
- Acrylic paint
- Clay-safe sealer
How to make it
Start by kneading a generous piece of air dry clay until it becomes soft and workable. Roll it into a slab around 6 mm thick.
Cut two rectangular pieces for the sides and two smaller pieces for the ends. You can also make a simple cylindrical version if you prefer fewer joins.
Press a clean pebble gently against the outside surface to create random impressions. Don’t make the pattern too perfect. Real stone has variation.
Join the pieces using score-and-slip. Press the seams together firmly and smooth them with a damp finger.
Now comes the important part. Cut several small irregular windows into the front and sides. Keep enough clay between the openings so the walls remain strong.
Make a slightly wider base and attach it underneath.
Let the lantern dry completely before painting. Depending on the thickness and climate, this can take several days.
Paint it in muted stone, cream, terracotta or charcoal tones. Add a darker wash into the textured areas and wipe the raised parts gently so the texture remains visible.
Once completely dry, add a suitable outdoor sealer.
Place an LED tea light inside rather than a real flame.
Prefer Ready-Made Lanterns?
Love the look of outdoor clay lanterns but don’t really want to spend your weekend working with clay? I get it. Sometimes you just want to add a beautiful piece to the patio and enjoy it. Here are a few ready-made outdoor lanterns and ceramic luminaries that can give your patio or garden a similar warm, handmade feel without the DIY work.
2. Botanical Cutout Clay Luminary

Want something softer and more decorative? Try leaves instead of geometric holes.
Roll your clay into a slab about 6 mm thick.
Cut four panels and join them into a box. Before the clay becomes too firm, sketch simple leaves, stems and tiny flowers on each panel.
Use a small craft knife to cut through the clay along your designs.
Keep the botanical shapes connected to the surrounding clay. Tiny floating pieces can break off during drying.
Make the base separately and attach it securely.
After drying, paint the outside a warm cream or muted sage green.
You can leave the inside unpainted or use a darker shade to make the cutouts more noticeable.
The result is basically an air dry clay luminary with a handmade botanical personality.
Use an LED light inside and place it near real foliage or potted plants.
3. Mini Terracotta Arch Lanterns
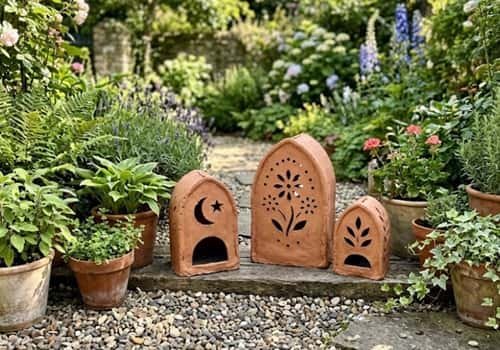
These tiny arch-shaped lanterns are perfect for lining a pathway.
Roll a clay slab and cut two matching arch-shaped panels.
Cut a doorway-like opening into each panel. Then make several tiny circular holes around the arch.
Join the two panels with narrow clay strips along the sides and top.
For extra stability, add a flat clay base.
Allow everything to dry slowly. If the clay starts cracking around the arch, stop handling it and let it firm up before continuing.
Paint the finished lanterns in terracotta orange, dusty red or warm brown.
Make three or five different sizes rather than creating identical pieces. That small variation makes the arrangement look much more natural.
These could also become attractive pottery luminary ideas if you eventually move from air dry clay into kiln-fired ceramic work.
4. Hanging Clay Disc Lantern
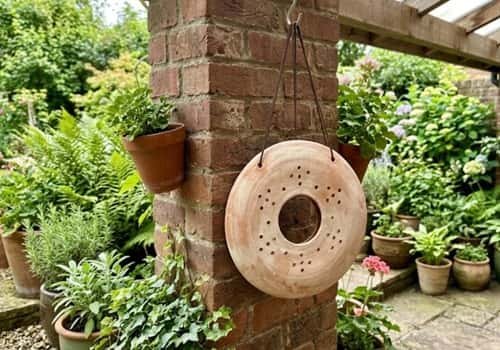
This is one of my favorite designs because it uses a very simple form.
Roll clay into a thick disc.
Cut a large central opening while the clay is still flexible. Around that opening, pierce small holes using a straw, skewer or narrow clay tool.
Make a second matching disc.
Join the two pieces around the edges with a thin strip of clay, leaving an opening at the bottom for the LED light.
Add three small holes near the top.
Once dry, thread weather-resistant cord through the holes and hang the lantern from a sturdy hook.
Keep the lantern lightweight. A huge slab of clay hanging from a cord is not a good idea.
Paint it in cream, terracotta or charcoal and seal it once completely dry.
This makes a lovely outdoor clay wall hanging lantern when mounted against a covered patio wall.
5. Moon-and-Star Garden Lantern

Kids usually love this one.
Build a small cylindrical clay lantern using either a slab or a thick coil.
Smooth the outside but don’t obsess over perfection.
Use tiny cutters or a craft knife to create moons, stars and dots around the cylinder.
Keep the openings relatively small because they make the walls stronger.
Add a clay base and leave the top open.
After drying, paint the outside deep blue, dusty navy or charcoal. Add tiny cream or pale yellow stars around the surface.
I would keep the actual light inside LED-only. A handmade air-dry clay piece isn’t something I’d put a flame into.
This makes a fun weekend clay activity for older children because they can create their own constellation pattern.
6. Vertical Slit Clay Lantern
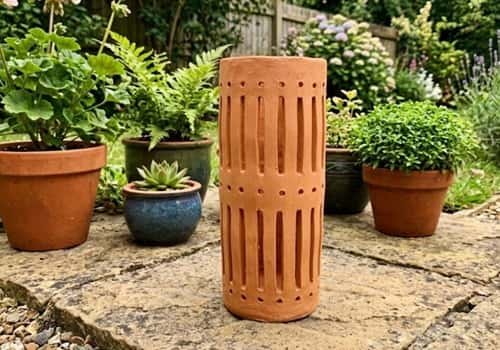
Instead of holes, create long narrow openings.
Roll a clay slab and form it into a rectangular or cylindrical lantern.
Before joining the sides, cut repeated vertical slits from top to bottom.
Leave generous clay between every slit.
Add a simple base and let it dry slowly.
Once hardened, paint the lantern in one color and add a slightly darker wash around the edges.
The narrow openings create a very different look from round-hole luminaries.
For patio decor, place two or three at different heights near a group of planters.
7. Clay Mushroom Garden Lantern
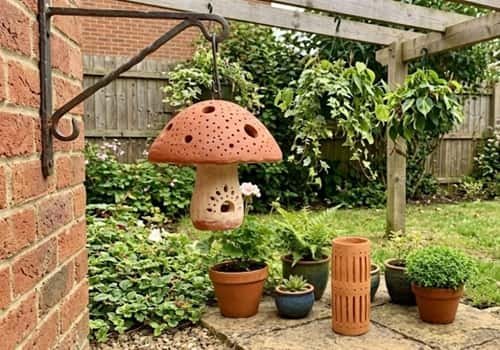
Why make another ordinary lantern when you can make one that looks like a tiny garden mushroom?
Create a short clay cylinder for the stem.
For the cap, shape a shallow dome and flatten its underside.
Join the cap and stem carefully.
Make several tiny holes through the mushroom cap.
Add a small opening underneath where an LED puck light or tea light can sit.
Let it dry completely before painting.
Use cream, red, mustard or earthy brown. Add tiny contrasting dots to the cap if you like.
These look particularly good tucked between real plants.
8. Stacked-Ring Clay Lantern
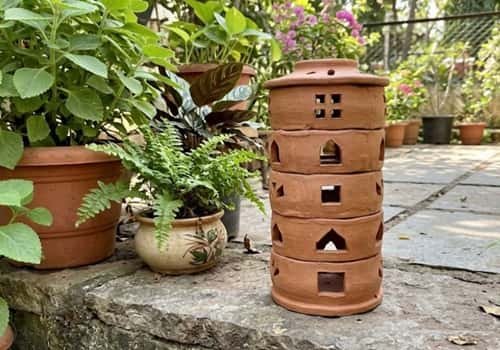
This design looks complicated but the construction is surprisingly simple.
Make four or five thick clay rings using a circular cutter.
Keep the rings roughly the same diameter.
Cut small windows or decorative holes into each ring.
Stack the rings vertically, adding a tiny amount of slip between them.
Don’t completely flatten the joins. A little handmade irregularity gives the lantern character.
Finish it with a flat clay base.
Once dry, paint the entire piece in a single earthy shade. A dry-brush technique over the raised edges can make the individual rings stand out.
This could become one of those diy clay gifts that looks far more expensive than it actually is.
9. Leaf-Wrapped Garden Lantern
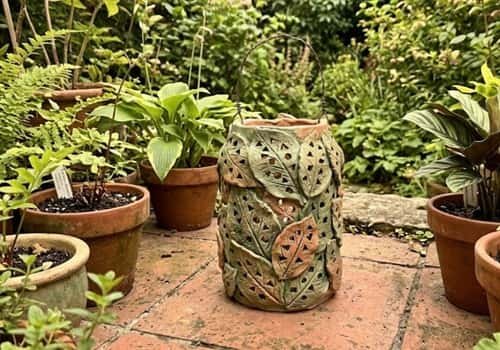
Here’s a more sculptural option.
Create a simple clay cylinder first.
Then make several thin clay leaves separately.
Score veins into each leaf using a pointed tool.
Attach the leaves around the cylinder so they overlap slightly.
Leave a few gaps between them so light can escape.
The trick is not making every leaf identical. Different sizes make the piece look much more organic.
Paint the lantern in two or three related green and earthy shades.
This is where a simple diy clay sculpture starts becoming useful patio decor.
10. Tiny Clay House Lantern
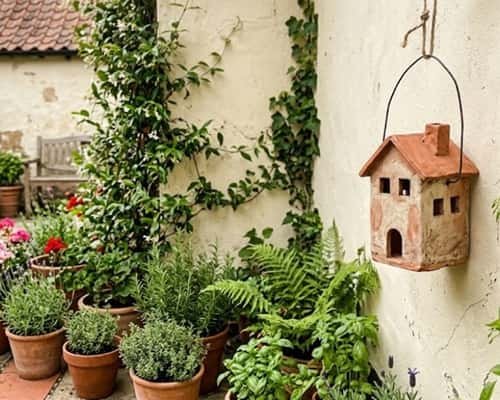
Make a miniature garden house.
Build four clay walls and add a simple peaked roof.
Cut a small door and several windows into the walls before assembly.
The roof can be slightly uneven. In fact, I prefer it that way because it makes the little house feel handmade.
Add a chimney if you want.
After drying, paint the walls cream and the roof terracotta or charcoal.
Place a small LED light inside.
Put several tiny houses together beside your patio planters to create a miniature village effect.
11. Rope-Texture Clay Lantern
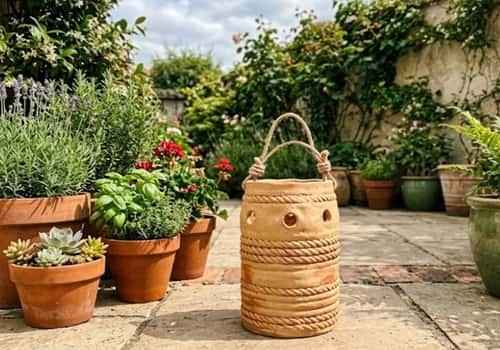
This one uses texture instead of complicated cutting.
Roll a clay slab.
Press a piece of clean rope or thick twine gently across the surface to create a repeating texture.
Wrap the slab into a cylinder and join the seam.
Add a few small circular holes between the textured bands.
Keep the base thick enough to support the structure.
Once dry, paint it a sandy beige, terracotta or warm gray.
A darker wash pushed into the rope impressions will make the texture stand out.
It has a rustic pottery feel without needing a pottery wheel.
12. The Garden Archway Lantern

For the final design, go bigger.
Build two curved clay side panels with a rounded arch at the top.
Join them with narrow clay strips.
Instead of filling the front with lots of tiny holes, create one large central arch opening surrounded by smaller dots and leaf marks.
Add a sturdy base.
Let the entire structure dry thoroughly before moving it.
Paint the outside in an earthy ceramic-inspired finish such as warm white, terracotta or muted charcoal.
This one can become a real focal point beside a large planter.
And if you eventually work with kiln-fired clay, the same concept can be adapted into a proper ceramic luminary.
Don’t Want to Make One Yourself?
Not everyone wants another DIY project on the weekend! If you love the earthy look of clay and ceramic lanterns but would rather skip the making part, here are a few ready-made outdoor lanterns worth checking out for your patio or garden.
Final Thoughts
What makes these outdoor clay lanterns interesting isn’t really the light.
It is the way the clay changes the light.
Small openings create dots, slits create stripes, while large arches give you broad patches of illumination.
That means you can design the pattern around the mood of your patio instead of simply decorating the lantern afterward.
I also like mixing three different heights and keeping the paint palette related rather than identical.
It feels collected, not mass-produced. If you’re exploring clay luminaries as a side business, these variations also give you several product styles without needing twelve completely different construction methods.





