There is something oddly charming about totem stacked taper candle holders.
Instead of making one chunky clay base, you build the holder upward, almost like a tiny sculpture.
Each section can have a different face, texture, color or shape.
That makes these pieces perfect for experimenting with clay candle holder crafts, clay activities, and unusual home decor.
I especially love the idea of treating each stack like a miniature character rather than just a candle stand.
Why make another plain candle holder when you can create a little clay totem sitting on your table? These projects also work beautifully as DIY clay gifts and small selling crafts.
Choose Your Air Dry Clay Type
Regular Air Dry Clay | Cornstarch Clay | Homemade Clay
Affiliate Disclaimer: Some of the links in this post may be affiliate links, which means I may earn a small commission if you choose to make a purchase through them – at no extra cost to you. I only share products that genuinely fit this project and can help make your ceramic mug clay craft process easier and smoother. Your support helps keep ideas like this coming.
1. Wonky Face Totem Candle Holder
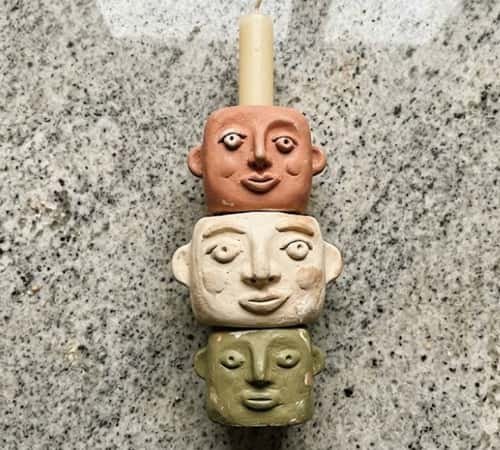
Let’s start with the one that looks handmade on purpose.
This design uses three or four uneven clay sections stacked vertically.
Each section gets a simple abstract face, creating a quirky clay totem candle holder that looks somewhere between folk art and playful sculpture.
What you’ll need
- Air-dry clay
- Acrylic paints
- Clay sculpting tools
- Rolling pin or smooth bottle
- Sandpaper
- Strong craft adhesive
- LED taper candle
- Pencil
- Clear matte sealer
How to make it
Start by dividing your clay into three pieces. Make the bottom piece the widest because it needs to visually support the entire stack.
Roll the first piece into a thick cylinder. Don’t make it perfectly smooth. A few dents actually make the finished piece more interesting.
Flatten the bottom slightly so it can stand without wobbling.
For the second section, create a shorter cylinder. Make it narrower than the first. Press a shallow groove around its middle using a sculpting tool.
Now make the top section smaller again.
Before the clay dries, gently press two shallow eye sockets into each section.
Add tiny clay eyebrows, noses or mouths. Keep the faces simple. One crooked eye is enough to give the piece personality.
Allow every component to dry completely according to your clay manufacturer’s instructions.
Once dry, sand only the areas that are dangerously sharp. Don’t over-sand the handmade texture.
Paint the sections in three related colors. Try terracotta, cream and muted olive instead of perfectly matching everything.
When the paint dries, glue the pieces together. Keep the stack slightly imperfect rather than forcing every section into perfect alignment.
For the candle opening, make the top section broad enough to hold an appropriate LED taper securely.
2. Pebble Stack Garden Totem
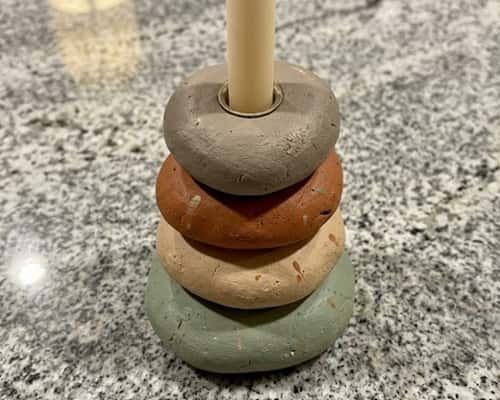
What if your candle holder looked like a tiny piece of garden pottery?
For this version, make every section resemble a rounded stone.
The result has a natural stacked-stone silhouette without looking like an actual rock.
Create four flattened oval clay forms in different sizes. The bottom should be heavy and wide. Gradually reduce the diameter as you move upward.
Press each piece gently against a flat surface to create a stable underside.
Use your thumb to make shallow depressions across the surfaces. Don’t smooth them out completely.
Stack the pieces temporarily while they’re still workable. This lets you check whether the silhouette looks balanced.
For the top section, create a shallow candle recess suitable for an LED taper.
Dry everything separately.
Paint the pieces in warm stone-inspired shades such as warm gray, beige, clay brown and dusty green. Add tiny darker marks with a nearly dry brush.
Glue the dry pieces together only after checking the final balance.
The trick here is restraint. You don’t want perfect stones. You want hand-shaped clay stones that look assembled.
This style could also become a miniature garden totem for a covered patio, although outdoor placement depends on the clay and sealer you use.
3. Moon-and-Eye Totem
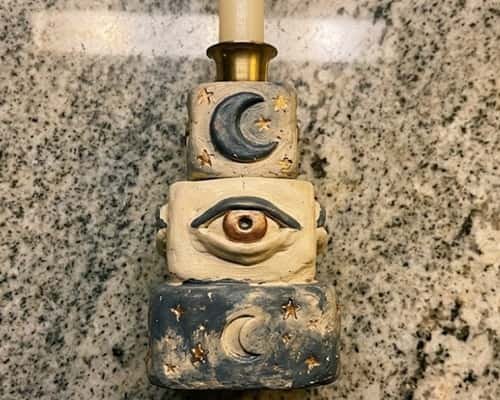
This one takes a slightly mysterious turn.
Make three stacked clay sections, but give each one a celestial symbol.
Shape the bottom into a squat rounded cylinder.
Make the middle section slightly narrower and press small crescent shapes into the clay.
For the top, create a rounder piece with one large raised eye.
Add tiny clay stars around the sides. Don’t make them too deep because delicate clay decorations can break.
Once dry, paint the entire stack a deep muted blue or charcoal.
Dry-brush cream over the raised details.
Add a tiny amount of metallic paint to selected stars.
The finished piece feels like a miniature assemblage art sculpture rather than a basic candle holder.
And yes, it would look particularly fun on a dark shelf.
4. Mushroom Totem Taper Holder
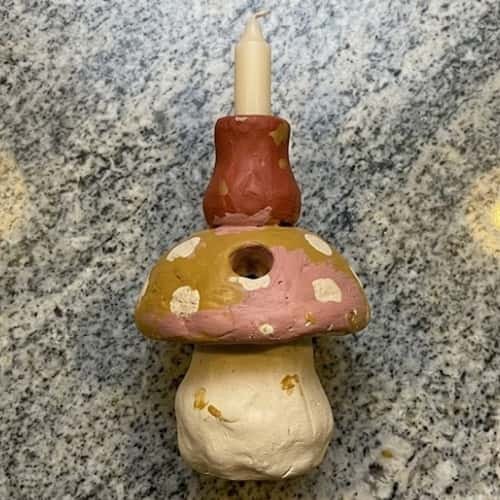
This design is playful without becoming childish.
Build three short clay forms resembling mushroom caps and stems.
The bottom mushroom should be the widest. Create a thick rounded stem and a broad cap.
Repeat the process with a smaller mushroom in the middle.
For the top, create one compact mushroom shape and flatten its upper center enough to accommodate the LED taper.
Press tiny dots into the caps with the rounded end of a sculpting tool.
Once completely dry, paint the caps in contrasting colors. Cream with rust spots is particularly nice, but mustard, dusty pink and brown can work too.
Paint the stems in an off-white shade.
Glue the pieces vertically, making sure the stems overlap visually.
This is one of those DIY clay sculpture projects where little imperfections make it better.
5. Checkerboard Totem Candle Stand
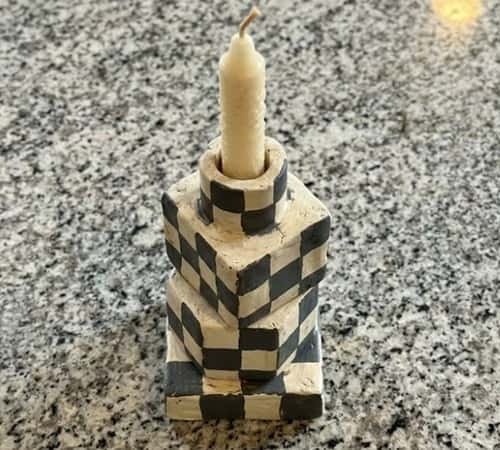
For something more graphic, make the sculpture from chunky geometric blocks.
Create four short clay cylinders.
Keep the first and third sections slightly wider than the second and fourth. Press shallow square patterns into selected surfaces.
After drying, paint alternating cream and charcoal squares.
Don’t worry if every square isn’t identical. In fact, a slightly uneven checkerboard gives the holder that handmade new ceramics feeling.
Stack the sections after painting and sealing.
Keep the colors limited. Too many colors will make this design lose its visual punch.
This could also be a surprisingly good small product for selling crafts, especially if you create several color combinations.
6. Mini Ceramic-People Inspired Totem
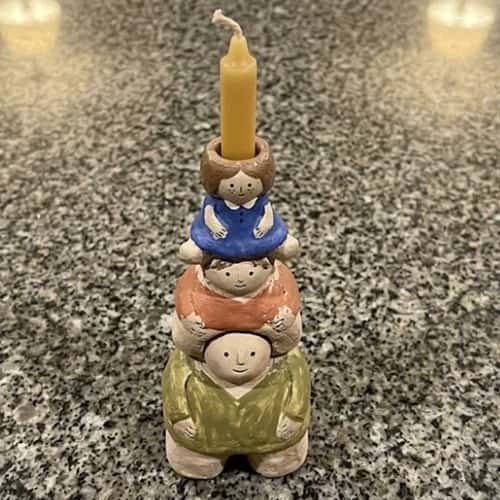
Here’s where you can borrow the charm of a ceramic people candle holder without copying traditional designs.
Make three simplified human-like forms.
The bottom can have a rounded body and tiny feet. The middle gets a different facial expression. The top can have an oversized head.
Keep the anatomy intentionally abstract.
Don’t attempt realistic faces. Two dots and a simple curved mouth are enough.
Create a small flat candle-supporting area at the top.
After drying, paint each figure in a different muted shade.
Add tiny painted lines for clothing or hair.
Stack them carefully using strong adhesive.
This turns the ordinary taper holder into a tiny character sculpture.
7. Spiral Totem Candle Holder
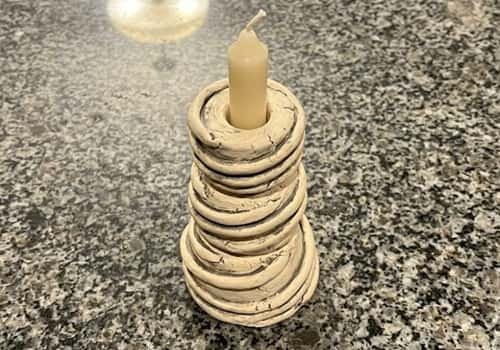
This one is all about movement.
Create three cylindrical clay sections.
Before drying, wrap thin clay coils around each section in loose spirals.
Press the coils gently into the body so they become part of the sculpture.
Don’t make every spiral identical. One can be tighter while another is slightly crooked.
For the top section, leave the center relatively flat for the candle position.
Paint the entire piece in one base color, such as warm ivory.
Once dry, add a darker wash into the spiral grooves.
Wipe the raised areas gently before the paint fully dries.
That creates an aged pottery effect without needing complicated techniques.
8. Gothic Garden Totem
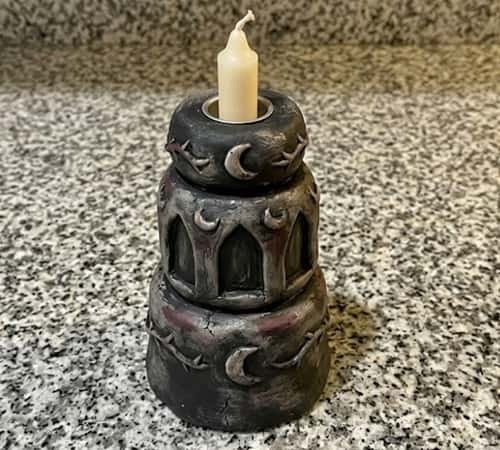
Want something moodier?
Make three irregular clay blocks and give each one a gothic-inspired motif.
Try an arched window, tiny crescent, thorn-like linework or a simple gothic flower.
Keep the shapes chunky enough for beginners.
Paint the whole sculpture matte charcoal.
After drying, lightly brush dusty gray across the raised areas.
Add a tiny amount of muted burgundy to selected details.
The result sits somewhere between garden pottery, gothic decor and miniature architectural sculpture.
It also has potential as a darker DIY clay gift for someone who loves unusual decor.
9. Sun Face Totem
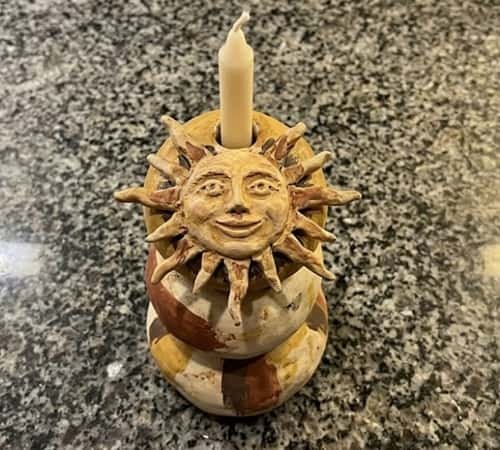
This one feels warm and folk-art inspired.
Make three rounded clay sections.
On the top section, create a raised circular sun face.
Press short lines around it to represent rays.
The middle section can have tiny painted dots.
The bottom section should remain relatively simple so the top face gets attention.
Paint the base warm ochre.
Add cream, rust and muted brown details.
For extra depth, use a thin darker paint wash around the facial features.
Don’t make the sun perfectly symmetrical. Handmade asymmetry is part of the charm.
This would fit nicely into a collection of colorful clay candle holder crafts.
10. Three-Eyed Statement Totem
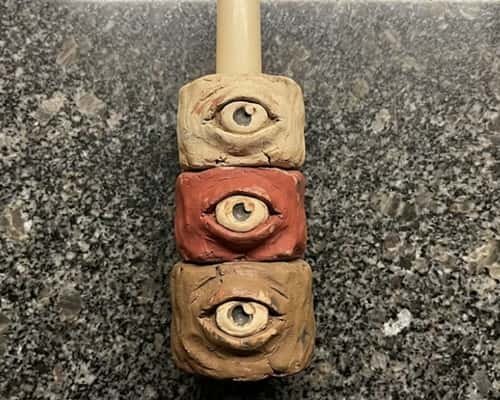
Let’s finish with the strangest one.
Create three chunky clay sections, each slightly different in shape.
Give every section one oversized raised eye.
The eyes don’t need to look realistic. Large circles with simple eyelids work beautifully.
Add tiny grooves around each eye.
Paint the sculpture in an earthy cream base.
Use dark brown for the eyes and muted red for a few small accent marks.
Once dry, lightly sand only the bottom.
Stack the sections so the eyes appear to look in different directions.
That little change makes the whole sculpture feel alive.
This is also where the idea starts crossing into new ceramic ideas and contemporary folk-style assemblage rather than simply being another candle holder.
Final Thoughts
The interesting thing about totem stacked taper candle holders is that the candle holder becomes the sculpture instead of simply holding the candle.
That gives you much more freedom with proportion, texture and character.
If you’re planning these as selling crafts, don’t make ten completely unrelated designs.
Create one recognizable silhouette and then develop several faces, colors or textures around it.
That makes a handmade collection feel intentional. You can even photograph the same base shape in different finishes for seasonal collections.
For more advanced clay activities, try translating your favorite design into properly fired ceramic clay.
That opens the door to genuine clay totems, functional pottery and more durable clay totem candle holders while keeping the handmade personality that makes these pieces special.





