Gothic decor doesn’t always have to mean skulls, spiders and spooky faces.
I love the idea of making darker pieces that look like they came from a tiny old castle, a forgotten attic or a mysterious little apothecary.
These gothic pottery ideas are designed around that feeling. You can use air-dry clay, simple household tools and acrylic paint to create them without a kiln.
Think crooked towers, moon shapes, ravens, arches and rough stone-like textures.
This is a gothic pottery craft collection that works especially well for kids, beginners and anyone who enjoys hands-on clay activities.
Choose Your Air Dry Clay Type
Regular Air Dry Clay | Cornstarch Clay | Homemade Clay
Affiliate Disclaimer: Some of the links in this post may be affiliate links, which means I may earn a small commission if you choose to make a purchase through them – at no extra cost to you. I only share products that genuinely fit this project and can help make your ceramic mug clay craft process easier and smoother. Your support helps keep ideas like this coming.
1. Crooked Gothic Castle Trinket Dish
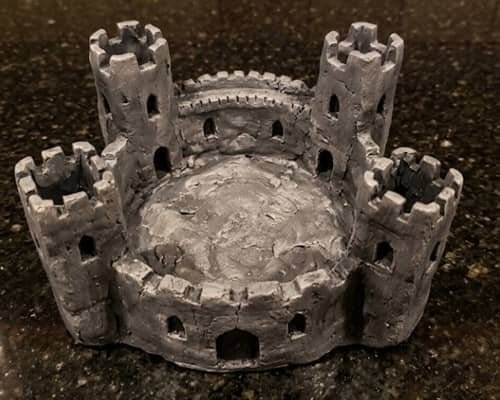
This one looks complicated, but the basic shape is just a shallow dish with tiny castle details around the edge.
What you’ll need
- Non-toxic air-dry clay
- Rolling pin or smooth bottle
- Small bowl
- Toothpick or blunt clay tool
- Acrylic paint
- Paintbrush
How to make it
Roll the clay into a sheet about 5 mm thick. Don’t make it perfectly smooth. A little unevenness actually makes the finished piece look like old stone.
Place a small bowl upside down on the clay and cut around it to create a circle.
Now gently lift the edges upward with your fingers. Pinch several tiny sections to create an uneven, slightly crooked rim.
For the castle effect, roll tiny pieces of clay into miniature towers. Press them around the outside edge. Add little windows with the blunt end of a clay tool.
Want it to look older? Scratch a few horizontal lines into the towers.
Let everything dry completely according to the clay manufacturer’s instructions. Once dry, paint the dish charcoal, deep gray or muted purple.
Add tiny touches of lighter gray over the raised areas.
The result is a little gothic castle bowl that can hold hair clips, toy treasures, paper notes or other small objects.
2. Moon Phase Clay Wall Plaque
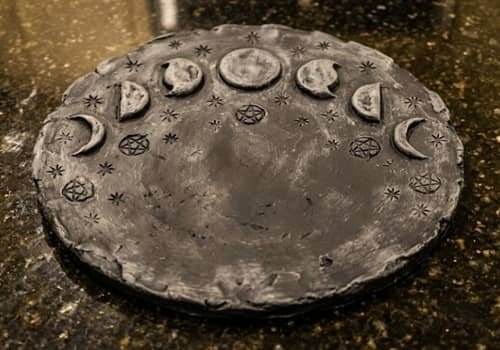
This is one of my favorite ideas for a bedroom or little reading corner.
Roll out a round clay slab. Use a cup or small plate as a guide if you want a cleaner circle.
Press three or four moon shapes into the surface using a cutter or cardboard template.
You can create a full moon, crescent and half-moon arrangement.
Add tiny stars using the blunt end of a pencil.
For an aged effect, lightly scratch random lines around the moon. Don’t overdo it. The roughness is what makes it interesting.
After drying, paint the entire plaque very dark gray. Then dry-brush a little silver-gray across the raised areas.
For kids, use water-based non-toxic acrylic paint and avoid sharp cutters.
Punch two holes near the top while the clay is still soft if you want to hang it later.
This is a simple diy clay project, but it can look surprisingly sophisticated.
3. Tiny Gothic Raven Pot
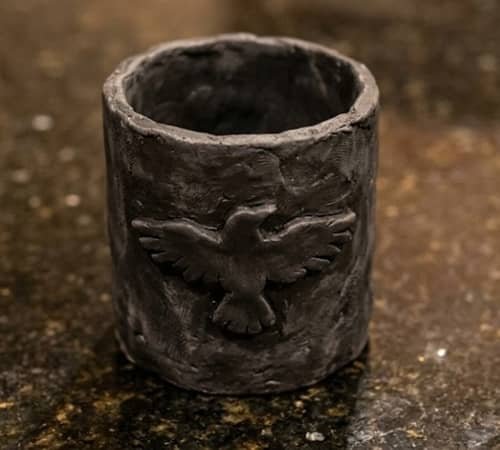
A raven silhouette instantly gives pottery a mysterious personality.
Start with a small clay cylinder. Press the bottom flat so it can stand.
For the raven, flatten a small piece of clay and cut a simple bird silhouette.
It doesn’t need to be anatomically perfect. A rounded body, pointed beak and little tail is enough.
Attach it to the front using a little water and gentle pressure.
Add two tiny wings with simple curved lines.
Once dry, paint the pot almost black. Leave some raw gray showing around the edges for a weathered effect.
You could use this as a small holder for paper flowers, craft supplies or decorative dried stems.
For kids, I would keep the raven shape chunky rather than making thin fragile parts.
4. Gothic Arch Jewelry Dish
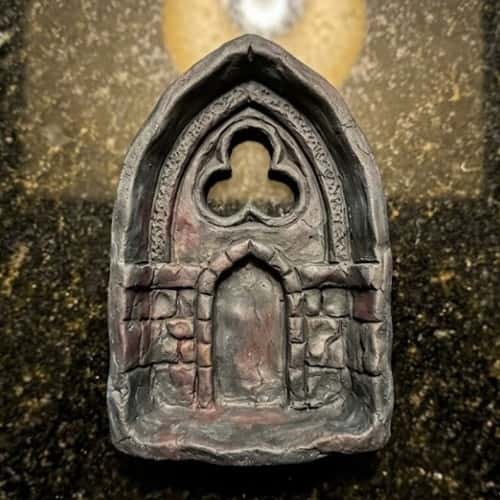
Imagine a tiny cathedral doorway turned into a jewelry tray.
Roll a slab of clay and cut a rounded arch shape.
Add a second smaller arch on top of it as a raised border. Press gently rather than making everything perfectly symmetrical.
Now create a shallow dish at the bottom by pushing the center down slightly.
Add simple vertical lines to imitate old stonework.
After drying, paint it deep gray. Add a tiny amount of muted burgundy or purple inside the arch.
This could hold rings, beads, hair clips or little treasures.
Just remember that homemade air-dry clay pieces aren’t automatically food-safe, so keep this kind of piece for decorative or non-food uses.
5. Black Cat Gothic Planter
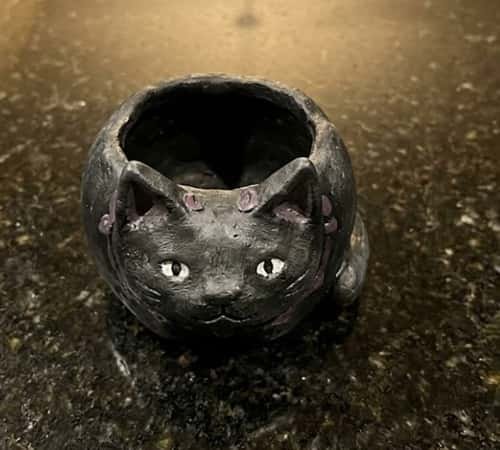
A chunky cat planter can look spooky without being frightening.
Make a small rounded clay pot first. Keep the walls fairly thick so they don’t become fragile.
Create two simple triangular ears and attach them to the top.
Press tiny clay eyes onto the front.
For the nose, use a very small ball of clay. Add whiskers as shallow carved lines rather than thin clay strips.
After drying, paint it black or very dark gray.
A tiny purple collar painted around the neck area gives it a gothic character without making the piece overly Halloween-themed.
If you’re making this with kids, use it as a decorative holder rather than a plant pot that stays constantly wet.
Air-dry clay doesn’t behave like fired ceramics when exposed to prolonged moisture.
6. Gothic Potion Bottle Clay Sculpture
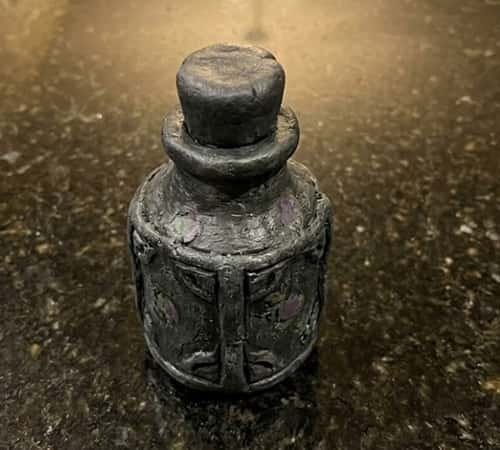
Here’s where things get playful.
Build a tiny bottle shape from clay by rolling a thick cylinder and narrowing the top.
Add a slightly wider rim around the opening.
You can press shallow decorative lines into the bottle to make it look antique.
Once dry, paint the bottle charcoal gray.
Then add a little dark purple or green paint around the center.
For kids, don’t try to create a removable clay stopper. A simple solid clay top is safer and much less frustrating.
This is technically more of a clay sculpture than functional pottery, but it fits beautifully into a gothic decor collection.
7. Gothic Bat Incense-Style Decor Holder – Without the Incense
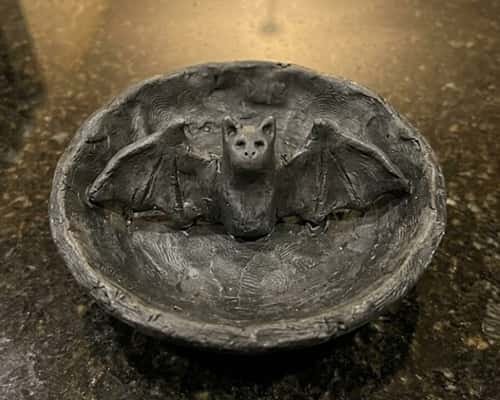
I would actually change this classic idea for kids.
Instead of making a holder for burning incense, create a decorative bat-shaped catchall.
Roll a small oval base.
Make two chunky bat wings from flattened clay and attach them to the sides.
Add two tiny ears and simple eyes.
Press the bat onto the center of a shallow dish.
Once dry, paint the whole thing charcoal or black.
The dish can hold paper stars, beads, small craft pieces or other dry objects.
That gives you the gothic look without introducing fire or smoke around children.
8. Crooked Gothic Candle Holder – Decorative Version
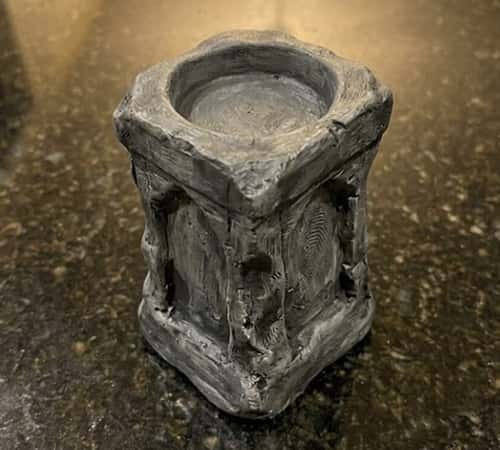
Traditional candle holders aren’t ideal for a children’s clay activity, so make this one purely decorative.
Build a short chunky column from air-dry clay.
Add a wider base.
Create crooked ridges around the outside to make it resemble an old gothic architectural pillar.
At the top, make a shallow circular depression rather than a real candle socket.
Paint it dark gray with lighter gray dry-brushing.
It can sit on a shelf and look like an antique candle holder without actually holding a flame.
This is a great example of how functional gothic pottery can inspire a safer decorative interpretation for kids.
9. Gothic Gargoyle Mini Sculpture
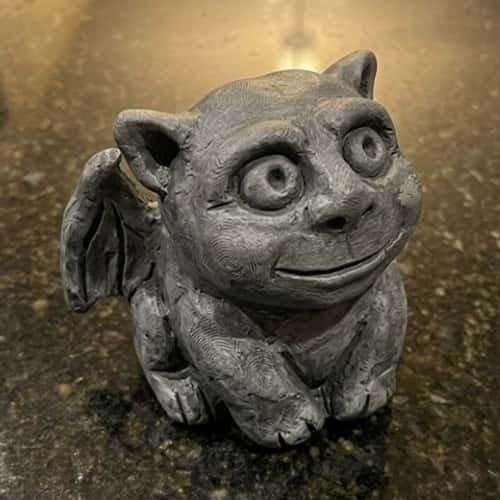
Don’t worry about sculpting a realistic gargoyle.
Start with a chunky oval body.
Add two small ears or horns, a wide nose and four simple feet.
Use a blunt tool to make shallow wing lines across the back.
Give the face an exaggerated expression. A slightly silly gargoyle can actually look more charming.
After drying, use dark gray paint and lightly brush a lighter gray over the raised areas.
The rough finish makes it look like weathered stone.
Kids can really have fun with this because there isn’t one “correct” gargoyle shape.
10. Gothic Coffin Trinket Tray
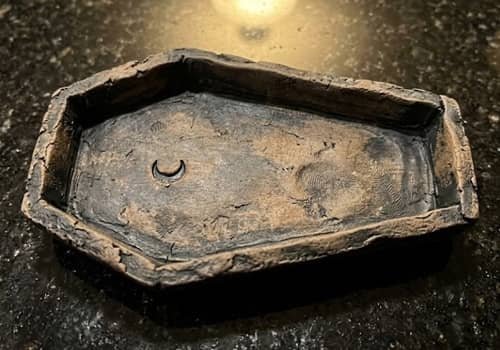
This sounds spooky, but the construction is incredibly simple.
Roll out a clay slab.
Cut a coffin-like six-sided outline using a cardboard template rather than a sharp tool.
Raise the sides slightly.
Add a tiny raised cross, moon or star in the center.
For a more unusual look, skip the obvious skull decoration and add a miniature “aged wood” pattern using shallow lines.
Paint the tray dark brown, charcoal or black.
A little gray dry-brushing over the edges makes it look worn.
Use it for beads, buttons, paper clips or other small dry items.
11. Gothic Mushroom Fairy House
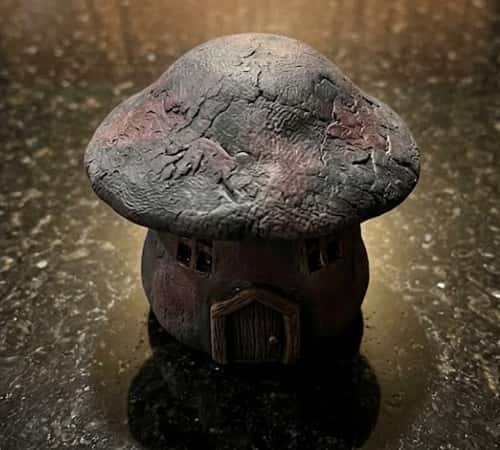
Now let’s make the collection a little stranger.
Create a small rounded mushroom-shaped house using air-dry clay.
Make a short chunky base and add a large rounded roof.
Press a tiny arched doorway into the front.
Add miniature windows and a few stone lines.
Paint the roof dark purple or charcoal and the walls gray.
You can add muted burgundy spots if you want it to feel more mysterious.
This makes a wonderful little shelf sculpture and works especially well as one of several diy clay Halloween craft pieces.
12. Gothic Graveyard Mini Planter Tray
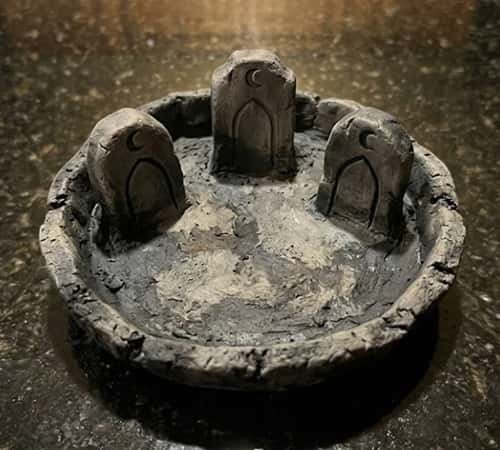
For the final project, combine several ideas.
Make a shallow rectangular tray.
Add three tiny uneven tombstones along the back.
Create miniature arches, crooked crosses or simple moon shapes.
Don’t make the pieces too thin. Thick, chunky details are easier for little fingers and less likely to break.
Paint the base dark gray.
Paint the tombstones slightly lighter and add tiny black cracks.
You can leave the whole thing as a shelf display or use the tray to organize small dry craft supplies.
This is one of those clay crafts where the imperfections actually become part of the design.
Final Thoughts
The fun part about these gothic pottery ideas is that you don’t need expensive ceramics equipment or advanced sculpting skills to create something with personality.
Start with one recognizable shape, then add texture. That is usually where the character appears. A crooked edge can look like an old ruin.
A scratched surface can resemble weathered stone.
Even a slightly lopsided gargoyle can feel more handmade than a perfectly polished sculpture.
If you’re doing these as clay activities with children, let them make the design decisions.
Which moon shape should the plaque have? Should the castle tower lean? Why not? Those little choices are what turn ordinary diy projects into pieces that actually feel personal.
And that handmade personality is exactly what can make small clay creations interesting for gifting, decorating or even selling crafts.





