In order to replace the dryer belt:
- Start by removing the front or back panels of your dryer, depending on your dryer type and model.
- You will now see a black rubber strip (drive belt) holding the drum and connected to the motor via the dryer’s pulley, i.e. the idler pulley.
- Loosen the pulley and then stretch to remove the drive belt from its place.
- Align the drive belt correctly and then use a socket wrench or pliers to tighten the tensioner pulley for securing the new belt in place.
Make sure that there is no slack in the belt before you reassemble your dryer.
Key Takeaways
- A dryer’s drive belt is what helps connect the motor to the drum, and it also has the responsibility of transferring rotational motion from the motor to the drum.
- Always refer to the user manual of your dryer’s model to locate the drive belt. It is usually found wrapped around the drum and to the dryer’s pulley that then connects to the drive motor.
- You can replace the drive belt at home using basic hardware tools.
- Typically a damaged dryer belt will show symptoms such as long drying times, loud noises, or the dryer failing to start. In fact, at times the dryer may start but the drum will not rotate at all in rare cases.
What is a Dryer belt?
The dryer belt is a belt that wraps around the drum and pulley in order to rotate the drum inside.
These belts are usually made of rubber, and they can wear out over time due to many factors, such as aging or poor maintenance.
If the dryer belt wears out, it can cause the dryer to stop working.
How to know if the dryer belt is worn out? (Symptoms of a worn out or damaged belt)
Dryer belts may wear out or get damaged due to many reasons such as age, overuse, poor maintenance, etc.
If your dryer belt is worn out, it may show some common symptoms.
Dryer Will not start
If your dryer is not starting, it can be a sign of other problems too. However, it’s common for a dryer to not start because its drive belt has snapped or been damaged.
Dryer will start and run but the drum won’t spin
If you find that your dryer starts up and runs but the drum does not rotate, it is likely that your drive belt has become damaged, snapped, or moved from its original position.
Loud noises from your dryer
If you hear a squealing or squeaking sound coming from your dryer, it is likely that the drive belt is either damaged or not properly aligned.
In some cases, if your dryer is making thumping noises and it’s not due to a heavy object inside, then the problem is likely a loose dryer belt.
Long time to dry
If your clothes are taking an unusually long time to dry, then it is a sign that the dryer belt has become stretched and needs to be replaced.
With that said, this symptom is common for other issues as well, for example, a problematic heating element. So, it’s important to diagnose the problem correctly before taking any action.
Where is a dryer’s drive belt located?
Depending on your dryer type and model, it can be accessed either after disassembling the back or front panels.
You will be able to see the drive belt wrapped over the dryer’s drum, and the other end will be connected to the tensioner pulley or to the motor shaft.
The tensioner, or the idler pulley, is a small wheel that keeps the drum belt tight as it rotates around the drum.
How does the dryer drive belt wear out?
There are various ways in which a drive belt can become damaged or stretched out.
Regular wear and tear
One of the most common ways a dryer belt can break is through regular wear and tear.
This can happen gradually as the belt is used repeatedly to turn the dryer drum.
In some cases, the damage may be caused by a manufacturing defect. Therefore, you may have to contact your dryer’s manufacturer’s helpline.
Overloading your dryer
Overloading the dryer more often can lead to putting a lot of stress on several components, including the drive belt.
It may end up stretching out or causing wear and tear faster than it should.
Problematic tensioner Pulley
Another way that the dryer’s drive belt can become damaged is if it becomes too loose.
This can happen if the tensioner pulley that keeps the belt tight is not functioning properly.
If the belt becomes too loose, it can slip off of the drum or fall off entirely, which can cause serious damage to the dryer.
Foreign Objects
If something gets caught in the belt, it can cause the belt to break or cause damage beyond repair.
Sometimes, buildup around the drive belt connecting points can also lead to severe damage to the drive belt.
Thus, it’s important to clean the areas around the drive belt at least once every three months.
How to replace the drive belt in a clothes dryer?
Replacing a dryer belt can be done at home by following the below steps carefully.
You will need basic hardware tools such as a screwdriver, a putty knife, pliers, and, of course, a replacement drive belt.
Do not forget to keep the user manual of your dryer handy for assistance.
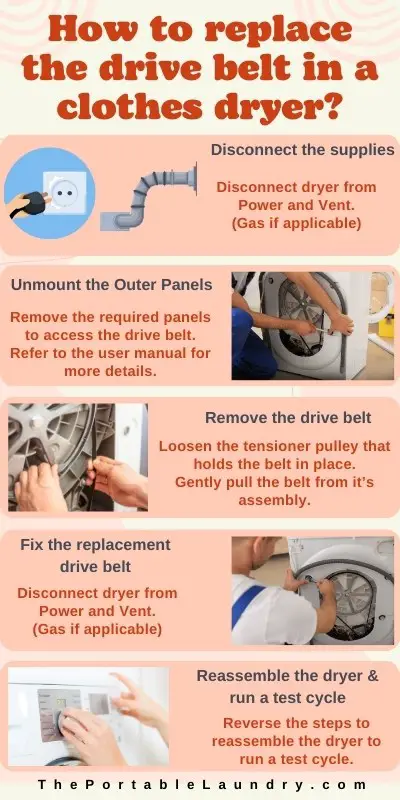
Step 1: Disconnect the supplies
Start by disconnecting the supplies such as power, gas, and vent so that you can move the dryer away from the back wall.
Move the dryer carefully away from the wall so you can get to the back panel.
Note: Disconnecting the power supply and gas lines (if applicable) is a very important step.
Step 2: Disassemble the outer panels
Find the right panels to open to get to the drive belt with the help of your dryer’s user manual.
In some models, you may need to take off the back panel. Whereas, in other models, you may need to take off the front panel.
Moreover, to gain better access, you may have to remove the top panels along with the front or back panels.
Accordingly, detach the required panels to locate the drive belt inside your dryer’s body.
Keep the detached panels aside and move on to the next step.
Note: You may want to remove the lint trap as you detach the panels. In order to do so, use the screwdriver to remove the screws that are holding the lint trap in place. Next, use the putty knife to pry the lint trap off of the dryer and keep it aside. Lastly, don’t forget to clean the parts of the dryer that you can reach as you take them apart.
Step 3: Locate and remove the drive belt
Now, you will see the drive belt in the form of a black rubber strip surrounding the dryer’s drum.
The other end of the belt will be connected to a small wheel, which is also called the dryer pulley, or an idler pulley (or the tensioner pulley).
Using a socket wrench or pliers, loosen the tensioner pulley that holds the belt in place.
This pulley is usually located at the top of the dryer near the front panel in most cases.
Simply follow the drive belt from the drum to locate the pulley and then loosen the drive pulley.
Now, slide the old drive belt off of the drum and dispose of it properly.
Step 4: Fix the replacement drive belt
Put the new drive belt around the drum, making sure that it is aligned with all of the grooves and pulleys.
Use your socket wrench or pliers to tighten the tensioner pulley and secure the new belt in place.
Make sure that there is no slack in the belt and that it is set properly before reattaching the front panel of your dryer.
Step 5: Reassemble the dryer
Start reassembling the dryer by simply reversing the steps.
Carefully move the dryer to its place and connect all the required supplies.
Step 6: Run a test cycle
Plug in the dryer to power and run a normal cycle to check if it is able to do its job like before.
Final Thoughts
Replacing a drive belt in the dryer is relatively easy once you have managed to access it.
It is advisable to turn off your dryer when you notice any problematic symptoms with the drive belt so that it does not cause any further damage.
Also, check if the dryer is still under warranty, as in some cases, the replacement might be covered under warranty.
Furthermore, you must always use a replacement belt that is the same size and type as the old one to avoid any compatibility issues.
Lastly, if you are unsure about the process or do not feel confident enough to replace the drive belt on your own, always consult a professional for help.
Frequently Asked Questions
How much does a dryer’s belt cost?
The cost of a drive belt will vary depending on the make, model, and size of your dryer. You can expect to pay anywhere between $10 and $50 for a replacement dryer belt. However, if you include the labor cost, it will be a lot more.
How long does the dryer drive belt last?
The average clothes dryer drive belt can last for more than 10 years. On average, a drive belt lasts anywhere between 10 to 20 years, depending on usage.
Can I run the dryer with a broken belt?
The dryer will power on, but the drum won’t rotate or spin. Therefore, it makes no sense to run a dryer with a broken drive belt. In some cases, the dryer may not start at all.
Do all dryers use the same drive belt?
No, the drive belt differs depending on the make, model, and size of the dryer.
Where can I buy a drive belt?
You can buy a compatible drive belt in appliance stores, or you can get one easily on online platforms. Make sure you buy the right one based on your dryer’s model number.
You May Also Like
- How to replace the Thermostat in a Dryer? (In-depth guide)
- How to replace a thermal fuse on a dryer?
- How To Replace a Dryer Blower Wheel?
- 11 Creative Ideas to Recycle Washer and Dryer Drums
- Can you use a Dryer Drum for a Fire pit?
- How To Replace Dryer Heating Element? (Step-by-Step)
- How to replace the Igniter in a Gas Dryer?
- 14 Reasons Why Your Dryer is Squeaking & Solutions
- What is a Smart Washer and Dryer? (Explained)
- Washer Dryer: 27 Questions Answered
- Why do Korean Homes come with Washers but not Dryers?
- Gas Dryers vs Electric Dryers (Differences Explained)
- Damaged Dryer Vents: 8 signs your dryer vent is damaged
- Dryers & Vents: 20 frequently asked questions