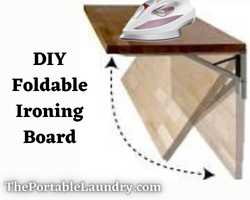
You can make your own foldable ironing board at home that can be mounted on a wall.
Moreover, you can get it customized as per your convenience and needs, such as its size, placement, and, most importantly, your comfort zone.
You can do it all by yourself if you’re handy with carpentry tools.
If that’s not the case for you, then you can get hold of a local carpenter to help you.
A wall-mounted ironing board can help you save a lot of space and can be used for multiple purposes.
Things to consider before making your own wall-mounted foldable ironing board.
Things required to make a wall-mounted ironing board
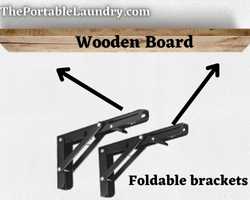
A wooden plank or a sheet of plywood
You don’t always have to buy a new one; sometimes you can use old items around your house, like an unused door or table.
Foldable brackets
You will need a strong foldable bracket with a locking mechanism similar to the ones used for foldable shelves.
Hinges and hooks
To make sure that the board can be folded and locked securely, you need to invest in high-quality hinges with a locking mechanism.
Along with hinges, you will also need hooks to mount the board on the wall.
Make sure you choose strong, sturdy ones that can handle the weight of the ironing board.
Hardware tools
You’ll need some basic woodworking tools and materials for this task, including a saw, drill, screwdriver, and nails or screws.
Things to keep in mind
When it comes to wall-mount ironing boards, there are a few things you need to take into account.
Here are some key points that you need to consider.
Weight
You need to make sure that the plywood or wooden sheet that you select can safely be mounted on your wall.
The wall should be capable of holding its weight with ease.
A concrete wall should be ideal for this setup.
Height
Next is the height, which should be at a comfortable working height for you.
But a small difference in mounting height won’t affect how well it works as a whole, so you can mount it on the wall.
The standard height of an iron folding table is around 32 inches above the ground.
Size
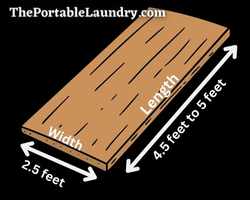
The width and length of the table should be based on your preferences and how comfortable you want it to be.
You can keep a width of at least 2 feet (as a standard size, keep a width of 2 ½ feet to 3 feet, or as needed for space and comfort).
In regards to its length, it should be around 4 feet or more (up to 5 feet should do the trick, or you can increase it at your convenience).
Folding
You need to decide if you want a locking mechanism for your ironing board, such as foldable brackets or shelves.
Though it’s not required, having this can be beneficial if you have small children or pets who might try to use it as a climbing surface.
Make sure to mount it in such a way that it folds down to the wall, which is the standard way of mounting.
Once you have all the components ready, it’s time to start mounting your ironing table to the dedicated wall.
Space
The most important thing to keep in mind is the space you want to dedicate to your ironing board.
Make sure that the area is flat and strong enough to support the weight of the shelf and its contents.
The power source or outlet for your ironing machine should be close enough to operate it comfortably.
The area should be well-lit, or you will need to install a lamp or bulb above the ironing board.
Additionally, it should be a ventilated place.
If you have space in your laundry room, then it would be best to install it close to your washer and dryer.
Steps to wall-mount the ironing board
Now that you know the basics of what you need to get started with your carpentry project, let’s take a closer look at how to mount an ironing board.
Step 1: Measure and mark
To start with, use a stud finder if necessary, and once you’ve found the studs, mark their location with a pencil on the wall so you know where to drill your pilot holes.
Use a leveler tool to check the accuracy of your measurements and ensure that the holes you drill are level.
Step 2: Drill holes
Next, using a drill, create two pilot holes at each stud location.
Only drill as deep as you need to; any more and you risk damaging the surface.
Step 3: Mount the holding brackets
Now it’s time to attach your brackets, so depending on the type of bracket you’re using, you can start fixing them.
Simply place the wall brackets for your wooden board into the pilot holes and screw them into place.
Note: This may require screws, nails, or adhesive strips. So, proceed accordingly.
Step 4: Check the level
Once your brackets are in place, double-check that they’re level before attaching your ironing board top.
Step 5: Fix the board
Using a wooden drill bit, start drilling holes in the markings of the wooden board.
Keep the brackets unfolded and in a locked position.
To attach the board to the bracket, place the board over the bracket and screw it into place according to the markings. It will at least require two or more screws or bolts on either side.
Step 6: Test the movement
Once your ironing board is assembled, test it out by folding and unfolding it several times to make sure everything works smoothly.
Step 7: Inspect the bracket locks
Now check if the locks on the holding bracket are working fine by locking them as you unfold the board.
Apply gentle pressure to the ironing board in an open position (the “unfold position”) to ensure it can support the weight of the iron.
Step 8: Fix a protective layer
Take a sheet that can tolerate high heat, something like thick cotton, a towel, or a Teflon surface sheet, and attach it to the ironing board.
These sheets come in a variety of colors, so most likely you should be able to find one that matches the overall look and feel of the house.
Additionally, fix an ironing blanket or a protective sheet (such as an ironing pad) over the board for added safety.
Step 8: Start ironing as usual

You are all set, and now you can start ironing your clothes as usual.
You can use an iron stand to place the iron as you reposition the garments while ironing them.
Final Thoughts
Wall mounts are great for small spaces because they allow you to fold your table up against the wall when you’re not using it.
Also, a DIY foldable wall-mount ironing board can be used in more than one way, giving you more storage space in your home.
The wall-mounted boards are easy to move and can be installed in another location.
You can make it at home and on your own with the right tools and basic hardware knowledge.
However, you can also get it done quickly with the help of a local carpenter, and it won’t cost you much compared to the ones that are readily available in the market.
Frequently Asked Questions
What is a good substitute for an ironing board?
A bathroom counter, a wooden or tile floor, a coffee table, a kitchen, or anything that has a flat surface with enough heat resistance can be used as a good substitute for an ironing board.
How much time does it take to make a Wall-mount ironing board?
It usually takes about an hour or two for an experienced person to make the wall-mount ironing board. However, it may take longer if you are a novice.
What is the best material for building a wall-mount ironing board?
Plywood is probably the best choice for building a Wall-mount ironing board. It is sturdy, easy to work with, and relatively lightweight. If you want to make it look fancier, you can choose a wooden board instead.
What is the best material for an ironing board cover?
An unbleached cotton or Teflon surface should be an ideal choice for an ironing board cover. Besides being highly durable and heat-resistant, it is also easy to clean. Additionally, it provides a smooth surface for better ironing.
How do I keep my Wall-mount ironing board from slipping?
You can keep your Wall-mount ironing board from slipping by using adhesive strips or silicone pads on the bottom. Additionally, you can use two screws to mount it securely to the wall. This will help keep it in place while you are ironing.
Can you use plywood as an ironing board?
Yes, you can use plywood as an ironing board. But to protect the plywood from damage, you should cover it with a heat-resistant material like Teflon or a thick layer of cotton. Additionally, make sure that the plywood is flat and free of splinters before you use it.
You May Also Like
- How to Install a Clothesline? (Step-by-step)
- How to Install a Clothesline Tightener? (Step-by-Step)
- How to Hookup a portable washer to the sink?
- How To Clean Car Carpet Without Extractor? (Comprehensive)
- How To Loosen Washing Machine Hose Safely? (Easy Guide)
- How to put Fabric Softener in a Washing Machine?
- How to Wash Allbirds Shoes? (Step-by-Step)
- How to Wash a Pillow Pet? (Step-by-Step)
- Five Stages Of Laundry Process (Explained)
- Laundry Bags: 11 Commonly Asked Questions Answered
- What does the laundry service do? (Explained)
- Do ozone laundry systems work? (Explained)
- What is a FoldiMate in Laundry? (Benefits & Drawbacks)
- Five Stages Of Laundry Process (Explained)
- How to use a Steam Iron effectively?
- Why is iron not heating up? (Explained)
- How to use charcoal iron effectively? (Explained)
- Steam Iron: 21 Frequently Asked Questions on steaming