Foxes have this playful charm that instantly grabs a child’s attention.
That’s exactly why this paper plate fox craft has become one of my favorite projects whenever fall rolls around.
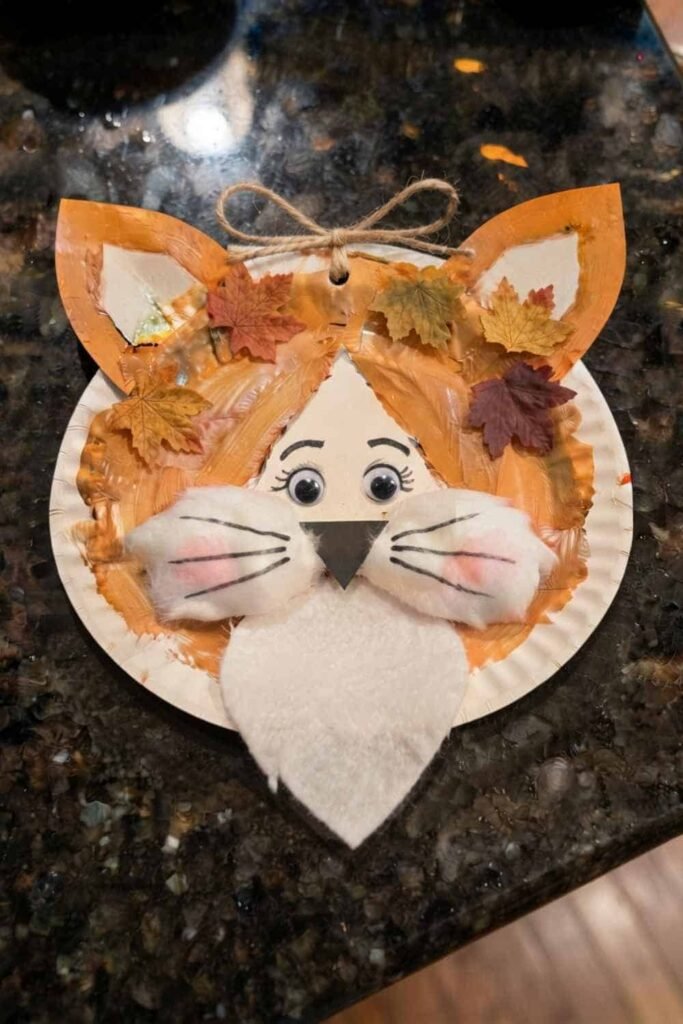
It isn’t expensive, it doesn’t require fancy supplies, and the finished fox looks surprisingly adorable hanging on a wall or classroom display.
The best part? Even if you’ve never made a paper plate craft before, you’ll be able to follow along without guessing what comes next.
Ready to turn one simple paper plate into a cheerful woodland friend? Let’s get started.
Why You’ll Love This Paper Plate Fox Craft
There are plenty of paper plate crafts, but this one feels different.
Instead of simply gluing a few shapes together, you’ll build the fox little by little. Every step adds something new, so children actually see their project come alive.
It’s perfect for:
- Preschoolers (with adult help)
- Kindergarten classrooms
- Elementary school art
- Family craft afternoons
- Rainy day activities
- Woodland themed units
- Forest animal crafts
- Autumn paper craft activities
- Fall craft project collections
I actually loves how forgiving this project is. A slightly crooked ear or uneven eye somehow makes the fox look even cuter.
Supplies Needed To Make Paper Plate Fox Craft
Gather everything before starting.
You’ll need:
- 1 sturdy white paper plate (9-inch)
- Orange acrylic paint
- White acrylic paint
- Black acrylic paint
- Medium paintbrush
- Small detail brush
- Orange construction paper
- White construction paper
- Black construction paper
- Pencil
- Scissors
- School glue
- Black marker
- Pink pastel or pink crayon (optional)
- Googly eyes (optional)
- Newspaper or craft mat
Before You Begin
Here’s one little trick I always recommend.
Lay the paper plate upside down.
The raised rim naturally creates dimension around the fox’s face without adding extra pieces.
Simple, but it makes the finished craft look much nicer.
Step 1: Paint the Base of the Fox
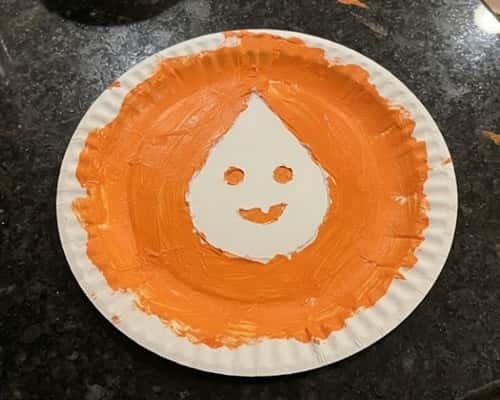
Turn the paper plate upside down.
Paint almost the entire surface orange.
Leave a large upside-down teardrop shape in the center unpainted. This white area will become the fox’s face.
Don’t stress if the paint isn’t perfectly smooth. Slight brush marks actually make the finished fox look handmade instead of factory perfect.
Paint the outer rim completely orange.
Now let everything dry completely before moving on.
Rushing here only creates muddy colors later.
Step 2: Create the Fox’s Ears
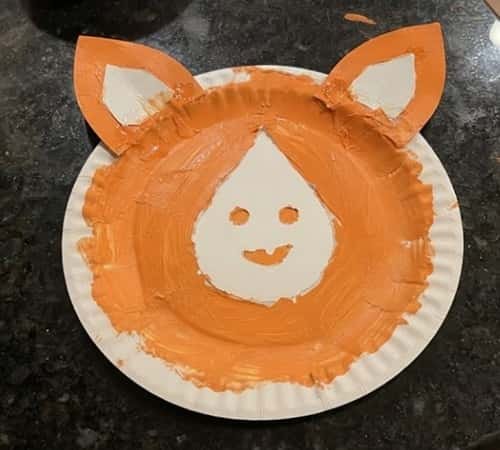
Fold a piece of orange construction paper in half.
Draw two tall triangles with softly rounded sides.
Cut them out.
Now cut two slightly smaller white triangles.
Glue one white triangle inside each orange ear.
This tiny layered detail gives the fox much more personality.
Flip the paper plate over slightly.
Glue both ears behind the top edge so only the pointed parts stick out.
Try to keep them evenly spaced.
If one ear leans a little, honestly it still looks adorable.
Sometimes handmade is more fun then perfect.
Allow the glue to dry for several minutes.
Step 3: Make the Fluffy Cheeks
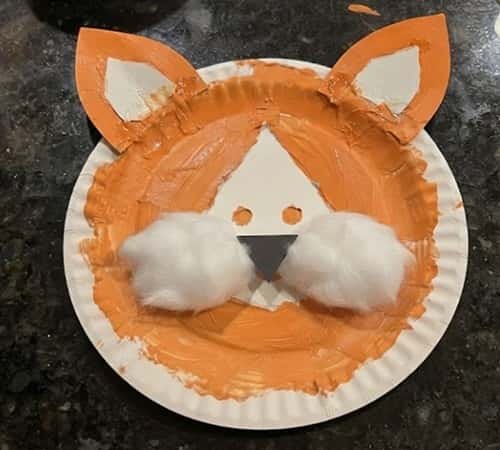
The fox starts looking real during this step.
Cut two white oval shapes.
Flatten one side of each oval.
Glue them onto the lower sides of the white face.
They should overlap slightly in the middle.
Together they create fluffy cheeks.
Next, cut a tiny black rounded triangle.
Glue it where the two cheek pieces meet.
That’s the fox’s nose.
Already starting to look cute, isn’t it?
Leave everything untouched until the glue grabs properly.
Step 4: Add the Eyes and Facial Details
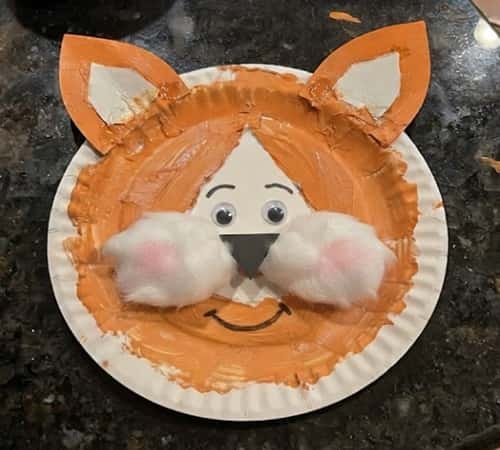
Now your fox gets its personality.
Glue two googly eyes above the cheeks.
No googly eyes?
Draw two round eyes with black marker instead.
Use the marker to draw tiny eyelashes if you’d like.
Draw a small smile beneath the nose.
Keep it simple.
Less really works better here.
Add tiny curved eyebrow lines.
Finally, use a pink crayon to lightly color small blush circles on each cheek.
The blush isn’t required.
But wow, it really changes the whole expression.
My son always says the cheeks make the fox look “friendlyer.”
Step 5: Give Your Fox a Soft Chest
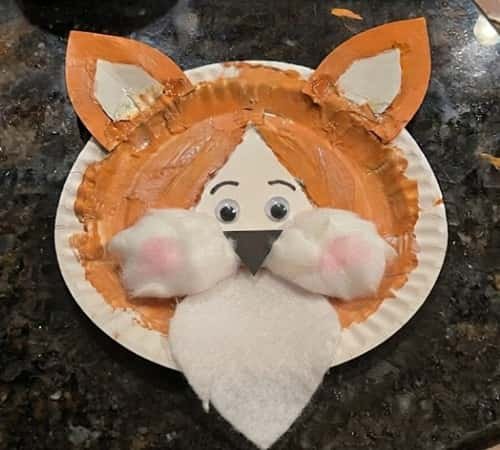
This small addition makes a huge difference.
Cut one rounded white teardrop shape.
Glue it below the face so it hangs slightly over the lower edge of the paper plate.
This becomes the fluffy chest fur.
Round the edges instead of making sharp points.
Fox fur naturally looks soft.
Stand back for a second.
Can you see how the fox suddenly feels more complete?
Kids usually notice this part right away.
Its amazing how one extra piece changes everything.
Step 6: Add Whiskers and Tiny Finishing Touches
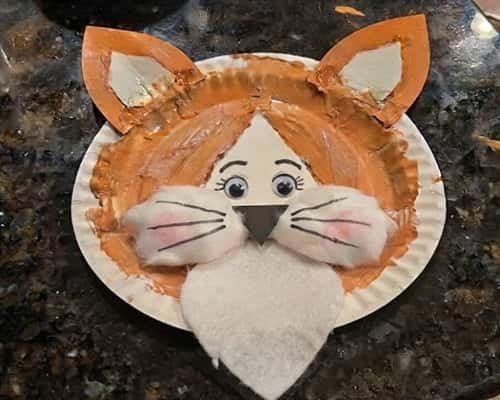
Grab your black marker.
Draw three short whiskers on each side.
Keep them thin.
Now outline the nose very lightly.
Add tiny white paint dots inside each eye if you drew them instead of using googly eyes.
These highlights make the eyes sparkle.
Look closely.
Does one whisker sit higher than another?
That’s okay.
Real handmade projects shouldn’t look laser perfect.
I actually leave little imperfections because they remind children that creativity doesn’t need perfect lines.
Step 7: Optional Fall Leaf Decoration
Want to make it feel even more seasonal?
Cut three or four tiny maple leaf shapes from yellow, red and orange paper.
Glue them near one corner of the paper plate.
Don’t cover the fox.
Instead, make the leaves appear as though they’re gently drifting beside it.
This transforms the project into a lovely fall craft without making it too busy.
It’s also a fun opportunity to talk about changing seasons while enjoying art activities for kids.
Simple details often tell the biggest story.
Step 8: Display Your Finished Paper Plate Fox
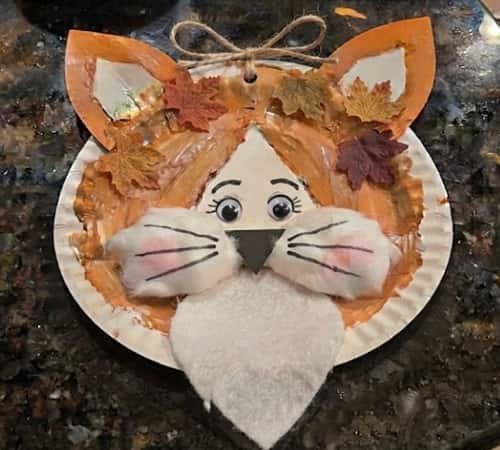
Congratulations.
Your woodland fox is finished.
Punch a small hole near the top.
Thread ribbon or twine through it.
Hang it on:
- Classroom bulletin boards
- Bedroom doors
- Fall windows
- Reading corners
- Homeschool displays
- Woodland themed parties
You can also glue the finished fox onto colored cardstock for a sturdier display piece.
One fox looks adorable.
A whole family of foxes looks absolutely fantastic.
Children usually starts making different expressions once they finish the first one.
Fun Ways to Customize Your Paper Plate Fox
Want every fox to look unique?
Try these ideas:
- Make a sleepy fox with closed eyes.
- Create a snowy winter fox using white paint.
- Add tiny freckles.
- Glue cotton around the cheeks for extra fluff.
- Use textured sponge painting instead of smooth brush strokes.
- Turn the fox into a puppet by attaching a craft stick.
- Create a full woodland collection alongside bears, owls and hedgehogs for themed forest animal crafts.
Final Thoughts
One thing I’ve noticed after making dozens of paper plate crafts is that children rarely remember whether every line was straight.
They remember how the project made them feel. That’s why this paper plate fox craft works so well.
It quietly builds cutting, painting and planning skills while leaving plenty of room for imagination.
The fox becomes more than a simple paper craft… it becomes a story starter, a decoration and sometimes even a favorite character during pretend play.
If you’re collecting meaningful kids craft ideas for autumn, this cheerful woodland friend easily earns a permanent place in your fall craft collection.





