Ganesh Chaturthi always brings a different kind of excitement into our home.
Instead of buying decorations every year, I like creating something handmade with my son because those little memories stay much longer than store-bought decorations.
This paper plate ganpati craft is simple enough for beginners yet looks surprisingly attractive once finished.
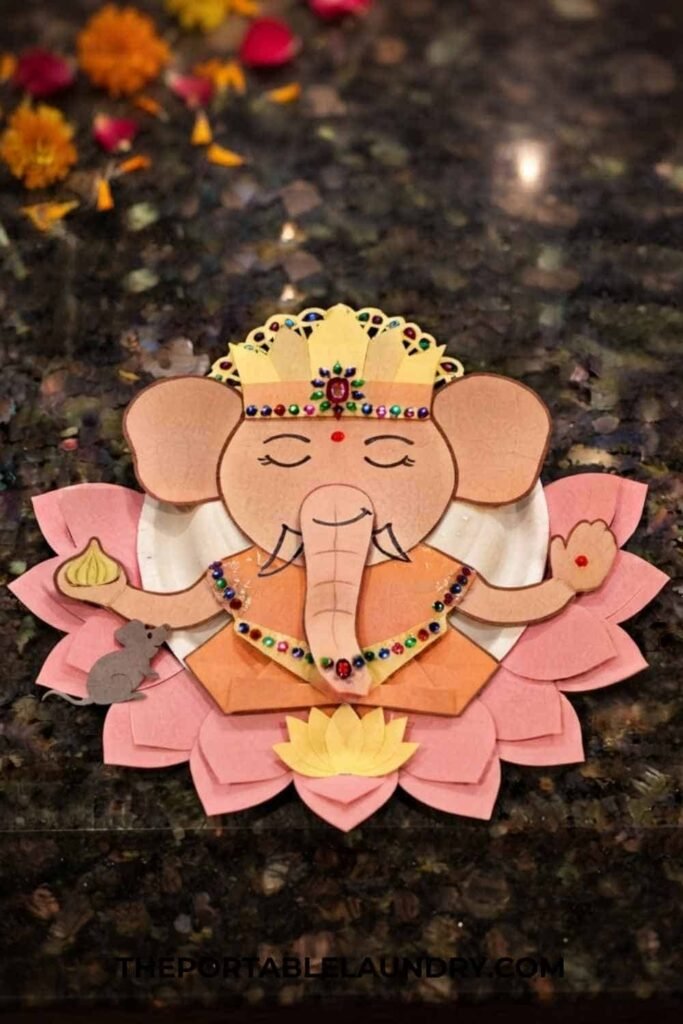
If you’ve been searching for an easy lord ganesha statue using paper plate, you’re in the right place.
Don’t worry if you aren’t very crafty. You don’t need fancy supplies, and by the end of this tutorial you’ll have a colorful keepsake that’s perfect for home decoration, classrooms, or festive kids craft sessions.
Why You’ll Love This Paper Plate Ganpati Craft
Unlike many paper plate projects that rely on complicated cutting, this version builds the entire paper plate Ganpati idol from simple layered shapes.
That means it is easier to follow, easier to teach, and even easier to turn into a printable template later.
Here’s why I keep coming back to this idea:
- Beginner friendly with simple shapes
- Great for Ganesh Chaturthi celebrations
- Uses inexpensive craft supplies
- Suitable for craft activities for preschool (with adult help)
- Easy to customize with different colors
- Makes a lovely classroom display
- Can even become a hanging decoration
And honestly, isn’t it fun when a plain paper plate transforms into something so meaningful?
Materials Needed To Make Paper Plate Lord Ganesha Idol
Gather everything before starting. It makes the whole process smoother.
Base
- 1 white paper plate (9-inch works best)
- Pencil
- Eraser
Colored Paper
- Peach or light pink craft paper
- Orange craft paper
- Yellow craft paper
- Red craft paper
- Green craft paper
- Light blue craft paper
- White cardstock
Craft Supplies
- Child-safe scissors
- Glue stick
- White craft glue
- Black marker
- Pink marker
- Gold glitter pen (optional)
- Small rhinestones or sequins (optional)
Before You Begin
This project works best if you think of Lord Ganesha as a collection of easy pieces instead of one difficult drawing.
You’ll create:
- One large circular face
- Two oversized ears
- One long curved trunk
- A crown
- Curved arms
- Round belly
- Folded legs
- Decorative lotus base
That’s it. It sounds like a lot, but every piece uses rounded shapes that are very forgiving.
Even if one ear becomes slightly larger, nobody will notice. Mine wasn’t perfectly even either, and it still looked wonderful.
Step 1: Prepare the Paper Plate Base
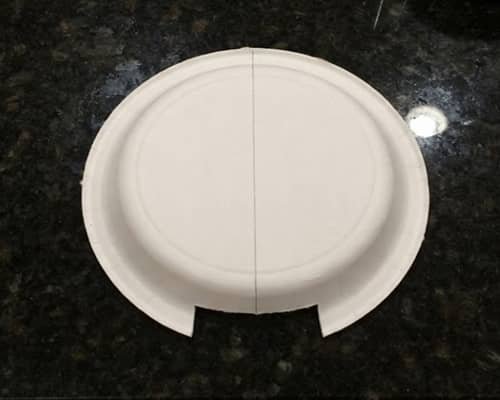
Start with a clean white paper plate and place it upside down so the raised center becomes your working surface.
This gives your paper plate craft a slightly three-dimensional appearance without needing extra cardboard.
Now lightly draw a vertical line down the center using a pencil.
Don’t press hard because you’ll erase it later. This simple guide helps keep the face balanced while positioning the ears, trunk, and crown.
Next, cut a narrow flat section… about ½ inch… from the bottom edge of the plate.
That tiny trim creates a stable base so your finished lord ganesha sculpture can sit nicely against a wall or inside a display without looking tilted.
Before moving ahead, quickly wipe away any pencil dust. Little details like this actually makes the finished craft look cleaner.
Don’t worry if the cut isn’t perfectly straight. Handmade crafts have personality, and that’s part of the charm.
Step 2: Build Lord Ganesha’s Face
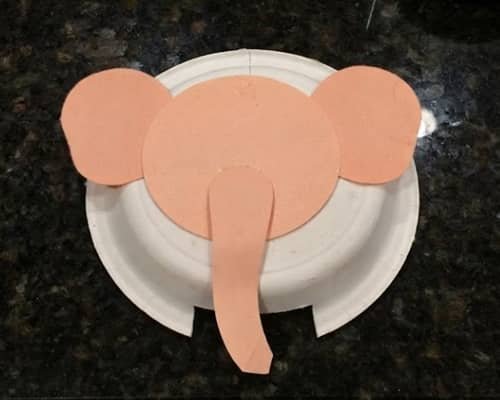
Using peach-colored craft paper, trace and cut a large circle that fits comfortably inside the raised center of the plate. This becomes the face.
Next, cut two large teardrop-shaped ears.
Keep them oversized because Lord Ganesha is traditionally shown with broad ears symbolizing listening and wisdom.
Now comes the trunk.
Draw a long strip that gently curves toward the left. Round off the end instead of making it pointy.
The trunk should reach almost to the bottom edge of the plate while leaving enough room for the lotus you’ll add later.
Glue the ears first.
Then glue the face circle directly over the center.
Finally, attach the trunk on top of the face so it overlaps naturally from between the eyes down toward the lower half of the plate.
Already starting to resemble Ganpati, isn’t it?
One ear maybe sits a little higher than the other, and thats perfectly alright because handmade crafts rarely follow rulers.
Step 3: Add the Crown, Eyes, and Gentle Expressions
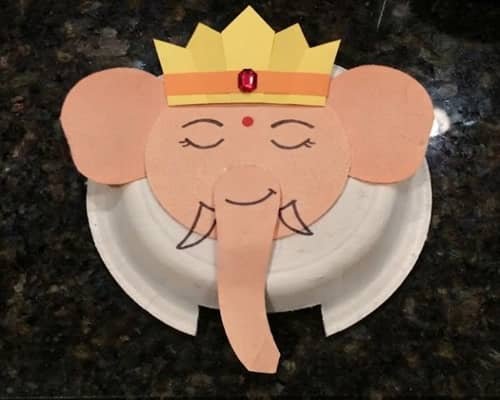
Now your paper plate Ganpati craft begins to come alive.
Cut a bright yellow crown shaped like a rounded temple arch.
Don’t overcomplicate the edges. Large curves actually look better than tiny spikes.
Glue the crown so it slightly overlaps the top of the face.
Cut a smaller orange strip to layer over the crown. Add a tiny red diamond in the middle to resemble a jewel.
Using a black marker, draw two relaxed almond-shaped eyes. Keep them slightly closed instead of fully open because it creates a peaceful expression.
Draw thin eyebrows.
Add a tiny curved smile.
Use a black marker to draw one visible tusk beside the trunk and the second tusk slightly shorter.
According to traditional depictions, Lord Ganesha’s broken tusk carries deep symbolic meaning, making this little detail extra special.
Finish by drawing a red tilak between the eyebrows.
The smile dont need to be perfectly even. In actuality, a face with somewhat irregular lines tends to appear warmer and more handcrafted.
Step 4: Create the Body, Arms, and Sacred Modak
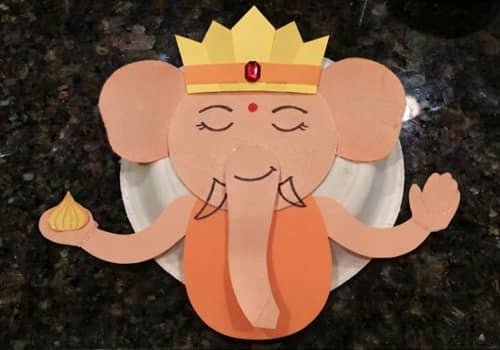
It’s time to give your lord ganesha statue a complete body.
Cut a rounded orange oval about half the size of the face. This becomes the tummy.
Glue it directly below the trunk while leaving a small overlap.
Next, cut two long curved arms from peach paper.
Each arm should bend naturally toward the center as though Lord Ganesha is gently holding offerings.
Glue one arm on each side of the body.
For the hands, cut two tiny rounded mitten shapes.
In the left hand, glue a small yellow modak made from a rounded triangle with soft ridges drawn using an orange marker.
On the opposite side, create an open blessing hand by drawing three tiny curved finger lines with a marker.
Already it feels much more festive, doesn’t it? The overall figure now has a calm sitting posture that becomes even more recognizable once the legs and lotus are added in the next steps.
Step 5: Add the Folded Legs, Lotus Seat, and Mouse Companion
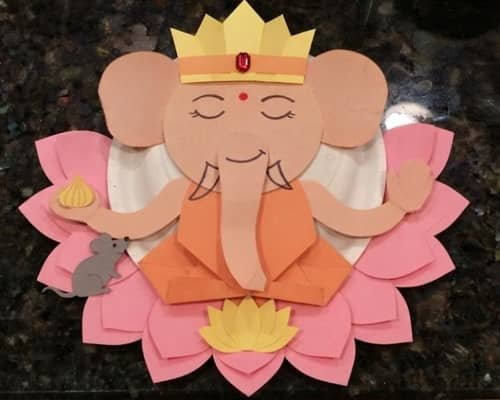
Now the craft finally starts looking like a seated Lord Ganesha. This is my favorite part because everything suddenly comes together.
Cut two orange rounded rectangles with one end slightly curved.
Fold each piece very gently in the middle to create a natural bend instead of a completely flat leg.
Glue the upper half of each leg underneath the body so the folded section sticks out just a little.
This tiny fold creates a soft shadow and gives your paper plate Ganpati idol a little dimension without making the project difficult.
Next, create a lotus seat. Cut eight to ten large pink petals with rounded tips.
Make all of them roughly the same size, but don’t stress over perfection. Flowers in nature aren’t perfectly identical either.
Glue the petals around the trimmed bottom edge of the paper plate so only the upper halves remain visible.
Work from the center outward, slightly overlapping each petal. This layering creates a fuller lotus without using extra materials.
Cut a smaller yellow oval and glue it across the middle of the petals to become the lotus center.
Want to add one more meaningful detail? Make a tiny gray mouse using an oval body, a small circle for the head, two little ears, and a long curved tail.
Place it near Lord Ganesha’s left foot, looking upward toward him.
The mouse is traditionally known as Mushak, Lord Ganesha’s vehicle, and including it gives your craft a thoughtful finishing touch.
If your lotus petals don’t line up perfectly, nobody is going to notice it unless they measure them with a ruler.
Step 6: Decorate the Crown, Clothes, and Halo
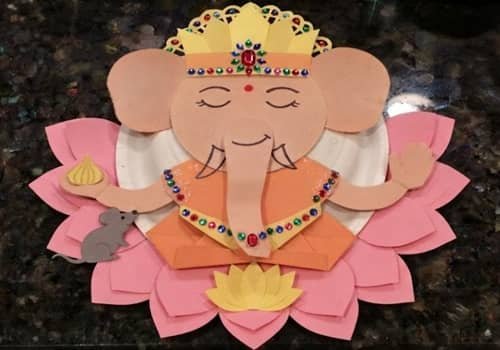
The structure is complete, so now it’s time to add personality.
Cut small teardrops, circles, and diamonds from red, green, and blue craft paper. Glue these onto the crown to resemble colorful gemstones.
Instead of covering every inch, leave a little yellow showing through. That contrast keeps the crown from looking too busy.
Create a simple shawl by cutting two narrow orange strips and placing them diagonally across the shoulders.
Add a small yellow waistband just above the folded legs.
Now cut a large yellow ring that is slightly smaller than the paper plate itself.
Carefully trim out the center so it becomes a halo rather than a solid circle.
Glue the halo behind the head, letting only the upper portion peek out above the crown.
Because it’s attached behind the face, the halo instantly gives the lord ganesha sculpture more depth.
Use a gold glitter pen to trace the crown edges, halo, and lotus center if you have one.
If you don’t, simply use a yellow marker. The craft still looks beautiful.
There is no rule saying every decoration has to sparkle. Sometimes the simpler version actually photographs better.
Step 7: Add the Final Details and Bring Lord Ganesha to Life
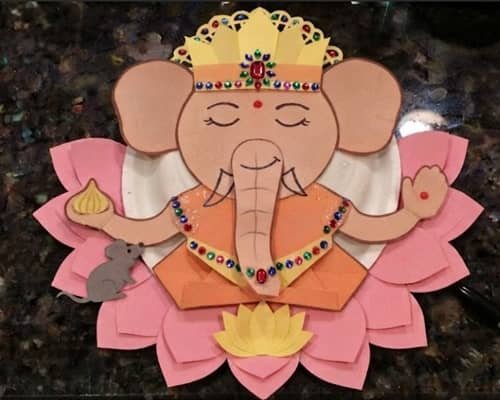
Now step back for a moment. Does anything feel empty? This is the stage where tiny details make a surprisingly big difference.
Outline the ears, trunk, arms, and lotus petals with a slightly darker marker. Don’t make thick cartoon lines. A soft outline helps every piece stand out without overpowering the craft.
Draw gentle curved lines across the trunk to suggest natural folds.
Add tiny white highlights inside the crown jewels using a gel pen or a white marker.
This simple trick makes the decorations appear slightly raised.
Place a small red dot on each palm.
Add a few delicate curved lines to the folded legs to suggest fabric.
Finally, erase any remaining pencil marks that might still be visible around the edges.
Take one last look before the glue fully dries. If something feels slightly crooked, now is the easiest time to adjust it.
Sometimes I intentionally leave a tiny glue smudge instead of trying to fix it.
Oddly enough, it reminds everyone that a child really made this kids craft, and I think that’s part of its charm.
Step 8: Display and Enjoy Your Handmade Ganpati
Your paper plate ganpati craft is complete.
If you’d like to hang it, glue a short loop of ribbon to the back of the paper plate.
For a tabletop display, tape a folded strip of cardstock behind the plate to create a simple stand.
This craft also works wonderfully as a festive classroom decoration, a family activity during Ganesh Chaturthi craft sessions, or as part of craft activities for preschool where adults prepare the template pieces in advance.
You can even personalize your paper plate craft by changing the crown colors, adding patterned paper, using glitter foam instead of cardstock, or decorating the lotus with fingerprint dots.
The best part? Every child ends up making a slightly different Lord Ganesha, and every single one feels special.
Easy Ways to Customize This Craft
Once you’ve made one version, try experimenting with different themes.
- Traditional Version: Gold crown, red shawl, pink lotus, and orange clothing.
- Pastel Version: Soft peach, mint green, baby blue, and lavender for a gentle modern look.
- Eco-Friendly Version: Kraft paper, recycled magazines, and natural jute ribbon.
- Classroom Version: Print all template pieces on colored cardstock so every child can assemble their own paper plate Ganpati idol.
- Decor Version: Add a larger halo and extra lotus petals to create a festive wall hanging.
Final Thoughts
A handmade craft can do something that a store-bought decoration rarely manages… it invites conversation.
While children cut, glue, and arrange each piece, they naturally begin asking questions about why Lord Ganesha has a curved trunk, large ears, or a mouse beside him.
Those little conversations quietly turn craft time into learning time without feeling like a lesson.
That’s what I enjoy most about this paper plate Ganpati craft. It isn’t just another festive activity.
It becomes an opportunity to share traditions, build creativity, improve fine motor skills, and create a keepsake that carries a memory long after Ganesh Chaturthi has ended.





