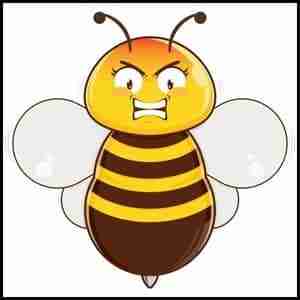
Buzz buzz! Get ready to create your own fierce paper friend with this fun paper bumble bee craft for kids.
I’ll guide you through transforming a simple printable bumble bee craft template into an adorable (but angry-looking) bee buddy.

Don’t let their grumpy expression fool you, making this craft is an absolute joy.
Grab your scissors, glue, and craftiest mindset as we cut, fold, and assemble the pieces into 3D bug bliss.
This bumblebee won’t sting, but it might just steal your heart with its papery charm.
Let’s dive right in and craft an insect masterpiece you’ll bee proud to display.
The best part? No actual bees were disturbed in this creative process.
Let’s take a quick look at the list of items required to make this angry paper bumble bee craft for preschoolers and toddlers.
Materials required to craft this angry paper bumble bee
- Scissors (preferably fine scissors for small details)
- Glue
- Printable bumble bee craft template (downloadable from this link)
- The template comes in two versions i.e. one pre-colored and one with an outline for you to color yourself (Use any one).
Step 1: Preparing/Downloading The Printable Bumble Bee Craft Template

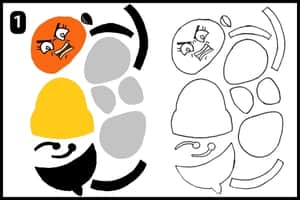
To start assembling the angry Bumblebee, you’ll need the printable bumble bee craft template.
You can easily download them from my blog with just a few clicks. Once downloaded, print the template and cut out the shapes for your Bumblebee.
If you check the image above, you’ll see what the template looks like.
I’ve made the printable bumble bee craft template available in two versions:
- One filled with colors
- And one with blank outlines – If you want to customize the colors, use the blank template to add your own shades.
Step 2: Cutting the Shapes

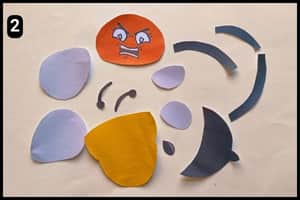
After downloading and printing the template, it’s time to cut out the shapes for assembly.
I used the colorful version of the angry Bumblebee template and carefully cut the shapes with a fine pair of scissors.
Remember to take your time with the fine details and tiny shapes, using small scissors for precision.
Step 3: The Assembling Process

It was time to assemble the shapes of the bee, so I started by attaching its antennas to its head.
This step ensured that the angry facial structure of the bumblebee was ready.
Step 4: Assembling the Lower Body

Next, I aligned and assembled the lower body of the bee using the black and yellow shapes.
I first attached the yellow shape to the black base of the bee.
Then, I carefully aligned and stuck the black stripes over its body one by one.
With this, the lower body of the angry Bumblebee was also assembled.
Step 5: Fixing the Head with lower body

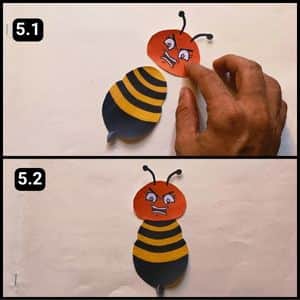
With the facial structure and lower body assembled, it was time to attach them together.
I applied glue to the top edges of the lower body and fixed the head to the front.
The bee was almost ready, but I still needed to assemble the wings (more on that in the next steps).
Step 6: Assemble the Bumblebee’s Wings

With this, we moved to the final step of the angry Bumblebee papercraft activity.
I began assembling the wings by attaching the large ones to the back of its body.
It was best to align the wings first, then apply glue to secure them in place.
Next, I positioned the small wings, ensuring they were properly aligned, and then attached them to the back of the structure.

The final structure looks just like an angry Bumblebee glaring at you. Doing this as a group activity was a hit with the children; they enjoyed it immensely.
This Bumblebee looks very angry, so watch out, or she might just give you a sharp poke!
Final Thoughts
I absolutely love projects like this that blend creativity with learning.
Not only do kids get hands-on practice with scissors and fine motor skills, but making the bee’s angry expression encourages emotional intelligence.
No matter their age, seeing their pride when the 3D bee comes to life is pure magic. A guaranteed pleasant-bee time together
I’d recommend having kids act out what might make the bee mad – was its nectar stolen? Did a human swat at it? The dramatic storytelling builds empathy.
Lastly, for younger kids, use safety scissors and do the intricate cuts yourself. Older children can try simple quilling with the stripes for an extra skill.
Note: For your reference I have uploaded the complete video walkthrough of the angry Bumblebee papercraft on our official YouTube channel.
Frequently Asked Questions
How long did it take to make the angry Bumblebee papercraft using the Printable Bumble Bee Craft Template?
It took 8 minutes for me to craft the angry Bumblebee craft using the colorful printable template from the website.
Is this bumble bee craft appropriate for a group activity?
Yes, this bumble bee craft is perfect for a group activity, especially for children of similar ages. Prepare the materials beforehand, and you can have a fun and creative session where everyone makes their own angry bumble bee.
Can I make this bumble bee double-sided?
Yes, you can make this bumble bee double sided, this will create a more finished look, especially if you plan to hang it as a mobile. Simply print two copies of the template (one mirrored if desired for different wing positions) and assemble the bee with the colored sides facing outwards on both sides.


