Tiny food crafts have a strange little charm, don’t they? A miniature strawberry, a slice of toast, or a tiny bowl of noodles can look surprisingly convincing when it is shaped by hand.
These small clay food figures take that idea a step further by using smooth, homemade cornstarch clay instead of complicated sculpting materials.
The result is inexpensive, beginner-friendly and wonderfully imperfect.
You can make these pieces for pretend-play scenes, miniature shelves, dollhouse displays, craft collections, or simply as one of those kids craft activities that keeps little hands busy.
And because the clay can be made with simple household ingredients, you don’t need a fancy craft kit to get started.
Before You Start… Make a Simple Cornstarch Clay
For these projects, use a basic air dry cornstarch clay.
One important thing first: this clay is for crafting only.
Even though some recipes use food ingredients, the finished clay and painted figures should never be eaten.
Basic cornstarch clay recipe
You’ll need:
- 1 cup cornstarch
- 2 cups baking soda
- 1¼ cups cool water
- A small amount of white acrylic paint later, if you want to tint the clay
- Acrylic paints for finishing
- A clean work surface
- Toothpicks or wooden skewers for tiny details
- A rolling pin, smooth bottle or flat glass
- Small paintbrushes
Make the clay
- Add the cornstarch and baking soda to a saucepan and stir them together while dry.
- Slowly pour in the water, stirring continuously so you don’t end up with dry pockets.
- Place the saucepan over low to medium-low heat.
- Keep stirring. The mixture will first look like thin paste, then thick mashed potatoes, and finally start pulling away from the sides of the pan.
- Once it becomes a soft dough-like mass, turn off the heat.
- Move it carefully to a spotless plate or work area.
- Let it cool until it is comfortable enough to handle.
- Knead it for several minutes until smooth.
If it feels sticky, dust your fingers with a tiny amount of cornstarch. Don’t dump in lots at once because the clay can become crumbly.
Keep unused dough wrapped tightly in plastic or inside an airtight container while you’re working. Cornstarch clay begins to dry surprisingly fast when exposed to air.
For the figures below, think small but not microscopic. Pieces around 1 or 2 inches are much easier for beginners to shape, paint and dry without breaking.
For details I would recommend you to check our DIY Cornstarch Clay Recipe Here.
And to make your cornstarch clay waterproof, I recommend you check out our Cornstarch clay waterproofing guide here.
1. Tiny Strawberry With a Leafy Crown
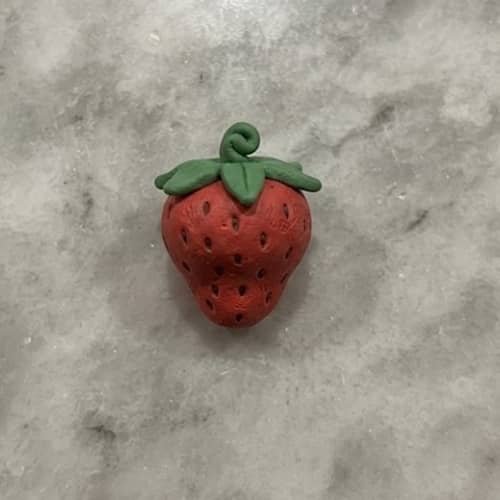
A strawberry is probably one of the easiest places to begin, but the trick is making it look like an actual strawberry rather than a red blob.
What you’ll need
- Red-tinted or plain cornstarch clay
- Green clay
- Red acrylic paint
- Dark red or brown paint
- Green paint
- Toothpick
How to make it
To begin, roll a little piece of clay into a smooth ball.
Now pinch one end gently between your thumb and index finger, creating the slightly pointed bottom that strawberries naturally have.
Don’t make it perfectly symmetrical; real strawberries aren’t.
Take a toothpick and press tiny shallow marks across the surface. These will become the little seed pockets.
For the leafy top, flatten a very small piece of green clay. Cut or pinch five tiny points around its edge and place it over the strawberry’s wider end.
Press the center lightly so the leaves sit naturally against the fruit.
Allow the piece to dry completely according to the clay’s drying behavior. Once hard, paint it red and add tiny dark seed marks.
Finally, paint the leafy crown green.
Tiny twist: Add one slightly squashed side to the strawberry. That small imperfection makes these miniature fruit shapes feel handmade instead of factory-perfect.
2. Mini Toast With a Golden Crust
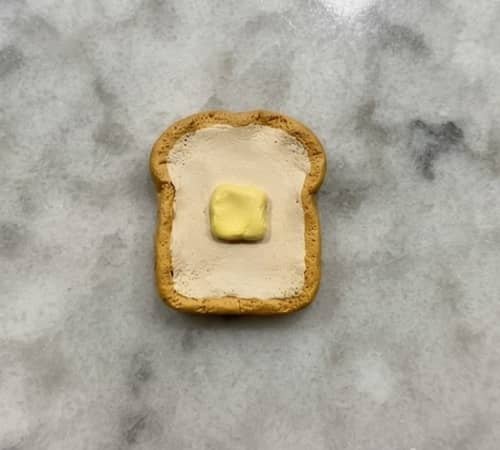
Who doesn’t love a tiny piece of toast? This one works particularly well in miniature kitchen scenes.
Materials
- Beige or unpainted clay
- Brown acrylic paint
- Light cream paint
- Toothpick
Steps
Roll a small ball of clay and flatten it into a thick oval.
Use your fingers to square off the bottom and sides while keeping the top slightly rounded. Toast doesn’t need razor-sharp corners.
With a toothpick, gently press an inner border approximately 3 to 4 mm from the outside edge.
This creates the lighter bread interior and raised crust area.
Let it dry fully.
Paint the inside cream or pale beige, then paint the outer border a warm golden brown.
For a toasted appearance, lightly dab a darker brown around a few corners rather than covering the entire crust evenly.
A little unevenness looks better here.
Creative variation: Add a tiny yellow clay rectangle on top for butter. Press it down only slightly so it looks like it is sitting on the warm toast.
3. Little Watermelon Slice
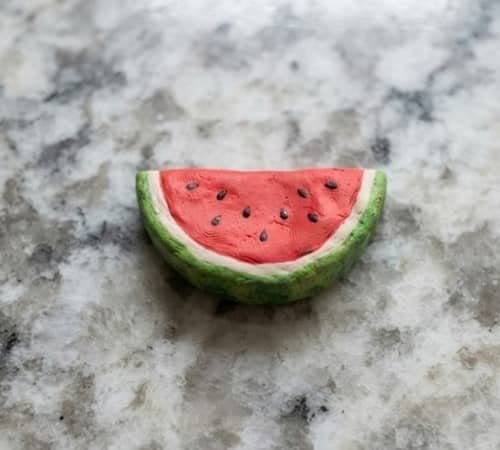
This is where layering becomes useful.
Materials
- Red clay
- Green clay
- White clay
- Black acrylic paint
- Green and red paint
Make it
Roll a small piece of red clay into a ball and flatten it.
Shape it into a semicircle by cutting away one side with a craft blade under adult supervision.
Make a thin strip of white clay and press it along the curved green-facing edge.
Then add a slightly thicker green strip underneath the white layer.
Press the layers together gently, but don’t flatten the whole slice.
For seeds, use the tip of a toothpick to create tiny dark indentations after drying, or paint miniature black teardrops onto the red section.
Keep the seeds irregularly spaced.
That little detail matters more than you think.
4. Mini Donut With Sprinkle Details
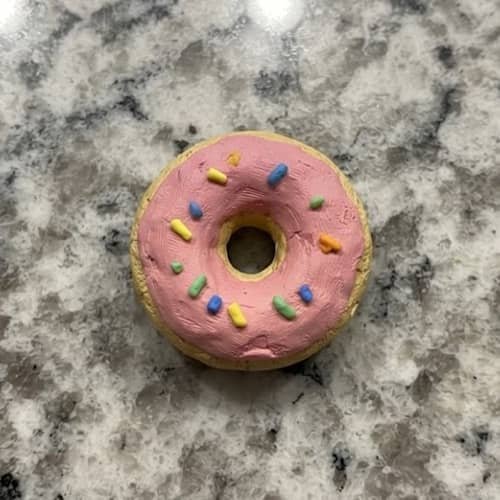
This one is especially fun for children because there are lots of tiny decorating choices.
Materials
- Beige clay
- Pink, white or chocolate-colored paint
- Tiny colored clay pieces
- Toothpick
Instructions
Roll the clay into a small ball.
Push your thumb through the center without piercing all the way through.
Now rotate the piece between your fingers while gently widening the hole.
Smooth the outer ring until it resembles a tiny donut.
Let it dry completely before decorating.
Paint the donut golden beige.
Add a thin layer of pink, white or chocolate-colored icing over the top.
For sprinkles, roll microscopic pieces of colored clay between your fingers and place them across the icing before the icing layer becomes completely firm.
If you’re making these with young children, larger sprinkles are much easier to handle.
5. Tiny Pizza Slice
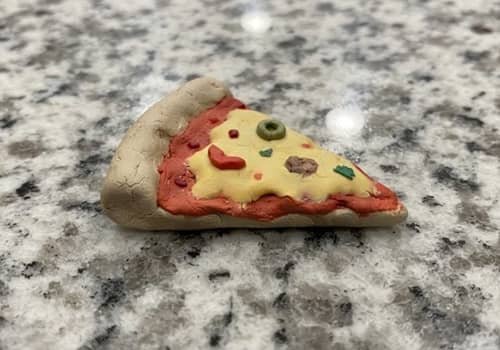
A pizza slice gives you several textures without requiring complicated sculpting.
Materials
- Beige clay
- Red clay
- Yellow clay
- Small green or brown clay pieces
- Paint
Instructions
Flatten beige clay into a small circle.
Cut it into a triangular wedge.
Don’t make the triangle too thin. A slightly chunky slice is easier to handle.
Roll a very thin strip of beige clay and place it along the wide edge to create a raised crust.
Flatten a tiny piece of red clay and place it over the triangular surface as tomato sauce.
Add small flattened yellow pieces for cheese.
Then place tiny toppings… green peppers, brown mushrooms or little red pepper pieces… wherever you like.
Press each topping gently into the cheese.
Once completely dry, add tiny darker paint marks around the crust for toasted spots.
6. Mini Banana Bunch
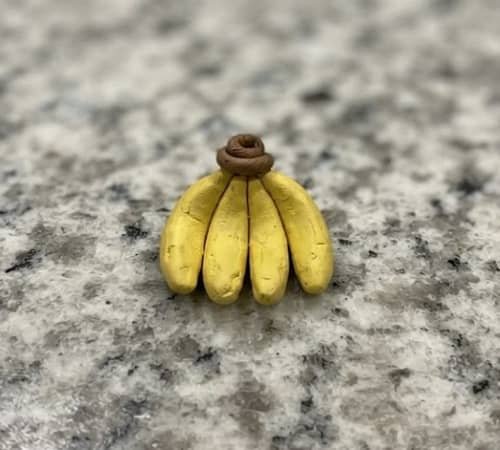
This is one of those miniature fruit design ideas that looks complicated but isn’t.
Materials
- Yellow clay
- Brown paint
- Green or brown clay
Instructions
Make four or five tiny banana shapes separately.
For each banana, roll a narrow clay sausage about 1–1½ inches long.
Curve it gently.
Taper both ends by pinching them lightly.
Now arrange the bananas so their curved sides point outward and their thicker ends meet.
Press the top ends together.
Add a tiny brown clay cap around the joined section.
Once dry, paint the bananas yellow.
Use a barely loaded brush to add a few faint brown marks.
Don’t cover them with spots; bananas have variation.
7. Little Bowl of Noodles
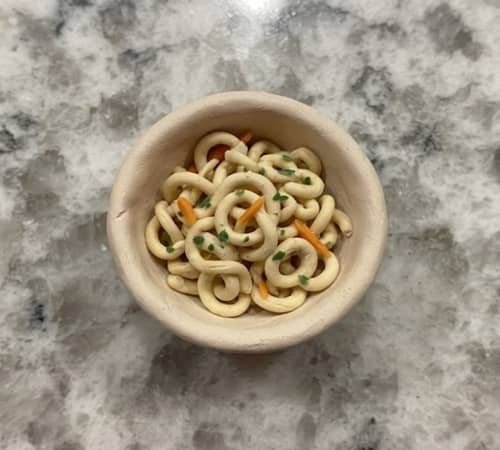
Now let’s make something that isn’t just fruit.
Materials
- White or beige clay
- A tiny amount of yellow clay
- Brown or orange paint
- Toothpick
Instructions
Flatten a small ball of clay into a shallow bowl.
Keep the walls fairly thick because very thin clay can break while drying.
For the noodles, roll several extremely thin clay strands between your palms or fingers.
Don’t worry if they’re not identical.
Place them inside the bowl in loose loops.
Layer a few over the others.
For extra detail, add two or three tiny green or orange clay pieces as vegetables.
After drying, paint the bowl and lightly shade the noodles.
Important: Don’t try to make the strands hair-thin for your first attempt. They become fragile very quickly.
8. Tiny Fried Egg
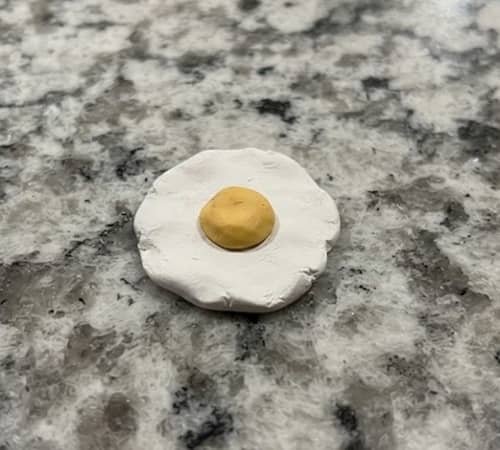
This is probably the simplest figure in the collection, yet it photographs beautifully.
Materials
- White clay
- Yellow clay
- Yellow and orange paint
Steps
Take a small ball of white clay and flatten it.
Don’t smooth the edges too much.
Instead, pinch random sections outward so the white part resembles the irregular edges of a fried egg.
Make a tiny yellow ball.
Flatten it slightly.
Place it in the middle.
Press it down just enough to attach it to the white clay.
Once dry, add a tiny orange-yellow shadow around part of the yolk.
That’s it.
Sometimes simple food art using cornstarch clay is more convincing than something overloaded with details.
9. Mini Cupcake With Frosting
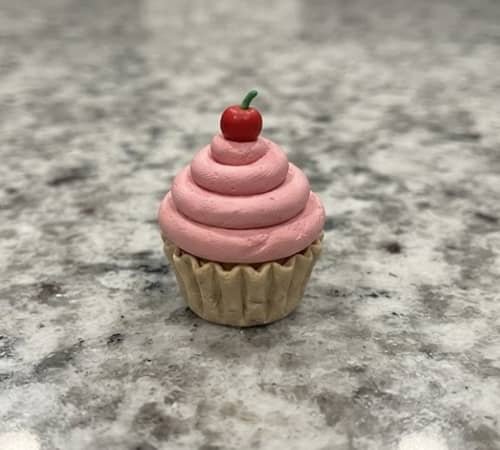
Ready for a slightly more detailed one?
Materials
- Beige clay
- Pink or white clay
- Small colored clay pieces
- Brown paint
Instructions
Form a tiny beige cylinder.
Make the bottom narrower than the top.
Using a toothpick, press several vertical lines around the sides to imitate cupcake paper.
For the frosting, roll a small piece of colored clay into a tapered coil.
Start with the widest section at the bottom and gradually make the coil narrower as you stack it upward.
Place the coil on the cupcake base.
Add one tiny colored clay ball at the top as a cherry.
Don’t make the frosting perfectly symmetrical… handmade is the whole point.
10. Tiny Apple
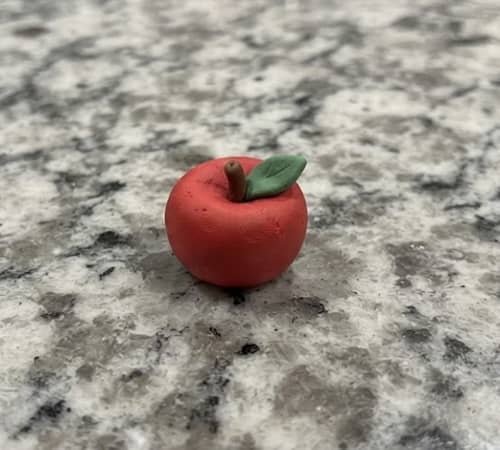
This is another excellent choice if you’re exploring creative clay fruit ideas.
Materials
- Red clay
- Green clay
- Brown clay
- Toothpick
Instructions
Roll a small red ball.
Press it gently from the top and bottom.
Apples are not perfect spheres, so make the sides subtly wider than the top.
Use your thumb to create a shallow depression at the top.
Make a tiny brown stem and push it into the depression.
For the leaf, flatten a microscopic piece of green clay and pinch one end into a point.
Press it beside the stem.
Once dry, add a very subtle darker red shade around the bottom.
11. Mini Ice Cream Cone
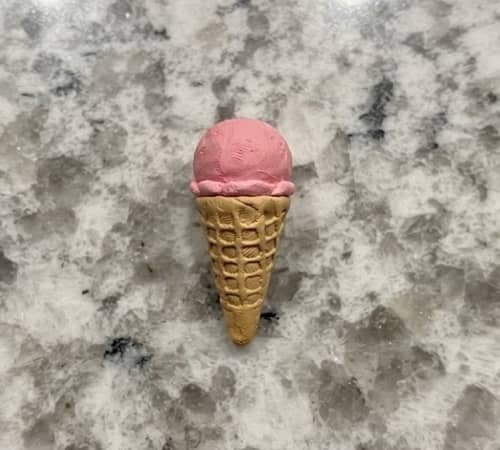
This one introduces a useful technique: making texture with repeated lines.
Materials
- Tan clay
- White, pink or brown clay
- Toothpick
Instructions
Make a tiny cone from tan clay.
Start with a small ball, flatten it into a circle and cut it into a wedge.
Roll the wedge into a cone, overlapping the edges slightly.
Press the seam closed.
Use a toothpick to draw diagonal lines across the cone in one direction.
Then add another set crossing those lines.
You now have a miniature waffle pattern.
For the ice cream, roll a small ball of colored clay.
Place it on top.
If you want two scoops, make the second ball smaller and gently balance it above the first.
Dry the piece thoroughly before painting any details.
12. Mini Bowl of Strawberries and Cream
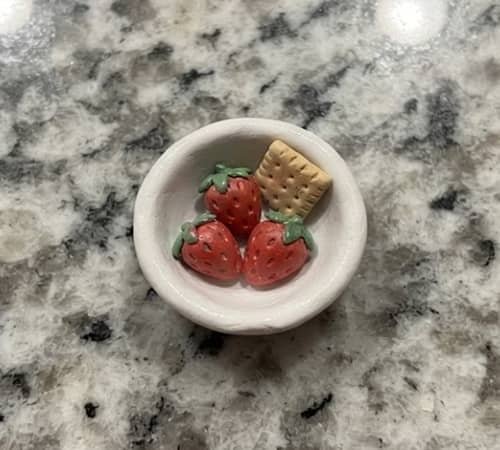
Let’s finish with something that combines several techniques.
Materials
- White clay
- Red clay
- Green clay
- Beige or brown clay
- Toothpick
Instructions
Start with a shallow white clay bowl.
Make the walls slightly thicker than you think you need because tiny edges can become fragile.
Create three or four miniature strawberries using the strawberry method from Idea #1.
Keep them smaller this time.
Make tiny green leaf crowns.
Place a small amount of white clay inside the bowl.
Arrange the strawberries on top.
For a little extra character, add one tiny beige biscuit or cookie shape beside the fruit.
Let everything dry completely before painting.
Use very small amounts of red and green paint on the strawberries.
The finished piece becomes one of those small clay food figurines that works beautifully inside a miniature kitchen, dollhouse scene or handmade display.
A Few Beginner Mistakes to Avoid
Making everything microscopic: Tiny is fun, but extremely thin clay breaks easily.
Using too much water: Water can make the surface mushy and difficult to control.
Adding details before the base is stable: Build the larger shape first, then decorate.
Overpainting: You want the sculpted texture to remain visible.
Making every piece identical: That’s not necessary, and honestly, it can make handmade work look less handmade.
For children, adults should handle hot clay during preparation and supervise any cutting tools.
Once the clay is cool and shaped, the decorating stage becomes much more suitable for supervised kids craft activities.
Final Thoughts
The interesting thing about small clay food figures isn’t really how tiny you can make them, it’s how much visual information you can communicate with a surprisingly small piece of clay.
A few grooves can turn a flat triangle into toast, while a tiny raised dot can suddenly read as a strawberry seed.
Start noticing those details in everyday food. What makes a banana look curved? Why does toast have a darker perimeter? How does melted cheese sit on a pizza? Those observations become your miniature sculpting library.
Before long, your cornstarch clay food figures won’t just be cute little objects… they’ll become tiny studies of shape, texture, color and proportion.
That’s what makes a simple cornstarch clay craft much more rewarding than it first appears.





