Looking for a clay monster craft that feels different from the usual blobs with googly eyes? You’re in the right place.
I love making a simple clay craft that doesn’t need fancy tools or years of experience, and most of these projects work beautifully with air dry clay.
Some monsters look adorable, others are wonderfully strange, and a few might even fit right into your favorite Halloween air dry clay ideas collection.
Grab your clay, keep a cup of water nearby, and don’t worry about making everything perfect. Monsters ain’t supposed to be perfect anyway.
Choose Your Air Dry Clay Type
Regular Air Dry Clay | Cornstarch Clay | Homemade Clay
Affiliate Disclaimer: Some of the links in this post may be affiliate links, which means I may earn a small commission if you choose to make a purchase through them – at no extra cost to you. I only share products that genuinely fit this project and can help make your ceramic mug clay craft process easier and smoother. Your support helps keep ideas like this coming.
1. Sleepy Moss Monster Holding a Tiny Mushroom
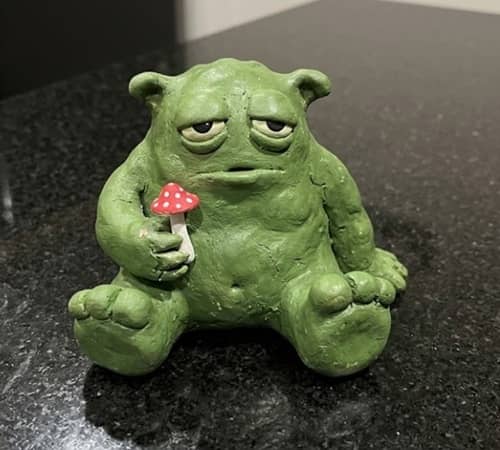
This little monster spends all day napping under imaginary forest mushrooms.
Instead of looking scary, it has droopy eyelids, oversized feet, and a chunky body covered with tiny textured bumps.
It feels like something straight out of a storybook rather than a horror movie.
Difficulty: Beginner
Materials
- Air dry clay
- Acrylic paints (green, cream, brown, pink)
- Clay sculpting tool or toothpick
- Small paintbrush
- Water
- Matte varnish (optional)
Step-by-Step Instructions
Start by rolling a ball about the size of a ping pong ball. This becomes the body.
Instead of making it perfectly round, gently squash the bottom so it sits flat on the table.
Roll two thick little cylinders for legs. Press them against the lower front of the body.
Blend the joints using a damp fingertip until the seams almost disappear.
Now make two oversized feet. Flatten tiny oval pieces before attaching them.
Don’t rush this step because balanced feet keeps the monster standing much easier.
Roll two short arms. Bend them slightly like they’re hugging something.
Create a tiny mushroom from two separate pieces. Roll a thin stem first.
Then flatten another small ball into a mushroom cap and attach it on top. Let one hand hold the mushroom while the other rests on its belly.
For the eyes, make two shallow horizontal ovals instead of circles. These sleepy eyelids instantly change the personality.
Add a tiny smiling mouth with the tip of a toothpick.
Here’s where things gets really fun.
Use a stiff toothbrush or aluminum foil to gently press hundreds of tiny marks all around the body.
Without the need for additional clay, the texture resembles soft moss.
Once dry, paint the body sage green. Dry brush lighter green across the raised texture so the bumps stand out naturally.
Paint pink cheeks for extra charm.
Seal after the paint cures.
2. Bubble Belly Monster with Floating Eyes
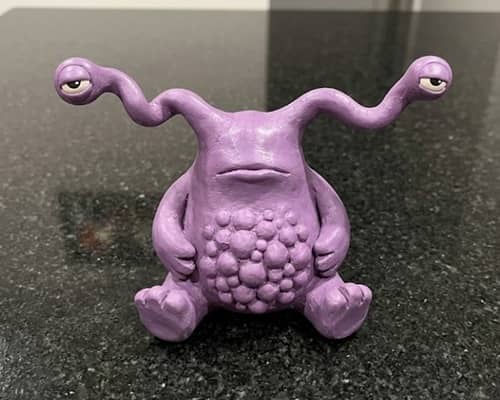
This goofy fellow has a giant transparent-looking belly filled with little clay bubbles.
Kids absolutely loves making this because every bubble can be a different size.
Difficulty: Beginner
Materials
- Air dry clay
- White, blue, purple and black acrylic paint
- Dotting tool or pencil
- Water
- Paintbrush
Step-by-Step Instructions
Roll one large oval for the body.
Flatten the front slightly.
Roll several tiny balls ranging from pea size down to mustard seed size.
Stick these tiny balls onto the stomach area. Fill almost the entire front with them.
Now lightly press every bubble just enough so it stays attached without losing its roundness.
Make two ridiculously long eye stalks by rolling thin snakes of clay.
Attach them to the head.
Place large eyeballs on top.
Don’t worry if one eye is higher than the other. Monsters don’t visit the mirror much.
Add two tiny arms sticking straight outward.
Roll two short legs.
Use a toothpick to make tiny pores randomly around the body.
Allow everything to dry completely.
Paint the monster pastel purple.
Paint every bubble slightly lighter than the body so they stand apart.
Shade underneath the bubbles with diluted darker purple paint.
Finish with glossy varnish only on the bubbles for a wet look while keeping the rest matte.
That contrast really makes people look twice.
Creative Twist
This playful clay monster craft mixes cartoon styling with unusual textures instead of relying on sharp teeth or scary faces. It also fits wonderfully among weird clay ideas because the bubble belly becomes the main attraction.
3. Three-Headed Marshmallow Monster
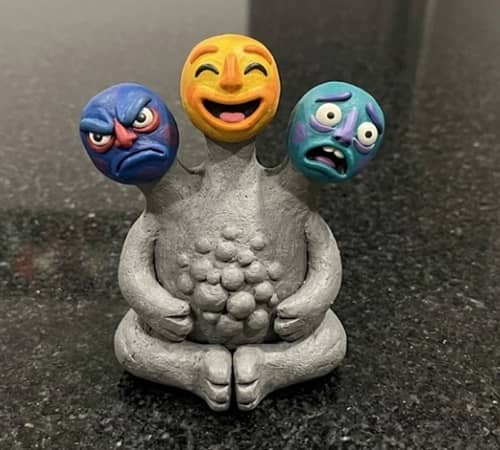
Sometimes one monster isn’t enough.
So…why not build three?
This funny air dry clay craft uses one body with three completely different personalities sitting on top.
Materials
- Air dry clay
- Acrylic paints
- Toothpick
- Small brush
- Water
Step-by-Step Instructions
Roll one rounded cube shape.
Flatten the base.
Instead of one neck, create three short thick cylinders.
Space them evenly across the top.
Now sculpt three different heads.
Head one should smile with tiny rounded teeth.
Head two sticks its tongue out.
Head three looks completely confused by raising one eyebrow.
Yes, eyebrows on monsters actually works.
Blend every neck carefully.
Roll six tiny arms instead of two.
Position each differently.
One arm can wave.
Another scratches its head.
Another simply hangs.
That tiny detail changes everything.
Press tiny dimples across the body using the end of a paintbrush.
Allow the clay to dry.
Paint each head a different color.
Green.
Orange.
Blue.
Keep the body neutral gray so the colorful heads steal attention.
The result feels playful rather than chaotic.
Honestly, it become my favorite every single time.
Why It’s Different
Most cute clay monsters have one expression. This project lets you practice multiple facial expressions in one sculpture, making it more engaging while improving beginner sculpting skills.
4. Pocket Monster with Giant Backpack
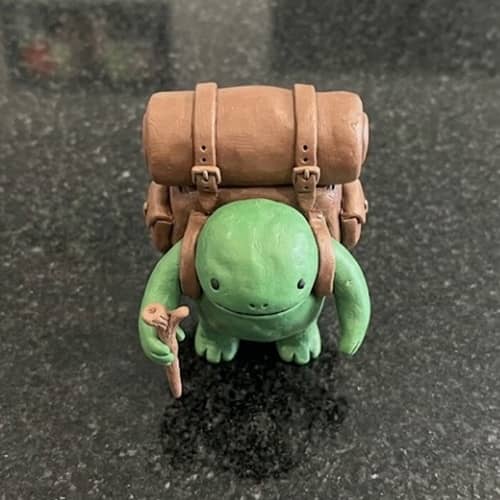
Imagine a tiny explorer who collected shiny pebbles all day.
That’s this little guy.
Its oversized backpack becomes the entire focus.
Materials
- Air dry clay
- Acrylic paints
- Toothpick
- Water
- Sculpting tool
Step-by-Step Instructions
Roll a pear-shaped body.
Flatten the bottom.
Create tiny legs.
Make slightly oversized boots.
Build a rounded backpack separately.
Attach it firmly to the monster’s back before it begins drying.
Blend carefully around every edge.
Roll two skinny arms.
One arm should hold a miniature walking stick.
The other can rest against the backpack strap.
Add two large eyes.
Instead of a scary grin, sculpt an amazed “O” shaped mouth.
Texture the backpack using tiny crisscross lines to imitate stitched fabric.
Paint earthy colors.
Brown backpack.
Olive green body.
Tan boots.
Use darker brown inside the backpack seams for depth.
You dont have to make every line perfect because handmade crafts actually look more believable with tiny imperfections.
Unique Angle
This isn’t simply another Halloween clay creature. It feels like a tiny traveler exploring forests, making it suitable year-round while still fitting spooky seasonal displays.
5. Moon Crater Monster
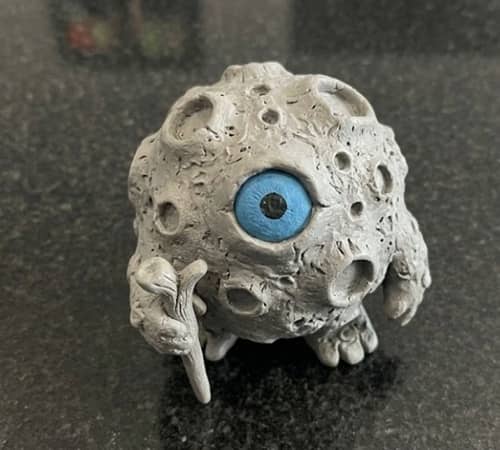
If the moon grew legs…
This would probably be walking around.
The crater texture makes this one incredibly satisfying to sculpt.
Materials
- Air dry clay
- Gray, white and black acrylic paint
- Cotton swab
- Toothpick
- Water
Step-by-Step Instructions
Roll a large sphere.
Flatten the base.
Using the rounded end of a paintbrush, gently press random craters across the entire body.
Don’t make them evenly spaced.
Nature rarely repeats itself perfectly.
Roll two thick legs.
Attach securely.
Make two tiny arms tucked close to the body.
Now sculpt one enormous eye that takes nearly one-third of the face.
Add a tiny smiling mouth below it.
Roll two tiny horns.
Keep them short.
Long horns would compete with the giant eye.
Once dry, paint everything medium gray.
Dry brush white lightly across raised surfaces.
Add a thin black wash inside every crater.
Suddenly the monster looks like a tiny moon.
Finish by painting the eye bright turquoise for a bold focal point.
It look surprisingly realistic despite being cartoonish.
6. One-Eyed Paint Splatter Monster
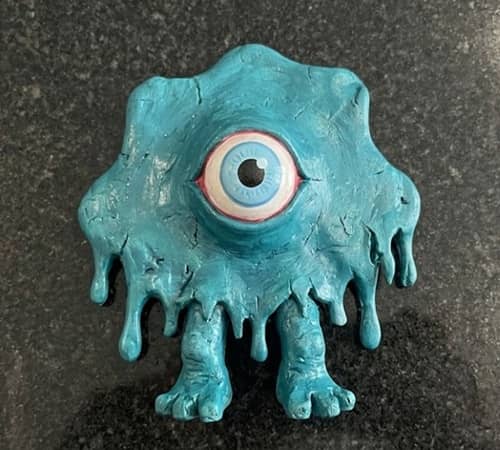
Ever wondered what would happen if a puddle of paint suddenly grew legs? This little fellow answers that question.
Instead of a neat body, it has uneven drips, wavy edges, and one oversized eye that seems to follow you around the room.
It looks wonderfully odd without being scary, making it a fun clay monster craft for both kids and adults.
Difficulty: Beginner
Materials
- Air dry clay
- Acrylic paints (teal, lime green, white, black, pink)
- Clay sculpting tool or butter knife
- Toothpick
- Small paintbrush
- Water
- Matte varnish (optional)
Step-by-Step Instructions
Start with a golf ball-sized piece of air dry clay.
Roll it into a loose ball, but don’t spend forever trying to make it perfectly smooth.
Flatten the bottom so it stands upright.
Now gently pinch random sections around the body. These become paint drips. Make some longer than others. A few can even curl slightly.
Roll two chunky legs and attach them underneath.
Blend each joint with a damp finger until the connection disappears.
Roll two tiny sausage-shaped arms.
Instead of placing them evenly, attach one arm slightly higher than the other. It gives the monster a playful pose.
For the eye, roll one large white ball.
Flatten it into a circle and place it near the top center.
Add a smaller black pupil.
Use a toothpick to press a wide smiling mouth underneath.
If you like, sculpt one tiny fang peeking out from one side.
Texture the body using crumpled aluminum foil. Lightly press it over the surface without flattening the drips.
Allow everything to dry completely.
Paint the monster bright teal.
Dry brush lighter green along the raised drips.
Paint pink cheeks beside the smile.
Finally, seal with matte varnish.
There isn’t many rules when making monsters, and that’s the fun part.
7. Flower-Horn Monster
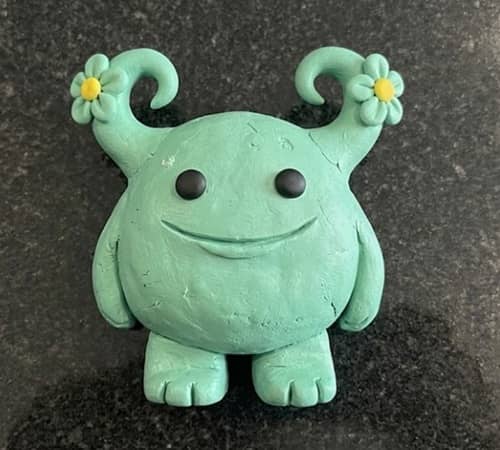
Who says monsters can’t enjoy flowers?
This cheerful little creature has blooming flower horns instead of sharp spikes, giving it an unusual personality that feels straight from a fantasy garden.
It’s a nice break from traditional Halloween clay designs while still keeping the monster theme alive.
Difficulty: Beginner
Materials
- Air dry clay
- Acrylic paints (mint green, yellow, coral, white, black)
- Toothpick
- Sculpting tool
- Water
- Fine paintbrush
Step-by-Step Instructions
Roll a rounded pear-shaped body.
Flatten the base.
Roll two thick feet.
Attach them securely underneath.
Next, make two short arms.
Curve them slightly inward as though the monster is waving.
Create two flower stems by rolling very small cylinders.
Attach one to each side of the head.
Now sculpt tiny five-petal flowers.
Roll five little balls.
Flatten each into petals.
Join them around a tiny center circle.
Attach the flowers to the stems.
Make two medium-sized eyes.
Press tiny dimples around the cheeks using a pencil tip.
Use a sculpting tool to carve a gentle smile.
After drying, paint the body mint green.
Paint each flower differently.
One coral.
One yellow.
Add tiny white dots around the petals for extra detail.
A little unevenness actually makes handmade flowers look more believable.
8. Patchwork Monster with Stitched Squares
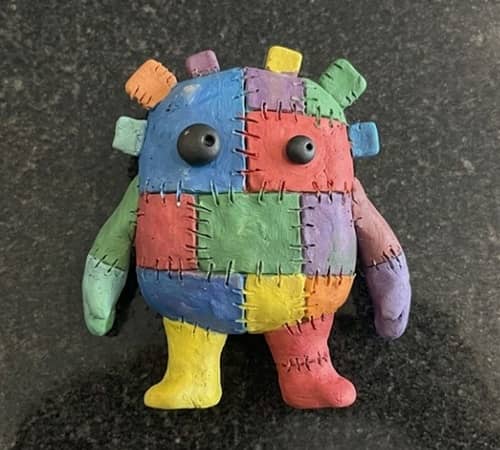
Imagine a soft toy stitched together from colorful fabric.
Now imagine it turned into clay.
That’s exactly what makes this monster different.
Instead of smooth skin, its body is covered with patchwork panels complete with stitched lines.
Difficulty: Easy
Materials
- Air dry clay
- Acrylic paints (purple, orange, turquoise, cream, black)
- Toothpick
- Butter knife
- Water
- Paintbrush
Step-by-Step Instructions
Roll a large oval body.
Flatten the bottom.
Instead of leaving the surface smooth, lightly score several uneven squares and rectangles across the body using the back of a butter knife.
Don’t press too deep.
These become fabric patches.
Roll two short legs.
Attach and blend.
Make slightly oversized hands with rounded fingers.
Add two round eyes.
One eye can be larger than the other.
Use a toothpick to create stitched lines around every square by making tiny diagonal marks.
Sculpt a happy crooked grin.
Leave to dry completely.
Paint every patch a different color.
Purple.
Orange.
Cream.
Turquoise.
Outline each stitch with thin black paint.
Highlight the raised edges using a lighter version of each color.
It almost looks sewn together, even though it’s solid clay.
9. Tiny Ghost Buddy Monster
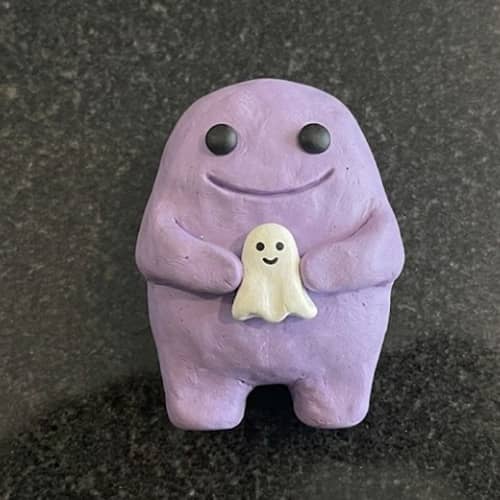
This monster refuses to haunt anyone alone.
Instead, it carries its tiny ghost friend everywhere it goes.
The pairing creates a fun little story while naturally fitting both Halloween clay projects and diy ghost collections.
Difficulty: Beginner
Materials
- Air dry clay
- Acrylic paints (lavender, white, black, gray)
- Toothpick
- Water
- Small paintbrush
Step-by-Step Instructions
Roll one medium-sized oval for the monster.
Flatten the base.
Roll two legs.
Attach them evenly underneath.
Create two small rounded arms.
One arm stays relaxed.
The other stretches forward.
Now sculpt a miniature ghost.
Roll a pea-sized ball.
Gently pull the bottom into soft waves.
Press two tiny eyes using the tip of a pencil.
Place the ghost into the monster’s hand.
Blend carefully so the ghost appears supported without hiding it.
Make two cheerful monster eyes.
Add tiny eyebrows.
Carve a wide smile.
Allow everything to dry fully.
Paint the monster lavender.
Paint the ghost white.
Shade the ghost lightly underneath using diluted gray paint.
Paint tiny rosy cheeks on both characters.
It somehow makes the whole project feel alive.
10. Marsh Monster with Floating Lily Pad Hat
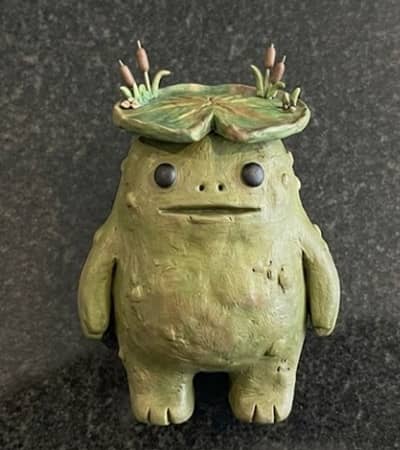
Not every monster lives in caves.
Some hide quietly in swamps.
This adorable swamp creature wears a lily pad as a hat and has tiny reeds growing from its shoulders. It feels imaginative without becoming difficult to sculpt.
Difficulty: Beginner
Materials
- Air dry clay
- Acrylic paints (olive green, dark green, brown, white, black)
- Toothpick
- Sculpting tool
- Water
- Small brush
Step-by-Step Instructions
Roll a rounded oval body.
Flatten the bottom.
Attach two thick feet.
Blend well.
Roll two arms.
Keep them short.
For the hat, flatten a small circle.
Cut one narrow wedge from it using a sculpting tool.
Now it looks like a lily pad.
Attach it loosely on top of the head at a slight angle.
Roll two very thin clay ropes.
Attach them beside the shoulders to resemble marsh reeds.
Create two medium eyes.
Press several tiny dots across the body using a pencil tip.
Make a curved smile.
Allow everything to dry.
Paint the body olive green.
Dry brush lighter green over the raised dots.
Paint the lily pad dark green with lighter veins.
Add tiny brown shading around the reeds.
It don’t need perfect paint lines because nature isn’t perfectly neat.
11. Inside-Out Monster with a Zipper Belly
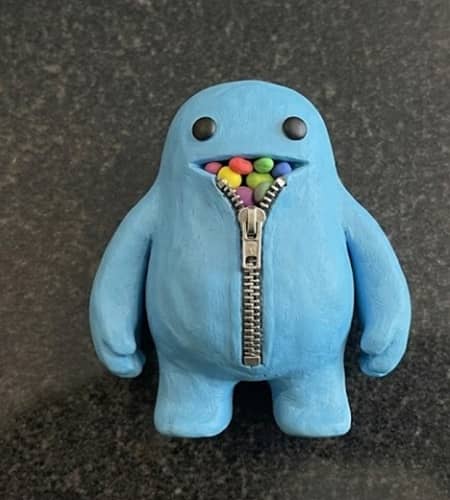
Some monsters hide secrets.
This one wears its secret right on its tummy.
Instead of making a frightening creature, you’ll sculpt a cheerful monster whose belly opens with a fake zipper to reveal tiny colorful “monster fluff.”
It’s playful, quirky, and unlike the usual clay monster craft you’ll find online.
Difficulty: Beginner to Easy
Materials
- Air dry clay
- Acrylic paints (sky blue, silver, white, black, red, yellow, pink)
- Toothpick
- Sculpting tool or butter knife
- Water
- Fine paintbrush
- Matte varnish (optional)
Step-by-Step Instructions
Begin with a ball of air dry clay about the size of a small orange.
Roll it until mostly smooth.
Flatten the bottom so it can stand without wobbling.
Roll two thick legs.
Press them firmly underneath.
Blend the seams using a damp fingertip until the legs appear naturally connected.
Create two chunky arms.
Bend one slightly upward like the monster is waving.
The other can rest against its belly.
Now comes the fun bit.
Roll a thin clay rope.
Lay it vertically down the center of the belly.
Press it gently into place.
Using a toothpick, make tiny diagonal marks across the rope. These become zipper teeth.
At the top, add a tiny rectangular zipper pull.
Next, sculpt tiny blobs, spirals, stars, and little balls around one side of the zipper so it looks like colorful monster stuffing is peeking out.
Don’t overcrowd it.
A few shapes tell the story better than dozens.
Roll two medium-sized eyes.
One eye can look slightly outward.
Monsters dont always focus on one thing anyway.
Add a wide smile with two tiny rounded teeth.
Use crumpled foil to lightly texture the body.
Allow the sculpture to dry completely.
Paint the body sky blue.
Paint the zipper metallic silver.
Paint every little blob inside a different bright color.
Use a thin black wash around the zipper to create depth.
Finish with a matte varnish.
12. Star Belly Galaxy Monster
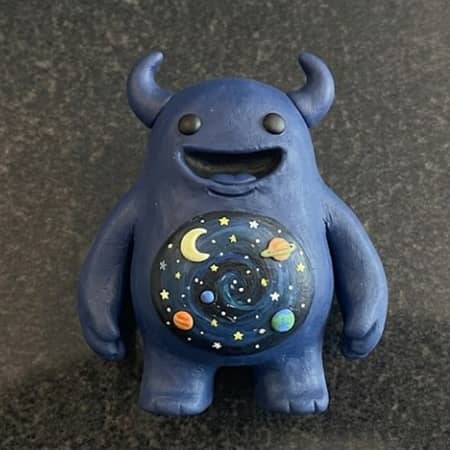
What if a monster swallowed the night sky?
This final clay monster craft turns that silly question into something surprisingly adorable.
Its round belly features tiny stars, moons, and planets, making it look like an entire galaxy lives inside.
It isn’t spooky. It isn’t overly cute either. It sits somewhere delightfully in the middle.
Difficulty: Beginner
Materials
- Air dry clay
- Acrylic paints (navy blue, turquoise, purple, white, yellow, black)
- Toothpick
- Small paintbrush
- Water
- Matte varnish
Step-by-Step Instructions
Start by rolling a smooth oval body.
Flatten the bottom carefully.
Check that it stands upright before adding anything else.
Roll two sturdy legs.
Attach and blend them into the body.
Next, roll two short rounded arms.
Curve them slightly forward.
Roll a flat oval about the size of a large coin.
Attach it to the center of the monster’s belly.
This raised oval becomes the galaxy window.
Blend only the outer edge so the oval still stands proud from the body.
Create two tiny horns.
Keep them short and rounded rather than sharp.
Now sculpt two cheerful eyes.
Press shallow circles first.
Place tiny clay pupils inside.
Add a curved smile underneath.
Use the end of a paintbrush to gently press tiny craters and dots around the body for subtle texture.
Let the sculpture dry completely.
Paint the body deep navy blue.
Paint the raised belly slightly darker.
Once dry, use a nearly dry brush to softly blend turquoise and purple across the belly.
Add tiny white stars using the tip of a toothpick.
Paint one miniature crescent moon.
Add two or three tiny yellow planets.
Finally, flick a few tiny white paint specks across the belly using an old toothbrush.
The effect looks surprisingly magical.
I still gets excited every time those little stars appear.
Seal everything with matte varnish once fully dry.
Final Thoughts
Making a clay monster craft isn’t really about copying somebody else’s design.
The most memorable monsters usually come from tiny unexpected choices – a crooked smile, one oversized eye, funny textures, or a color combination that shouldn’t work but somehow does.
That’s where personality sneaks in. As your confidence grows, try mixing features from several projects into one completely original creature.
A sleepy moss monster could wear a galaxy belly, or a marsh monster might carry a tiny diy ghost friend.
Those small experiments is often where your best clay craft ideas begin, and they’ll naturally help you develop your own recognizable style with air dry clay rather than simply repeating what everyone else is making.