Ever stared at a blank block of mud and wondered if it could become your next favorite statement piece? Making an air dry clay necklace is honestly one of the most therapeutic ways to dive into clay crafts without needing a massive, fiery kiln in your kitchen.
This simple air dry clay craft requires zero complex machinery – just your hands, some basic tools, and a little bit of patience while it cures.
Whether you are obsessed with bold, chunky geometric shapes or dainty, pressed-flower pendants, you can easily craft custom accessories that look like they came straight out of an boutique.
Ready to turn some squishy clay into stunning, wearable clay art? Let’s get a little messy!
Choose Your Air Dry Clay Type
Regular Air Dry Clay | Cornstarch Clay | Homemade Clay
Affiliate Disclaimer: Some of the links in this post may be affiliate links, which means I may earn a small commission if you choose to make a purchase through them – at no extra cost to you. I only share products that genuinely fit this project and can help make your ceramic mug clay craft process easier and smoother. Your support helps keep ideas like this coming.
1. The Terrazzo Fragment Collar
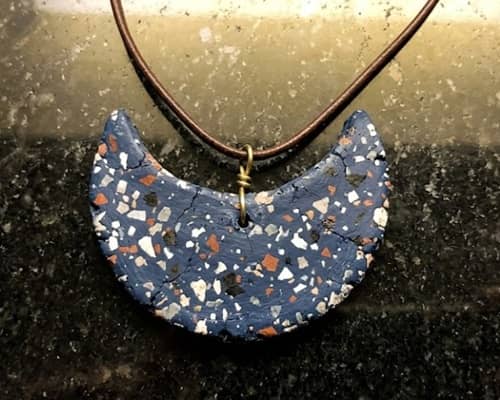
Why buy expensive Italian stone when you can mimic it with scraps? This design uses a mosaic technique to create a high-end, speckled look.
Step 1: Prep the Base
Roll out a quarter-inch thick slab of white air dry clay using a rolling pin or smooth jar.
Step 2: Create the Flakes
Take tiny pinch of leftover colored clay (black, terracotta, and mustard work amazing). Flatten them ultra-thin between your fingers and tear them into irregular, jagged confetti pieces.
Step 3: Embed the Pattern
Scatter these tiny colored flakes randomly across your white slab. Lightly roll over the entire thing with your rolling pin to press the colored bits flush into the base clay.
Step 4: Shape and Punch
Use a sharp craft knife to cut out a wide, curved crescent shape that will sit flat against your collarbone. Pop two clean holes at the top corners using a plastic straw.
Step 5: Dry and Finish
Let it cure for 24 hours, flipping it halfway through so it don’t warp. To make the colors stand out, lightly smooth the edges with fine-grit sandpaper before applying a glossy varnish. Thread a thick suede cord through the holes.
2. Faux-Turquoise Raw Nugget Pendant
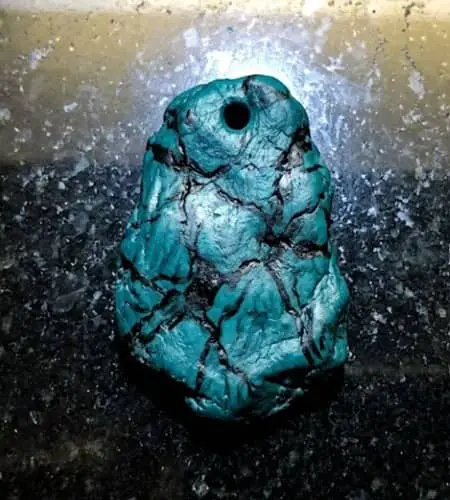
Obsessed with bohemian jewelry but hate the price tag of real gemstones? You can fake the matrix lines of real turquoise with some clever painting tricks.
Step 1 – Sculpt the Nugget
Tear off a piece of clay about the size of a walnut. Instead of rolling it smooth, roughly squash it into an organic, asymmetrical boulder shape using your knuckles.
Step 2 – Insert the Hardware
Push an eye pin deeply into the top of the nugget while the clay is wet. Backfill a tiny bit of wet clay around the wire base to lock it in place.
Step 3 – The Crackle Painting Trick
Once fully dry, paint the entire nugget with a vibrant turquoise acrylic paint. Let it dry completely.
Next, dip a dry, stiff-bristled brush into a tiny amount of black or dark brown paint.
Wipe most of it off on a paper towel, then lightly drag it across the nugget.
The dark paint will catch in all the accidental cracks and crevices you made earlier, mimicking natural stone veins!
Step 4 – Seal
Apply a matte sealer to keep that authentic, earth-mined look.
3. The Minimalist Arch and Ball Tier
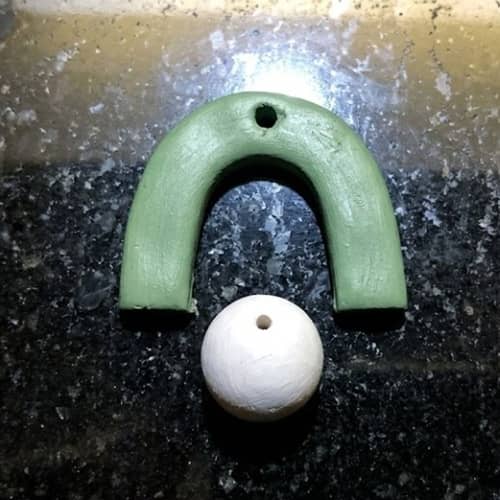
Structured lines meet playful shapes. This geometric marvel is all about balance and looks incredibly modern.
Step 1: Form the Components
Roll out a smooth slab to about 6mm thickness. Cut out an elongated “U” shape (an inverted arch) using a template or freehand with an X-Acto knife. Separately, roll a small, perfect sphere between your palms.
Step 2: Pierce the Connection Points
Using a toothpick, poke a hole through the center of the sphere. Then, poke a hole at the top curve of your arch, and another hole right at the very bottom center of the arch.
Step 3: Dry Flat
If air-dried clay is cured too quickly, it tends to curl. Lay a heavy book over them (with parchment paper in between) for the first few hours to keep them perfectly flat.
Step 4: Assembly
Paint the arch a rich, matte forest green and leave the ball raw white for contrast. Connect the ball to the top of the arch using a small metal jump ring, then attach your necklace chain to the ball.
4. Botanical Fossil Medallion
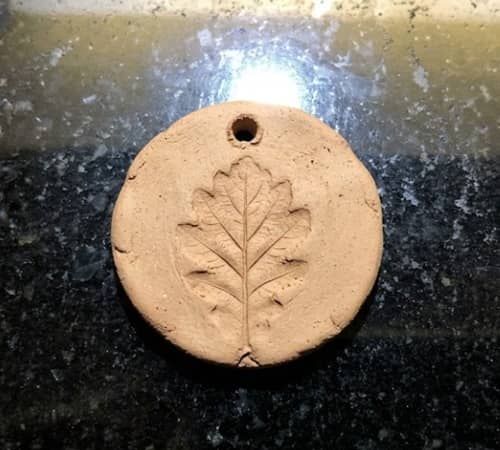
Bring a piece of nature indoors. This technique uses real plants to leave an permanent imprint in your jewelry.
- Forage Your Stamps: Go outside and find a small, sturdy leaf with deep, prominent veins (sage, fern, or rosemary work beautifully).
- Press the Print: Roll a ball of clay flat into a neat circle. Put the selected leaf onto the clay, vein-side down. Press down firmly with your thumb or roll over it once with a rolling pin to embed the plant texture deeply into the surface.
- Peel Carefully: Gently peel the leaf away using tweezers to reveal the intricate botanical imprint left behind. Use a straw to punch a hole at the top of your circle.
- Enhance the Details: After the medallion dries, brush a watered-down brown acrylic wash across the surface, then quickly wipe the excess away with a damp cloth. The dark pigment stays trapped inside the leaf vein imprints, making them stand out beautifully against the lighter clay.
5. Industrial Concrete-Look Hexagon
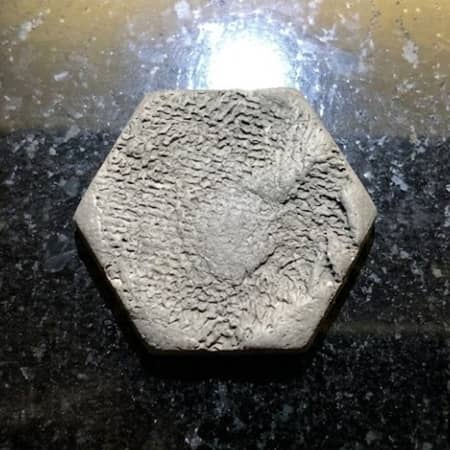
Who knew clay could look like heavy industrial building materials? This lightweight alternative is perfect for minimalist wardrobes.
- Cut the Geometry: Roll your clay out flat. Use a hexagonal cookie cutter or a ruler and craft knife to cut a crisp, six-sided shape.
- Texture the Surface: To get that gritty concrete texture, take a crumpled piece of aluminum foil and gently dab it all over the wet clay hexagon. It will create tiny, random pits and pockmarks.
- Color Faking: Once dry, mix black and white acrylic paint to get a mid-tone gray. Paint the entire piece. While it’s wet, dab a sponge dipped in pure white paint over the top to create the tonal variations you see in real cured cement.
- Cord Selection: Pair this rough sculpted pendant with a minimalist black cord or a sleek silver snake chain to lean into that industrial vibe.
6. The Abstract Face Outline
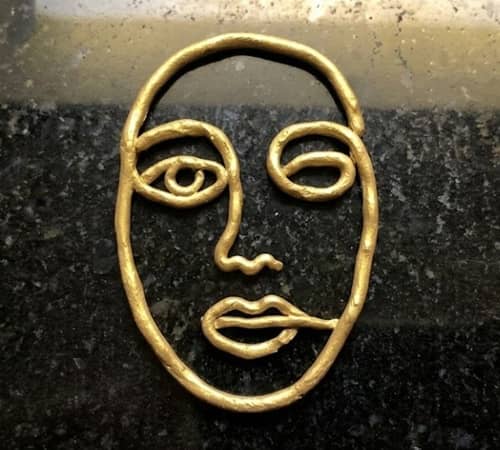
Line art is having a massive moment. Why not wear it as an artistic statement necklace?
Step 1: Roll a Snake
Instead of cutting a flat slab, take a small piece of clay and roll it against your table until it forms a long, thin, uniform noodle (or “snake”), about the thickness of a headphone wire.
Step 2: Bend the Contour
On a piece of wax paper, carefully bend and fold the clay noodle to trace the silhouette of an abstract face – think one continuous line drawing a nose, lips, and an eye profile. Where the clay overlaps, add a drop of water and press gently to fuse the joints together.
Step 3: Reinforce
Because thin line art can be fragile, keep the design relatively compact. Make sure to loop the top of the wire outline into a built-in ring where your chain can slide through.
Step 4: Bake… Wait, Air Dry!
Let it cure completely undisturbed for at least 48 hours. Paint it a striking metallic gold to mimic expensive wire jewelry.
7. Textured Stamp and Tassel Statement Piece
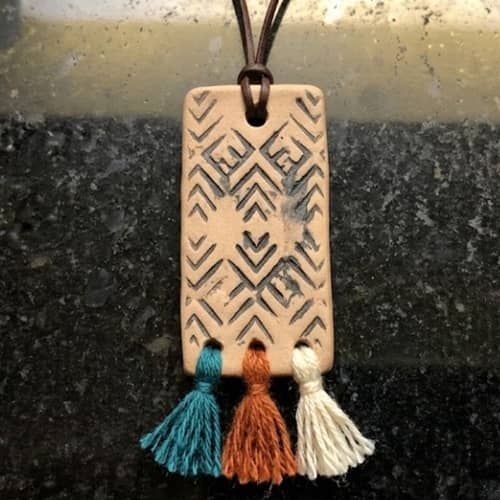
Tassels add instant movement and bohemian flair to any handmade necklace design.
- Stamping Patterns: Roll out a thick, rectangular slab. Use an ink stamp (like a mandala or geometric grid pattern) to firmly press a design directly into the wet clay.
- Bottom Holes: Punch one hole at the top for your main necklace loop, but also punch three small holes along the bottom edge of the rectangle.
- Dry and Paint: Once dry, sand the rough corners. Paint the piece with a terracotta color, then use a white paint pen to trace over the raised stamped lines.
- Add the Fringe: Thread colorful embroidery floss through the three bottom holes, tying them off into mini tassels that dangle freely below the clay piece.
8. Faux Speckled Ceramic Beads
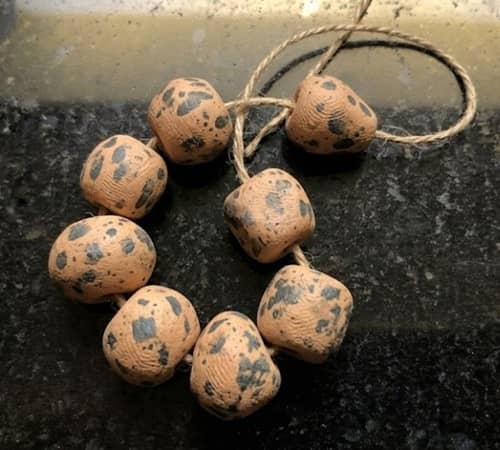
Love the look of trendy speckled pottery? You can totally replicate that look with a toothbrush and some paint flicking.
Step 1: Roll the Beads
Pinch off equal-sized pieces of clay and roll them into spheres, discs, or cylinders. Use a bamboo skewer to poke a generous hole straight through the center of each bead. Leave them on the skewer while drying so the holes don’t collapse.
Step 2: Base Coat
Paint the dry beads a creamy beige or off-white matte color.
Step 3: The Toothbrush Trick
Dip an old toothbrush into slightly watered-down dark brown or black paint. Hold the brush over your beads and run your thumb backwards across the bristles to flick tiny, fine speckles of paint all over the clay. It perfectly mimics speckled stoneware!
Step 4: String Em Up
String these beads onto a thick leather cord, separating them with small knots for a gorgeous organic look.
9. Layered Landscape Medallion
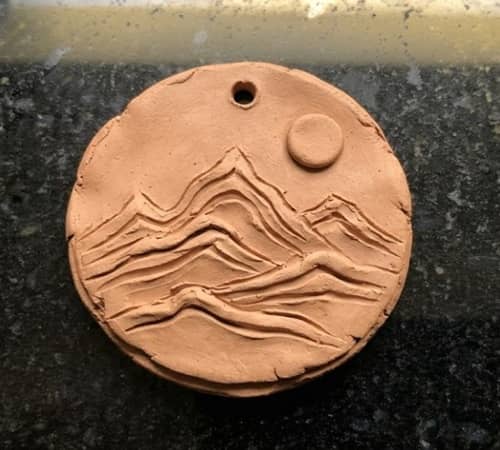
Create a miniature mountain range or sunset that you can carry around your neck everywhere you go.
- The Layering Technique: Cut out a circle base slab. Then, roll out a thinner piece of clay and cut a wavy line across it to represent a mountain horizon.
- Assemble the Scene: Place the wavy piece on top of the bottom half of your circle base. Use a wet finger to smooth the edges down so it fuses together into a single, tiered piece. You can add a tiny ball of clay in the sky area to act as a rising sun.
- Punch and Dry: Don’t forget to add your necklace loop hole at the top before it dries out!
- Paint with Depth: Paint the mountains a rich olive green, the sun gold, and the sky a soft dusty pink to complete the whimsical boho landscape look.
10. Sea Glass Inspired Translucent Pendant
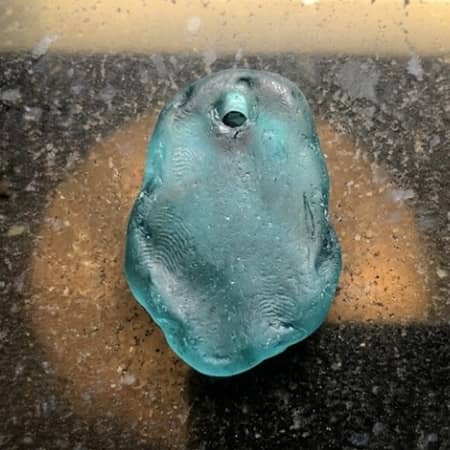
While regular air dry clay dries opaque white, choosing a high-quality translucent clay variant can yield a stunning, frosted beach glass effect.
- Shape and Smooth: Shape a small piece of clay into a flat, smooth, irregular triangle or oval shape – just like a piece of glass tumbling in the ocean waves.
- Soften the Edges: Dip your finger in water and thoroughly rub around the perimeter to melt away any sharp cuts. We want completely rounded, soft edges here. Punch your chain hole.
- Drying Transition: As this specific clay dries, it will transform from cloudy white to a semi-translucent, milky state.
- The Secret Glaze: Once dry, coat it with a layer of translucent aqua-tinted glass varnish or resin. It will look exactly like a precious find from the seashore.
11. Gilded Marble Slab Geometric
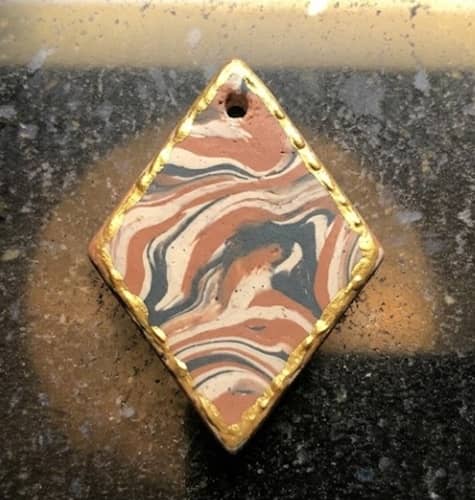
Marbling is an ancient air dry clay jewelry design technique that never fails to look incredibly sophisticated and expensive.
- Twist the Colors: Roll out two long snakes of clay – one pure white and one soft gray or charcoal. Twist the two ropes together like a candy cane, then fold it in half and twist again.
- Roll and Reveal: Squish the twisted clay into a ball and roll it flat with your rolling pin. As you roll, a gorgeous, fluid marble vein pattern will magically appear on the surface!
- Cut Your Geometric Shape: Use a square or diamond-shaped cookie cutter to slice out the best section of the marble pattern.
- Gold Rim: Once the piece has completely dried, take a metallic gold paint pen or liquid gold leaf and carefully paint only the outer edges of the shape. This frames the marble pattern and gives it an instantly luxurious, upscale feel.
12. Imprinted Lace Mandala Pendant
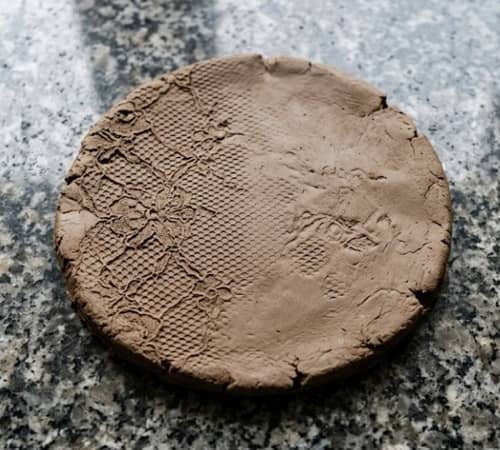
Do you have old lace fabric or a doily lying around the house? It is the perfect tool for creating intricate, vintage-inspired textures.
Step 1 – Slab Prep: Roll your clay out to an even thickness on a piece of parchment paper so it doesn’t stick to your workspace.
Step 2 – Press the Lace: Lay a piece of textured lace fabric directly over the wet clay slab. Press down firmly with your hands, or gently run a rolling pin over the lace once with even pressure.
Step 3 – Reveal the Magic: Peel the lace off slowly. You will be left with a stunning, intricate web of raised patterns embossed directly into the surface.
Step 4 – Cut and Refine: Use a round cutter to select the prettiest section of the lace print. Poke your stringing hole, let it dry, and seal it with a clear satin finish to protect the fine details from wearing down over time.
Final Thoughts
Making your own wearable clay art isn’t just about saving money on accessories, it’s an incredible window into understanding material science and personal design expression.
When you work with air-dry mediums, you quickly learn how moisture control affects structural integrity – adding too much water causes shrinking and cracking, while too little leads to brittle edges.
By mastering these simple balancing acts, you unlock the ability to prototype complex shapes and textures right at your kitchen table.
It teaches patience, hones fine motor skills, and provides a tangible sense of accomplishment every time someone asks, “Where did you get that necklace?” and you get to reply, “I made it.”





