Every autumn I end up looking for fall clay planters that feel warm, handmade, and just a little different from everything flooding Pinterest.
That’s exactly what inspired this collection.
Instead of copying trendy designs, I wanted to mix practical planting with decorative pieces that actually deserve a spot on a shelf even after the flowers are gone.
If you enjoy a relaxing clay craft project and you’re always hunting for fresh fall craft ideas, these beginner-friendly tutorials are made for you.
Some use air dry clay, others pair beautifully with terra cotta pots, and every project is designed so you can confidently recreate it at home.`
Choose Your Air Dry Clay Type
Regular Air Dry Clay | Cornstarch Clay | Homemade Clay
Affiliate Disclaimer: Some of the links in this post may be affiliate links, which means I may earn a small commission if you choose to make a purchase through them – at no extra cost to you. I only share products that genuinely fit this project and can help make your ceramic mug clay craft process easier and smoother. Your support helps keep ideas like this coming.
1. Cozy Sweater Knit Pumpkin Planter
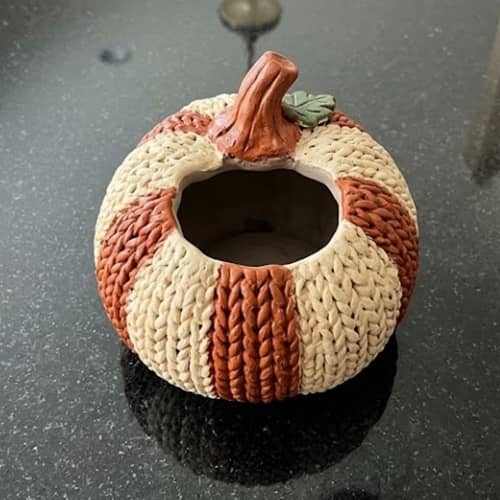
I love crafts that make people ask, “Wait…is that really clay?” This planter has that effect because the textured surface looks almost like a chunky knitted sweater wrapped around a pumpkin.
It works beautifully for succulents, dried wheat, faux maple leaves, or even a tiny herb plant on a kitchen shelf.
If you’re exploring unique fall clay pot ideas, this one feels cozy without becoming overly themed.
What You’ll Need
- Air dry clay (about 500g)
- Small plastic nursery pot (4 to 5 inches)
- Acrylic rolling pin or glass bottle
- Craft knife
- Ball stylus
- Toothpick
- Soft paintbrush
- Water
- Beige, cream, burnt orange and brown acrylic paint
- Matte sealer
Instructions
Start by cleaning the plastic planter. Any dust or oil can prevent the clay from gripping properly.
Roll the air dry clay until it’s roughly ¼-inch thick.
Don’t worry if it isn’t perfectly even because slight thickness changes actually make handmade projects look nicer.
Wrap the sheet around the planter.
Trim away excess clay with a craft knife. Leave about half an inch extra near the bottom because clay shrinks just a tiny bit while drying.
Now comes the fun part.
Roll dozens of thin clay ropes about the thickness of spaghetti.
Lay two ropes side by side.
Twist them gently together.
Press them onto the planter vertically. Continue wrapping the entire planter with twisted ropes.
Looks messy? Good. Knitted fabric isn’t perfectly straight either.
Use a damp brush to smooth every seam without flattening the texture.
For the pumpkin look, gently press shallow vertical grooves between every fourth rope using the rounded end of your stylus.
Around the top rim, roll one thicker rope and press it in place like a soft rolled sweater collar.
Leave everything untouched for at least 24 to 48 hours depending on humidity.
Mine usually dries slower during fall because the air gets a little damp.
Paint the base with warm cream.
Dry brush burnt orange lightly across the raised texture.
Finally add tiny touches of brown inside the grooves to create shadows.
Seal with matte varnish.
Now it honestly resembles a knitted pumpkin sitting on your table.
2. Rustic Woodland Acorn House Planter
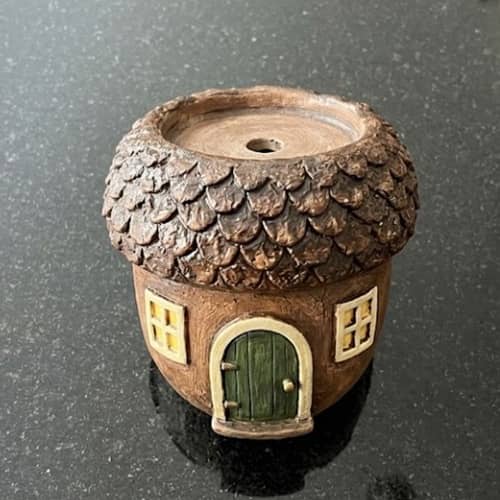
Instead of making another pumpkin, why not build something that feels straight out of an old forest? This little house planter combines an acorn cap roof with a woodland cottage. Kids loves this one too.
Supplies
- Air dry clay
- Small round planter
- Clay sculpting tools
- Toothpick
- Fine sponge
- Acrylic paints
- Matte varnish
Detailed Instructions
Cover the outside of your planter with a smooth layer of clay about 5mm thick.
Keep your fingers slightly wet while smoothing.
That tiny trick prevents fingerprints from showing everywhere.
Sketch a tiny cottage door using a toothpick.
Cut around it carefully without cutting all the way through.
Add miniature logs by rolling short clay cylinders.
Stack them around the doorway.
Now make four tiny windows.
Press a cross into each one using your knife.
Roll dozens of little teardrop shapes.
Flatten each gently.
Layer them around the planter from top to bottom.
These become overlapping acorn scales.
Don’t rush this part because uneven spacing actually makes the texture look realistic.
Near the rim, add one thick rounded band.
Texture it with small curved lines.
It suddenly starts looking like an acorn cap.
Funny how one little detail changes everything.
Let dry completely.
Paint the body warm tan.
The roof gets dark chocolate brown.
Dry brush lighter brown across the raised scales.
Add white around the windows.
Paint tiny black dots for window openings.
Finish with matte varnish.
Among all the clay pot fall crafts I’ve experimented with, this one keeps getting compliments because people notice something new every time they look.
3. Harvest Quilt Patchwork Planter
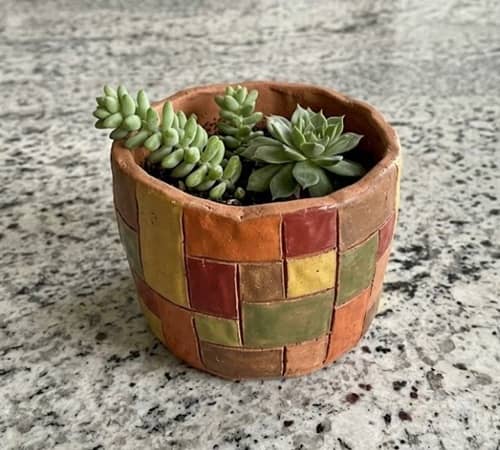
Quilts remind me of cool evenings, warm soup, and grandparents’ homes. So why not borrow that same feeling for fall clay planters?
This design doesn’t rely on pumpkins at all, which makes it stand out from hundreds of similar projects online.
Materials
- Air dry clay
- Square or round planter
- Ruler
- Clay knife
- Toothpick
- Acrylic paints
- Matte sealer
Step-by-Step Guide
Roll clay into an even sheet.
Wrap your planter carefully.
Smooth every seam.
Using a ruler, lightly mark horizontal lines around the planter.
Now add vertical lines.
You should have dozens of little squares.
Inside every square, create different patterns.
Some can have diagonal stripes.
Others tiny dots.
Some tiny leaves.
Others simple basket weave impressions.
Don’t repeat the same pattern next to each other.
That little variation gives it a handmade quilt appearance.
I almost messed mine up by making every square identical. It looked boring real quick.
Allow the clay to dry slowly.
Paint each square a slightly different autumn shade.
Think mustard.
Brick red.
Forest green.
Muted cream.
Soft brown.
The colors shouldn’t scream. They should whisper.
Dry brush antique brown over everything before sealing.
This project makes beautiful seasonal centerpieces and fits perfectly beside rustic candles or dried grasses.
It also pairs nicely with other fall terra cotta pot ideas if you’re creating an entire autumn display.
4. Whimsical Sleeping Fox Planter
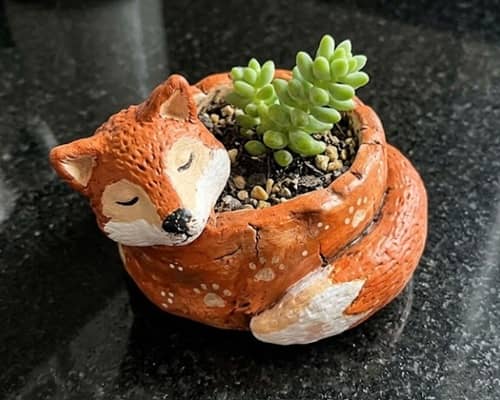
I wasn’t planning to make a fox planter. Then leftover clay sort of became one.
Sometimes the best fall craft projects happens by accident.
Materials
- Air dry clay
- Round planter
- Sculpting tools
- Needle tool
- Acrylic paints
- Matte varnish
Beginner-Friendly Tutorial
Apply clay around the planter evenly.
Roll one thick rope.
Wrap it around the lower third.
Blend the top edge.
This becomes the curled fox tail.
Now sculpt a rounded fox head.
Flatten the back.
Attach it near the rim using scoring and a little water.
Create tiny ears.
Attach carefully.
Blend every joint thoroughly.
Nobody likes floating fox ears.
Press shallow fur lines using a needle tool.
Don’t carve deeply.
Gentle texture always looks more believable.
Paint the body burnt orange.
The tail tip becomes white.
Ears receive darker brown edges.
Tiny black eyes.
Little nose…. And Done.
Actually…wait.
Add soft dry-brushed cream around the cheeks before sealing.
That tiny detail makes the fox look much softer.
This could even become part of Thanksgiving clay pot crafts, especially filled with dried wheat stems instead of flowers.
5. Vintage Barn Owl Moss Planter
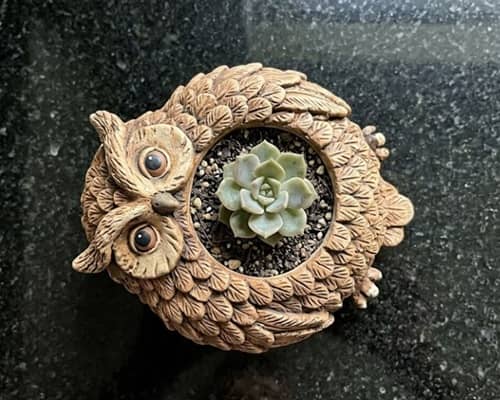
Owls always remind me that autumn evenings are getting longer.
This planter doubles as sculpture because the owl remains visible even after adding plants.
It’s also a refreshing alternative if you’ve already made enough pumpkins for one season.
Supplies
- Air dry clay
- Small planter
- Sculpting tools
- Toothpick
- Acrylic paints
- Matte sealer
Complete Instructions
Cover the planter evenly with clay.
Draw a large heart shape on the front.
This becomes the owl’s facial disc.
Roll two tiny balls.
Flatten them.
Place inside the heart.
These become eyes.
Roll dozens of tiny teardrops.
Attach them one by one below the face.
Overlap slightly.
Congratulations.
You’re making feathers.
It takes a while, but the texture is worth every minute.
Shape two folded wings.
Attach each side.
Blend the edges.
Create a tiny beak using a miniature triangle.
Dry for 48 hours.
Paint warm taupe first.
Dry brush cream across the feathers.
Dark brown settles inside every groove.
Finally, highlight the eyes using soft amber paint.
Add preserved moss or trailing greenery inside for a woodland look.
I’ve even seen similar styles combined with a playful terracotta pig display or nearby clay pot Scarecrow ideas, creating a fun seasonal collection without everything matching exactly.
6. Stacked Woodland Mushroom Planter
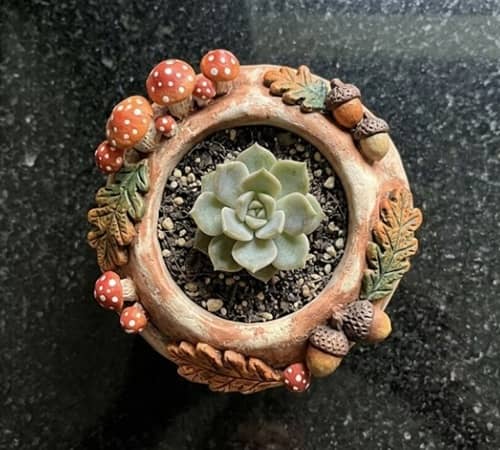
I wanted one planter that looked like it had been sitting quietly on a forest floor for years.
This one ended up becoming my favorite because it feels playful without looking childish.
Even when the plant isn’t inside, it still works as autumn shelf decor. That’s pretty rare for a planter project.
What You’ll Need
- 500-700g air dry clay
- 5-inch plastic nursery pot
- Clay roller
- Craft knife
- Ball stylus
- Toothpick
- Water
- Acrylic paints (terracotta, cream, warm brown, olive green)
- Matte varnish
- Fine sponge
Detailed Instructions
Start by rolling your air dry clay into a sheet around 6mm thick.
Wrap it around the nursery pot.
Trim away the extra clay.
Blend the seam with damp fingertips until it almost disappears.
Now lightly sketch several mushroom stems around the planter using a toothpick.
Don’t make every mushroom identical.
Nature never does.
Roll short cylinders for each stem.
Flatten them just slightly before attaching.
Score both surfaces before pressing them together.
This step matters more than people realize because dry clay doesn’t magically stick to dry clay.
Next, roll small balls for mushroom caps.
Flatten them into domes.
Attach each cap above its stem.
Some mushrooms can overlap each other.
Some should lean a tiny bit.
That imperfect placement actually makes the design more believable.
Use your stylus to gently blend every connection.
Now add tiny woodland details.
Press miniature oak leaves between mushrooms.
Create little acorns using tiny clay teardrops.
Scatter a few raised dots to imitate forest moss.
It dont have to look perfectly symmetrical.
Allow everything to dry for 24 to 48 hours.
Once dry, paint the base a muted terracotta color.
Paint mushroom caps warm rust, caramel, and chestnut.
Add cream dots to only a few caps instead of every single one.
Dry brush olive green lightly near the base to imitate moss growing against old pottery.
Seal everything with matte varnish.
The finished planter almost looks like something you’d discover during a fall hike.
7. Twisted Grapevine Harvest Basket Planter
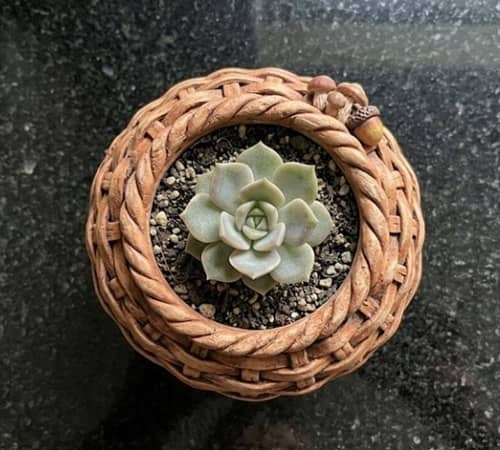
Most fall clay planters are round and smooth. This one intentionally isn’t.
Instead of pretending to be pottery, it mimics an old woven grapevine basket. I honestly didn’t expect the illusion to work so well.
Materials
- Air dry clay
- Small planter
- Clay roller
- Toothpick
- Sculpting tool
- Acrylic paints
- Matte sealer
Step-by-Step Tutorial
Cover the planter with an even clay layer.
Smooth every seam carefully.
Now roll dozens of thin ropes.
Try keeping them roughly pencil-lead thickness.
Twist two ropes together.
Attach them diagonally across the planter.
Leave tiny gaps between each strip.
Repeat in the opposite direction until they crisscross.
Suddenly the planter starts looking woven.
Pretty satisfying honestly.
Along the rim, create one thick braided rope.
Attach it carefully.
Blend only the bottom edge.
Leave the braid itself raised.
Now make miniature grapevine details.
Roll tiny curling vines.
Wrap them randomly between the woven sections.
Add three or four tiny maple leaves.
Keep them small.
Oversized leaves ruin the basket illusion.
After drying completely, paint the planter deep brown.
Dry brush lighter tan over only the raised braid and woven strips.
Finally add tiny green highlights inside vine curls.
The finished piece blends beautifully with rustic centerpieces and many fall clay pot ideas because it adds texture rather than another pumpkin shape.
8. Cozy Pumpkin Cottage Lantern Planter
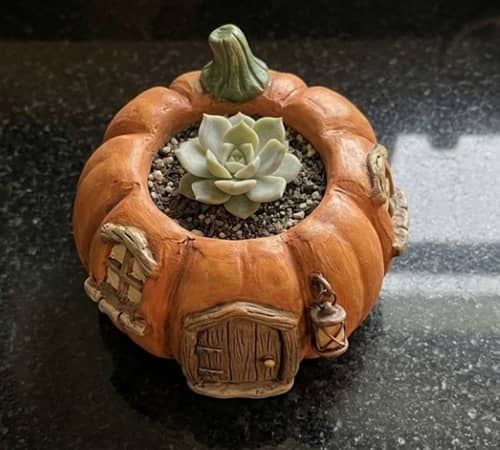
This design started with one question.
What if a pumpkin became somebody’s little home?
The result feels like something from an old storybook without becoming cartoonish.
Supplies
- Air dry clay
- Round planter
- Craft knife
- Toothpick
- Ball stylus
- Acrylic paints
- Matte varnish
Complete Beginner Instructions
Wrap the planter with clay about 5-6mm thick.
Smooth the entire surface.
Using your fingers, gently create shallow pumpkin grooves all around.
Don’t press too deeply.
Now sketch a tiny arched front door.
Cut shallow lines only.
Do not cut through the clay.
Roll miniature logs.
Frame the doorway.
Next add two tiny windows.
Press crossbars using your knife.
Above one window, sculpt a miniature lantern.
Use a tiny clay cylinder.
Attach an even smaller rounded piece beneath it.
It looks ridiculously tiny but somehow becomes the cutest detail.
Create a curled chimney on one side.
Roll a thin clay snake.
Curve it gently upward.
Finally add scattered vines growing across the pumpkin.
Some vines should simply disappear behind grooves.
That little trick adds depth.
Allow the planter to dry slowly.
Paint soft pumpkin orange.
Shade grooves with burnt sienna.
Paint the door walnut brown.
Use pale yellow inside the windows to imitate warm light.
Seal everything.
This one fits beautifully as Thanksgiving clay pot displays and works wonderfully beside candles or dried eucalyptus.
9. Rustic Birch Tree Bark Planter
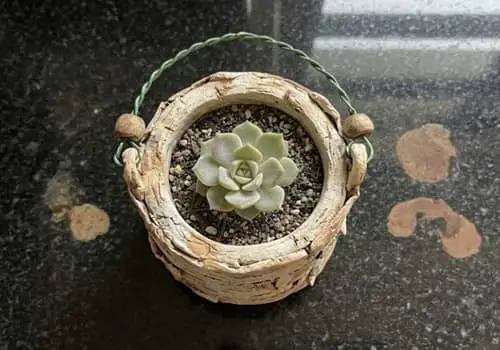
Not every autumn project needs pumpkins.
Sometimes texture alone tells the story.
This planter copies peeling birch bark, and from a distance many people assume it’s carved wood.
Materials
- Air dry clay
- Plastic planter
- Aluminum foil
- Toothpick
- Needle tool
- Acrylic paints
- Matte sealer
Detailed Instructions
Roll clay evenly.
Wrap the planter.
Blend the seam.
Now crumple aluminum foil tightly.
Lightly press it across the clay.
Instant bark texture.
Use your needle tool to create long vertical cracks.
Don’t make perfectly straight lines.
Trees rarely grow like rulers.
Peel back tiny clay sections near the edges using your craft knife.
Leave them attached.
These become lifting bark layers.
Score lightly beneath each lifted edge.
Smooth only where necessary.
After drying, paint everything creamy white.
Dry brush pale gray vertically.
Finally add tiny black markings using the tip of a detail brush.
Less is definitely more here.
I almost added too many black lines on my first attempt, and it looked more like zebra stripes than birch bark.
This planter pairs surprisingly well with fall terra cotta pot ideas, creating contrast between smooth pottery and textured bark.
10. Autumn Storybook Scarecrow Planter
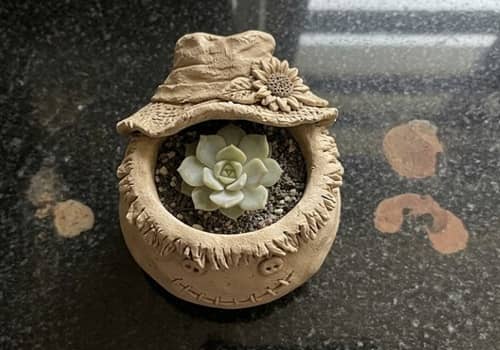
I wanted to end this batch with something cheerful.
Instead of sculpting a full scarecrow, the face wraps around the planter while straw and hat details frame the rim. It feels festive without being over-the-top.
If you’ve searched for clay pot Scarecrow ideas, this version offers a completely different direction.
What You’ll Need
- Air dry clay
- Round planter
- Sculpting tools
- Toothpick
- Acrylic paints
- Matte varnish
Step-by-Step Guide
Wrap clay around the planter.
Blend every seam smoothly.
Mark two shallow circles for the eyes.
Roll tiny balls.
Flatten and attach.
Now shape a rounded triangle nose.
Attach securely.
Roll one long rope.
Curve it into a stitched smile.
Use your toothpick to press stitch marks across the smile.
Next create the scarecrow hat.
Roll one long strip.
Wrap it around the rim.
Add another flattened oval on top as the hat crown.
Texture both pieces with gentle wood-grain lines.
Around the base of the hat, press dozens of tiny vertical cuts.
These imitate loose straw.
The planter already looks charming at this stage.
Create two miniature sunflower accents beside the hat.
Roll tiny petals individually.
Yes, it takes patience.
Worth it though.
Allow everything to dry fully.
Paint the face warm tan.
Paint the hat weathered brown.
Highlight the straw with golden yellow and cream.
Finish with soft orange blush around the cheeks before sealing.
It almost looks like a smiling harvest decoration that just happens to hold a plant.
This project blends naturally with other clay craft displays, whether you’re making rustic centerpieces or experimenting with seasonal house planter designs.
11. Rustic Fallen Oak Log Planter
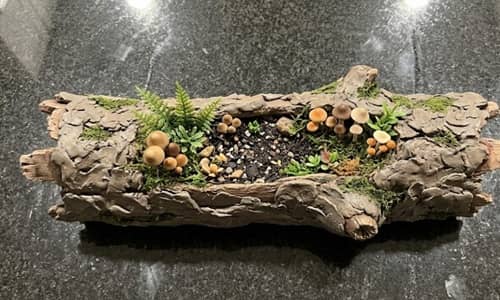
I wanted one design that looked like it had been picked up from the woods after a crisp autumn walk.
Not carved. Not polished. Just naturally weathered.
This planter became that project, and honestly, it fools people from across the room because the bark texture looks surprisingly convincing.
What You’ll Need
- 500 to 700g air dry clay
- 5-inch plastic nursery pot
- Acrylic rolling pin
- Aluminum foil
- Toothpick
- Craft knife
- Needle tool
- Water
- Acrylic paints (dark brown, raw umber, tan, cream, moss green)
- Matte varnish
Beginner-Friendly Instructions
Begin by rolling your clay into an even sheet about 6mm thick.
Wrap it carefully around the nursery pot.
Trim the excess.
Blend the seam using a damp finger until it becomes almost invisible.
Now crumple a sheet of aluminum foil into a loose ball.
Lightly press it over the clay.
This instantly creates rough bark texture.
Next, use your needle tool to carve long vertical cracks.
Make some deep.
Leave others shallow.
Trees aren’t perfectly balanced, and your planter shouldn’t be either.
Use your craft knife to carefully lift tiny strips of clay.
Don’t remove them.
Leave one edge attached so they resemble peeling bark.
It looks strange now.
Trust the process.
Roll several tiny clay knots and attach them randomly around the planter.
These imitate old branch scars.
Press a few shallow circles around each knot.
That tiny detail makes the bark feel incredibly realistic.
Near the bottom, sculpt two or three miniature mushrooms growing from the trunk.
Keep them small.
Oversized mushrooms steal all the attention.
Mine was way too big on my first attempt, and it looked funny.
Allow the planter to dry for at least 48 hours.
Paint the entire planter dark brown.
Dry brush tan across the raised bark.
Add cream only to the peeling edges.
Finally, dab tiny touches of moss green around the mushrooms and lower bark to create a naturally aged appearance.
Seal with matte varnish.
This rustic house planter looks beautiful filled with trailing ivy, preserved moss, dried grasses, or even tiny faux pumpkins during the season.
It also complements other fall clay planters without competing for attention.
12. Antique Autumn Quilt Barn Planter
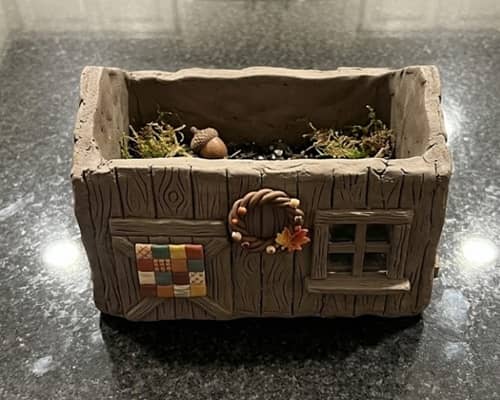
I wanted to finish this collection with something that combined several fall memories into one project.
Old barns. Patchwork quilts. Wooden fences. Harvest colors.
Instead of choosing just one theme, this planter quietly blends them together. It feels decorative before you even place a plant inside.
Supplies
- Air dry clay
- Small round or square planter
- Clay roller
- Toothpick
- Ball stylus
- Craft knife
- Acrylic paints (barn red, mustard, cream, walnut brown, sage green)
- Matte varnish
Detailed Step-by-Step Instructions
Roll your air dry clay evenly until it reaches about ¼ inch thick.
Wrap the planter.
Trim away the extra clay.
Blend the seam using a damp fingertip.
Using a ruler, lightly divide the planter into rectangular panels.
Think of them as wooden barn boards.
Now texture each board.
Drag a toothpick lengthwise across every panel.
Some lines should stay shallow.
Others can be slightly deeper.
Next, create tiny patchwork quilt squares.
Choose only one section of the planter instead of covering everything.
Roll miniature clay strips.
Arrange them into small squares and diamonds.
Inside each square, press different textures.
Tiny dots.
Diagonal lines.
Crosshatching.
Simple leaf veins.
No two blocks should match exactly.
That variation gives the finished piece far more personality.
Above the quilt section, sculpt a tiny barn window.
Below it, add two crossed wooden beams.
Near one corner, create a miniature wreath using a thin clay rope.
Press tiny leaf marks all around the circle.
It don’t need to be perfect because rustic projects rarely are.
Allow the clay to dry completely.
Paint the barn boards a faded barn red.
Dry brush walnut brown over the wood grain.
Paint the quilt blocks using muted mustard, cream, sage green, burnt orange, and dusty brown.
Keep the colors slightly weathered instead of bright.
Finish the wreath with soft olive green and tiny golden berries.
Seal everything using matte varnish.
Final Thoughts
One thing I’ve learned after making plenty of seasonal clay craft projects is that texture almost always matters more than complexity.
A simple planter with believable bark, woven rope, or stitched details usually feels more expensive than one packed with decorations.
When you experiment with fall crafts, don’t worry about making every line perfectly straight or every leaf identical.
Those little imperfections are often what make handmade pieces memorable.
Whether you’re exploring fall clay pot ideas, trying your first planter project, or simply looking for creative ways to use air dry clay, focus on building pieces that still look beautiful long after autumn flowers have been replaced with winter greenery.





