Halloween doesn’t have to mean complicated supplies or messy projects that leave teachers cleaning for an hour.
The best Halloween daycare crafts are simple enough for tiny hands, exciting enough to keep older kids interested, and creative enough that every child ends up with something they feel proud of.
Looking for fresh spooky craft ideas instead of the same pumpkin coloring pages? You’re in the right place.
I put together these beginner-friendly projects so caregivers, teachers, and parents can confidently guide children step by step, even if they’ve never hosted a Halloween craft session before.
Every project focuses on fun, creativity, and easy-to-find materials.
1. Puffy Ghost Cotton Ball Friends
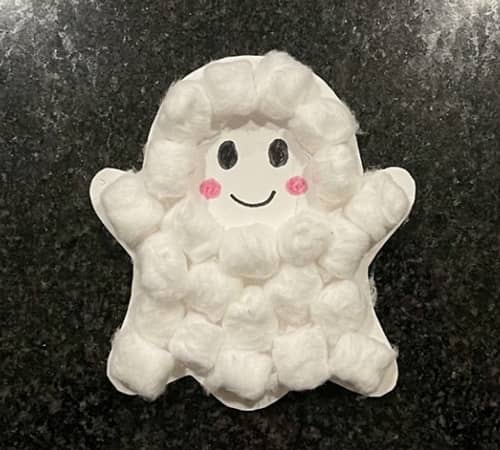
This little ghost always gets giggles. It looks fluffy, feels soft, and nobody minds if every ghost turns out a little crooked. That’s the fun part.
Supplies
- White cardstock
- Cotton balls
- School glue
- Black marker
- Kid-safe scissors
- Googly eyes (optional)
- Small pink crayon
Instructions
Draw a ghost about the size of an adult hand on white cardstock.
Don’t worry if the edges wobble a little because cotton will cover most of it.
Let children cut out the ghost if they’re old enough. Younger kids can use a pre-cut shape instead.
Spread school glue over the ghost one section at a time.
Don’t coat the entire thing immediately because the glue can dry quicker than expected.
Press cotton balls gently across the body until every white area disappears. Leave a tiny gap around the eyes.
Now comes the personality.
Draw a surprised mouth.
Or maybe a happy smile.
Some ghosts even get sleepy eyes. There isn’t really a wrong face here.
If using googly eyes, glue them on once the cotton has settled. Add tiny pink cheeks with a crayon for extra charm.
Allow everything to dry flat before hanging the ghosts around the classroom.
Why kids love it
The fluffy texture keeps little fingers busy while encouraging sensory exploration. It also works wonderfully as one of those Halloween preschool crafts that almost every age group can finish successfully.
2. Paper Plate Friendly Jack-o’-Lantern
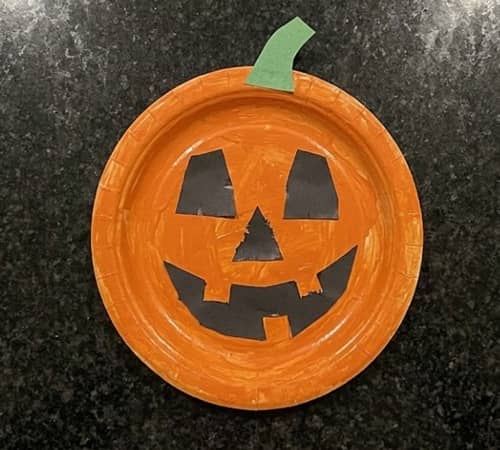
Pumpkins don’t always have to look scary. Mine usually end up smiling more than frightening anyone.
Supplies
- Orange paper plate
- Green construction paper
- Black construction paper
- Glue stick
- Child-safe scissors
- Pencil
Instructions
Place the orange paper plate upside down.
This becomes your pumpkin.
For the stem, cut a tiny rectangle out of green paper. Glue it near the top center.
Now cut simple black triangles for the eyes. Make them large enough for younger children to handle easily.
Cut a nose.
Then cut a curved smile.
Some children likes adding silly teeth, and honestly, those often become the cutest pumpkins.
Glue each piece carefully onto the plate.
Older children can decorate the edges with tiny dots, squiggles or orange crayon shading to create more texture.
Punch a small hole at the top if you’d like to hang the finished pumpkin around the daycare.
This simple Halloween daycare craft also makes wonderful seasonal decorations without creating much mess.
Why kids love it
Every pumpkin ends up with its own personality, making this a fantastic classroom display and one of my favorite Halloween decor crafts for kids.
3. Spider Handprint Web Art
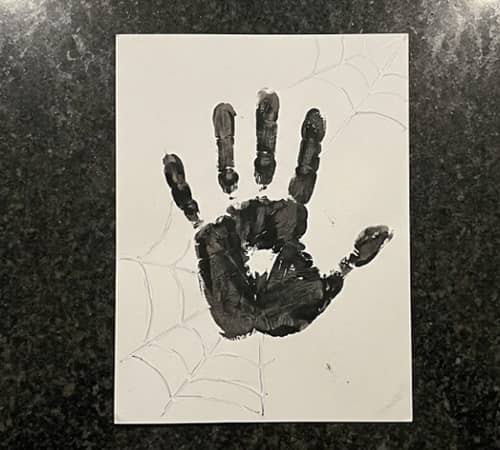
Kids absolutely love tracing their own hands. Then suddenly…boom…it’s a spider.
Supplies
- White cardstock
- Black washable paint
- Paintbrush
- Cotton swabs
- Black marker
- White paint
Instructions
Paint the child’s palm lightly with black washable paint.
Not too thick.
Too much paint makes fingerprints disappear.
Press the hand firmly onto white cardstock. Lift straight upward without sliding.
Allow the print to dry completely.
Use a cotton swab dipped in white paint to create tiny web lines stretching around the handprint.
Draw little eyes near the palm.
Add eight silly legs extending outward from each finger.
Want something even cuter?
Glue tiny googly eyes once the paint dries.
Children love comparing their spider sizes because every handprint tells its own story.
It become one of those keepsakes families actually save.
Why kids love it
Besides being a memorable Halloween project, it doubles as a fun memory of how tiny their hands once were.
4. Popsicle Stick Candy Corn Friends
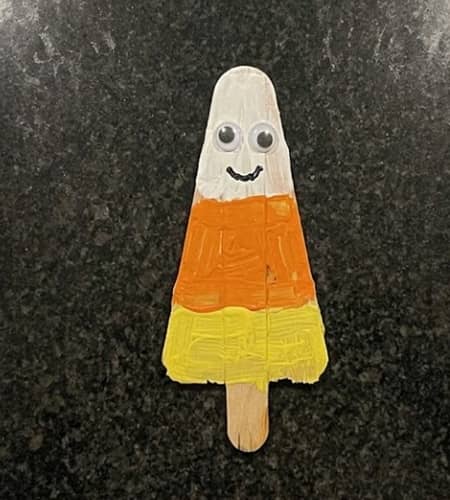
Candy corn suddenly gets little faces, and somehow they become adorable.
Supplies
- Three popsicle sticks
- White paint
- Orange paint
- Yellow paint
- Glue
- Black marker
- Small googly eyes
Instructions
Glue three popsicle sticks into a triangle shape.
Allow the frame to dry first.
Paint the top white.
Paint the middle orange.
Finish the bottom yellow.
Don’t rush between colors or they’ll blend together.
That isn’t always bad though because younger children often create fun watercolor-looking effects.
Once everything dries, glue on googly eyes.
Draw tiny smiles.
Maybe add little eyelashes.
Perhaps freckles.
Every candy corn should look different because perfection isn’t the goal.
Tie a ribbon through the top if you’d like children to hang them at home.
These also work brilliantly for kids craft activities for Halloween when supplies are limited.
5. Toilet Paper Roll Little Bats
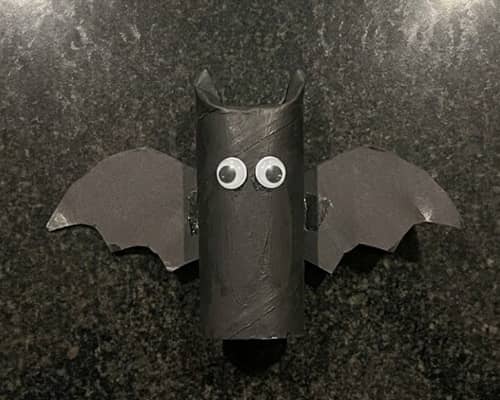
Don’t throw away those cardboard rolls just yet.
Seriously…they’re perfect.
Supplies
- Empty toilet paper roll
- Black paint
- Black construction paper
- White crayon
- Glue
- Googly eyes
Instructions
Paint the cardboard tube completely black.
Leave it standing upright inside a paper cup while drying.
Fold the top edges inward slightly to create pointed bat ears.
Cut two wide bat wings from black construction paper.
Glue them to each side of the tube.
Attach googly eyes.
Draw a tiny smile using a white crayon.
Some children likes giving their bats funny eyebrows, and those always make everyone laugh.
Older children can decorate wings with silver gel pen patterns.
Arrange several bats together across a classroom shelf to create a flying family.
This makes a creative craft for Halloween while recycling everyday materials.
6. Fingerprint Pumpkin Patch
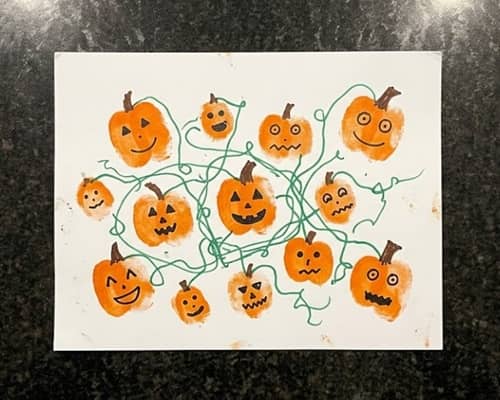
This project grows an entire pumpkin field from fingerprints alone.
Tiny fingerprints.
Big imagination.
Supplies
- White cardstock
- Orange washable ink pad
- Green marker
- Brown marker
- Black fine-tip marker
Instructions
Press one finger gently into the orange ink pad.
Stamp fingerprints across the page with small spaces between them.
Allow the prints to dry for several minutes.
Draw tiny green vines above each fingerprint.
Add brown stems.
Finally, use the black marker to turn each fingerprint into a smiling jack-o’-lantern by drawing miniature eyes and mouths.
Some pumpkins can look surprised.
Others can wink.
One might even wear tiny glasses.
Who says pumpkins all need identical faces?
Children naturally create completely different pumpkin patches every single time.
It’s one of those halloween art projects for preschoolers that also encourages pattern recognition and counting activities.
Why kids love it
Each fingerprint becomes something unique, making this an engaging sensory activity that easily fits daycare classrooms of mixed ages.
7. Paper Bag Monster Puppets
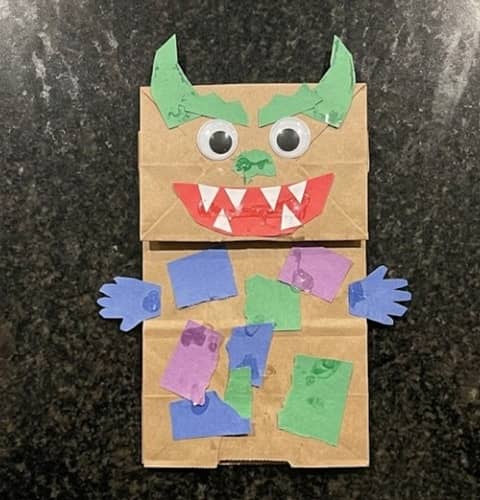
Some monsters roar.
Others just want to tell silly jokes. That surprise is exactly what makes this one such a hit during circle time.
Supplies
- Small brown paper lunch bags
- Construction paper (green, purple, orange, black)
- Glue stick
- Child-safe scissors
- Googly eyes
- Black marker
- Yarn scraps (optional)
Instructions
Lay the paper bag flat with the folded flap facing upward. That flap becomes the monster’s mouth.
Choose a colorful sheet of construction paper and glue it over the front of the bag. Press from the center outward so wrinkles stay away.
Cut two large circles or ovals for the eyes. Bigger pieces are much easier for preschoolers to handle.
Glue the eyes above the flap.
Now it’s monster time.
Cut funny horns, pointy ears, shaggy eyebrows, crooked teeth, or tiny fangs from colored paper.
Encourage children to mix colors instead of copying one example. Every monster should feel like its own character.
Glue yarn onto the top for messy monster hair if desired.
Draw freckles, a goofy tongue, or spotted cheeks using markers.
Slide your hand inside the bag after everything dries. Open and close the flap to make the monster “talk.”
Its voice don’t have to sound scary. Funny monsters usually get the biggest laughs.
Invite children to perform short puppet stories in pairs. This naturally builds confidence while encouraging imaginative play.
8. Egg Carton Mini Spiders
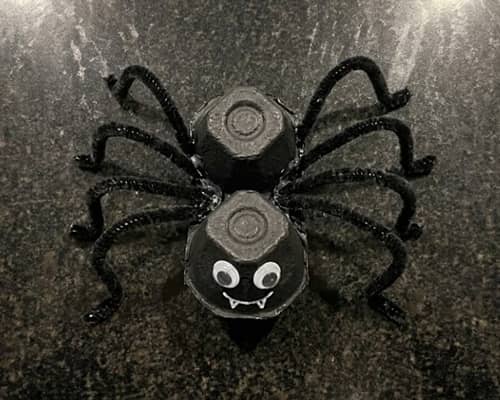
Sometimes the best Halloween daycare craft starts in the recycling bin.
These tiny spiders are cute enough that even kids who dislike creepy crawlies usually end up smiling.
Supplies
- Cardboard egg carton
- Black paint
- Pipe cleaners
- Googly eyes
- Glue
- Child-safe scissors
- Hole punch
Instructions
Separate individual egg carton cups using scissors. Each cup becomes one spider body.
Paint every cup black.
Allow the paint to dry completely before moving to the next step.
Punch four holes along each side of the cup.
Cut four black pipe cleaners in half to create eight spider legs.
Push one piece through each hole and bend slightly inside so the legs stay secure.
Curl the ends of the pipe cleaners outward to make the spider look ready to crawl.
Glue on two googly eyes.
Draw a cheerful smile if children prefer friendly spiders instead of spooky ones.
Some children makes their spiders wear tiny paper hats, and honestly, those little details make every finished project memorable.
9. Witch Hat Name Craft
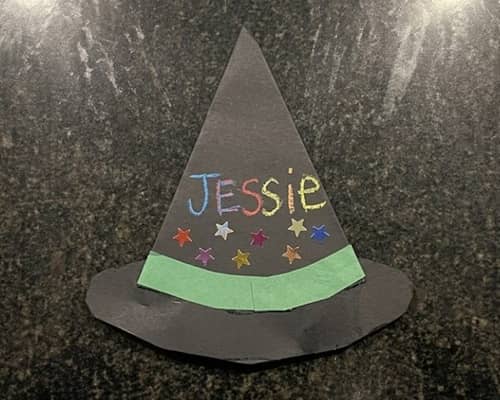
This one secretly teaches name recognition while feeling like a festive Halloween activity.
Kids rarely notice they’re practicing literacy.
Supplies
- Black construction paper
- Purple construction paper
- Green paper strip
- Glue
- Scissors
- Alphabet stickers or marker
- Foam star stickers (optional)
Instructions
Cut a large triangle from black paper.
Next, cut a wide oval to create the brim.
Glue the triangle onto the brim.
Cut a thin strip of green paper and glue it across the hat where the brim meets the triangle.
Write each child’s name vertically on the hat using colorful markers or alphabet stickers.
Decorate with tiny stars, moons, dots, or little spiders.
Older children can trace their own names first before decorating.
Hang every completed witch hat across a bulletin board.
Suddenly the classroom turns into personalized Halloween decor without much effort.
There is something really satisfying about watching children proudly point to their own names.
10. Masking Tape Mummy Canvas
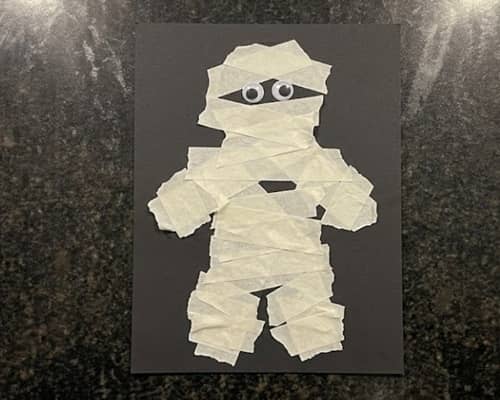
No fancy supplies.
No complicated cutting.
Just tape, paper, and lots of imagination.
Supplies
- Black cardstock
- White masking tape
- Googly eyes
- Glue
- Black marker
Instructions
Give each child a sheet of black cardstock.
Tear masking tape into strips of different lengths.
Stick the strips across the cardstock, slightly overlapping each other to resemble wrapped mummy bandages.
Don’t line them up perfectly.
Crooked tape actually makes the mummy look better.
Leave a small opening near the top.
Glue two googly eyes inside that space.
Use a marker to draw tiny eyebrows or eyelashes if children want extra personality.
Press all tape firmly before displaying the artwork.
It looks wonderfully textured from a distance, yet every child creates something noticeably different.
11. Leaf Ghost Hanging Mobile
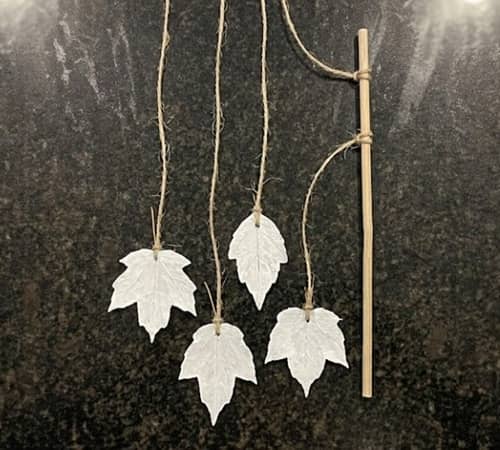
Nature joins the Halloween party with this simple outdoor-inspired project.
A short walk outside becomes part of the activity.
Supplies
- Large dried leaves
- White acrylic paint
- Black marker
- String
- Hole punch
- Small stick
Instructions
Collect sturdy dried leaves during outdoor play.
Brush one thin coat of white paint across each leaf.
Allow them to dry fully.
Draw ghost faces using a black marker.
Some ghosts can smile.
Others can look sleepy.
A few surprised expressions always make children laugh.
Punch a small hole near the top of every leaf.
Tie pieces of string through the holes.
Attach the strings to a small stick collected outdoors.
Hang the finished mobile near a classroom window or reading corner.
Every little breeze creates gentle movement that brings the ghosts to life.
It are surprisingly calming to watch.
12. Monster Footprint Welcome Sign
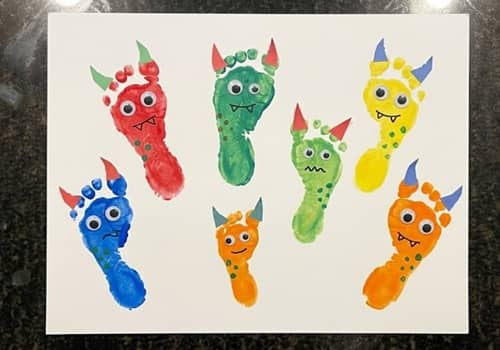
This final project turns little feet into colorful Halloween monsters.
Parents absolutely adore taking this keepsake home.
Supplies
- Large white poster board
- Washable paint
- Paintbrush
- Googly eyes
- Construction paper
- Glue
- Marker
Instructions
Paint the bottom of one foot using washable paint.
Press the foot firmly onto the poster board.
Lift it straight upward.
Allow every footprint to dry before decorating.
Turn each footprint upside down.
The heel becomes the monster’s head while the toes become funny monster hair.
Glue on googly eyes.
Cut colorful paper horns, tiny wings, bows, hats, or antennae from construction paper.
Add names underneath each monster.
Finish the poster by writing “Our Little Halloween Monsters” across the top.
The finished display becomes a cheerful classroom entrance and one of those Halloween decor crafts for kids that families love photographing.
You won’t believe how different every monster looks, even though everyone started with exactly the same instructions.
Final Thoughts
The magic behind memorable Halloween daycare crafts isn’t found in expensive supplies or picture-perfect results.
It’s found in those tiny moments when a child proudly says, “I made this!”
Sometimes the glue ends up where it shouldn’t, a spider gets seven legs instead of eight, or a pumpkin wears three smiles instead of one.
That’s completely okay because creativity grows through exploration, not perfection.
Mixing sensory materials, recycled items, painting, cutting, and storytelling keeps children engaged while quietly building fine motor skills, confidence, and problem-solving abilities.
If you rotate different spooky craft for kids throughout October instead of repeating similar projects, children stay curious, excited, and eager to discover what they’ll create next.