If you adore soft plush-inspired designs, these clay Jellycat craft ideas are going to keep your hands busy in the best way.
I love turning simple air dry clay into tiny characters with rounded shapes, sweet expressions, and a handmade charm that looks perfectly imperfect.
The best part? You don’t need expensive tools or years of experience to create each clay craft in this guide.
I’ll walk through every step in beginner-friendly detail, throw in little tricks I learned along the way, and help you build adorable figures that feel inspired by cozy plush toys rather than complicated sculptures. Ready? Let’s make something tiny.
Choose Your Air Dry Clay Type
Regular Air Dry Clay | Cornstarch Clay | Homemade Clay
Affiliate Disclaimer: Some of the links in this post may be affiliate links, which means I may earn a small commission if you choose to make a purchase through them – at no extra cost to you. I only share products that genuinely fit this project and can help make your ceramic mug clay craft process easier and smoother. Your support helps keep ideas like this coming.
1. Sleepy Bunny Holding a Tiny Carrot
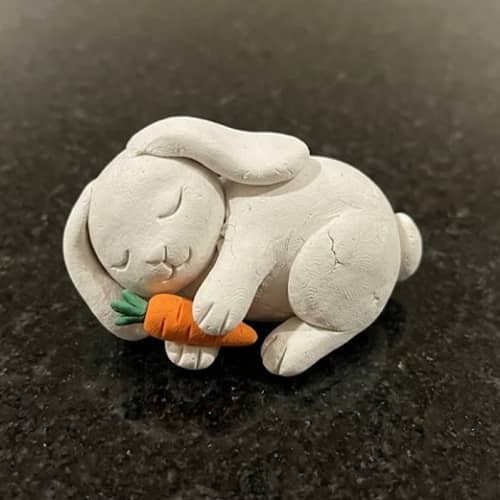
Nothing says cozy quite like a sleepy bunny with floppy ears.
Instead of making it perfectly symmetrical, leave little imperfections.
Funny enough, those tiny flaws make it look softer. Thats what gives handmade projects their personality.
Materials
- White air dry clay
- Light pink clay
- Orange clay
- Green clay
- Clay sculpting tool
- Toothpick
- Soft paintbrush
- Matte varnish (optional)
Instructions
Start by rolling a ball about the size of a large grape.
This becomes the bunny’s head. Roll another ball that’s slightly smaller for the body.
Press them together gently without flattening either piece. If the clay feels dry, dip your fingertip in a tiny bit of water before joining them.
Roll two equal cylinders for the ears. Flatten each one lightly using your finger instead of a roller so they stay puffy.
Bend both ears naturally. One can droop lower than the other because real plush-inspired designs rarely look perfectly matched.
Create two miniature arms by rolling tiny sausages. Attach them near the chest while curving both inward.
Now roll an orange teardrop for the carrot. Make faint vertical lines using a toothpick. Add three tiny green leaves on top.
Place the carrot between the bunny’s arms before the clay firms up.
For the face, poke two tiny eye indentations using the rounded end of a paintbrush.
Fill them with tiny black clay dots or paint them after drying. Draw a tiny upside-down Y for the nose and mouth using a needle tool.
Add pink inner ears using very thin flattened clay pieces.
Smooth fingerprints using a damp brush. Don’t overdo it because a few tiny marks actually makes it feel handmade.
Leave it to dry for 24 to 48 hours depending on your climate.
2. Smiling Mushroom Friend
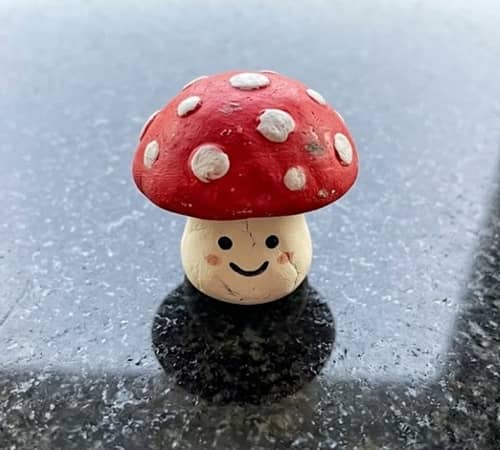
This one reminds me of those tiny woodland characters that instantly brighten a shelf. It looks complicated. It honestly isn’t.
Materials
- White clay
- Beige clay
- Red clay
- White paint
- Needle tool
Instructions
Roll a thick cylinder for the mushroom stem. Keep the bottom wider than the top so it stands without wobbling.
Create a dome using red clay. Instead of making a perfect half-circle, flatten the bottom slightly. Place it gently on top.
Blend the joint using your fingertip until both pieces look connected.
Roll six or seven tiny white balls for mushroom spots. Press them lightly onto the cap. Vary the sizes because nature doesn’t follow rulers.
Make two tiny stubby arms and attach them halfway down the stem.
Roll two even smaller legs. Flatten the bottoms slightly.
Use a dotting tool to create two eye sockets.
Add tiny black dots inside. Make the smile with a curved needle line. Don’t make it too wide. A tiny smile somehow feels cuter.
Let everything dry completely before sealing with matte varnish.
This is one of my favorite tiny clay animals alternatives because it isn’t an animal at all, yet still captures the same cozy personality.
3. Tiny Sleepy Cloud with Dangling Legs
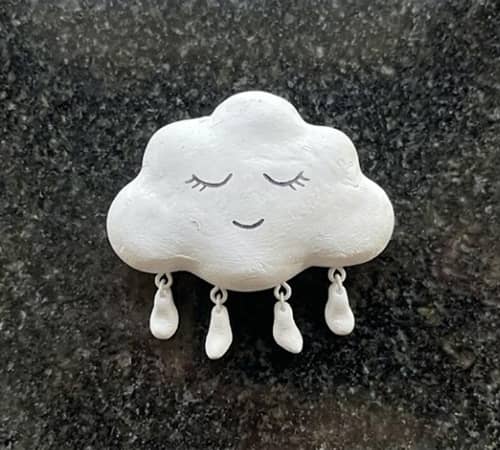
Sometimes simple shapes create the biggest smiles. You dont always need complicated details.
Materials
- White air dry clay
- Black paint
- Pink pastel
Instructions
Roll one large oval.
Pinch small rounded bumps around the edges until the oval slowly transforms into a fluffy cloud.
Smooth each bump with gentle circular motions instead of pressing hard.
Roll four tiny cylinders.
Cut them into two arms and two legs.
Attach the arms midway up the cloud.
Let the legs hang lower than the body by supporting them with folded paper while drying.
Draw closed sleepy eyes using thin curved lines after the clay dries.
Dust tiny pink cheeks using pastel powder applied with a cotton swab.
Want extra personality?
Add one tiny star resting beside the cloud using pale yellow clay.
This idea fits beautifully alongside super light clay ideas because lightweight clay creates an extra plush appearance.
4. Tiny Frog Reading a Book
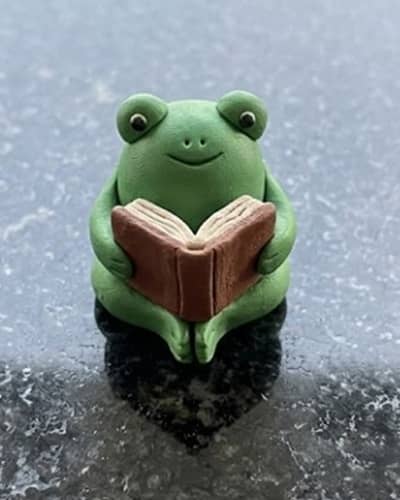
This little fellow looks like he belongs inside a miniature library.
Materials
- Green clay
- White clay
- Brown clay
- Black acrylic paint
Instructions
Roll a pear-shaped body.
Create a slightly oversized round head.
Join both pieces while gently blending the neck area.
Roll two tiny balls for eye bumps.
Attach them high above the face.
Press miniature black dots into each eye.
Roll four short cylinders.
The back legs should be slightly thicker than the front.
Bend each leg naturally before attaching.
Now make the smallest rectangle possible using brown clay.
Fold it gently like an open book.
Score tiny page lines using a needle.
Glue the book into both hands before the clay begins drying.
Add a tiny smile beneath the eyes.
Leave everything untouched for two full days.
The oversized head paired with tiny limbs gives this clay craft inspired by Jellycat plush toys its soft toy feeling.
5. Happy Croissant Character
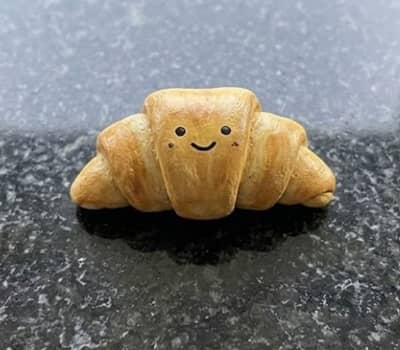
Cute food always wins. This one feels like it belongs in a tiny bakery.
Materials
- Beige clay
- Brown chalk pastel
- White paint
- Black paint
Instructions
Roll one thick cylinder.
Curve both ends inward.
Pinch the center slightly so the croissant shape becomes obvious.
Create three curved ridges across the top.
Blend gently.
Brush brown pastel onto the ridges before the clay dries for baked shading.
Roll two tiny arms.
Attach near the middle.
Create tiny feet underneath.
Paint smiling eyes after drying.
Optional?
Add a tiny chef hat resting slightly off-center.
It gives the figure a playful personality without making the project difficult.
If you enjoy air dry clay food projects, this project is probably the first one I’d recommend trying.
6. Cozy Teddy Hugging a Heart
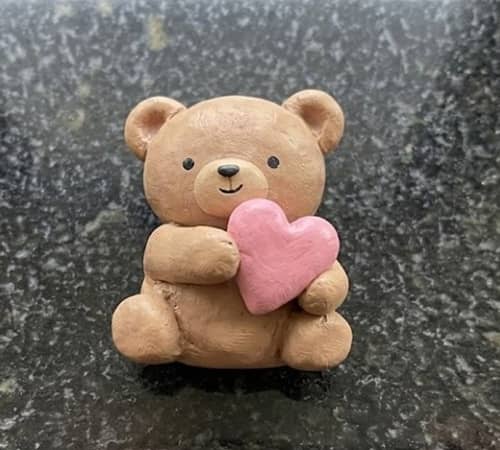
Soft rounded proportions make this one instantly lovable.
Materials
- Light brown clay
- Cream clay
- Pink clay
- Black paint
Instructions
Roll one medium ball for the head.
Roll a slightly smaller oval for the body.
Attach carefully.
Create four identical rounded cylinders.
Attach two as arms.
Attach two as legs.
Roll two tiny balls for ears.
Flatten slightly before placing them near the top.
Add a cream belly patch shaped like an oval.
Create a tiny pink heart.
Press it between both paws.
Make small black eyes.
Instead of adding a large smile, create only a tiny curved mouth. The subtle expression gives it much more charm.
Allow the project to dry slowly away from direct sunlight to reduce cracking.
This design also works beautifully with air dried clay or lightweight modeling clay if you’re creating tiny clay Ideas for gifts or shelf decor.
Some people even describe these rounded designs as having a jellycat pottery style because of their soft, sculptural appearance.
7. Tiny Lavender Dragon Curled Around a Star
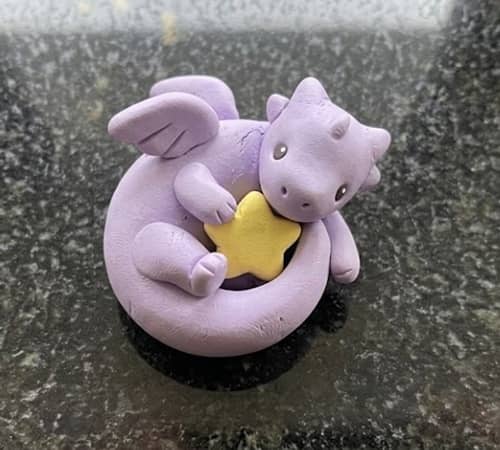
Dragons don’t always have to look fierce.
I actually prefer making them look sleepy and gentle because the rounded features feel much more comforting.
If one horn ends up slightly bigger, leave it alone. It somehow adds charm.
Materials
- Lavender air dry clay
- White clay
- Pale yellow clay
- Black acrylic paint
- Silicone sculpting tool
- Soft paintbrush
Instructions
Roll one medium ball for the dragon’s head.
Next, roll a long clay rope about five times the length of the head. Keep one end thicker than the other.
The thicker section becomes the body while the thinner end naturally forms the tail.
Attach the head by gently pressing both pieces together. Blend the seam using a damp fingertip until it disappears.
Curve the entire body into a loose “C” shape. Don’t wrap it into a tight spiral because that makes it look stiff. A relaxed curve feels much softer.
Roll four tiny teardrops for the legs. Press each one onto the underside while bending them slightly as though the dragon is resting comfortably.
Now make two small horns from white clay. Roll tiny cones, then gently curve them backward.
Create miniature wings using flattened teardrops.
Score two shallow lines on each wing with a needle tool to suggest folds without making them look realistic.
Roll a tiny five-pointed yellow star.
Place the dragon’s front legs around the star so it appears to be hugging it while sleeping.
For the face, add two tiny black eyes and draw the smallest curved smile imaginable. Less really is more here.
Smooth every fingerprint with a damp brush before allowing the sculpture to dry for at least 48 hours.
This project fits perfectly among clay Jellycat ideas because the oversized head, chunky body and tiny limbs create that unmistakable cuddly appearance.
8. Little Highland Cow with Fluffy Hair
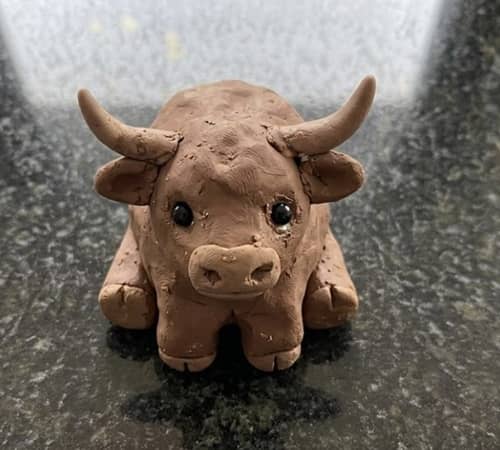
This one quickly became my favorite because the shaggy fringe hides tiny mistakes so well.
Nobody will notice if the bangs aren’t perfectly even. Thats honestly part of the fun.
Materials
- Light brown air dry clay
- Dark brown clay
- Cream clay
- Black paint
- Needle tool
Instructions
Roll a large oval for the body.
Create a slightly oversized round head and attach it securely.
Roll four thick little cylinders for the legs. Flatten the bottoms just enough so the cow stands steadily.
Now roll several very thin clay ropes.
Lay these across the forehead one by one to create fluffy bangs.
Let some overlap naturally. Avoid making straight lines because messy looks much softer.
Shape two tiny horns from cream clay and tuck them behind the fringe.
Add miniature ears beneath each horn.
Create a tiny oval muzzle.
Press two nostrils using a toothpick.
Place two tiny black eyes just below the fringe so they peek through instead of sitting high on the forehead.
Roll a tiny tail with a small tuft on the end.
Leave everything to dry slowly.
If tiny cracks appear, rub a little watered-down clay into them before they harden completely.
This adorable project blends beautifully with other tiny clay animals, especially woodland and farm-themed collections.
9. Smiling Acorn with Tiny Boots
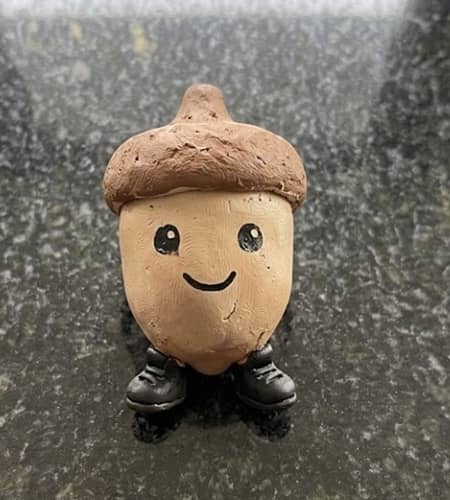
Tiny woodland pieces always make me smile. They’re simple enough for beginners, yet they still grab attention sitting on a shelf.
Materials
- Warm brown clay
- Beige clay
- Black clay
- White paint
Instructions
Roll one large teardrop from beige clay.
Flatten the bottom slightly.
Now create a textured cap using brown clay.
Wrap it over the pointed end while gently blending the edge.
Use a toothbrush to press tiny textures across the cap. Don’t push too hard or you’ll flatten the shape.
Roll two tiny boots using black clay.
Attach them underneath.
Create short rounded arms.
Curve them slightly outward as though the acorn is happily waving.
Paint two tiny eyes once dry.
Add a small smile.
Want to make it extra cozy?
Place a miniature green leaf beside one foot.
Sometimes the smallest details changes everything.
This little project pairs wonderfully with air dry clay craft ideas for autumn displays or miniature fairy gardens.
10. Mini Capybara Holding an Orange
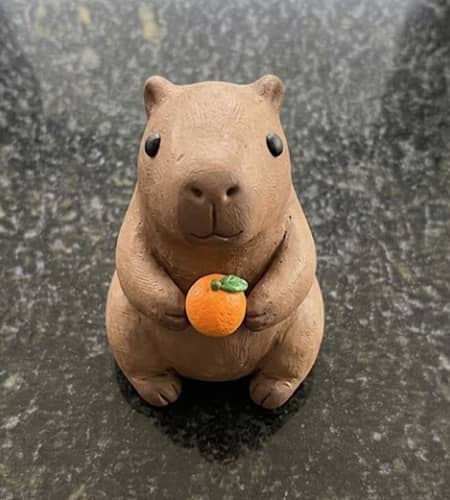
Capybaras have exploded in popularity recently, and I can absolutely see why. Their calm little faces are oddly relaxing to make.
Materials
- Brown air dry clay
- Light beige clay
- Orange clay
- Black acrylic paint
- Clay knife
Instructions
Roll one chunky oval for the body.
Make a slightly smaller rounded block for the head.
Attach both while keeping the neck almost invisible.
Roll four short thick legs.
Position them slightly outward rather than directly underneath.
Create tiny rounded ears.
Attach them high on the head.
Roll a miniature orange sphere.
Score faint lines around it using the back of a craft knife.
Place the orange between both front paws.
Add two tiny eye dots.
Press a tiny nose just below them.
Draw a very small straight smile.
Don’t exaggerate the expression.
Capybaras naturally look peaceful, so keeping everything understated gives the sculpture much more personality.
Allow two full days for drying before sealing.
This design also works well if you’re experimenting with super light clay ideas, especially when making larger figures that need to stay lightweight.
11. Happy Coffee Mug Friend
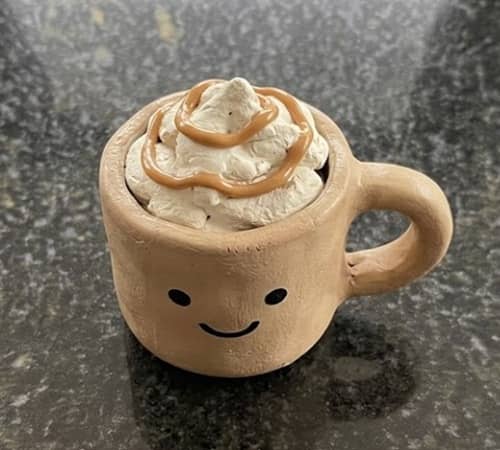
Not every clay craft inspired by Jellycat plush toys needs to be an animal. Everyday objects can look just as adorable.
Materials
- Cream clay
- Brown clay
- White clay
- Black paint
Instructions
Roll a thick cylinder.
Press your thumb into the center to create the mug opening.
Smooth the inside walls using a damp brush.
Roll one thin rope.
Curve it into a handle and attach it securely.
Fill the mug with dark brown clay to represent coffee.
Add a tiny swirl of white clay on top for whipped cream.
Roll miniature arms and legs.
Attach them evenly.
Paint tiny smiling eyes after drying.
Finish with little rosy cheeks using soft pastel.
If you’re feeling creative, make a tiny marshmallow floating inside the mug.
It isn’t necessary, although it sure looks cute.
Projects like this prove that air dry clay food ideas don’t always have to be edible-looking desserts.
12. Chubby Whale Carrying a Tiny Shell
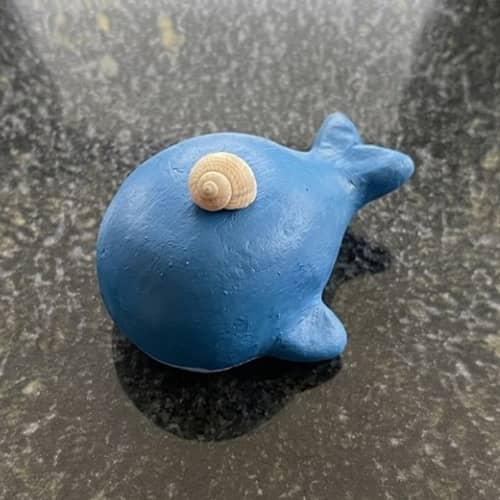
Let’s finish with something peaceful. Every collection deserves one ocean friend.
Materials
- Blue air dry clay
- White clay
- Beige clay
- Black acrylic paint
- Ball stylus
Instructions
Roll a large oval.
Gently taper one end to create the tail section.
Pinch two rounded tail fins.
Flatten the underside slightly so the whale sits securely.
Add a white belly by attaching a thin flattened oval underneath.
Create tiny side fins.
Curve them upward just a little.
Roll an extremely small shell using beige clay.
Press faint spiral lines across it with a needle tool.
Place the shell on the whale’s back.
Add tiny black eyes close together.
Draw the smallest curved smile.
Finally, create a tiny water spout using three little curved clay droplets rising from the blowhole.
Let everything dry naturally away from direct heat.
Rushing the drying process usually causes cracks, and nobody wants that after putting in all this work.
This gentle whale completes the collection with a calm, cozy feel while staying true to the soft proportions people love in clay Jellycat craft ideas.
Final Thoughts
One thing I’ve noticed after making dozens of these miniature projects is that the tiny imperfections often become the most memorable part of the finished piece.
A slightly crooked ear, an uneven smile, or a lopsided little paw can make a figure feel warmer than something that looks machine-made.
That’s why I rarely chase perfection anymore.
Instead, I focus on simple shapes, soft proportions, and characters that spark a smile the moment someone sees them.
Whether you’re experimenting with air dried clay, trying your first clay craft, or collecting inspiration from cozy clay Jellycat ideas, remember this… every finished figure teaches your hands something new, and the next one almost always turns out even better.





