Winter has a way of slowing everything down, and honestly, that’s what makes it the perfect season to pull out a block of air dry clay and create something with your hands.
These winter clay projects are simple enough for beginners yet satisfying enough for experienced crafters looking for a relaxing afternoon project.
Whether you’re decorating your home, making thoughtful handmade gifts, or planning kids craft activities during chilly weekends, these ideas combine creativity with practical techniques that anyone can follow.
Choose Your Clay Type For These Projects
Air Dry Clay | Polymer Clay
Affiliate Disclaimer: Some of the links in this post may be affiliate links, which means I may earn a small commission if you choose to make a purchase through them – at no extra cost to you. I only share products that genuinely fit this project and can help make your ceramic mug clay craft process easier and smoother. Your support helps keep ideas like this coming.
1. Cozy Clay Snowman With Textured Scarf
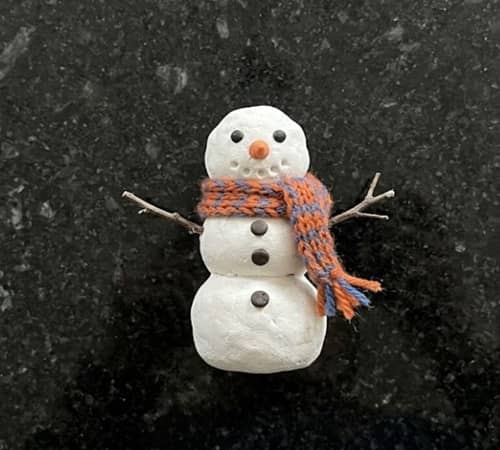
Nothing says winter quite like a cheerful snowman.
Instead of using three perfectly round balls, give this one a little personality by making its body slightly uneven.
Tiny imperfections actually make handmade pieces feel more charming.
Materials
- White air dry clay
- Black acrylic paint
- Orange acrylic paint
- Fine paintbrush
- Wooden toothpick
- Rolling pin
- Water in a small bowl
- Soft sponge
- Matte sealer (optional)
Instructions
Step 1: Break off a piece of clay about the size of a tennis ball. Knead it for 3 to 5 minutes until it feels soft and smooth. If it begins cracking, lightly dampen your fingertips with water while kneading.
Step 2: Divide the clay into three pieces. Roll one large, one medium, and one small ball. Don’t worry if every ball isn’t perfectly round. A handmade look suits this snowman craft beautifully.
Step 3: Flatten the bottom of the largest ball slightly so it can stand without wobbling.
Step 4: Stack the three balls together. Press gently where they meet, then smooth the seams using a damp fingertip.
Step 5: Roll a thin strip of clay about ¼ inch wide. llTo make a scarf, wrap it around the neck. Press soft diagonal lines into the scarf using a toothpick to imitate knitted fabric.
Step 6: Roll two tiny balls for buttons and attach them to the body with a tiny amount of water.
Step 7: Shape a miniature carrot for the nose and attach it carefully.
Step 8: Leave the figure untouched for 24 to 48 hours.
Step 9: Paint the eyes, smile, buttons, and carrot nose after the clay has fully dried.
This little clay snowman also makes adorable shelf decor throughout the entire winter season, not just during Christmas.
2. Frosted Evergreen Clay Coasters
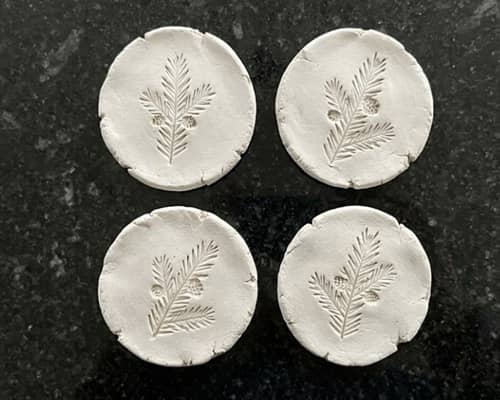
Functional crafts are fun because you actually use them every day.
These coasters bring subtle winter charm without looking overly festive.
Materials
- Air dry clay
- Rolling pin
- Round bowl
- Craft knife
- Evergreen branch
- White acrylic paint
- Dark green acrylic paint
- Matte varnish
Instructions
Step 1: Roll clay to approximately ¼ inch thickness.
Step 2: Place a bowl upside down and cut circles using a craft knife.
Step 3: Smooth every edge with a damp sponge.
Step 4: Lay a fresh evergreen branch onto the clay. Roll lightly over it so the needles leave a detailed impression.
Step 5: Carefully lift away the branch.
Step 6: Let every coaster dry on a flat surface for at least two days. Flip them after the first day so both sides dry evenly.
Step 7: Paint the entire coaster dark green.
Step 8: Once dry, lightly dry-brush white paint across the raised texture. This creates a frosted appearance similar to freshly fallen snow.
Step 9: Seal with matte varnish to improve durability.
These elegant pieces blend nicely with rustic tables, farmhouse décor, and even modern interiors. They also fit naturally among other pottery crafts for winter.
3. Nordic-Inspired Clay Village Houses
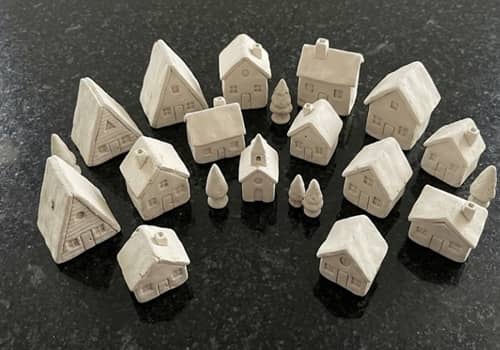
Tiny ceramic-style houses instantly make a winter display feel cozy. The best part? Every house can be different.
Materials
- Air dry clay
- Craft knife
- Metal ruler
- Toothpick
- White acrylic paint
- Beige acrylic paint
Instructions
Step 1: Roll clay into an even slab roughly ¼ inch thick.
Step 2: Cut rectangles for the walls.
Step 3: Cut triangles for the roof sections.
Step 4: Score every joining edge using a toothpick before adding a little water. This helps the pieces bond securely.
Step 5: Assemble the walls one by one.
Step 6: Attach the roof panels.
Step 7: Cut tiny doors and windows using the knife. Press lightly rather than cutting completely through.
Step 8: Smooth every seam using a damp finger.
Step 9: Let dry completely before painting soft white or warm cream shades.
Place several houses together to build a peaceful little winter street.
It looks surprisingly expensive, yet it costs very little to make.
4. Snowflake Trinket Dish
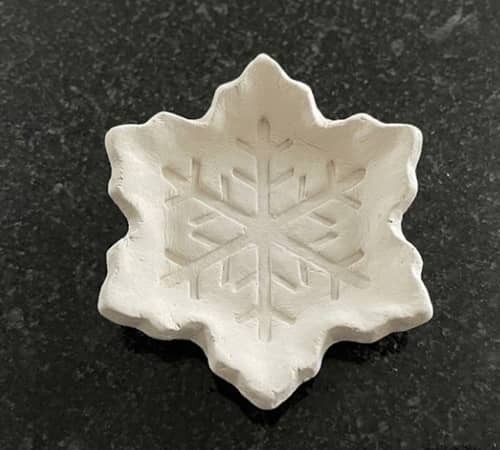
Need somewhere for rings or earrings? This delicate dish doubles as décor all winter long.
Materials
- Air dry clay
- Rolling pin
- Snowflake cookie cutter
- Small bowl
- Fine embossing tool
- White paint
- Pearl varnish
Instructions
Step 1: Roll clay evenly to about ¼ inch thickness.
Step 2: Cut a large snowflake shape.
Step 3: Carefully transfer it into an upside-down bowl so the edges gently curve downward.
Step 4: Press lightly into the bowl without stretching the clay.
Step 5: Use an embossing tool to deepen the snowflake details.
Step 6: Leave it untouched until completely dry.
Step 7: Paint white and finish with pearl varnish for a subtle icy shimmer.
This project works beautifully as part of winter crafts, and it also makes a thoughtful handmade gift.
5. Noel Clay Gift Tags
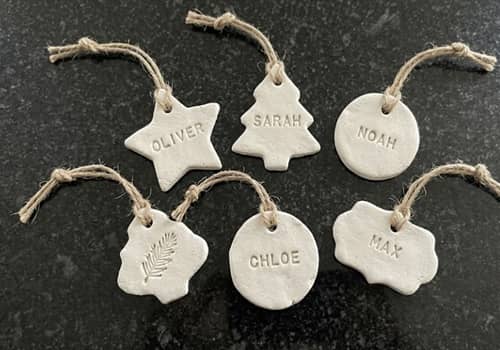
Gift tags often get thrown away. Handmade clay ones become keepsakes instead, especially during Noel Christmas celebrations.
Materials
- Air dry clay
- Rolling pin
- Cookie cutters
- Alphabet stamps
- Straw
- Twine
- Acrylic paint
Instructions
Step 1: Roll clay into an even sheet.
Step 2: Cut circles, stars, or mitten shapes.
Step 3: Use a drinking straw to punch a neat hanging hole.
Step 4: Stamp names or festive words before the clay dries.
Step 5: Smooth rough edges gently using a damp fingertip.
Step 6: Dry completely for 24 to 48 hours.
Step 7: Paint lightly or leave natural for a Scandinavian-inspired appearance.
Step 8: Thread twine through each hole.
Pair these with wrapped gifts or hang them directly on the Christmas tree as simple clay Christmas decorations.
6. Winter Woodland Animal Ornaments
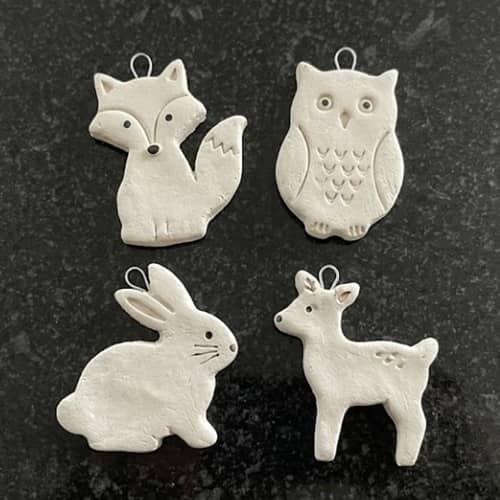
Foxes, owls, rabbits, and tiny deer instantly bring woodland charm to any holiday display.
Materials
- Air dry clay
- Pencil
- Craft knife
- Acrylic paints
- Fine brushes
- Twine
Instructions
Step 1: Roll clay flat to approximately ¼ inch thick.
Step 2: Draw simple animal silhouettes on paper and cut them out.
Step 3: Place each template over the clay and carefully trace around it.
Step 4: Cut each ornament with a craft knife.
Step 5: Smooth every edge before poking a hanging hole near the top.
Step 6: Allow every ornament to dry slowly on a flat board.
Step 7: Paint soft woodland colors, adding tiny scarves, snowflakes, or evergreen branches for winter details.
Step 8: Finish with twine for hanging.
These ornaments blend beautifully alongside other Christmas clay crafts, but they also look lovely throughout the colder months after the holiday decorations come down.
7. Birch Log Tea Light Holder (LED Only)
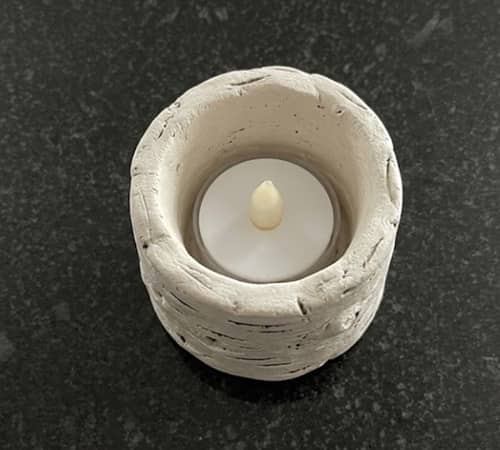
Real birch logs have beautiful bark, but you can recreate that rustic look with air dry clay.
This project looks elegant on a coffee table, fireplace mantel, or winter centerpiece.
If you’re crafting with younger kids, let them help make the bark texture while an adult handles the candle opening.
Safety Tip: Use only battery-operated LED tea lights with air dry clay.
Materials
- White air dry clay
- Rolling pin
- Cardboard tube (paper towel roll)
- Butter knife
- Toothpick
- Small sponge
- White, gray and light brown acrylic paint
- Matte sealer
- LED tea light
Instructions
Step 1: Knead the clay until it feels smooth and pliable.
Step 2: Roll it into a slab about ¼ inch thick.
Step 3: Wrap the slab around a cardboard tube. Trim away any excess clay.
Step 4: Blend the seam together using slightly damp fingers.
Step 5: With the edge of a butter knife, press long uneven vertical grooves all around the outside. These become the birch bark.
Step 6: Add tiny horizontal marks using a toothpick. Keep them random because real bark isn’t symmetrical.
Step 7: Carefully slide the clay cylinder off the cardboard tube.
Step 8: Flatten the bottom so it stands securely.
Step 9: Leave it somewhere flat for 48 hours. Rotate it every 10 to 12 hours during the first day to reduce warping.
Step 10: Paint the entire holder white. Once dry, lightly dry-brush gray and soft brown over the raised bark texture.
The finished piece blends nicely with farmhouse décor, Scandinavian interiors, and other pottery crafts for winter. It even look amazing grouped in different heights.
8. Cozy Winter Mug Ornament
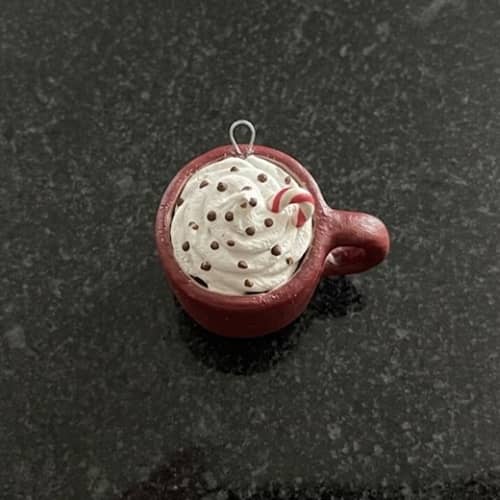
Who says mugs are only for drinking? Tiny clay mugs hanging on a Christmas tree instantly feel warm and inviting.
Materials
- White air dry clay
- Rolling pin
- Craft knife
- Wooden skewer
- Acrylic paints
- Fine paintbrush
- Twine
Instructions
Step 1: Roll your clay into an even sheet around ¼ inch thick.
Step 2: Draw a simple mug shape with a rounded top.
Step 3: Cut it carefully using a craft knife.
Step 4: Roll a tiny snake of clay for the mug handle.
Step 5: Attach the handle using a little water. Blend both connection points gently.
Step 6: Use a skewer to make whipped cream swirls or tiny marshmallows sitting inside the mug.
Step 7: Add miniature snowflakes, candy canes, or little hearts if you’d like.
Step 8: Punch a hanging hole before drying.
Step 9: Allow the ornament to dry completely before painting.
Step 10: Paint warm cocoa colors, soft reds, creamy whites, or muted greens.
Kids absolutely love personalizing these, which makes them wonderful kids craft activities during winter break.
9. Snowy Pinecone Clay Garland
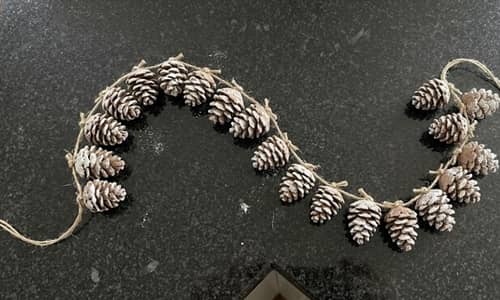
Instead of making every ornament identical, this garland mixes different pinecone shapes for a more natural look.
Small differences actually make the finished garland feel handcrafted.
Materials
- White or brown air dry clay
- Toothpick
- Craft knife
- Twine
- White acrylic paint
- Matte varnish
Instructions
Step 1: Roll several egg-shaped pieces of clay.
Step 2: Starting at the bottom, use a craft knife to gently lift small overlapping scales.
Step 3: Continue working upward in rows.
Step 4: Make each scale slightly different. Nature rarely repeats itself perfectly.
Step 5: Poke a small hole through the top.
Step 6: Let every pinecone dry thoroughly.
Step 7: Dry-brush white paint onto the tips to create a freshly snow-covered appearance.
Step 8: Thread them onto twine, spacing each pinecone about two inches apart.
Hang the garland across shelves, windows, or mantels.
It pairs beautifully with other winter crafts and subtle clay Christmas decorations without looking overly festive.
10. Ice Skate Keepsake Ornament
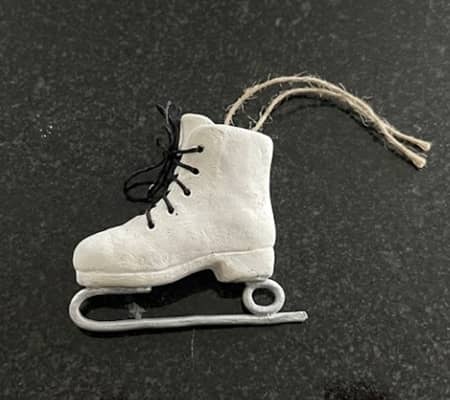
Vintage ice skates have a nostalgic winter feeling that never seems to go out of style.
Materials
- Air dry clay
- Paper template
- Pencil
- Craft knife
- Toothpick
- Silver acrylic paint
- White acrylic paint
- Ribbon
Instructions
Step 1: Draw a simple ice skate template on paper.
Step 2: Roll clay evenly before tracing around the template.
Step 3: Cut out the skate.
Step 4: Roll tiny thin ropes of clay for the boot laces.
Step 5: Press them gently into place.
Step 6: Add lace holes using a toothpick.
Step 7: Shape a thin blade underneath the skate.
Step 8: Smooth every edge using a damp fingertip.
Step 9: Dry completely.
Step 10: Paint the blade silver and the boot white, cream, pale blue, or soft pink.
This project looks especially lovely hanging alongside homemade Christmas clay crafts on the tree.
11. Winter Mitten Wall Hanging
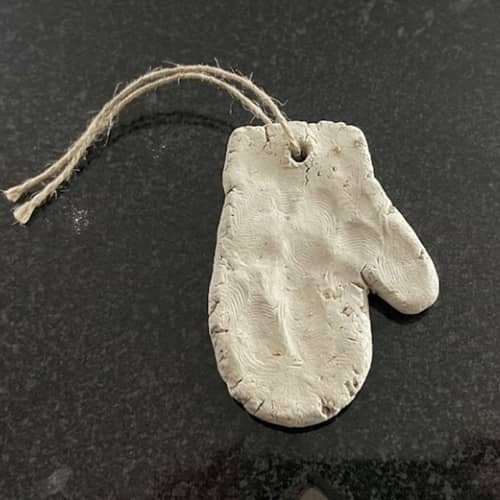
Mittens instantly remind me of snowy mornings, warm drinks, and wool blankets.
They also happen to be one of the easiest beginner-friendly DIY air dry clay craft projects.
Materials
- White air dry clay
- Rolling pin
- Paper mitten template
- Toothpick
- Acrylic paints
- Twine
- Wooden beads (optional)
Instructions
Step 1: Roll the clay flat.
Step 2: Trace around your mitten template.
Step 3: Cut two or three mittens in different sizes.
Step 4: Add knitted texture by pressing small repeating diagonal lines with a toothpick.
Step 5: Create tiny cuffs using an additional strip of clay.
Step 6: Punch hanging holes before drying.
Step 7: Dry for 24 to 48 hours.
Step 8: Paint cozy winter colors or leave the clay natural.
Step 9: Thread twine through the holes.
Step 10: Separate each mitten with a wooden bead before tying knots.
The finished hanging feels cozy without overwhelming your winter décor. Your family probably will ask where you bought it.
12. Personalized Winter Name Plaque
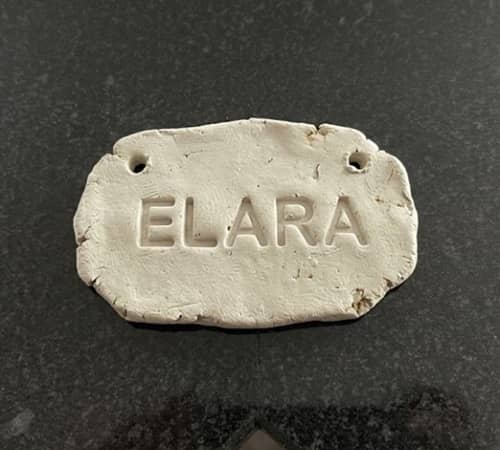
Finish your collection with something that stays on display all season.
A personalized plaque works on bedroom doors, craft rooms, entryways, or gallery walls.
Materials
- Air dry clay
- Rolling pin
- Wooden alphabet stamps
- Small evergreen stamp (optional)
- Acrylic paints
- Matte sealer
- Ribbon or jute twine
Instructions
Step 1: Roll clay into an even slab.
Step 2: Cut a rectangle, oval, or arch shape.
Step 3: Smooth every edge with damp fingers.
Step 4: Stamp a family name, favorite winter word, or welcoming phrase into the clay.
Step 5: Decorate around the edges with tiny snowflakes, pine branches, stars, or miniature berries.
Step 6: Punch two holes across the top for hanging.
Step 7: Leave the plaque flat while it dries naturally.
Step 8: Paint using soft neutral colors, muted blues, sage greens, or classic white.
Step 9: Seal the finished surface once the paint has cured.
This project brings together several techniques you’ve already practiced, making it a satisfying way to finish your collection of winter clay projects.
Honestly, don’t rush this one because slower work usually produces cleaner details.
Final Thoughts
One thing I’ve noticed after making dozens of winter clay projects is that the pieces I end up loving most aren’t the flawless ones.
Tiny fingerprints, slightly uneven edges, or a scarf that’s wrapped a little crooked often become the details that make handmade creations memorable.
Try mixing techniques from different projects instead of following every step exactly as written.
A woodland fox can wear a knitted scarf, or a snowflake dish can borrow bark textures from the birch holder.
That’s where creativity really starts growing.
As your confidence builds, you’ll naturally begin designing original pieces instead of simply copying tutorials, and that’s one of the most rewarding parts of working with clay.