There’s something about autumn that makes me want to slow down and create things with my hands.
Maybe it’s the cooler air, the changing colors, or the excuse to decorate every corner of the house.
While pumpkins and leaf crafts get most of the attention, there are so many other creative directions you can take with autumn clay crafts.
This collection focuses on unusual ideas inspired by woodland textures, harvest traditions, cozy seasonal details, and natural elements that often go unnoticed.
Whether you’re looking for beginner-friendly air dry clay projects, unique seasonal decor, or even a fun kids craft using clay, these creative projects offer a fresh take on fall crafting without feeling repetitive.
1. Acorn Cap Memory Bowls
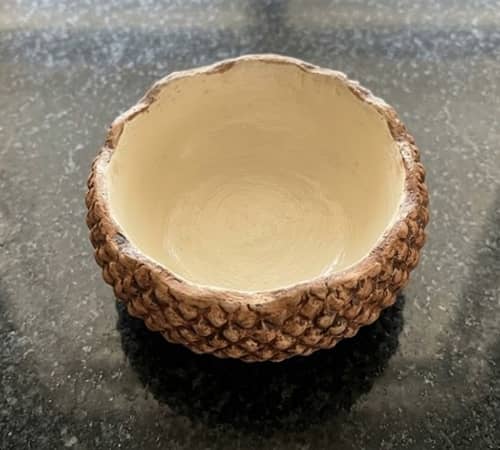
Some autumn clay crafts look nice. This one actually becomes useful too.
I started loving tiny catch-all bowls after losing my rings for the hundredth time. These miniature acorn-inspired bowls borrow the texture and shape of real acorns but add a practical twist.
Gather air dry clay, a rolling pin, a small bowl for shaping, a toothpick, fine sandpaper, acrylic paints in warm autumn shades, and matte sealer.
Start by taking a ball of clay about the size of a golf ball. Roll it smooth between your palms.
Press your thumb into the center and slowly rotate the clay while pinching outward. Keep going until a shallow bowl begins to form.
Place the clay over an upside-down ceramic bowl. Gently smooth the edges with damp fingertips. Let the clay rest for 15 minutes. This helps it firm up slightly.
Now create the acorn cap effect. Roll another thin piece of clay. Cut a circle slightly larger than the bowl opening. Place it around the outer rim of the bowl.
Using a toothpick, press tiny overlapping scales into the clay. Work in rows. Don’t rush this step because it creates the entire acorn appearance.
The texture dont need to be perfect. Real acorns aren’t perfect either.
Blend the textured cap into the bowl using a damp brush. Smooth any obvious cracks.
Allow the bowl to dry completely for 24 to 48 hours.
Once dry, lightly sand rough spots. Paint the bowl portion in muted cream, dusty sage, burnt orange, or soft beige. Paint the cap rich chestnut brown.
Finish with matte sealer.
The finished piece works beautifully for rings, spare keys, paper clips, or dried flower petals. It feels like something found during an autumn woodland walk rather than a typical craft store project.
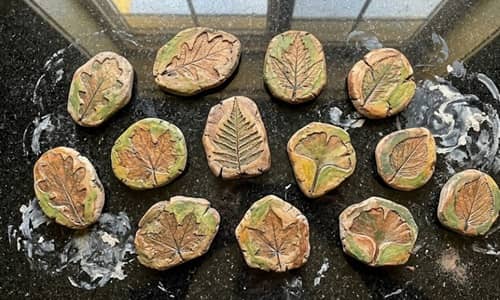
2. Pressed Leaf Story Stones
Want a craft that feels part decoration and part keepsake?
These story stones capture actual autumn leaves forever inside clay impressions. They look expensive. They really isn’t.
You’ll need air dry clay, collected fall leaves with visible veins, rolling pin, craft knife, acrylic paints, metallic wax optional, and sealer.
Roll clay to roughly 1/4 inch thickness on a smooth surface.
Pick leaves with strong vein patterns. Maple, oak, sweetgum, and elm leaves work especially well for air dry clay autumn projects.
Press a leaf firmly into the clay. Use the rolling pin to gently press it deeper.
Slowly peel the leaf away.
You’ll see every tiny vein transferred into the clay surface. This is where the magic happens.
Using a craft knife, cut around the leaf shape but leave a border of about half an inch around it. Instead of making leaf ornaments, you’re creating organic stone shapes inspired by leaves.
Round the edges with damp fingers.
Create several pieces in different sizes.
Allow them to dry completely.
Once dry, paint the entire stone with a dark base color such as walnut brown or charcoal.
After the paint dries, lightly dry-brush bronze, copper, antique gold, or rust orange across the raised veins.
Suddenly all that texture starts popping.
Some people use these as paperweights. Others display them in dough bowls. I even seen them arranged around candles during autumn gatherings.
Each one becomes completely unique because no two leaves share identical vein patterns.
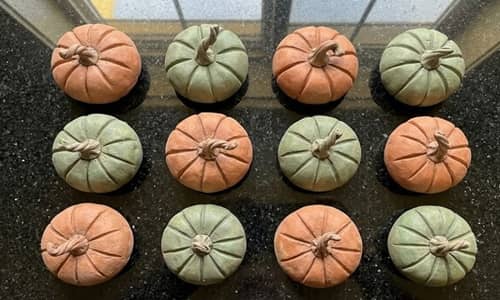
3. Hidden Cinnamon Pocket Pumpkins
Most clay pumpkins only look seasonal.
These smell seasonal too.
The secret is hiding ground cinnamon inside the clay structure so the finished piece releases a faint autumn scent for months.
Gather air dry clay, ground cinnamon, sculpting tool, acrylic paint, jute twine, matte sealer, and water.
Take a medium-sized clay ball.
Flatten it slightly.
Mix a teaspoon of cinnamon with a small amount of clay and form a tiny ball.
Press your thumb into the center of the larger clay ball. Create a hollow pocket.
Place the cinnamon-filled clay ball inside.
Seal the opening carefully.
Now shape the pumpkin.
Use a sculpting tool to press vertical grooves around the entire surface. Rotate slowly after each groove.
Pinch the top slightly.
Create a separate stem from clay. Twist it gently before attaching. Natural pumpkin stems often bend and curve.
Add tiny imperfections. Real pumpkins are lumpy, uneven, and quirky.
Let everything dry completely.
Paint the pumpkin using muted autumn shades such as dusty pumpkin orange, heirloom white, sage green, or pale mustard.
Dry-brush darker paint into the grooves to enhance depth.
Seal lightly but avoid thick coatings because heavy sealer can reduce the scent.
This project fits beautifully into air dry clay fall craft ideas because it combines visual appeal with fragrance. Kids love discovering the hidden cinnamon center too, making it a fun kids craft using clay when supervised.
And honestly? Guests almost always pick these up first because they’re curious why the pumpkins smell like autumn.
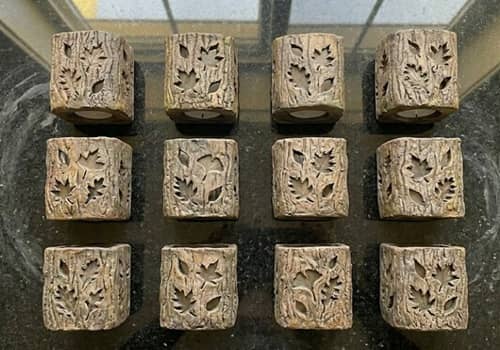
4. Mushroom Spore Trinket Tiles

Most mushroom crafts focus on the mushroom itself. This project takes inspiration from the hidden world underneath.
These decorative tiles mimic the delicate gills found beneath woodland mushrooms and make surprisingly beautiful autumn displays.
You’ll need air dry clay, a rolling pin, a plastic knife, acrylic paints, a soft brush, matte sealer, and a small round lid.
Roll your clay until it’s about 1/4 inch thick.
Use the lid to cut circles roughly 3 to 4 inches wide.
Now comes the fun part.
Starting from the center of each circle, use the plastic knife to create dozens of thin lines spreading outward toward the edges. Some lines should be close together. Others can branch slightly. Nature is messy.
Keep carving until the surface resembles mushroom gills.
If the lines looks uneven, leave them. The natural imperfections make the piece feel more realistic.
Let the tiles dry completely.
Once dry, paint them using earthy shades like mushroom beige, weathered cream, soft taupe, or muted gray.
Lightly brush darker paint into the grooves and wipe away the excess with a paper towel. This makes every carved detail stand out.
Seal when fully dry.
Arrange several tiles together on a shelf, inside a tray, or beneath candles. They create an interesting woodland vibe without screaming “fall decor.”
5. Sweater Texture Candle Pebbles
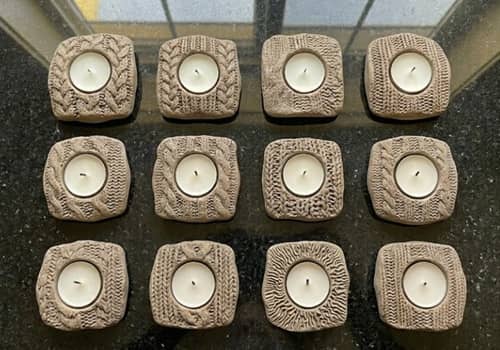
Ever noticed how certain knitted sweaters instantly feel like autumn?
This craft captures those cozy textures in clay.
Gather air dry clay, an old knitted sweater, rolling pin, tea light candle, acrylic paint, sealer, and a round cookie cutter.
Roll clay to roughly 1/3 inch thickness.
Place the knitted sweater fabric over the clay.
Roll firmly across the surface. The yarn pattern will press directly into the clay.
Carefully peel the fabric away.
The texture is kinda amazing honestly.
Use the cookie cutter to cut circles around 4 inches wide.
Place each circle over an upside-down bowl to create a shallow curved shape. These will become decorative candle pebbles.
Allow them to dry for 24 to 48 hours.
After drying, sand rough edges gently.
Paint using soft autumn-inspired shades such as oatmeal, cinnamon brown, dusty pumpkin, or faded olive.
Dry brush a slightly lighter shade across the raised sweater pattern.
Seal with matte varnish.
Place battery-operated tea lights on top and scatter them through bookshelves, entry tables, or seasonal centerpieces.
Unlike many polymer clay crafts for autumn, these feel soft and cozy despite being made from clay.
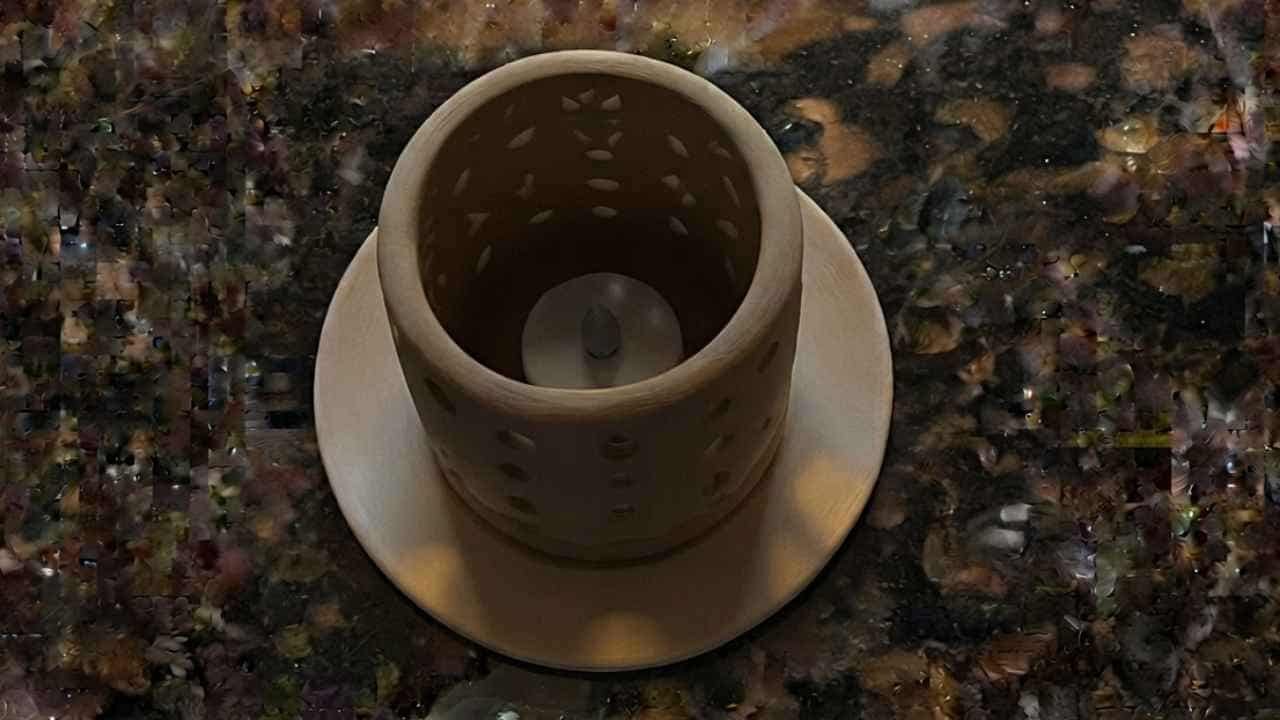
6. Bark Imprint Tea Light Towers
This might be one of my favorite air dry clay projects because the texture comes directly from nature.
You’ll need air dry clay, tree bark pieces, rolling pin, ruler, craft knife, battery tea lights, acrylic paints, and sealer.
Roll clay into long rectangles about 8 inches long and 4 inches tall.
Press real tree bark firmly onto the clay surface.
Push hard enough to capture every crack and ridge.
Carefully remove the bark.
Suddenly the clay looks like miniature tree trunks.
Cut the clay into rectangles if needed and gently curve each piece into a cylinder shape.
Join the ends together using water and gentle pressure.
Leave the bottom open.
Near the top edge, cut small leaf-shaped openings using a craft knife.
When a battery candle sits inside, these openings allow light to shine through.
Let everything dry completely.
Paint with layers of bark brown, gray, moss green, and subtle black washes.
Don’t paint everything evenly. Trees rarely have one solid color.
Seal once dry.
At night, these tiny towers cast leaf-shaped shadows across nearby surfaces. Its a detail people never expect.
Perfect for autumn tablescapes or woodland-themed decorating.
7. Harvest Moon Shelf Charms
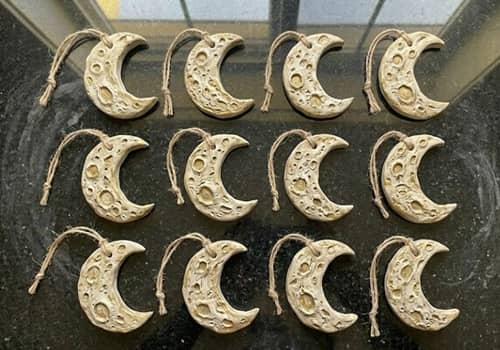
When people think of autumn clay crafts, pumpkins usually steal the spotlight. But the harvest moon has been part of fall traditions for generations, and it makes a surprisingly beautiful craft.
You’ll need air dry clay, rolling pin, circular cookie cutters in two sizes, toothpick, jute twine, acrylic paints, and matte sealer.
Roll the clay to about 1/4 inch thickness.
Use the larger cutter to create several moon circles. Don’t worry if the edges aren’t perfectly smooth.
Now use the smaller cutter to remove a crescent-shaped section from each circle.
You should end up with chunky crescent moons.
Take a toothpick and gently poke tiny crater marks across the surface. Vary the sizes. Some should be deep. Others barely visible.
Near the top, create a small hanging hole.
Allow the moons to dry completely.
Once dry, paint them with soft harvest-inspired shades. Try antique cream, muted gold, pale pumpkin, dusty bronze, or faded ivory.
Use a dry brush to lightly highlight the raised crater textures.
Thread jute twine through the holes and tie simple knots.
These charms can hang from shelves, baskets, cabinet knobs, seasonal garlands, or even gift packages.
I made a few that looked slightly crooked. Funny enough, those became my favorites.
The irregular shape gives them more personality than factory-made decor ever could.
8. Frost-Kissed Seed Pod Sculptures

Autumn isn’t only colorful leaves. It’s also the season when seed pods start drying, opening, and preparing for winter.
This project celebrates those overlooked details.
Gather air dry clay, aluminum foil, sculpting tool, acrylic paints, white paint, fine brush, and matte sealer.
Start by crumpling small pieces of aluminum foil into oval shapes.
These will act as lightweight cores.
Cover each foil shape with a thin layer of clay.
Smooth the surface with damp fingers.
Using a sculpting tool, divide the pod into sections by carving deep vertical grooves.
Some pods can have four sections. Others six or eight.
Nature likes variety.
Pinch the top and bottom slightly to create a realistic seed pod shape.
Now add tiny cracks and ridges across the surface.
Don’t overthink this part. Random usually looks better.
Allow everything to dry fully.
Paint the base color using earthy tones like walnut brown, dried olive, muted rust, or weathered tan.
Once dry, lightly dab diluted white paint around the edges and ridges.
This creates a soft frost-kissed effect that hints at the seasonal transition between autumn and winter.
Seal with matte varnish.
Display them inside wooden bowls, trays, or shelf arrangements.
Many air dry clay fall craft ideas focus on bright colors. These feel quieter, more natural, and honestly a little sophisticated.
9. Woodland Lantern Tags
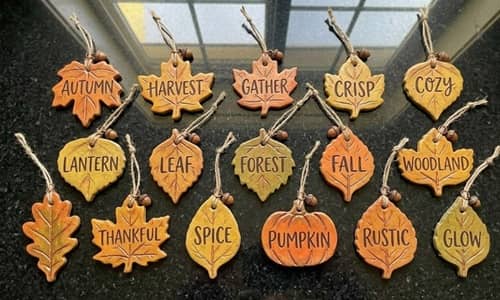
This project combines autumn decorating with a touch of storytelling.
Instead of making ordinary ornaments, you’ll create decorative tags designed to hang from lanterns, baskets, and seasonal displays.
You’ll need air dry clay, rolling pin, leaf-shaped cutters, small alphabet stamps or toothpick, acrylic paints, jute twine, and matte sealer.
Roll the clay to roughly 1/4 inch thick.
Cut several large leaf shapes.
Maple leaves work wonderfully, but oak and beech-inspired shapes also look beautiful.
Near the top of each leaf, create a hanging hole.
Now personalize each tag.
Use stamps or a toothpick to write simple autumn-themed words such as “Gather,” “Harvest,” “Cozy,” “Thankful,” or “Wander.”
Keep the letters slightly imperfect.
Handmade pieces should look handmade.
Press additional vein details into the leaves using a toothpick.
Allow everything to dry completely.
Paint each leaf using layered autumn colors.
Blend burnt orange into golden yellow. Add touches of olive green. A little brown around the edges makes them feel more realistic.
The colors dont need to match exactly. Real leaves rarely do.
After painting, lightly brush metallic bronze across the raised veins.
Seal when dry.
Thread jute through each tag and tie them onto lantern handles, woven baskets, centerpieces, or seasonal wreaths.
This is also a great kids craft using clay because the writing and decorating can be customized for every family member.
10. Woodland Echo Stones
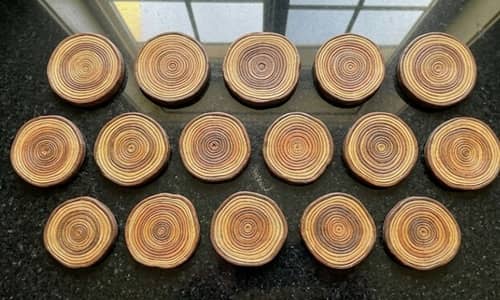
Some of my favorite autumn clay crafts come from things people usually walk right past. Tree rings are one of them.
These decorative stones mimic the growth rings found inside old tree trunks and look amazing scattered through seasonal displays.
You’ll need air dry clay, rolling pin, circular cookie cutter, toothpick, acrylic paints, sponge, and matte sealer.
Roll the clay to about 1/3 inch thick.
Cut several circles in different sizes. Don’t make them all identical. Forests aren’t built from perfect circles.
Using a toothpick, draw a tiny circle in the center of each piece.
Now slowly add larger rings around it.
Some rings should be close together. Others should wander slightly. That’s exactly how real growth rings behave.
Press a few small cracks extending outward from the center.
The stone should start looking like a miniature tree slice.
Allow the clay to dry completely.
Once dry, paint a base coat using light tan or warm beige.
When that dries, use a darker brown to highlight the rings. A sponge works really well for this because it creates natural variation.
A few uneven spots makes it look more realistic.
Seal with matte varnish.
Arrange them in decorative bowls, bookshelf displays, or around candles. Guests often assume they’re carved from actual wood until they pick one up.
11. Wild Berry Branch Wall Discs

Autumn isn’t only falling leaves. Berry-covered branches are everywhere once you start noticing them.
This project captures that overlooked detail.
Gather air dry clay, rolling pin, circular cutter, sculpting tool, acrylic paints, fine paintbrush, and sealer.
Roll clay until it’s roughly 1/4 inch thick.
Cut circles about 4 to 5 inches across.
Smooth the edges lightly.
Using a sculpting tool, draw a winding branch across the surface.
From the branch, create smaller offshoots.
Now roll tiny clay balls for berries.
Make lots of them.
Attach the berries along the branches using a little water.
Some should cluster together. Others should sit alone.
Press gently so they stay attached.
Let the disc dry completely.
After drying, paint the background a soft cream, warm gray, or muted beige.
Paint branches deep brown.
For the berries, use cranberry red, burgundy, burnt orange, or even dusty plum.
Add tiny highlights to some berries for extra depth.
Seal everything once dry.
These discs look beautiful leaning against books, layered inside trays, or displayed on miniature easels.
They feel seasonal without relying on the usual autumn symbols.
12. Falling Leaf Wind Catchers
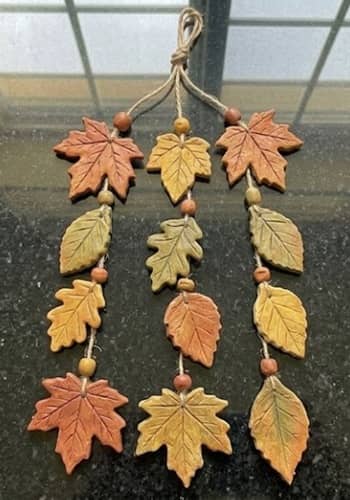
This might be one of the most unique air dry clay autumn projects in the entire list.
Instead of making a wind chime that creates sound, you’ll make one that creates movement.
You’ll need air dry clay, leaf-shaped cutters, toothpick, jute twine, wooden hoop, acrylic paints, and matte sealer.
Roll the clay to about 1/4 inch thick.
Cut out multiple leaves in different sizes.
Create maple, oak, and beech-inspired shapes if possible.
Use a toothpick to add detailed veins.
Near the stem of each leaf, make a hanging hole.
Near the tip, make another hole.
This allows the leaves to connect vertically.
Allow all pieces to dry completely.
Paint them using realistic autumn colors.
Mix golden yellow, rust orange, muted red, olive green, and warm brown.
Don’t paint every leaf the same shade.
That would looks unnatural.
Once dry, seal the leaves.
Attach the leaves together using short lengths of twine.
Create several dangling strands.
Tie the strands to a wooden hoop.
When hung near a window or covered porch, the leaves gently rotate and sway with air movement.
The effect is subtle, relaxing, and surprisingly elegant.
This is one of those air dry clay fall craft ideas that feels decorative long after pumpkin season ends.
Final Thoughts
One thing I love about working with clay is how it teaches you to notice details that normally get overlooked.
A seed pod, a patch of bark, a mushroom gill, or even the texture of a favorite sweater can become inspiration for something beautiful.
That’s what makes autumn clay crafts so rewarding. Instead of recreating the same seasonal decorations year after year, try looking at autumn through a different lens.
Nature is full of patterns, textures, and shapes that most people never stop to appreciate.
The more closely you observe the season, the more ideas you’ll discover for future air dry clay autumn projects, and that’s where truly original crafting begins.