If you’ve been staring at a lump of clay and wondering what else you can make besides a basic bowl, you’re in the right place.
Most lists recycle the same projects over and over.
I wanted these clay pottery wheel ideas to feel different. A little more creative. A little more useful.
And honestly, more fun to throw on the wheel. Some are functional, some are decorative, and a few sit somewhere in between.
Whether you’re exploring wheel ceramics for the first time or looking for unique thrown pottery ideas to challenge yourself, these projects will help you turn simple clay into pieces that feel personal, handmade, and genuinely interesting.
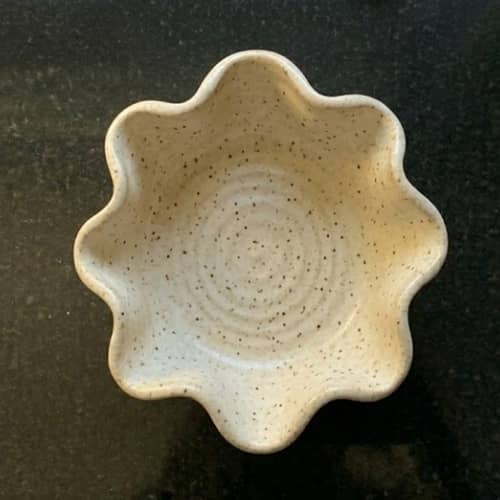
1. Ripple Edge Herb Keeper
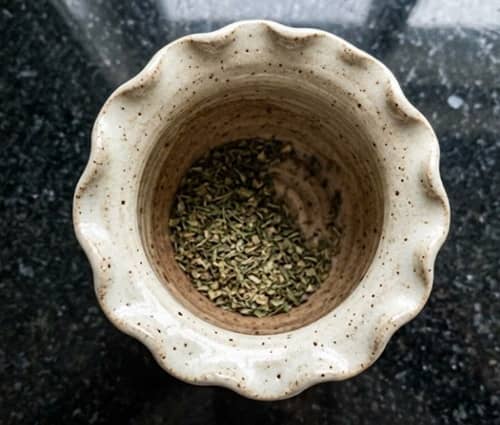
Fresh herbs seem to wilt the second I bring them home. That’s what inspired this little kitchen pottery project.
Start by centering about 1.5 pounds of clay on your clay pottery wheel. Open the center and pull the walls upward just like you would for a small vase. Aim for roughly 5 to 6 inches tall.
Once the cylinder is formed, gently widen the upper third while keeping the bottom narrower. This creates a pocket shape that naturally supports herb stems.
Now comes the fun part.
Slow the wheel way down. Wet your fingers slightly and pinch the rim every inch or so while rotating the wheel.
This creates a soft ripple pattern around the edge. Don’t worry if it isn’t perfectly symmetrical.Actually, when it’s not, it looks better.
Smooth the outside with a wooden rib.
Then trim the base after the clay reaches leather-hard stage.
Poke three tiny drainage holes in the bottom. These allow excess moisture to escape if you place damp herbs inside.
Bisque fire, glaze with a food-safe glaze, and fire again according to your clay body’s specifications.
Place parsley, cilantro, mint, or even dried lavender inside. It works surprisingly well.
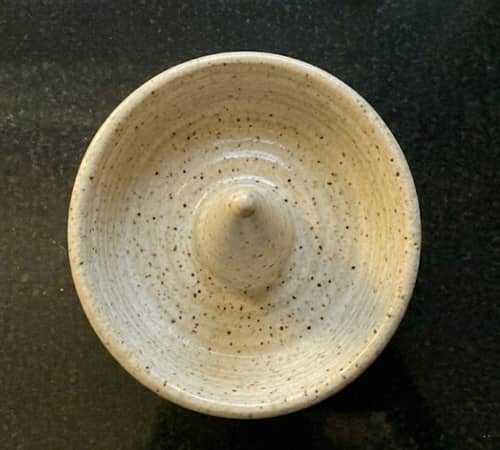
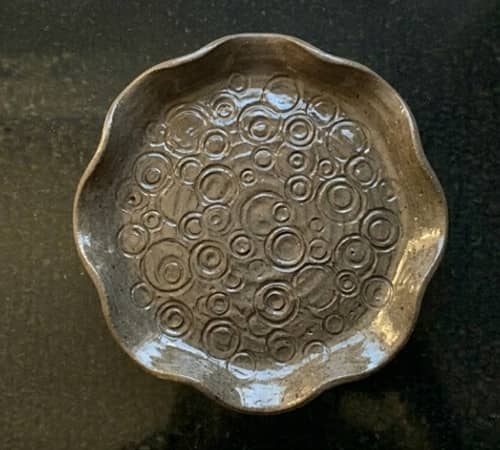
2. Moon Crater Trinket Bowl
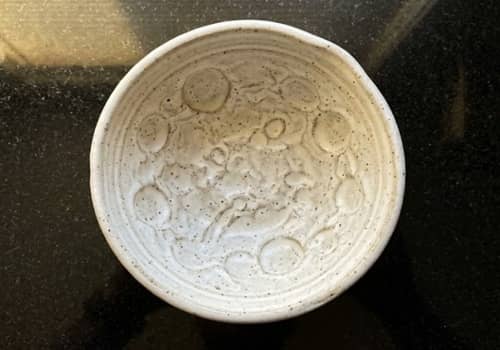
This one looks fancy but is actually beginner-friendly.
Prepare roughly 1 pound of clay. Carefully center it on the clay pottery wheel, then spread it out into a shallow bowl that is roughly 6 inches wide.
Keep the walls low. Think jewelry dish rather than cereal bowl.
Once the shape is complete, let it firm up until leather hard. Then grab the rounded end of a paintbrush, a wooden dowel, or even your finger.
Press random shallow indentations all across the inside surface.
Not too deep.
Not too shallow either.
You’re trying to create the look of moon craters scattered across the bowl.
Some should overlap. Some should be larger. Nature isn’t organized and this shouldnt be either.
Smooth any rough edges with a damp sponge.
After trimming the foot ring, allow the bowl to dry completely before firing.
For glazing, try a matte charcoal, deep blue, or speckled white finish. The texture catches shadows beautifully.
It’s one of those pottery ideas on the wheel that instantly looks more advanced than it actually is.
3. Twisted Stem Fruit Pedestal
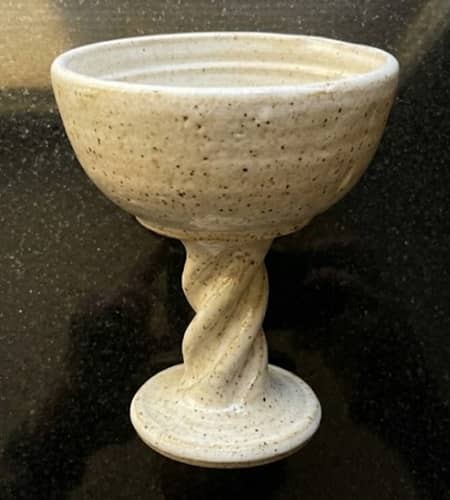
Want something that feels sculptural but still useful?
This project combines functional wheel thrown pottery with a decorative twist.
Begin with two separate pieces of clay.
Use 1.5 pounds for the bowl section and another pound for the pedestal stem.
Throw a shallow serving bowl first. Keep the rim broad and open. Set it aside.
Next, center the second clay ball. Pull it into a thick cylinder about 4 inches tall.
Remove it from the wheel using a wire cutter.
While the clay is still soft, gently twist the cylinder with both hands. Move slowly. If you rush it, the walls may collapse. I learnt that the hard way once.
The twist should be subtle rather than dramatic.
Allow both pieces to firm up slightly.
Score and slip the top of the stem and bottom of the bowl. Attach carefully. Blend the seam using a modeling tool.
Check the piece from every angle. If it leans too much, adjust immediately before the clay stiffens.
After drying, trim lightly if needed and fire as usual.
The finished result makes an excellent fruit display, centerpiece, or serving stand. Because it doesn’t appear to be mass-produced, it’s one of those clay pottery concepts that people frequently inquire about.
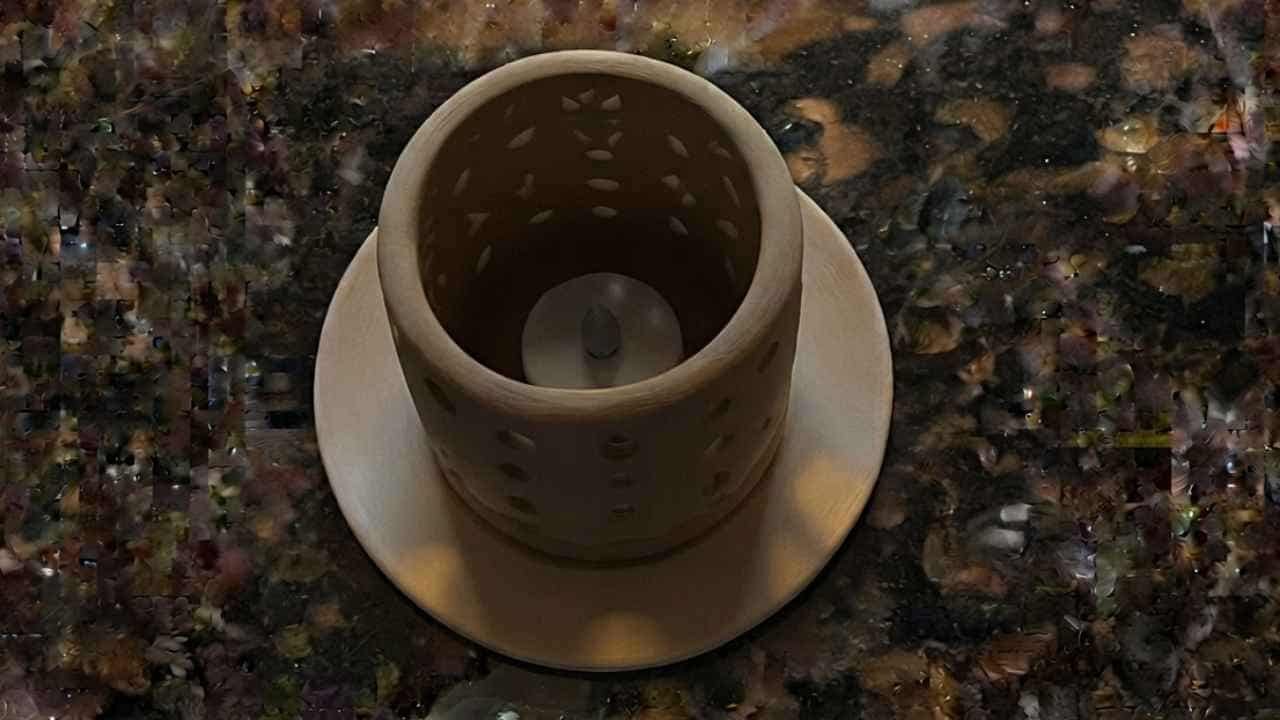
4. Hidden Pocket Tea Light Lantern
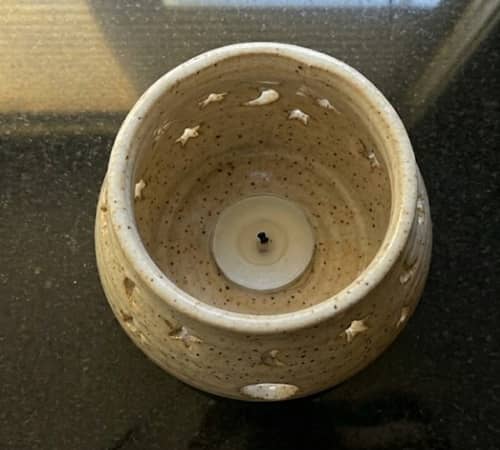
Most lanterns made on a clay pottery wheel look pretty predictable. This one has a secret compartment built into the design, which makes it feel a bit special.
Start with about 2 pounds of clay. Center it carefully and throw a cylinder roughly 7 inches tall. Keep the walls medium thickness because you’ll be carving later.
Shape the form so the bottom is slightly wider than the top. Think of an old-fashioned lantern silhouette.
Allow it to reach leather-hard stage.
Now cut a small arched opening near the bottom using a craft knife. This will become the hidden tea light access door. Above that, carve tiny stars, crescent moons, dots, or geometric cutouts around the body.
Don’t overthink the pattern. Some people spend forever planning. I just start cutting and see where it goes.
Trim the base and smooth all sharp edges.
Before firing, place a battery tea light inside to check how the light shines through the openings.
A translucent glaze works wonderfully because it lets the shadows become part of the design.
When lit at night, the little cutouts scatter light across nearby surfaces. Its surprisingly dramatic for such a simple project.
5. Spiral Spoon Rest With Raised Center
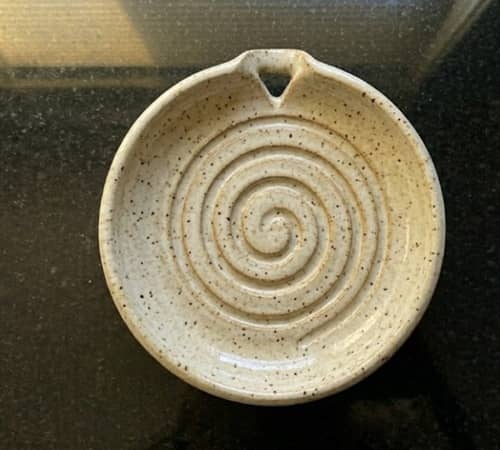
A spoon rest sounds ordinary until you make one that actually solves a common kitchen mess.
Center approximately 1 pound of clay on the wheel and throw a shallow plate around 6 inches across.
Keep the center slightly elevated rather than completely flat.
Why?
Because sauces and drips naturally collect around the outer edge instead of spreading everywhere.
Once the form firms up to leather-hard consistency, use a blunt tool to carve a continuous spiral groove beginning from the center and working outward.
The groove should be shallow. You aren’t digging trenches here.
As the wheel slowly rotates, follow the curve steadily. If the line wobbles a little, that’s okay. Handmade pieces should feel alive.
Cut a gentle notch into one side of the rim where spoon handles can rest comfortably.
After drying, trim the underside lightly and fire normally.
A speckled glaze highlights the spiral beautifully because glaze tends to settle into the carved channel.
This project fits perfectly into the world of functional wheel thrown pottery and practical kitchen pottery.
6. Double-Wall Secret Vase
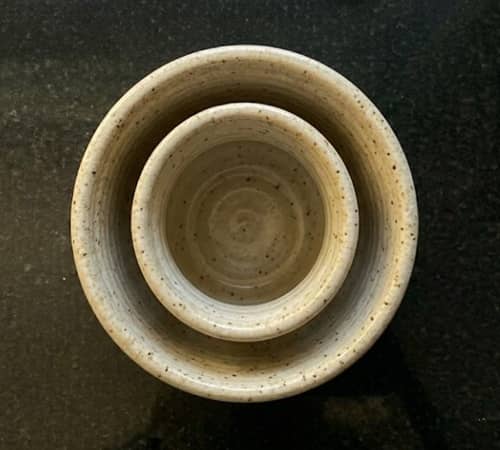
If you’ve already made basic vases, this project feels like a fun upgrade.
You’ll create two walls instead of one, giving the piece a floating appearance.
Center about 2.5 pounds of clay on the clay pottery wheel. Open the clay wider than normal.
Pull up an outer wall first.
Then, inside that wall, leave enough clay to pull a second inner wall. The two walls should rise together while maintaining a gap between them.
Take your time here.
Really take your time.
The first attempt usually looks weird. Mine certainly did.
Continue pulling until both walls stand roughly 5 inches tall. Join them together only at the rim.
From above, you’ll see a hidden chamber surrounding the central opening.
Refine the shape using ribs and sponges. The outer wall can flare outward while the inner wall remains vertical, creating visual depth.
Trim carefully once leather hard.
When glazing, use contrasting colors inside and outside. The hidden gap creates shadows that make the colors pop more than expected.
The finished vase looks complex, almost like something from a boutique ceramics gallery, yet it’s achievable with patience and steady hands.
Among unique thrown pottery ideas, this one always grabs attention because people cant immediately figure out how it was made.
7. Floating Ring Catcher Dish
Jewelry dishes are common. A jewelry dish with a built-in ring tower? Much less common.
Start with roughly 1 pound of clay centered on your clay pottery wheel. Throw a shallow dish about 5 to 6 inches wide. Keep the walls low and gently curved.
Next, throw a separate narrow cone-shaped piece from a small ball of clay. Aim for about 3 inches tall. This will become the ring holder.
Let both pieces firm up until they reach leather-hard stage.
Score and slip the center of the dish and the bottom of the cone. Attach carefully and blend the seam with a small modeling tool.
Here’s where it gets interesting.
Instead of placing the cone directly in the center, position it slightly off-center. The design suddenly feels more modern and less factory-made.
Smooth every connection thoroughly.
After drying completely, bisque fire and glaze. Satin glazes work beautifully because they feel soft without looking overly shiny.
Rings slide neatly onto the cone while earrings and bracelets rest inside the surrounding dish.
This project combines clay crafts with functional wheel thrown pottery in a way that’s genuinely useful every day.
8. Folded Rim Dessert Bowl
Most bowls end with a simple round rim. This one takes a completely different direction.
Center approximately 1.5 pounds of clay and throw a medium-sized bowl about 6 inches wide.
Keep the rim slightly thicker than usual. You’ll need that extra clay later.
Allow the bowl to firm up until it becomes soft leather hard.
Now gently pinch one section of the rim and fold it inward toward the center. Move to another section across from it and repeat.
The result should resemble soft fabric folds frozen in clay.
Not perfect folds.
Not matching folds.
Natural folds.
If they all look identical, the piece starts feeling manufactured.
Use a damp sponge to soften any sharp transitions.
Trim the foot ring once the bowl is firm enough to handle upside down.
When glazed, the folded sections create wonderful highlights and shadows that shift depending on where you’re standing.
I wasn’t sure this would work the first time I tried it. Turns out it become one of my favorite serving bowls.
The finished piece works wonderfully for desserts, snacks, or even as decorative tabletop pottery.
9. Pebble Foot Serving Plate

Here’s a project that surprises people when they pick it up.
Instead of a traditional foot ring, this plate stands on several rounded clay “pebbles.”
Begin with about 2 pounds of clay.
Center it on the clay pottery wheel and throw a flat serving plate around 8 inches wide. Compress the base well to prevent warping later.
Allow the plate to reach leather-hard stage.
Flip it upside down on a soft surface.
Roll five to seven small clay balls roughly the size of large marbles. Flatten each slightly so they don’t roll around.
Arrange them evenly underneath the plate.
Step back and look at it from multiple angles.
Seriously, walk around it.
A plate that looks balanced from one side may lean from another.
Once you’re happy, score and slip every contact point thoroughly before attaching the pebble feet.
Blend the edges carefully.
After drying, trim any rough spots and fire normally.
The plate appears to float slightly above the table, creating a shadow underneath that gives it a gallery-quality look.
Among pottery ideas on the wheel, this one feels fresh because the detail is hidden until someone lifts the piece.
10. Raindrop Texture Catch-All Tray
Some pottery pieces look completely different depending on how light hits them. This is one of those.
Start with about 1.5 pounds of clay and center it on your clay pottery wheel. Throw a shallow tray roughly 7 inches wide with gently sloping sides. Keep the walls low because the texture will become the star of the project.
Allow the tray to reach soft leather-hard stage.
Now grab the rounded end of several tools with different diameters. A paintbrush handle, marker cap, wooden dowel, and even a fingertip work nicely.
Press hundreds of overlapping impressions across the interior surface. Vary the size and depth. Imagine raindrops landing in a puddle during a light rainstorm.
Some marks should overlap.
Others shouldn’t.
There is no perfect pattern here.
Actually, if it looks too perfect, start over in a few spots and make it messier.
Continue until the entire inside surface feels alive with texture.
Trim the base carefully and smooth the outer walls.
A glossy transparent glaze pools inside the impressions and creates beautiful depth after firing.
Keys, coins, jewelry, or loose change all look great sitting inside this tray.
It’s one of those clay pottery ideas that feels artistic without being difficult.
11. Offset Wave Vase
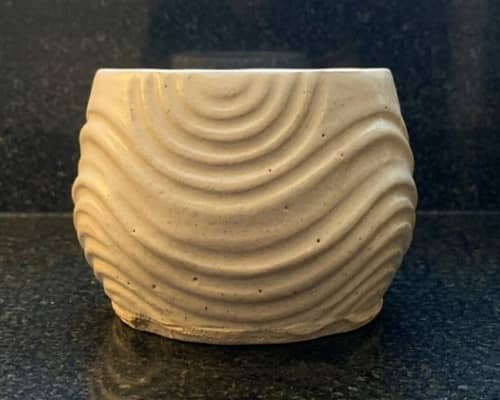
Most vases rise straight from the center. This one deliberately leans into asymmetry.
Center approximately 2 pounds of clay on the clay pottery wheel and throw a cylinder around 7 inches tall.
Keep the walls slightly thicker than normal because you’ll be altering the shape later.
Once the clay firms up to soft leather-hard consistency, gently press one side inward while supporting the opposite side with your hand.
Rotate the vase and repeat the process in a gradual spiral pattern moving upward.
The result creates a soft wave that wraps around the form.
Don’t force dramatic bends.
Small movements make a bigger impact than most people expect.
If one side starts looking strange, leave it alone for a few minutes. Sometimes it grow on you after stepping back.
Refine the silhouette with a flexible rib and smooth the surface lightly.
After trimming and firing, consider using a single-color glaze. Complex glazes can distract from the shape itself.
The finished vase feels modern, sculptural, and surprisingly elegant despite its simple construction.
Among unique thrown pottery ideas, this one manages to feel contemporary without requiring advanced skills.
12. Split-Level Snack Bowl
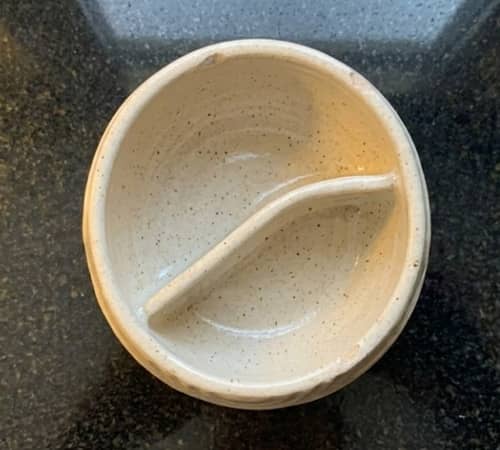
Why make one bowl when you can make two connected spaces in a single piece?
Begin with about 2 pounds of clay centered on the wheel.
Throw a wide shallow bowl approximately 7 inches across. Keep the base thicker than usual.
After removing it from the wheel, allow it to stiffen until it reaches leather-hard stage.
Now create a curved divider from a rolled slab of clay. The divider should rise slightly above the rim height.
Place the divider off-center rather than directly in the middle.
One side becomes larger.
The other becomes smaller.
That imbalance is what makes the design interesting.
Score and slip thoroughly before attaching the divider.
Blend every seam carefully using a small sponge and modeling tool.
Check for weak spots where the divider meets the bowl. Reinforce them if needed.
Once fired, the larger section can hold crackers, fruit, or snacks while the smaller compartment works perfectly for dips, nuts, or candies.
This is functional wheel thrown pottery with a playful twist, and guests almost always ask where you bought it.
When you tell them you made it yourself, they usually don’t beleive you.
Final Thoughts
One thing I’ve noticed about wheel ceramics is that the most memorable pieces rarely come from chasing perfection.
They come from experimenting with shape, texture, balance, and function.
A small adjustment to a rim, a hidden detail underneath, or an unexpected curve can completely change how a piece feels.
That’s why exploring clay pottery wheel ideas beyond the standard mug-and-bowl routine is so valuable.
As your skills grow, try paying attention to everyday frustrations around your home.
The best pottery often begins as a solution to a tiny problem. That approach naturally leads to original pottery ideas on the wheel and helps you develop a style that feels uniquely yours rather than something copied from a shelf or social feed.