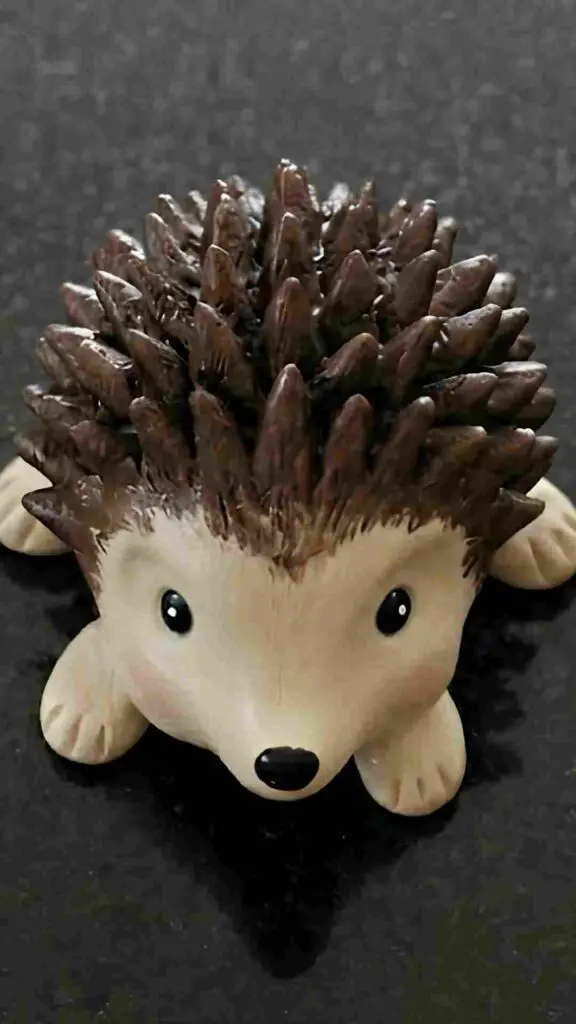
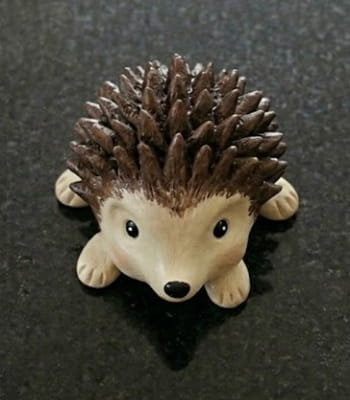
There is something oddly charming about tiny hedgehogs. Maybe it’s the round little body. Maybe it’s those funny spikes.
Or perhaps it’s because they look like they woke up from a nap and immediately forgot where they were going.
Whatever the reason, Hedgehog clay crafts are one of my favorite woodland-inspired projects because they look cute even when they’re not perfect.
This project uses simple techniques that work for beginners, kids with supervision, and adults who just want a relaxing afternoon craft.
If you’ve been exploring air dry clay crafts, experimenting with clay animals sculpture, or searching for a detailed clay hedgehog tutorial, this guide walks through every step carefully.
No fancy pottery wheel needed. No kiln required. Just clay, patience, and a little bit of personality.
Things Needed To Make Hedgehog Clay Crafts
- Air dry clay (brown, beige, or white)
- Small bowl of water
- Clay sculpting tool or toothpick
- Soft paintbrush
- Acrylic paints (brown, black, cream, pink)
- Clear craft sealer (optional)
- Paper towel
- Smooth work surface
Step 1: Build the Main Body Shape
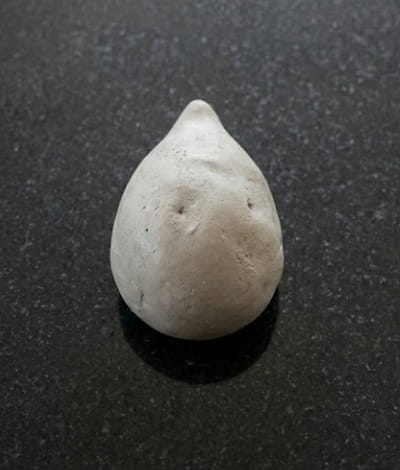
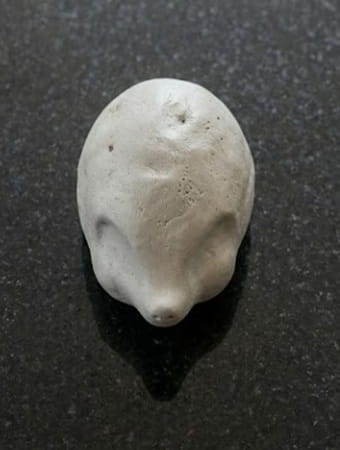
Start with a lump of air dry clay about the size of a small lemon.
Roll it gently between your palms. Don’t rush this part. The body shape becomes the foundation for everything that follows.
Now place the clay on your work surface and lightly roll one side into a tapered point. Think of a teardrop lying on its side.
The rounded end becomes the hedgehog’s back while the narrow end becomes the face.
Look at the shape from above.
Does it resemble a tiny potato with one pointed end?
Good. That’s exactly what we’re after.
Smooth any large cracks with a damp fingertip. Tiny imperfections are perfectly fine. In fact, they makes the project feel more handmade.
Avoid making the nose too thin. You have more space to add details later if the face part is thicker.
Step 2: Shape the Face and Snout
This is where the personality starts showing up.
Using your fingers, gently pinch the pointed end. Don’t squeeze too hard or the clay may flatten.
Create a soft cone shape for the snout.
Then use your thumb to slightly widen the cheeks behind the nose area. Hedgehogs have surprisingly cute little faces when you give them some fullness around the cheeks.
Take a moment and look at it from different angles.
You know what’s funny? Even at this stage, some hedgehogs already look grumpy while others look curious.
Smooth the face with a damp brush.
Leave the body thick and sturdy. We aren’t trying to make a realistic wildlife sculpture here. This project leans into storybook charm.
Step 3: Add the Tiny Feet
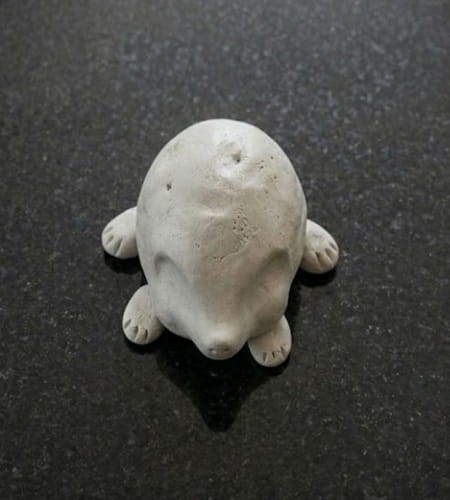
Roll four small clay balls.
They should all be roughly pea-sized.
Shape them into little oval feet.
Attach two near the front and two near the back. Use a tiny amount of water as slip to help them stick.
Press gently.
Not too much.
I’ve seen beginners accidentally turn their hedgehog into a pancake right here.
Use a toothpick to blend the seams where the feet meet the body.
The feet don’t need lots of detail. Small and simple actually works better.
A slightly awkward foot often looks more charming than a perfectly sculpted one.
Step 4: Create the Signature Hedgehog Spikes
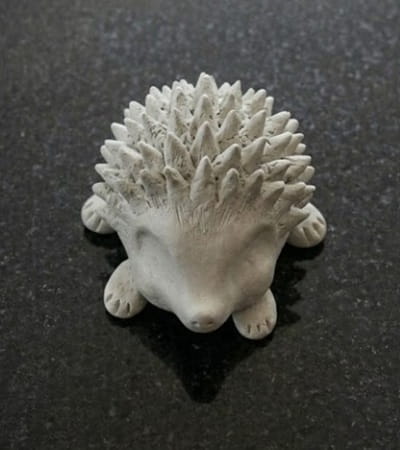
Now for the fun part.
Take a toothpick, wooden skewer, or clay needle tool.
Starting near the back of the head, create short upward textures by pressing and lifting repeatedly.
Work row by row.
Move slowly toward the back.
These marks create the illusion of spikes without adding hundreds of individual clay pieces.
Want something more dramatic?
Pinch tiny sections of clay upward before texturing them.
This creates thicker spikes and gives your hedgehog clay art more depth.
Don’t texture the face.
Leave the face smooth.
That contrast is what makes the spikes stand out.
It look strange halfway through, but trust the process.
Step 5: Add Eyes, Nose, and Small Details
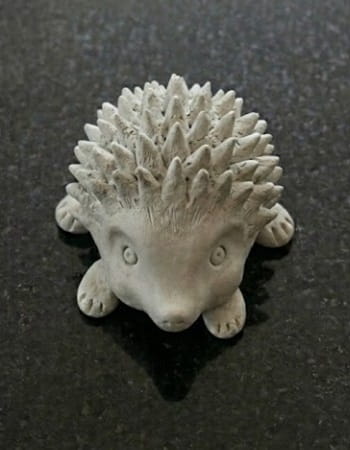
Use a toothpick to create two tiny eye sockets.
Press gently.
Add miniature clay dots or leave the sockets empty for painting later.
Create a tiny nose at the tip of the snout.
You can roll a tiny clay ball and attach it, or simply build up the clay already there.
Add small mouth lines if you want.
Some crafters skip the mouth entirely.
Honestly, both versions look adorable.
This stage is where your clay Hedgehogs starts feeling alive.
Take your time.
Tiny details can change the entire expression.
Step 6: Dry the Sculpture Properly
Place the hedgehog somewhere safe.
Away from direct sunlight.
Away from curious pets.
Away from that one family member who touches every unfinished craft project.
Allow it to dry for 24 to 72 hours depending on thickness.
Turn it occasionally.
This helps prevent uneven drying.
If small cracks appear, don’t panic.
Many beginners thinks their project is ruined.
Usually a little clay paste can repair minor surface cracks easily.
The hedgehog should feel completely dry before painting.
No cool or damp spots should remain.
Step 7: Paint Your Woodland Friend
Start with a cream or beige color on the face.
Paint the spikes with medium brown.
Add darker brown into deeper textures.
This creates natural dimension.
Use black paint for the eyes and nose.
A tiny dot of white paint inside each eye can create a surprisingly expressive look.
Add a touch of pink inside the ears if desired.
Well, technically our hedgehog doesn’t need pink ears. But it sure looks cute.
Allow the paint to dry completely.
Step 8: Seal and Display
Once the paint is fully dry, apply a thin coat of clear sealer.
This step is optional but helpful.
It protects paint from scratches and moisture.
Allow the sealer to cure according to package instructions.
Your hedgehog is now ready for display.
Place it on a shelf.
Use it as desk decor.
Create a collection of woodland creatures.
Many people who start with one hedgehog end up making foxes, owls, rabbits, and other pottery animals soon after.
That’s how the hobby sneaks up on you.
Creative Variations
Want to make your project even more unique?
Try:
- Mushroom-carrying hedgehog
- Autumn leaf hedgehog
- Sleeping hedgehog curled into a ball
- Hedgehog holding an acorn
- Mini hedgehog family set
- Fairy garden hedgehog
- Ceramic-inspired woodland collection
If you’re learning how to make ceramic animals, these variations help build sculpting skills without becoming overwhelming.
For younger crafters, even edible clay alternatives can be used for temporary practice sculpting, although this tutorial is designed for air dry clay.
Final Thoughts
One thing I find fascinating about animal sculpting is that tiny imperfections often improve the final result. In painting, people chase perfection.
In handmade clay work, the opposite can be true.
A slightly crooked nose, uneven spikes, or a lopsided smile can make a hedgehog feel like a character instead of an object.
That’s why projects like Hedgehog clay crafts remain so popular among beginners and experienced makers alike.
They teach observation, patience, texture-building, and creative problem-solving all in one small sculpture.
And perhaps the best part? No two hedgehogs ever come out exactly the same, which makes every finished piece genuinely one of a kind.