Quick Answer
In order to replace the dryer drum:
- Unscrew the outer body of your dryer to access the drum.
- Take the drive belt off the drum by loosening the tensioner pulley.
- With the help of a nut driver remove the retaining nuts from the drum and pull it off its place.
- Install the new drum and reassemble the dryer by reversing the above steps.
Key Takeaways
- The dryer’s drum is the largest and the most active component in a clothes-drying machine. It is the place where all the tumbling and spinning action happens.
- The drum is usually made of either steel or aluminum and is coated with a porcelain-enamel finish.
- These drums have multiple coatings to prevent corrosion and are designed to operate continuously in hot environments.
- Always check the user manual and warranty coverage before performing any self-troubleshooting.
What is a drum in a dryer?
A drum in a clothes drying machine is the inner tub where all the damp garments are loaded for drying.
It is then powered by a drive motor that connects the drum through a drive belt.
The force transferred to the drum makes it rotate, tumble, and even spin at the set RPMs.
Different dryers use different drums depending on their make, model, and, more importantly, their size.
Drums for dryers are typically made of sturdy metals like stainless steel or aluminum alloy and have coatings to withstand heat and corrosion.
How to replace the dryer drum?
Before you start the replacement process, it’s a good idea to look at the user manual for your dryer’s model. This can help you figure out what’s wrong and put the dryer back together.
If your clothes dryer is still under warranty, then it’s best to call customer service and have them send a technician over as the process of replacing the drum voids the warranty.
That being said, if you’re comfortable with a few mechanical repairs and are out of warranty, then you can follow the below steps to replace your dryer’s drum.
Instructions to replace the dryer drum
Step 1: Unplug the dryer & disconnect the attachments
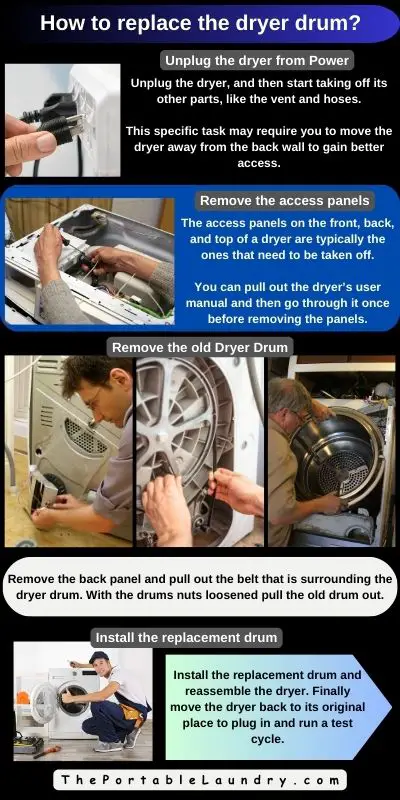
Unplug the dryer, and then start taking off its other parts, like the vent and hoses.
This specific task may require you to move the dryer away from the back wall to gain better access.
Hence, move it slightly aside to proceed with the core steps.
Step 2: Remove the access panels from the dryer
The access panels on the front, back, and top of a dryer are typically the ones that need to be taken off.
At this point, you can pull out the dryer’s user manual and then go through it once before removing the panels.
Keep the screws and the panels aside.
Now you should have access to the internal components and the drum.
Step 3: Remove the old dryer drum
The drum is usually secured with nuts and a drive belt around it. This drive belt connects to the idler pulley, which serves as a tensioner.
Start by loosening the screws on the dryer’s idler pulley to loosen the dryer’s belt.
Now carefully pull out the belt that is surrounding the dryer and move to the next step.
Remove any electrical wires in your path and make a note to reconnect them later.
Loosen the nuts to release the drum from its place.
Lift or pull out the dryer drum carefully and place it aside.
Tip: As you have your dryer exposed, it is the right time to clean the inner areas before installing the replacement drum.
Step 4: Install the replacement drum
Place the new drum and make sure it is in the right spot so that the nuts fit into the right slots. Using a nut driver, tighten the nuts and then surround the dryer’s belt to its body.
Make sure the belt is aligned correctly with all the grooves and pulleys.
Next, tighten the pulley to provide the necessary tension to the belt without slacking.
Finally, reconnect the electrical wires that were disconnected earlier in the previous steps.
Step 5: Reassemble the dryer panels
Now all you need to do is to reassemble the detached panels back onto the dryer and move the dryer back to its original place.
Step 6: Plug the dryer to run a test cycle
Connect the dryer’s supplies again, and then plug the dryer’s power cord into the wall.
Run a test cycle to check if the drum is working like before.
Things to keep in mind while replacing dryer drum & safety precautions
When it comes to replacing your dryer drum, the safety of both you and others should be your top priority.
As you gear up for this task, keep the following safety precautions and considerations in mind:
Disconnect from Power Source
Begin by ensuring your dryer is entirely disconnected from its power source.
Unplugging it from the electrical outlet is essential to prevent any unintended electric shocks.
Protective Gear
Prioritize your safety by wearing suitable protective gear like gloves and safety goggles.
These essentials will safeguard your hands and eyes from potential hazards, given that the process involves handling components like nuts, belts, and electrical parts.
Read the User Manual
Familiarize yourself with your dryer’s user manual before you commence the task.
This resource offers valuable insights into your specific dryer model, including potential risks and recommended safety practices.
Create the Right Workspace
Set up your workspace in a well-ventilated area to prevent inhaling dust, debris, or any potential fumes during the process.
Clear out sufficient space around the dryer to ensure safe maneuvering and avoid unnecessary hazards as you handle various components.
Deal with Electrical Components Cautiously
Under no circumstances should you work on electrical components while the dryer is still connected to a power supply.
Even after unplugging the dryer, exercise caution when dealing with wires and connectors.
Capacitors can hold an electrical charge even after the power is cut.
If you’re working with circuit boards or electrical components, consider discharging capacitors to eliminate any residual charge and reduce risks.
Choose the Right Tools
Utilize the correct tools for each step of the process.
Employing the wrong tools can lead to accidents, potential component damage, or personal injury.
Stability Matters
Ensure your dryer is stable and properly supported throughout the replacement process.
An unstable or unbalanced dryer can tip over and cause harm.
No Need to Rush
Take your time with each step of the process and no need to rush as it can lead to mistakes or accidents.
Professional Consultation
If you find any aspect of the process daunting or encounter unexpected issues, consider seeking assistance from a professional.
Final Thoughts
A drum is the largest component or part of a dryer that does all of the tumbling and spinning to dry your clothes.
Over time if it breaks or shows signs of aging and may wear out due to many reasons such as Overusing, overloading, poor maintenance, accidental damages, etc.
At such times, you will have to replace the dryer’s drum with a new one as per the
size and the model number.
When compared to fixing other electrical parts in a dryer, replacing the drum is easy, as long as you know how to take it off.
If you are unsure or not certain about the process, then it is best to consult a professional or customer service as they will be able to guide and help you out.
Frequently Asked Questions
Are all dryer drums the same size?
No, the drums in all dryers are not the same and vary depending on the make and model of your dryer. Moreover, the size of the dryer matters the most when it comes to the drum.
How do I know if my dryer’s drum needs replacing?
If your clothes are not getting dried even after multiple cycles or if you see any cracks or holes in the drum, then it is time to replace the dryer’s drum.
Can you use a washing machine drum in a dryer?
It is not possible to use a washing machine drum in a dryer as the make and design differ according to its usage. Moreover, the hooks and grooves will differ for both machines.
Is it worth replacing a dryer drum?
It is not worth replacing a dryer drum if the overall condition of the dryer is not good. If multiple parts need to be replaced or if the dryer is very old, i.e., more than 10 years old, then it is better to buy a new one.
How much does it cost to replace a dryer drum?
On average, the replacement drum may cost you anywhere between $200 and $450, depending on the model and size of the dryer. This is where the cost-benefit analysis comes into play, as it will help you decide whether to replace the drum or buy a new dryer instead.
You May Also Like
- How to Replace the Idler Pulley in a Dryer?
- How to replace the dryer drive motor?
- How to Replace the Control Board in a Dryer?
- How to replace the door switch in a dryer?
- How to replace a dryer door latch?
- How to replace the timer in a dryer?
- How to Replace Gas Valve in a Gas Dryer?
- How to replace the flame sensor in a dryer?
- How to replace the moisture sensors in a dryer?
- How to replace the drive belt in a dryer?
- How to replace the Thermostat in a Dryer? (In-depth guide)
- How to replace a thermal fuse on a dryer?
- How To Replace a Dryer Blower Wheel?
- How To Replace Dryer Heating Element? (Step-by-Step)
- How to replace the Igniter in a Gas Dryer?
- 14 Reasons Why Your Dryer is Squeaking & Solutions
- Why do Korean Homes come with Washers but not Dryers?
- Gas Dryers vs Electric Dryers (Differences Explained)
- Damaged Dryer Vents: 8 signs your dryer vent is damaged
- Dryers & Vents: 20 frequently asked questions
- Why is the dryer not drying clothes?