Halloween crafts don’t always need to be complicated to be fun.
This trick or treat smell my feet clay craft turns a silly Halloween rhyme into a small handmade keepsake using air dry clay and a child’s footprint.
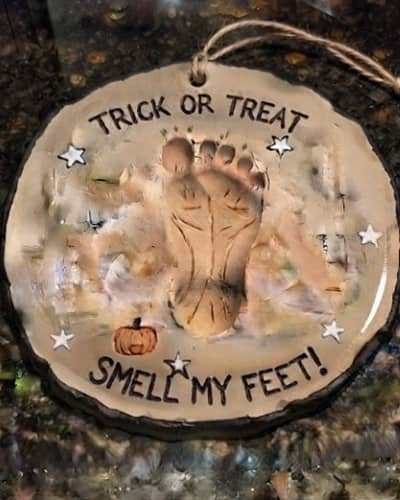
I like this idea because it feels more personal than a basic pumpkin or ghost.
It is part clay craft, part keepsake, and definitely a fun kids craft for an afternoon at home.
You don’t need a pottery wheel, special tools, or perfect sculpting skills. A little unevenness actually makes this air dry clay craft look better.
Materials Needed Needed To Make Trick or Treat Smell My Feet Clay Craft
- Air dry clay
- Rolling pin or smooth glass bottle
- Parchment paper
- Small child’s bare foot or clean footprint template
- Acrylic paint
- Black paint
- Orange paint
- White paint
- Small paintbrush
- Pencil or blunt clay tool
- Toothpick
- Small piece of cardboard
- Clear craft sealer or Mod Podge, optional
- Fine sandpaper, optional
- Craft knife, adult use only
- Water in a small cup
- Paper towel
Step 1: Prepare the Clay
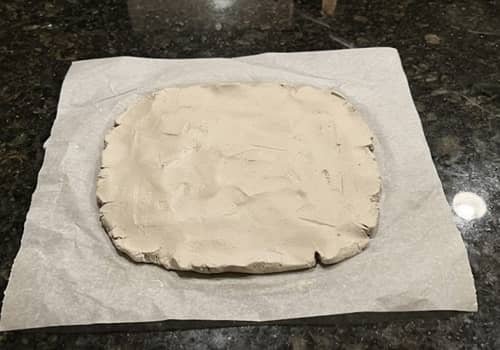
Start by cutting or pulling off a generous handful of air dry clay.
Knead it between your palms for a minute or two.
This softens the clay and gets rid of some of those little cracks that can appear while rolling.
Now place the clay between two sheets of parchment paper.
Roll it slowly until you have a slab around 1/4 inch thick.
Don’t make it paper-thin. A little thickness gives the finished footprint enough strength to become a keepsake.
Aim for roughly 7 to 9 inches wide, depending on the size of the child’s foot.
Is the surface perfectly smooth? It doesn’t have to be.
A few tiny dents will actually give the finished piece that handmade look.
Step 2: Make the Footprint Shape
This is where the craft gets its personality.
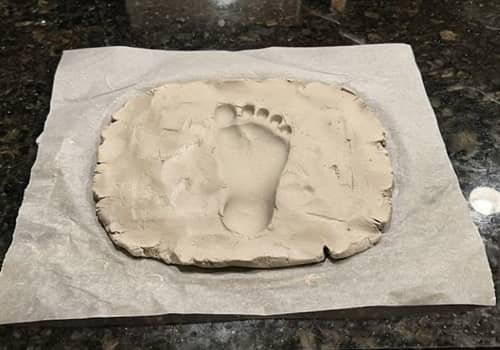
Place the child’s clean bare foot gently over the clay and press down evenly.
You don’t need to put the entire body weight onto it. A firm, gentle press is enough to leave the outline.
Lift the foot straight up.
Don’t drag it sideways, or the toes can smear.
If you don’t want to use an actual foot, draw a simple footprint shape on paper and use it as a guide instead.
Using a blunt clay tool, carefully trace around the footprint.
Keep the toes rounded and slightly separated. It doesn’t need to look anatomically perfect.
Then use a craft knife to trim away the excess clay around the outside. Adults should handle this part.
Leave a little clay around the footprint so it becomes a small plaque rather than just a thin foot shape.
Step 3: Turn It Into a Halloween Plaque
Now give the footprint a stronger shape.
Gently smooth the outside edges with a slightly damp fingertip.
Don’t rub across the footprint itself because you want those little toe and sole impressions to remain visible.
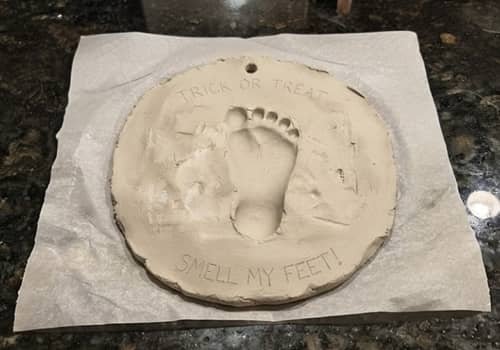
Create a simple rounded plaque around the foot. You can make it oval, slightly rectangular, or follow the shape of the foot.
I prefer an intentionally uneven oval because it looks handmade instead of factory-made.
Want to hang it later? Use a straw or the end of a thick paintbrush to make one small hole near the top edge.
Don’t make the hole too close to the edge.
Finally, use a toothpick to lightly sketch the words “TRICK OR TREAT” above the footprint and “SMELL MY FEET!” below it. Don’t press too deeply yet.
Step 4: Add the Funny Halloween Details
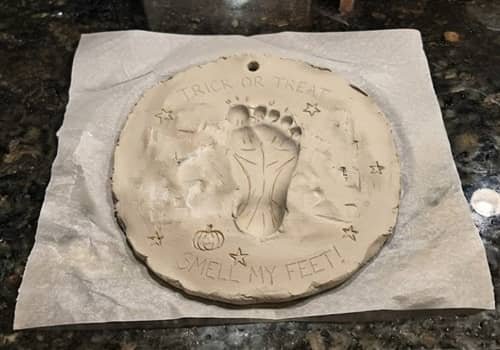
This is the part where I add my own twist.
Instead of covering the footprint with complicated decorations, keep it simple and make the foot itself the star.
Use a toothpick to draw tiny curved lines across the sole and small crease marks around the toes. These don’t need to be perfect.
Add three or four tiny stars, dots, or crooked little bats around the outside of the footprint.
You could also add one tiny pumpkin beside the heel.
Keep the decorations sparse. Too many details can make the plaque look busy and can hide the footprint.
If the clay starts becoming sticky, stop working for a few minutes and let the surface firm up.
Step 5: Carve the Message
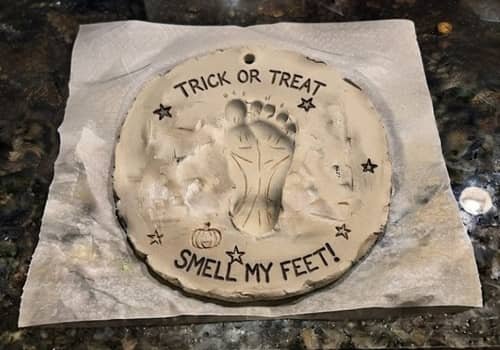
Once the clay has become slightly firmer but is still workable, go back over your lettering.
Slowly carve TRICK OR TREAT across the top.
Then carve SMELL MY FEET! underneath the footprint.
Use a toothpick for thin letters. A blunt clay tool works better if you want wider grooves.
Don’t worry if every letter isn’t the same size.
In fact, a crooked letter here and there makes this trick or treat footprint clay art feel like something a child actually helped make.
Check the lettering from a distance.
Can you read it easily?
If yes, leave it alone. If not, widen the grooves slightly.
Now let the entire plaque dry according to the clay manufacturer’s instructions.
Many air dry clays need roughly 24 to 72 hours depending on thickness, humidity, and brand.
Step 6: Paint the Footprint
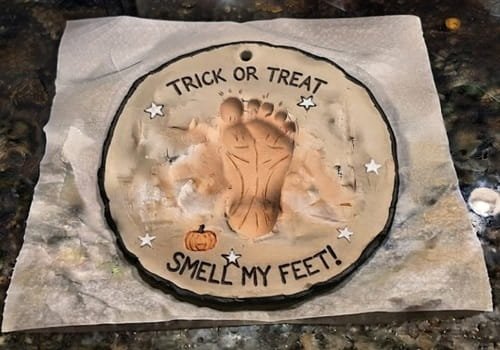
Once completely dry, brush away loose clay dust.
Start with the footprint itself.
I like using a warm skin-tone shade, but you can choose any color you like.
Paint carefully inside the footprint while allowing some of the carved details to remain visible.
Next, paint the plaque border black.
Add orange to the little pumpkin and white to a few tiny Halloween details.
Don’t chase perfect coverage. A slightly visible brush stroke makes this Halloween clay craft look much more believable.
For the lettering, use black paint and a very small brush.
If your carved grooves are deep enough, gently push the paint into them and wipe the excess from the raised surface with a barely damp cloth.
That trick makes the message stand out.
Step 7: Add the Final Hanging Detail
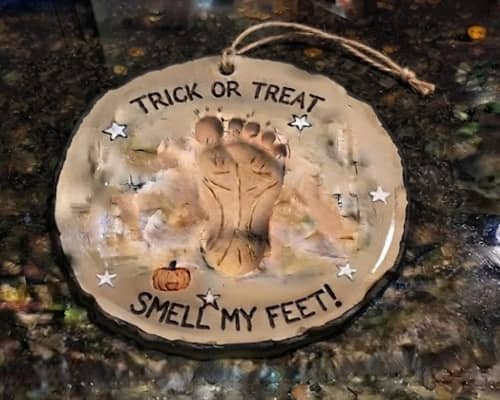
Once the sealer is fully dry, thread a short piece of twine, ribbon, or black cord through the hole.
Tie it into a simple loop.
That’s it.
I wouldn’t add a huge bow or a pile of embellishments. The funny footprint and the message already do the work.
If you’re making this with kids, let them choose the footprint color or paint the tiny pumpkin.
Those little decisions are what make each trick or treat smell my feet clay keepsake different.
You could even make two footprints and turn them into a pair of hanging Halloween decorations.
And yes, the silly wording is part of the fun. It has the same playful energy as the “trick or treat smell my feet” meme, but here it becomes something you can actually keep.
Also Read: Trick Or Treat Smell My Feet Paper Craft
Final Thoughts
What I like most about this project is that the footprint isn’t just decoration.
It turns an ordinary Halloween saying into a little snapshot of how small those feet are right now.
Air dry clay also makes this kids craft practical because there is no kiln or complicated pottery equipment involved.
The finished piece can become a yearly Halloween keepsake, classroom decoration, or a funny little gift for grandparents.
I’d actually keep the imperfections instead of correcting them.
A crooked letter, uneven toe, or visible brush mark tells the story better than a perfectly manufactured decoration ever could. That is what makes this simple DIY project worth making.





