Ever spent hours shaping a clay piece only to find a crack running right through it the next day? Yeah, that feeling is rough.
The good news is that most cracks are completely repairable, even the ugly ones.
Learning how to fix cracked air dry clay isn’t complicated, but there are a few tricks that make the difference between a repair that disappears and one that keeps reopening.
In this guide, I’ll walk through the exact process I use when repairing damaged clay creations, from tiny hairline fractures to deeper splits.
If you’re working on DIY gifts, homemade air dry clay decorations, or larger air dry clay projects, these methods can help save your piece instead of tossing it away.
Why Is Air Dry Clay Cracking?
Before fixing the problem, it helps to understand why it happened.
Air dry clay shrinks as moisture leaves the material. If one area dries faster than another, stress builds up and cracks begin to appear.
Common causes include:
- Drying near direct sunlight
- Placing clay close to a fan or heater
- Making pieces too thick
- Adding uneven amounts of water
- Poorly blended homemade air dry clay
- Joining pieces without scoring properly
- Drying one side faster than the other
Sometimes people ask, “Why is air dry clay cracking even though I followed the instructions?”
Honestly, sometimes clay just decides to be dramatic. Tiny differences in room temperature can create stress points that wasn’t visible at first.
Supplies Needed To Make Your Air Dry Clay Crack Proof
Gather everything before starting.
Basic Repair Kit
- Air dry clay
- Small bowl
- Water
- Fine paintbrush
- Craft knife
- Sandpaper (220–400 grit)
- Cotton swabs
- Small spatula or sculpting tool
- Paper towel
Optional But Helpful
- Clay slip (clay mixed with water)
- Spray bottle
- Soft makeup sponge
- Acrylic paint
- Sealer or varnish
Step 1: Examine the Crack Carefully
Not all cracks need the same repair.
Place your clay piece under bright lighting and inspect every side.
Look for:
- Hairline surface cracks
- Medium-depth cracks
- Deep structural cracks
- Broken sections that move when touched
Run your fingernail gently across the damaged area.
If your nail catches slightly, it is usually a surface crack.
If you can press both sides apart, you’re dealing with a deeper repair.
Don’t skip this step. Seriously. Fixing a deep crack with a surface method usually ends with the crack returning a few days later.
Step 2: Create a Clay Paste Repair Mixture
This is where many tutorials stop being helpful.
Instead of simply adding water to the crack, make a repair paste.
Take:
- 1 part fresh air dry clay
- A few drops of water
Mix until it resembles thick yogurt.
Not runny.
Not stiff.
Think peanut butter that sat in the sun for five minutes.
This mixture works better because it fills the damaged area with actual clay instead of just softening the surrounding material.
If you’re using homemade air dry clay, use the same clay recipe for the repair whenever possible.
Step 3: Open the Crack Slightly
Sounds backwards, right?
But hear me out.
If the crack is deeper than a hairline, gently widen it using a craft knife.
Only a tiny amount.
You’re creating room for fresh material to enter.
Trying to force repair paste into an extremely tight crack often leaves hidden air pockets.
Those hidden gaps can become future cracks.
Work slowly. There is no prize for finishing this step in ten seconds.
Step 4: Add Moisture First
Before applying repair paste, lightly dampen the crack.
Use a small paintbrush dipped in water.
Brush the moisture directly into the damaged area.
The clay should feel slightly cool and damp.
It should not be soaking wet.
Too much water creates a soft mushy spot that may shrink differently later.
And then guess what happens?
Another crack.
Step 5: Pack the Crack Completely
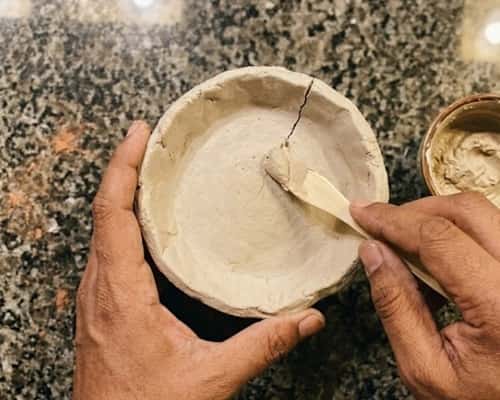
Using a sculpting tool or fingertip, press the repair mixture into the opening.
Push firmly.
Then push again.
You want the material filling every little gap.
For deeper repairs, work in layers.
Add a small amount.
Press it down.
Add another layer.
Press again.
Sometimes beginners rush this part and the repair sinks later as it dries. That don’t look very nice when the final paint goes on.
Take your time.
The extra few minutes is worth it.
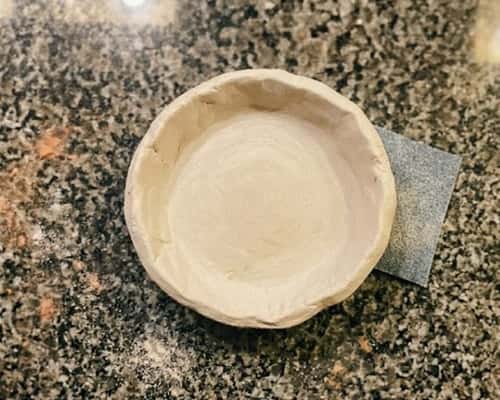
Step 6: Blend the Surface
Now comes the secret that helps make repairs nearly invisible.
Dip a fingertip into clean water.
Gently smooth the repaired area.
Use tiny circular motions.
Then switch to a damp makeup sponge.
Blend the surrounding clay into the repair.
This technique helps with smoothing air dry clay while hiding the transition between old clay and new clay.
If you’re wondering how to smooth air dry clay effectively, this is honestly one of the simplest methods I’ve found.
Keep checking from different angles.
The repair should slowly disappear into the surface.
Step 7: Let It Dry Slowly
Most people cause a second crack right here.
After repairing the clay, don’t place it near a sunny window.
Don’t use a fan.
Don’t put it outside.
Instead:
- Place it on cardboard
- Cover loosely with a paper bag
- Allow gradual drying
Slow drying reduces stress inside the clay body.
A repaired area is especially sensitive because it contains fresh moisture while the surrounding clay is already dry.
This part feels boring. It is boring.
But boring is exactly what prevents another crack.
Allow at least 24 hours.
Larger pieces may require 48 hours or longer.
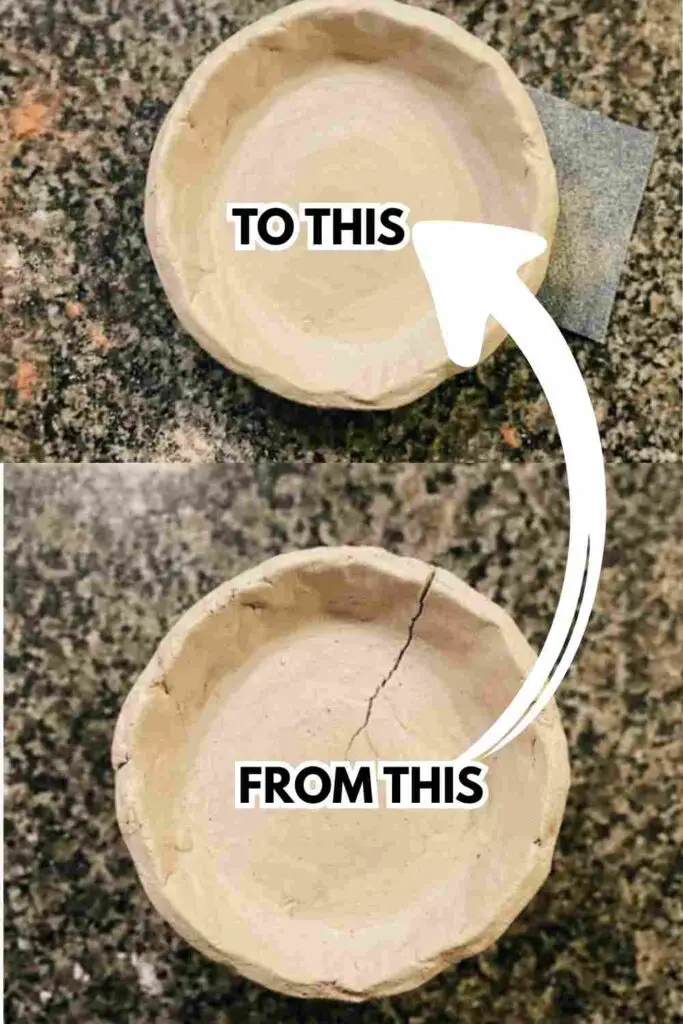
Step 8: Sand the Repair
Once fully dry, inspect the repaired section.
Feel it with your fingers.
Notice any bumps?
Small ridges?
Raised edges?
Use fine-grit sandpaper.
Sand gently.
Very gently.
Air dry clay sands surprisingly fast.
One aggressive pass can remove more material than you expected.
Years ago, I had to learn that lesson the hard way.
Work slowly until the repair blends naturally into the surrounding surface.
Step 9: Check for Hidden Cracks Before Finishing
The repair may look perfect from one angle and completely different from another.
Turn the piece slowly under natural light.
Look closely.
Then look again.
Tiny hairline cracks sometimes hide until the clay is fully dry.
If you discover a small crack, don’t panic. That’s actually pretty normal.
Mix a tiny batch of clay paste and repeat the filling process. The second repair is usually much smaller and faster.
I like running a fingertip across the surface with my eyes closed. Sounds weird, doesn’t it? Yet fingers often find imperfections before your eyes do.
What If the Clay Piece Is Completely Broken?
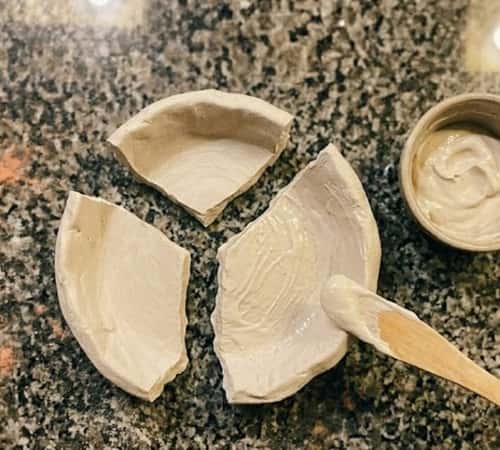
Sometimes a crack becomes a full break.
Maybe a handle snapped off.
Maybe a decorative piece detached.
Maybe gravity won the argument.
The repair method changes slightly.
Step 1: Clean the Broken Edges
Remove dust and loose clay particles.
A dry paintbrush works well for this.
Avoid using excessive water here because saturated edges can weaken the bond.
Step 2: Create Thick Clay Slip
Clay slip acts like glue.
Mix:
- Air dry clay
- Water
Keep stirring until it reaches a thick pudding consistency.
Not watery.
Not chunky.
Just thick enough to stick to a tool.
Step 3: Score Both Surfaces
Using a craft knife, create shallow crosshatch marks on both broken edges.
Nothing deep.
You’re simply creating texture.
These scratches give the clay slip something to grip.
Think of it like sanding wood before painting.
Step 4: Apply Slip Generously
Brush the slip onto both surfaces.
Don’t be stingy here.
Cover every section that will touch.
Step 5: Join the Pieces
Press both sections together firmly.
Hold for about thirty seconds.
Then remove excess slip that squeezes out.
If the piece is heavy, support it with crumpled paper towels while drying.
Step 6: Reinforce the Joint
Roll a tiny snake of fresh clay.
Press it over the seam.
Blend it smoothly into the surrounding surface.
This extra reinforcement helps make air dry clay strong enough to handle everyday display use.
A Little Trick for Preventing Future Cracks
Most guides focus only on repairs.
But preventing cracks is much easier than fixing them.
Here are habits that help:
Keep Thickness Consistent
Large differences in thickness create uneven drying.
Try to keep walls and surfaces relatively uniform.
Dry Slowly
Fast drying is one of the biggest reasons people search for “why is air dry clay cracking.”
Patience beats repairs every single time.
Flip Flat Pieces
For trays, ornaments, and dishes, turn them over occasionally during drying.
This helps moisture leave more evenly.
Store Unused Clay Properly
Air exposure starts the drying process before you even begin crafting.
Always seal leftover clay tightly.
Avoid Excess Water
Many beginners think more water equals smoother clay.
Not exactly.
Too much water can weaken the structure and increase shrinkage.
Smoothing Air Dry Clay Before Painting
A good paint job starts long before the paint comes out.
If you want professional-looking results from homemade projects, surface preparation matters.
Here’s my favorite process:
Light Sanding
Start with 220-grit sandpaper.
Remove bumps and uneven spots.
Fine Sanding
Move to 320 or 400 grit.
This creates a softer finish.
Damp Sponge Finish
Use a barely damp sponge.
Not wet.
Barely damp.
Wipe gently across the surface.
This helps with smoothing air dry clay without removing too much detail.
The difference can be surprisingly noticeable.
How to Paint Air Dry Clay After Repairs
A repaired piece can absolutely be painted.
In fact, paint often helps hide minor imperfections.
Step 1: Remove Dust
Wipe away sanding residue using a dry cloth.
Dust trapped under paint creates rough spots.
Step 2: Apply Primer (Optional)
White acrylic primer creates a more even base.
This is especially useful if the repaired area differs slightly in color.
Step 3: Paint in Thin Layers
Avoid thick coats.
Several thin layers usually look smoother than one heavy coat.
Allow each layer to dry completely.
Step 4: Inspect Between Coats
Tiny flaws become easier to see once paint is applied.
If needed, sand lightly and continue.
Step 5: Seal the Piece
Use:
- Matte sealer
- Satin sealer
- Gloss sealer
The finish depends on your project style.
A simple trinket dish often looks beautiful with a satin finish.
Common Mistakes That Cause Repairs to Fail
I’ve seen these mistakes pop up over and over.
Using Only Water
Water alone softens clay.
It doesn’t actually replace missing material.
Drying Too Fast
A repaired area needs gradual drying.
Rushing often recreates the original problem.
Skipping Surface Preparation
Dust and debris prevent strong repairs.
Over-Sanding
Air dry clay is softer than many people realize.
A few extra strokes can change the shape quickly.
Painting Before Fully Dry
Even slightly damp clay can cause paint issues later.
Patience wins again.
Final Thoughts
One thing I’ve learned from years of making diy air dry clay creations is that cracks aren’t always signs of failure.
They’re often little clues telling you how the clay dried, where moisture escaped too quickly, or which areas experienced stress.
Understanding those clues makes every future project better. The funny part is that some of my favorite handmade pieces started with cracks I thought would ruin everything.
Learning how to fix cracked air dry clay gives you more than a repair technique. It teaches you how the material behaves.
Once you understand that relationship, you’ll spend less time rescuing projects and more time confidently creating them.
Frequently Asked Questions
Are hairline cracks normal?
Absolutely. Small cracks happen frequently, especially with larger air dry clay projects.
Can homemade air dry clay be repaired the same way?
Usually yes. Using matching clay for repairs often provides the best results.
Why do cracks keep returning?
Most recurring cracks happen because the original crack wasn’t filled deeply enough or the repaired section dried too quickly.