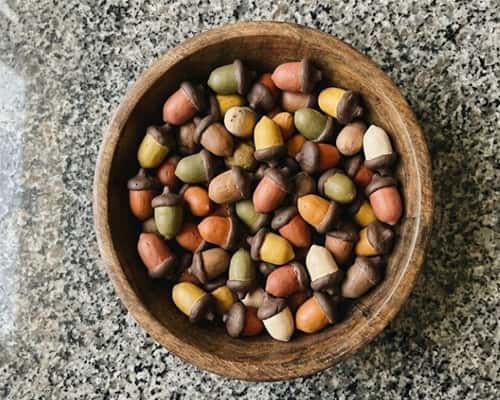
Fall always makes me want to bring a little bit of nature indoors, but not in the usual way. That’s where clay acorn decor becomes surprisingly fun.
These tiny acorn-inspired pieces can become table accents, shelf decorations, gift toppers, seasonal centerpieces, and even conversation starters.
Some look rustic, others feel almost heirloom-worthy. The best part? Most of these projects use simple supplies and beginner-friendly techniques.
If you’ve been looking for new clay fall activities for adults or inventive clay fall projects for novices, these suggestions go above and beyond typical making and transform basic clay into adorable pieces of fall decor that people actually notice.
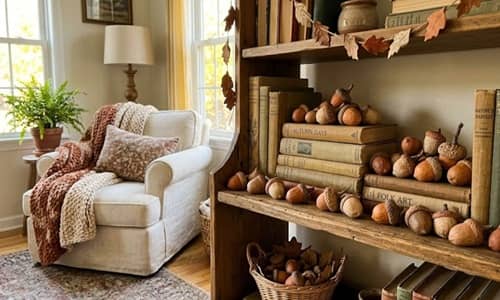
1. Woodland Storybook Acorn Bowl Fillers
This project creates a collection of decorative acorns that look like they came straight from an old woodland storybook.
Start with air-dry clay and roll it into several egg-shaped pieces about 2 inches long. Don’t worry if every acorn looks exactly the same. Nature isn’t perfect and neither is this.
Pinch one end slightly to create the pointed tip. Smooth the surface using a damp fingertip.
Now take a small ball of clay and flatten it into a thin circle. Place it over the wider end of the acorn shape. Using a toothpick, press tiny crisscross marks across the cap section.
Want them to look more realistic? Press a piece of rough fabric lightly against the cap before the clay dries.
Create 8–12 acorns in different sizes.
Allow them to dry completely for 24 to 48 hours.
Once dry, paint the bodies with warm beige, cream, muted cinnamon, and dusty brown shades. Dry-brush darker paint around the grooves.
Finish with a matte sealer.
Arrange them inside a wooden dough bowl, wicker basket, or alongside pinecones. It looks surprisingly expensive when displayed this way.
2. Floating Acorn Candle Ring
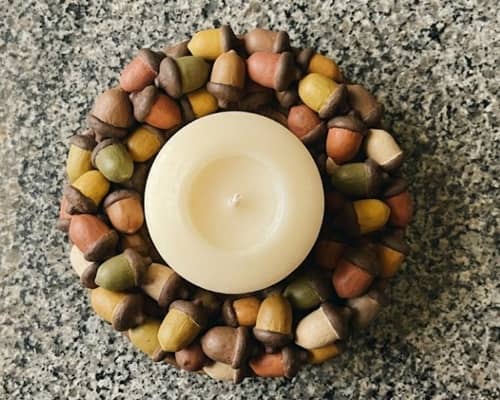
This one feels fancy but it’s actually beginner friendly.
Roll clay into 10 medium acorn shapes.
Before the clay dries, carefully poke a small hole through each acorn from side to side using a wooden skewer.
Let everything dry fully.
Paint the acorns using warm walnut and chestnut tones. Add tiny gold highlights along the edges if you like a subtle shimmer.
Thread natural jute twine through all acorns.
Create a circular ring shape.
Tie securely.
Place the ring around a pillar candle or battery-operated candle.
The acorns should rest around the candle like a miniature acorn wreath. It creates a soft woodland vibe that works on dining tables, mantels, and coffee tables.
Sometimes the simplest things ends up looking the most beautiful.
3. Acorn Memory Shelf Tokens
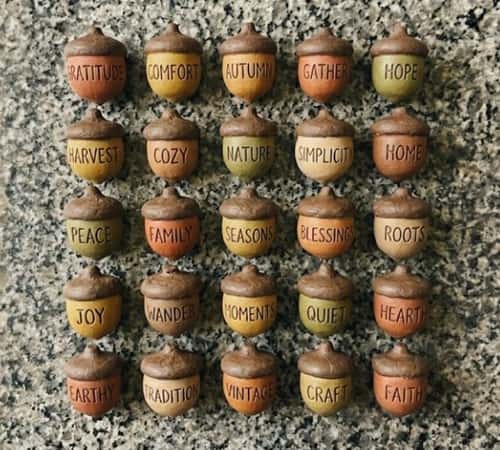
This idea turns clay acorn decorations into meaningful keepsakes.
Roll clay into large acorns about 3 inches tall.
Before drying, use a wooden stylus to carve a short word into each acorn. Examples include:
- Gather
- Thankful
- Family
- Adventure
- Home
Keep the lettering slightly imperfect. That handmade feeling matters.
After carving, let the clay dry completely.
Paint using soft earthy shades.
Apply a thin antique glaze made from watered-down brown paint and immediately wipe away excess using a cloth.
This settles color into the lettering and makes the words stand out.
Display the finished acorns along a floating shelf, fireplace mantel, or entryway table.
One thing I really like about this project is how personal it become. Every word tells its own tiny story.
4. Stacked Acorn Topiary Tower
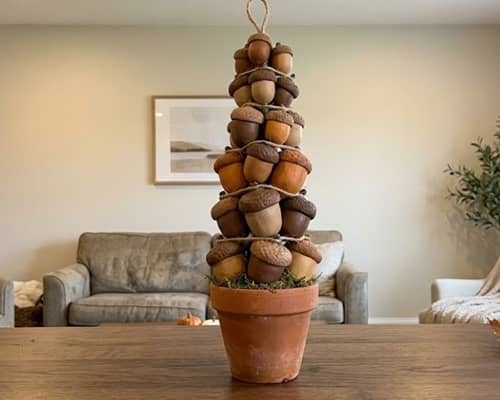
Most people think of acorns as tiny accents. This project flips that idea completely.
Start by creating 15–20 clay acorns in three sizes: small, medium, and large. The larger acorns will form the bottom of the tower while the smallest pieces will sit near the top.
Roll each acorn body from air-dry clay. Create separate caps and attach them using a little water as adhesive. Texture the caps using a stiff brush or toothpick.
Allow everything to dry fully.
Paint the acorns in varying shades of walnut brown, warm taupe, soft cream, and muted caramel. Don’t paint every piece the same color. The variation makes the display feel collected over time.
Take a wooden dowel and secure it into a small wood block base.
Beginning with the largest acorns, glue them around the bottom. Continue stacking upward. Rotate sizes and colors randomly.
Leave tiny gaps here and there. It looks more natural that way.
Finish by lightly brushing metallic bronze paint on a few cap edges.
Place the finished tower on a bookshelf, console table, or beside an acorn wreath. It draws the eye upward and doesn’t scream “craft project.”
5. Acorn Treasure Tray With Hidden Messages
This project works well for all age groups and doubles as a conversation piece.
Roll out a slab of air-dry clay about ¼ inch thick.
Using a dinner plate as a guide, cut out a large circle.
Gently lift the edges upward to form a shallow tray.
Now create 7 to 10 miniature clay acorns.
Before attaching them around the tray rim, carve tiny hidden words underneath each one.
Try words such as:
- Dream
- Hope
- Joy
- Courage
- Explore
Let the tray and acorns dry separately for a few hours.
Attach the acorns around the outer rim using clay slip or strong craft glue after drying.
Paint the tray in a soft linen shade and paint the acorns in natural woodland colors.
Add a matte sealer.
Guests often don’t realize the words are hidden underneath. Then somebody picks one up and suddenly everybody is looking.
Its kind of a fun surprise.
6. Oversized Knit-Texture Acorn Sculpture
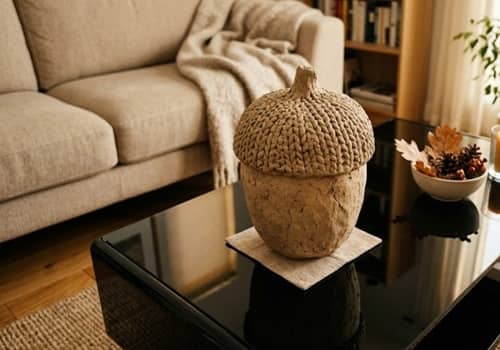
If you want something that feels more like designer fall decor than a clay acorn craft, try this.
Roll a large piece of clay into an acorn shape approximately 6–8 inches tall.
Smooth the body first.
Before the clay begins drying, press a chunky knit sweater against the acorn body. Apply gentle pressure all around.
The fabric imprint creates a woven texture that resembles cozy fall blankets.
For the cap section, add a separate layer of clay and texture it with deeper crosshatch patterns.
Allow the sculpture to dry slowly.
Large clay pieces can crack if they dry too quickly, so keep them out of direct sunlight.
Once dry, paint the body using soft cream, oatmeal, dusty sage, or muted terracotta.
Use darker paint inside the knitted impressions and wipe away excess immediately.
The result feels surprisingly high-end.
People often ask where it was purchased from, which is always satisfying.
Display it on a coffee table, entry console, or fireplace hearth alongside other fall crafts.
7. Suspended Acorn Window Charm Mobile
Most clay acorn decor sits on a shelf. This one dances with sunlight.
Start by making 12–15 miniature clay acorns ranging from 1 to 2 inches tall.
Shape each acorn individually rather than trying to make them identical. A little variation makes the finished mobile feel collected from nature.
Before the clay dries, insert a small eye pin into the top of every acorn. Twist gently so it stays secure.
Texture the caps using a toothbrush, rough sponge, or toothpick.
Allow all pieces to dry completely.
Paint using a mix of mushroom brown, honey beige, muted rust, and weathered cream.
After drying, seal with matte varnish.
Take an embroidery hoop, grapevine ring, or thin metal ring. Tie fishing line at varying lengths and attach the acorns.
Space them unevenly.
Seriously, avoid perfect spacing. Nature dont work that way.
Hang the mobile near a window where natural light can catch the different shapes.
As the air moves, the acorns gently sway. It almost feels like a tiny woodland installation rather than a simple clay fall craft for beginners.
8. Faux Vintage Acorn Book Stack Accent
This idea combines books and clay acorn decorations in a way that feels cozy and unexpected.
Create 5 to 7 medium-sized clay acorns.
Shape and texture them as usual.
Allow them to dry completely.
Paint each acorn using muted antique-inspired colors such as faded chestnut, weathered walnut, dusty cream, and aged bronze.
Now lightly dry-brush dark brown paint into the grooves and immediately wipe some away with a cloth.
The goal is not perfection.
You actually want them looking slightly worn.
Take a stack of old thrifted books or decorative books. Arrange the acorns casually between the layers, allowing some to peek out from the sides.
Add a few preserved leaves if desired.
The combination creates a display that looks collected over years rather than crafted in an afternoon.
I wasn’t expecting this project to look so charming, but it really does.
Place it on a coffee table, bookshelf, or entry console as part of your fall decor collection.
9. Acorn Lantern Surround Centerpiece

If you enjoy decorating your dining table during autumn, this project creates a centerpiece that feels far more expensive than it costs.
Begin by making approximately 20 small clay acorns.
Create a variety of sizes.
Some should be chunky. Others should be slender. The mixture adds realism.
Texture the caps carefully and allow everything to dry.
Paint the acorns using layered shades of caramel, cinnamon brown, oatmeal, walnut, and soft taupe.
After sealing them, arrange a lantern in the center of a tray.
Battery-operated lanterns work best.
Place the acorns around the lantern base.
Continue building outward in natural clusters.
Avoid placing them in perfect circles. Random groupings usually look better.
Add a few tiny dried twigs between clusters if desired.
The finished centerpiece works beautifully for family dinners, Thanksgiving gatherings, or seasonal decorating. It feels like something from a boutique home store, except you made it yourself.
One little detail make all the difference here: varying the acorn sizes.
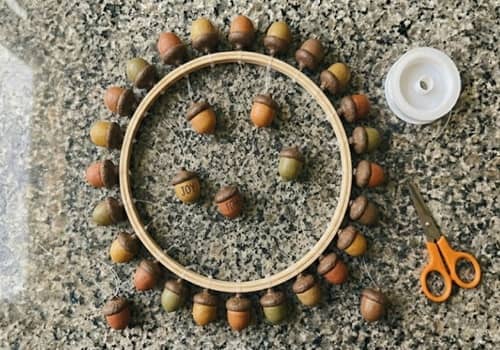
10. Heirloom-Inspired Acorn Garland
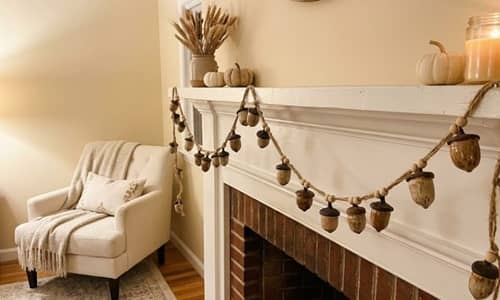
Most garlands are flat. This one has depth, texture, and a handmade character that gets noticed from across the room.
Start by creating 18–25 small clay acorns in slightly different sizes.
Don’t measure them. Seriously. The tiny differences help the finished garland feel more natural.
Roll the acorn bodies from air-dry clay and attach textured caps. Before the clay hardens, carefully insert a needle through the top of each acorn to create a threading hole.
Allow the pieces to dry for at least 24 hours.
Paint them using a mix of warm chestnut, soft mushroom brown, muted cream, weathered bronze, and dusty caramel shades.
Once dry, lightly sand any rough edges.
Thread natural jute twine through each acorn, leaving uneven spacing between them. Every third or fourth acorn can have a small wooden bead beside it for extra visual interest.
Tie loops at both ends.
Drape the garland across a mantel, bookshelf, entry table, or even around an existing acorn wreath.
The finished piece looks like something passed down through generations rather than something made during a weekend craft session.
11. Framed Botanical Acorn Wall Art

This project transforms clay acorn decor into artwork.
Begin by making 9 clay acorns in various sizes.
Try creating a mixture of tall, round, narrow, and chunky shapes.
Texture each cap carefully and allow the acorns to dry completely.
Paint them in soft earthy shades such as walnut brown, warm ivory, muted sage, faded terracotta, and oatmeal.
While they dry, prepare a shadow-frame backing.
A linen-textured scrapbook paper works beautifully, but plain neutral cardstock works too.
Arrange the acorns before gluing.
Experiment with layouts. A scattered arrangement can look just as good as a structured one.
Once happy with the design, attach the acorns using strong craft adhesive.
For extra detail, add small handwritten labels beneath some acorns, naming imaginary woodland varieties. It’s a tiny detail, but people always seem to notice it.
Let everything cure fully before placing inside the frame.
This project sits somewhere between wall decor and sculpture. It don’t really feel like a traditional clay acorn craft at all.
Hang it in an entryway, reading nook, or living room gallery wall.
12. Woodland Story Shadow Box Display

For the final project, let’s create something that feels like a miniature autumn scene captured in time.
Start by making 10–15 clay acorns in different sizes.
Create a few split-open acorns too by carefully cutting one side before the clay dries.
Texture all caps and allow the pieces to cure completely.
Paint using layered woodland tones including warm brown, chestnut, cream, soft gray, muted rust, and weathered tan.
Take a deep shadow box frame.
Cover the back panel with linen fabric, burlap, or textured scrapbook paper.
Now begin arranging your scene.
Position the acorns in natural clusters as though they’ve just fallen beneath an oak tree.
Add small preserved twigs, tiny dried leaves, and bits of preserved moss.
Keep it simple though. Too many elements can make the display feel crowded.
Secure everything with hot glue.
Step back every few minutes while arranging. Sometimes a small adjustment changes the entire composition.
Once complete, close the frame and display it on a shelf or hang it on a wall.
Unlike many fall crafts, this one feels permanent. You may find yourself displaying it year after year.
Its funny how a handful of clay acorn decorations can end up looking like a tiny piece of woodland history.
Final Thoughts
The interesting thing about clay acorn decor is that it sits right in the middle of crafting and decorating.
A lot of seasonal projects get packed away because they feel too much like a craft. Acorns are different.
Their shape is timeless, which is probably why they continue appearing in home design, woodland-inspired interiors, and handmade fall decor collections.
Even better, these projects can be adapted for all age groups, from clay fall crafts for beginners to experienced makers looking for something fresh.
The secret isn’t making them perfect. In fact, slight imperfections often make handmade pieces feel warmer, more authentic, and far more memorable than anything mass-produced.