Tiered trays always seem to make a space feel finished, but buying seasonal pieces over and over can get expensive fast.
I began experimenting with air-dry clay tiered tray decor for precisely this reason.
A simple block of clay can become tiny pumpkins, miniature houses, rustic tags, and even charming little trinkets that look completely custom.
The best part? Most of these projects require very few tools and can be finished in a weekend. If you’ve never worked with clay before, don’t worry.
These beginner-friendly ideas break everything down step by step so you can create unique decorations that look handmade in the best possible way.
1. Mini Cottage Window Lantern Charms
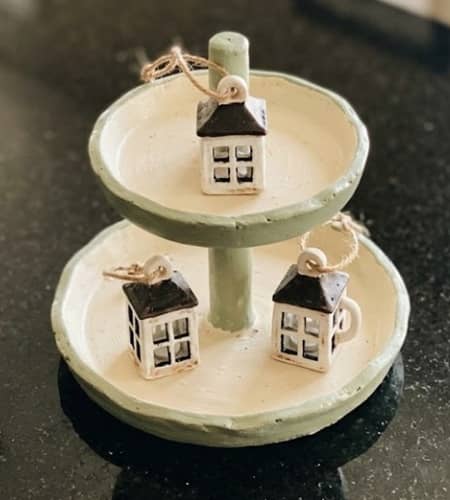
This project creates tiny faux lanterns that look like they belong in a storybook village. They work beautifully on fall trays, winter displays, or cottage-inspired shelves.
Start by rolling your air dry clay to roughly ¼ inch thick. A rolling pin works fine, though a smooth drinking glass works too.
Using a craft knife, cut four rectangles measuring about 2 inches tall and 1 inch wide. These become the lantern walls.
Take a toothpick and carefully score window panes into each rectangle. Draw one vertical line and two horizontal lines. Don’t press all the way through.
Cut another small square for the roof. Fold it gently over a pencil so it forms a slight peak.
Now comes the fun part.
Lightly dampen the edges of the wall pieces with water. Press the pieces together into a hollow box shape. Hold for several seconds. Air dry clay sticks surprisingly well when slightly damp.
Attach the roof.
If the seams look messy, smooth them with a damp fingertip. Nobody is gonna notice tiny imperfections anyway.
Give the lantern a full day or two to dry.
Paint the finished lantern with soft cream, dusty sage, or weathered white acrylic paint. Once dry, lightly brush brown paint around the edges for an aged appearance.
Place two or three lanterns on different tray levels. They look well with other cottage core items and dried flowers.
2. Wildflower Seed Packet Hanging Tags
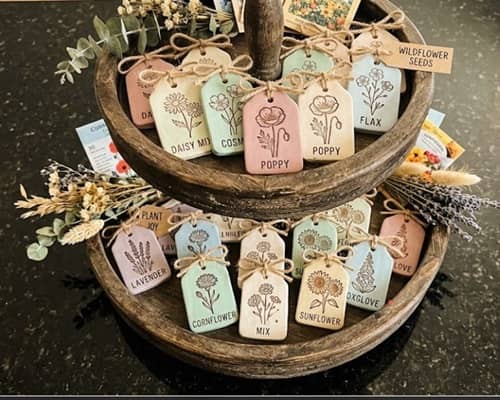
Most people make signs. I wanted something that looked a little more unexpected.
These miniature seed packet tags bring instant spring charm to an air dry clay tiered tray decor setup.
Roll clay to about ⅛ inch thickness.
Cut small rectangles roughly 2½ inches tall and 1½ inches wide.
Use a ruler if you want straight lines. Or don’t. Handmade looks better sometimes.
Round the top corners slightly using your fingers.
Using a pencil tip, lightly engrave simple flower stems, daisies, lavender sprigs, or wildflower bunches onto the surface.
Near the top center, poke a hole with a straw.
Let the clay dry completely.
Paint the tags in muted shades like pale blush, buttercream yellow, dusty blue, or faded lavender.
Once dry, use a fine-tip paint marker to write phrases like:
- Bloom & Grow
- Wildflower Market
- Picked Fresh
- Garden Notes
Thread jute twine through the hole and tie a loose bow.
These tags can hang from tray handles, small hooks, or lean against other decorative pieces. They almost look like vintage garden shop finds.
The texture turns out really nice if you leave some fingerprints visible. It make the piece feel more authentic.
3. Tiny Mushroom Trinket Bowls
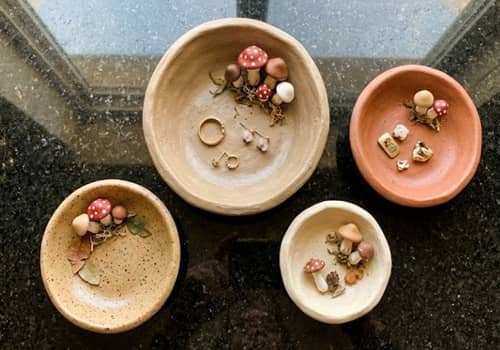
This idea combines a miniature bowl with whimsical woodland styling. It can even double as a tiny air dry clay trinket holder for rings, beads, or small keepsakes.
Begin by rolling a clay ball about the size of a golf ball.
Flatten it gently.
Place the clay circle over a small measuring spoon or condiment cup.
Press lightly so the clay forms a shallow bowl shape.
Leave it there for about 30 minutes until the clay begins holding its form.
While waiting, create mushroom decorations.
Roll several pea-sized clay balls.
Shape each into tiny stems.
Create mushroom caps by flattening small balls into domes.
Attach caps to stems using a drop of water.
Once partially dry, attach two or three mushrooms around the bowl rim.
Allow everything to dry fully.
Paint the bowl in earthy cream, warm beige, or soft terracotta.
Paint mushrooms in muted red, dusty orange, or sage green. Avoid bright colors. The softer tones feel more collected and less toy-like.
A light brown wash over the entire bowl adds depth and makes it resemble aged ceramics jewelry dish pieces often found in artisan markets.
These also make adorable alternatives to cute ring dish ideas and can be displayed beside a polymer clay jewelry holder collection.
4. Miniature Farmers Market Crate Signs
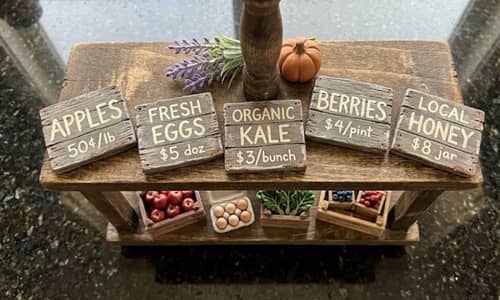
These tiny crate signage can unify your tiered tray with seasonal foliage, tiny pumpkins, or fake fruit without taking up much room.
Start by rolling your air dry clay to about ¼ inch thick.
Using a craft knife, cut small rectangles measuring approximately 3 inches long and 1½ inches tall.
Now make them look like wooden crates.
Use a ruler and a toothpick to press shallow horizontal plank lines across the surface. Add a few tiny dents and imperfections. Real wood isn’t perfectly smooth, so your clay shouldn’t be either.
At each corner, poke tiny holes using a pencil tip to imitate nail holes.
Let the pieces dry for about an hour. While they are still slightly soft, gently bend a few edges outward. Not too much. Just enough to create an aged appearance.
Allow the signs to dry completely.
Paint them with a medium brown base coat. Once dry, dry-brush lighter beige paint across the raised areas. This trick instantly creates a weathered wood effect.
Using a paint marker, write phrases such as:
- Apple Harvest
- Fresh Pears
- Market Day
- Pumpkin Patch
- Berry Stand
The lettering does not have to be perfect. Actually, slightly crooked writing looks more believable.
Place one sign leaning against a miniature basket and another near a candle. It creates a collected display instead of everything looking store-bought.
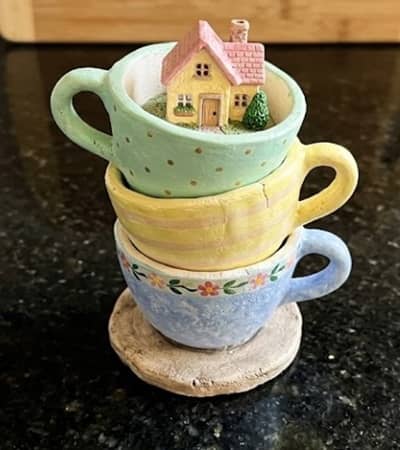
5. Stacked Teacup Cottage Shelf Sitters
This is one of those projects that people usually ask about because it looks much harder than it really is.
Begin by rolling three clay balls in different sizes.
Flatten each slightly.
Using your thumb, create shallow cup shapes. The largest becomes the bottom teacup, followed by a medium and small cup.
Create tiny saucers by flattening additional clay circles.
Let everything sit for 20 to 30 minutes. This helps the pieces firm up before assembly.
Attach each cup onto a saucer using a little water.
Stack the cups at slightly different angles. Don’t make them perfectly centered. A little wobble makes the design more charming.
Now create a tiny cottage.
Roll a marble-sized clay ball and shape it into a small rectangle.
Add a triangular roof.
Use a toothpick to draw a door and windows.
Attach the cottage inside the top teacup.
Allow the entire piece to dry thoroughly.
Paint the teacups in soft floral shades like dusty pink, pale mint, cream, or faded blue.
Paint the cottage white with a weathered brown roof.
The finished piece almost looks like something from a fairy garden, except much more practical for tiered trays.
There is something oddly satisfying about tiny houses sitting inside tiny cups.
6. Pressed Herb Keepsake Trays
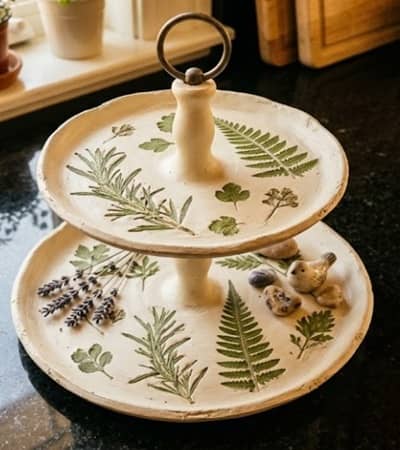
Many air dry clay tray ideas use stamps. This version uses actual herbs from the kitchen or garden.
Roll your clay to roughly ¼ inch thickness.
Place a small bowl upside down on the clay and cut around it using a craft knife.
Lift the clay circle carefully.
Now gather herbs such as rosemary, thyme, parsley, mint leaves, or small fern pieces.
Arrange the herbs across the clay surface.
Using a rolling pin, gently roll over them.
Peel the herbs away slowly.
You should now see detailed botanical impressions left behind.
It’s kinda amazing how much detail gets captured.
Place the clay circle over a shallow bowl.
Press lightly to create a tray shape.
Allow it to dry completely.
Once dry, sand any rough edges.
Paint the tray with matte white, warm cream, or pale stone colors.
To highlight the impressions, lightly brush diluted brown paint across the surface and immediately wipe away excess.
The wash settles into the recessed herb details and makes everything stand out beautifully.
These trays work wonderfully beside candles, miniature books, and other air dry clay crafts. They can even function as a tiny ceramics jewelry dish for rings and earrings.
7. Miniature Quilt Block Plaques
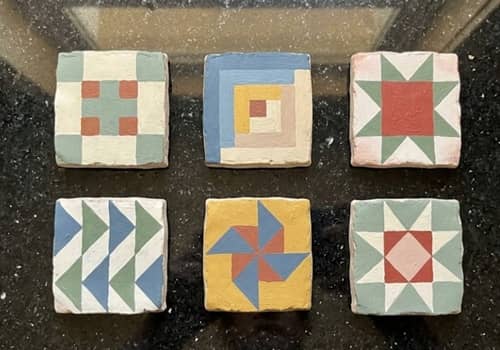
I stumbled onto this idea while looking at vintage quilts, and honestly, I haven’t seen many people turn the patterns into air dry clay tiered tray decor. That alone makes it feel fresh.
Roll your clay to about ¼ inch thick.
Using a ruler, cut squares measuring roughly 3 inches by 3 inches.
Smooth the edges with your fingertips.
Now divide the square into simple quilt sections using a toothpick. Draw diagonal lines, triangles, diamonds, or checkerboard shapes. Keep the design fairly bold because tiny details can disappear once painted.
Press the lines deep enough to remain visible after drying.
Near the top center, poke a small hanging hole if you’d like the plaque to hang from a tray handle.
Allow the clay to dry completely.
Paint each section a different color. Soft sage, faded navy, dusty rose, buttercream, and cream work beautifully together.
Once dry, lightly sand a few spots to create a worn heirloom appearance.
If some paint goes outside the lines, don’t panic. Old handmade pieces rarely look perfect.
Lean the finished plaque against a small candle, seasonal greenery, or other cottage-inspired decorations.
The result feels like a tiny piece of farmhouse history.
8. Faux Antique Measuring Scoops
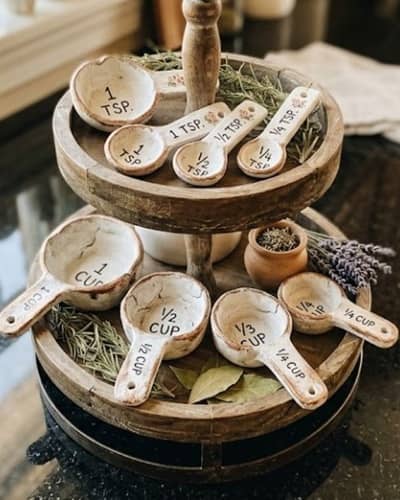
This project creates miniature decorative scoops that look like old kitchen collectibles. They pair especially well with farmhouse trays and baking-themed displays.
Start by rolling a clay ball about the size of a walnut.
Flatten it into a thick circle.
Press the circle into a tablespoon measuring spoon. This creates the scoop shape.
Carefully remove the clay.
Roll a thin clay rope about 2 inches long.
Attach it to the scoop as a handle using a small amount of water.
Smooth the connection with a damp fingertip.
Create two or three scoops in different sizes for visual interest.
Allow everything to dry for at least 24 hours.
Paint the scoops using antique white, soft gray, or aged bronze tones.
For extra character, lightly dry-brush brown paint around the edges and handle.
Use a fine-tip marker to write tiny words such as:
- Sugar
- Flour
- Cinnamon
- Harvest
The lettering does not need to be perfectly centered. Mine never are and they still look great.
Arrange the scoops so they overlap slightly on one tray tier. The layering makes the display feel intentional rather than random.
These little pieces almost look like treasures rescued from an old baking cupboard.
9. Seasonal Recipe Card Holders
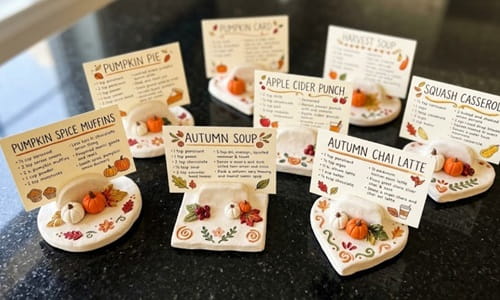
This idea is surprisingly practical because the finished pieces can actually hold miniature recipe cards, seasonal quotes, or holiday messages.
Roll your clay to about ⅜ inch thick.
Cut rectangles roughly 3 inches wide and 2 inches tall.
Round the corners slightly.
Allow the clay to firm up for about 30 minutes.
Using a craft knife, carefully cut a narrow slot across the top center. The slot should be deep enough to hold cardstock later.
Do not cut too close to the edge or the clay may crack.
Now decorate the front.
For fall, add tiny pumpkins.
For spring, create flowers.
For winter, make miniature pine trees.
For summer, try strawberries or lemons.
Create these embellishments separately and attach them using a little water.
Let the entire piece dry completely.
Paint everything in coordinating colors.
Once dry, slide a handwritten recipe card or seasonal message into the slot.
One thing people dont always realize is that tiered trays look more interesting when they include height variation. These holders help solve that problem instantly.
They also make thoughtful handmade gifts. Pair one with a favorite family recipe and suddenly it feels very personal.
You could even make matching versions alongside other air dry clay tray ideas or a tiny air dry clay trinket display.
10. Tiny Storybook Door Shelf Leaners
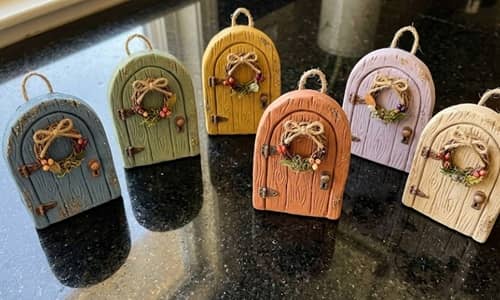
This might be my favorite project in the entire collection because it sparks curiosity. People immediately wonder where the tiny door leads.
Start by rolling air dry clay to roughly ¼ inch thickness.
Using a craft knife, cut a door shape about 4 inches tall and 2 inches wide. A simple rounded top works beautifully.
Gently smooth all edges with a damp finger.
Now add details.
Roll a very thin clay rope and attach it around the outer edge to create a door frame.
Create a tiny doorknob using a pea-sized clay ball.
Use a toothpick to lightly draw wood grain lines running vertically from top to bottom.
Want extra character?
Make a miniature wreath by twisting two tiny clay ropes together and forming a circle. Attach it near the top portion of the door.
Allow the piece to dry flat for 24 to 48 hours.
Paint the door in muted colors such as dusty teal, weathered cream, faded mustard, or sage green.
Use darker paint inside the engraved wood grain lines to make the texture stand out.
Once finished, simply lean the door against another object on your tiered tray.
The illusion works surprisingly well. It looks like a tiny hidden entrance tucked into the display.
These pair beautifully with cottage core gifts and other whimsical handmade accents.
11. Mini Berry Basket Trinket Cups
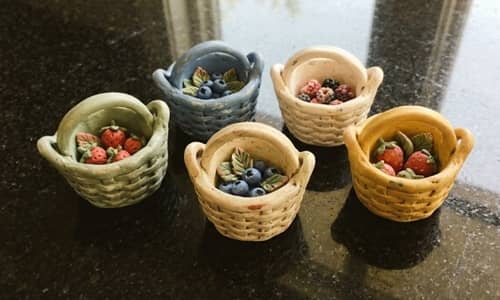
This project takes inspiration from old berry baskets found at roadside farm stands.
Roll a ball of clay slightly larger than a golf ball.
Shape it into a short cylinder.
Using your thumb, hollow out the center until you have a small cup.
Do not make the walls too thin. Around ¼ inch thickness works well.
Now use a ruler and toothpick to create a basket weave pattern.
Press horizontal lines around the entire cup.
Then add vertical lines crossing over them.
The texture instantly transforms the piece.
Create two tiny handles from rolled clay ropes.
Attach one on each side using a small amount of water.
Allow everything to dry completely.
Paint the basket in soft cream, weathered beige, pale blue, or faded green.
To create a vintage look, lightly brush darker paint into the weave texture and wipe away the excess.
Fill the finished basket with miniature faux strawberries, tiny wooden beads, dried flowers, or seasonal decorations.
It can even serve as a tiny air dry clay trinket holder for jewelry, buttons, or keepsakes.
The finished piece looks much more expensive than the materials used to make it.
12. Vintage Lace Impression Ring Dishes
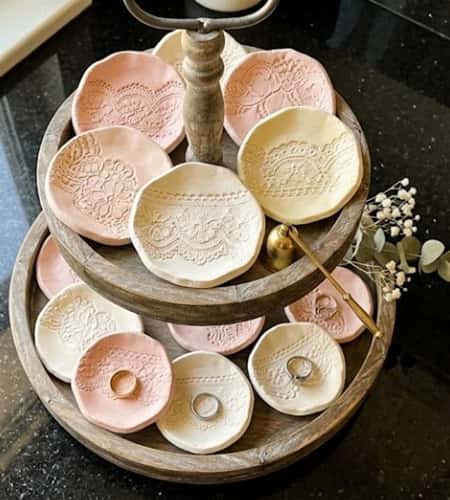
If you’re looking for something that feels elegant without requiring advanced skills, this project is a great place to start.
These miniature dishes are inspired by antique lace patterns and work beautifully as decorative tray fillers.
Roll your clay to approximately ¼ inch thickness.
Use a round cookie cutter or drinking glass to cut circles measuring around 3 inches across.
Place a clean piece of lace directly onto the clay surface.
Gently roll over the lace using a rolling pin.
Lift the lace carefully.
You should now see detailed impressions left behind.
Press each clay circle into a shallow bowl to create a dish shape.
Allow it to dry completely.
Once dry, lightly sand any rough edges.
Paint the dish in soft ivory, warm cream, dusty blush, or pale sage.
For added depth, apply a diluted brown wash and wipe most of it away. The paint settles into the lace pattern and highlights every detail.
These are wonderful alternatives to many cute ring dish ideas found online because every lace pattern creates a completely unique result.
They can also complement a polymer clay jewelry holder collection or function as a small ceramics jewelry dish style accent on your tray.
One dish is lovely. Three grouped together looks even better.
Final Thoughts
One thing I’ve learned from making air dry clay tiered tray decor is that the projects people remember most are rarely the most perfect ones.
Tiny fingerprints, slightly uneven paint, and little imperfections often make handmade pieces feel more authentic.
Air dry clay also gives you the freedom to create decorations that match your home exactly instead of settling for whatever happens to be available in stores.
Try repeating a favorite shape in different seasons rather than constantly inventing new designs.
A simple tray, a few versatile clay accents, and some thoughtful color changes can create dozens of completely different displays throughout the year while keeping your decorating budget surprisingly small.