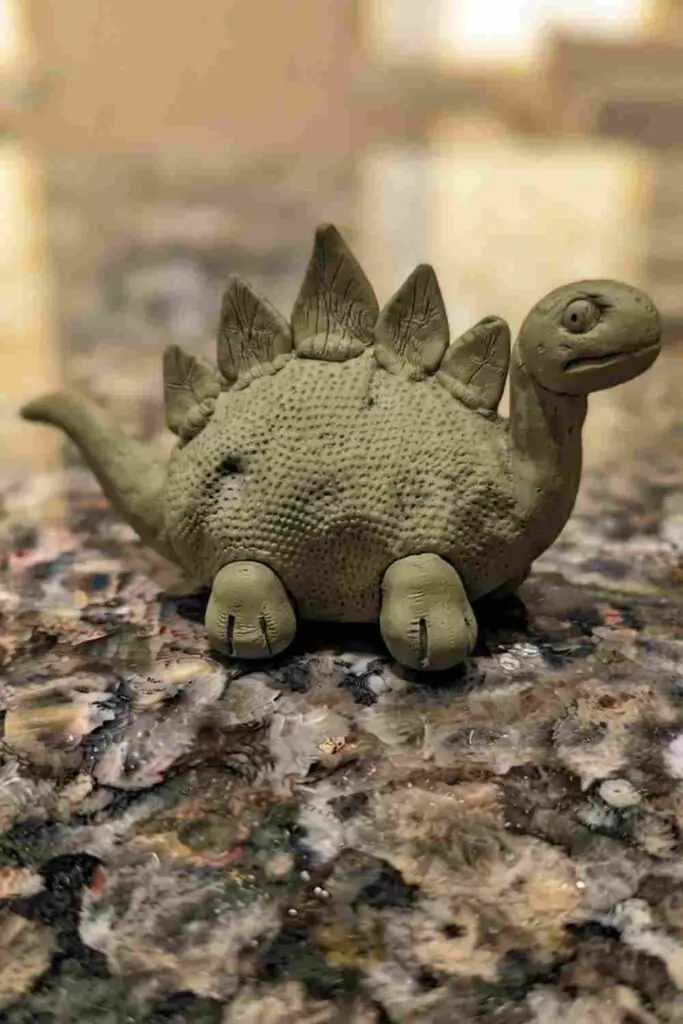
This clay dinosaur craft is for anyone who wants a dinosaur that looks handmade in the best way: a little lumpy, a little charming, and full of personality.
We will use air dry clay, so there is no baking, no kiln, and no complicated tools.
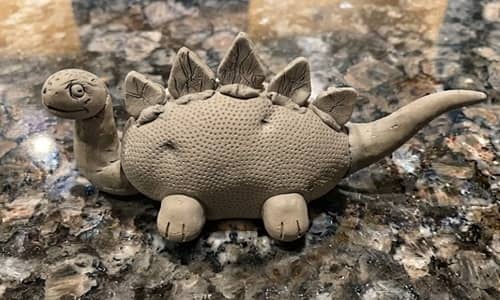
The twist is a fossil-textured back plate, like your tiny dinosaur wandered out of a kid-made museum display.
Ready to make one that actually looks like yours, not a copy of every other dinosaur tutorial online?
Choose Your Clay Type For This Dinosaur Clay Craft
Air Dry Clay | Polymer Clay
Affiliate Disclaimer: Some of the links in this post may be affiliate links, which means I may earn a small commission if you choose to make a purchase through them – at no extra cost to you. I only share products that genuinely fit this project and can help make your ceramic mug clay craft process easier and smoother. Your support helps keep ideas like this coming.
Why This Clay Dinosaur Craft Feels Different
Most dinosaur crafts are either too perfect or too cartoon-flat.
This one sits in the middle. It looks like a tiny prehistoric creature, but it keeps that sweet handmade wobble that makes a clay animal craft feel alive.
The dinosaur we are making is a small, chunky, side-facing dino with a long tail, rounded belly, short legs, and textured fossil plates along the back.
Think friendly stegosaurus, but not scientifically strict. We are borrowing from dinosaur pictures, dinosaur Illustration, and playful museum-style paleo art, then making it simple enough for beginners.
Also, this is an air dry clay craft, which means patience matters more than fancy equipment. Your hands are the main tool here, and honestly, they does most of the work.
Materials Needed To Make Clay Dinosaur Craft
| Material | Why You Need It |
| Air dry clay | The main material for the dinosaur body, legs, tail, head, and plates. |
| Small bowl of water | Helps smooth cracks and join pieces. |
| Toothpick or wooden skewer | For texture, eyes, nostrils, and fossil-line details. |
| Plastic knife or butter knife | For cutting clay pieces and shaping plates. |
| Rolling pin or smooth bottle | For flattening small clay slabs. |
| Acrylic paint | Optional, for color after drying. |
| Small paintbrush | For painting details and soft shadows. |
| Clear craft varnish | Optional, to seal the finished dinosaur. |
| Shiny granite surface or mat | Good clean background for photographing the craft. |
If your clay feels sticky, let it sit uncovered for 3 to 5 minutes.
If it feels dry, touch it with damp fingers and knead slowly. Not too much water, though.
Air dry clay can get mushy fast, and then the dinosaur starts acting like melted mashed potato.
Before You Start: Choose the Dinosaur Shape
For this clay dinosaur craft, we will make a beginner-friendly mini dinosaur with:
| Part | Shape |
| Body | Oval bean shape |
| Head | Small rounded oval |
| Neck | Short thick bridge |
| Tail | Tapered cone |
| Legs | Four short rounded stumps |
| Back plates | Uneven fossil-like triangles |
| Face | Tiny eyes, nostrils, and soft smile |
Step 1: Make the Main Body
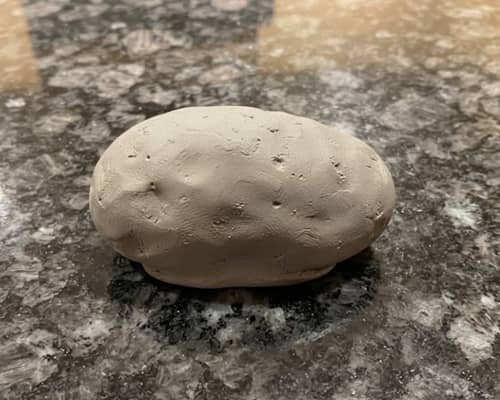
Start with a piece of air dry clay about the size of a large walnut. Roll it between your palms until it becomes a smooth ball.
Then gently press and roll it into an oval bean shape, about 2.5 to 3 inches long.
Press the bottom lightly against your table so it sits flat.
Do not squash it too much. You want the dinosaur to have a rounded belly, not look like a pancake.
Smooth the surface with a damp fingertip, especially if small cracks appear.
Now pinch one end just a tiny bit. This pinched end will help the tail attach later. The other end stays round because the neck and head will go there.
Here is the little secret: leave one side slightly higher than the other. It gives the dinosaur a handmade, walking-forward feel. Perfect things can look boring sometimes, right?
Step 2: Add Four Short Legs
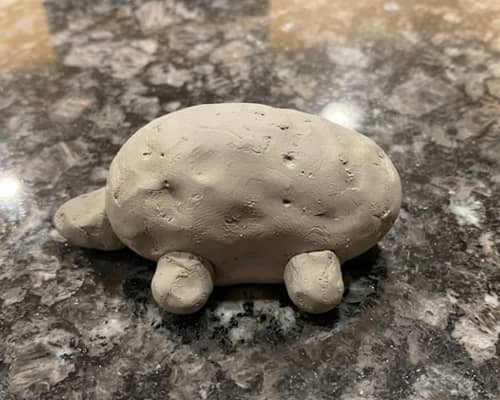
Pinch off four small clay pieces, each about the size of a blueberry.
Roll each piece into a short cylinder. They should look like tiny rounded pegs, not skinny sticks.
Place two legs on one side of the body and two legs on the other side.
Because this is a top angle craft, make sure the legs peek out from under the body. Press each leg gently into the underside of the oval body.
To attach them strongly, use the toothpick to scratch small lines where the leg touches the body.
Scratch the top of each leg too. Add a tiny dab of water, then press together.
This is called scoring and slipping, but no need to make it sound fancy. It just helps clay grip clay.
After attaching, blend the top edge of each leg into the body using a damp fingertip.
The dinosaur should now stand low and chunky. If it wobbles, press the feet gently against the granite or table to flatten them.
This part might look silly at first, but trust the blob. Many prehistoric clay creatures begins as suspicious little potatoes.
Step 3: Shape and Attach the Tail
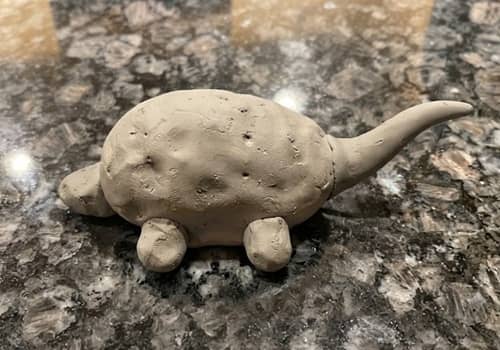
Take a piece of clay about the size of a grape. Roll it into a cone shape by pressing one side more than the other.
One end should be thick, and the other end should taper into a soft point.
Curve the tail slightly, like a sleepy comma. Do not make it too thin at the tip or it may crack while drying. A chunky tail is stronger and looks cuter.
Scratch the thick end of the tail and scratch the pinched back end of the body. Add a tiny bit of water. Press the tail onto the body and blend the seam with your finger.
Now look from above. The tail should flow naturally from the body, not stick out like a glued-on carrot.
If needed, support the tail with a tiny scrap of clay underneath until it firms up. You can remove or blend that support later.
The tail gives the whole clay craft movement. Suddenly it is not just a lump. It is a creature, maybe one of those gentle extinct animals who only wants snacks.
Step 4: Build the Neck and Head
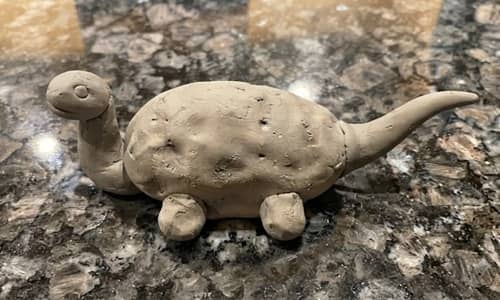
Roll a small piece of clay into a short thick tube for the neck. It should be about the size of a pea stretched slightly longer.
Attach it to the front of the body using the same scratch-and-water method.
For the head, roll another piece of clay into a small oval. Keep it rounded, not flat. Press one side very gently to make a soft snout area.
Attach the head to the neck. Blend the seam carefully with a damp fingertip or the side of a toothpick.
Do not overwork it, because too much water can make the head slide around.
Tilt the head just a little to one side. That tiny angle adds personality, like the dinosaur heard someone open a biscuit tin. Cute, yes. Scientifically dramatic, also yes.
If the neck droops, place a small rolled tissue or clay scrap under the chin for 15-20 minutes. Remove it once the clay has firmed slightly.
Step 5: Add the Fossil-Back Plates
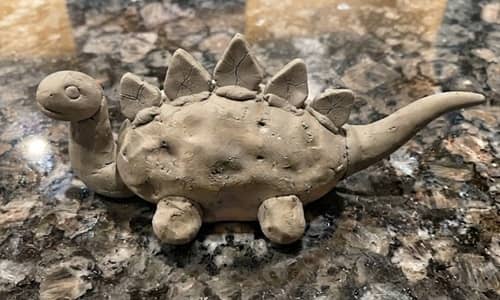
This is the special twist. Instead of smooth cartoon spikes, we will make back plates that look like tiny fossil shards.
Roll a small piece of air dry clay into a thin slab, about 2 to 3 mm thick.
Use a plastic knife to cut 5 to 7 uneven triangles or rounded triangles. Make some tall and some short. Real handmade charm needs variation.
Before attaching, press a toothpick lightly into each plate to make lines.
These can look like leaf veins, fossil cracks, or bone marks. Keep the lines shallow. Deep cuts can split the clay as it dries.
Start placing the plates from the neck down the back toward the tail.
Use the largest plate near the middle of the back and smaller ones near the head and tail. Scratch the base of each plate and the dinosaur back, add a tiny touch of water, then press gently.
Blend just the bottom of each plate into the body. Do not smooth the whole plate flat. You want those little fossil edges to stay visible.
This is where the clay dinosaur craft starts to stand out. It has that sztuka I rękodzieło feeling – art and handcraft together, slightly raw, not factory neat.
Step 5.1: Make the Face
Use the pointed end of a toothpick to poke two small eye holes on the head. Keep them close to the top-front area, but not too close together. Then poke two tiny nostrils on the snout.
For a smile, use the side of the toothpick, not the sharp point.
Press a small curved line under the snout. Keep it shallow. A huge smile can look strange from a top angle.
If you want a more expressive dinosaur, add two tiny clay balls above the eyes as brow bumps.
Press them lightly and blend only the bottom edge. This gives the face a curious look.
You can also make little cheek dots with the toothpick. But stop before the face gets too crowded. Tiny crafts need breathing room.
At this stage, compare your dinosaur with simple dinosaur pictures or a friendly dinosaur Illustration. Not to copy exactly, just to check if the face reads as dinosaur-ish.
Step 6: Add Skin Texture Without Making It Messy
Texture makes air dry clay look more finished, but beginners often overdo it. Use a toothpick, skewer, or the dull end of a paintbrush to add tiny marks.
Add small dots along the sides of the body. Add a few short lines near the tail.
Press gentle crescent marks on the legs to suggest toes. For toes, three tiny lines per foot is enough.
On the belly area, leave the clay smoother. This contrast makes the dotted back and fossil plates stand out more.
If one mark looks too deep, rub it softly with a damp finger. If a plate bends, nudge it upright.
If a leg looks uneven, good. This is an amateur-style cute Clay dinosaur, not a plastic toy.
The goal is controlled imperfection. It should look like a real person made it, because they did.
Step 7: Smooth Cracks and Strengthen Joins
Before drying, inspect the dinosaur carefully. Look at the neck, tail, leg joints, and the base of each back plate. These are the places most likely to crack.
Dip your finger in water, then wipe most of it off.
Your finger should be damp, not dripping. Smooth around each seam in small circles.
If there is a gap, press a tiny noodle of clay into the crack and blend it.
For the back plates, add a very thin clay bead at the base of each plate if they feel loose.
Blend the bead into the body. This creates a stronger support without ruining the fossil-shard look.
Do not keep touching the whole dinosaur forever. Air dry clay gets weaker when it is over-wet.
Once it looks joined and stable, leave it alone. Seriously, step away from the tiny dino.
This step is not glamorous, but it saves the project. A strong air dry clay join is the difference between “aww” and “why did its head fall off?”
Step 8: Let the Dinosaur Dry Properly
Move the dinosaur onto a piece of parchment paper, cardboard, or a clean dry spot where it can stay untouched.
Drying time depends on clay brand, room temperature, and thickness. A small dinosaur usually needs 24 to 48 hours.
Turn it gently after the top feels firm, usually after 8 to 12 hours. This helps the bottom dry too.
Be careful with the back plates when turning it. Support the body, not the tail.
Do not put it in direct sunlight, near a heater, or under a fan blasting air. Fast drying can cause cracks. Slow drying is boring, but it works better.
If a tiny crack appears, wait until the clay is almost dry. Then press in a little fresh clay mixed with a drop of water. Smooth it and let it dry again.
Patience is part of the clay art project, annoying as that sounds. The dinosaur is doing quiet chemistry while you wait.
Step 9: Paint the Base Color
Once the dinosaur is fully dry, paint a thin base coat. Do not use thick paint straight away. Thin coats look smoother and do not hide the texture.
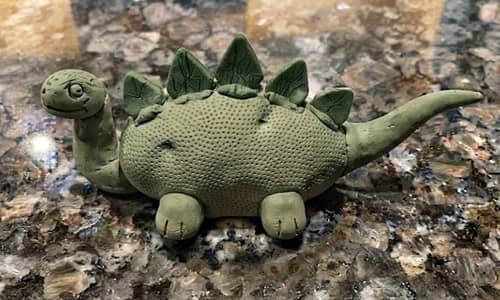
Choose one main color. Soft moss green, dusty blue, clay orange, warm gray, or muted lavender all work well.
For a more fossil-inspired look, use sandy beige or stone gray.
Paint the whole dinosaur except the bottom. Let the first coat dry, then add a second thin coat if needed.
Hold the dinosaur gently by the body, not by the plates or tail.
If your brush leaves streaks, that is okay. The handmade look is part of the charm. This clay dinosaur craft should not look like it came from a toy shop shelf.
A smart color trick: paint the plates slightly darker than the body. This makes them pop in top-angle photos.
Step 10: Add Fossil Wash and Tiny Details
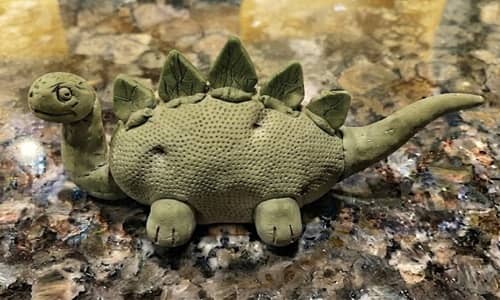
Now make the fossil texture stand out. Mix a tiny bit of brown or dark gray acrylic paint with water. It should look like weak tea.
Brush it over the back plates, side dots, toe lines, and face details.
Quickly wipe the raised areas with a tissue or dry brush.
The darker color will stay inside the carved lines. This makes the dinosaur look aged without needing advanced painting skills.
Paint the eyes with tiny black dots if you want. Add a cream or pale yellow dry-brush stroke along the top of the plates.
You can also add two soft blush dots on the cheeks, but make them muted.
Bright pink can make the dinosaur look like a cupcake mascot, unless that is the vibe you want.
This is where paleo art meets kitchen-table craft. It is not museum accurate, but it hints at bones, stone, and extinct animals in a playful way.
Step 11: Seal and Finish the Dinosaur
After the paint is dry, you can seal the dinosaur with clear craft varnish.
Use matte varnish for a soft natural look or satin varnish if you want a slight shine. Avoid heavy glossy varnish unless you love that candy-coated style.
Brush a thin coat over the dinosaur. Do not flood the cracks or the face details. Let it dry according to the varnish instructions.
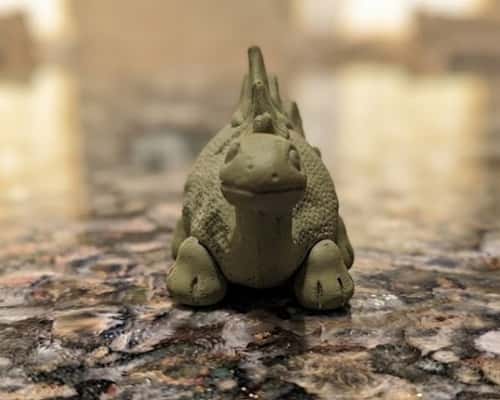
Once sealed, place the dinosaur on the shiny granite and check it from above.
If one side looks plain, add a few extra dots with paint. If the plates look too dark, dry-brush a lighter color over the edges.
You now have a finished clay dinosaur craft that looks like a tiny handmade fossil creature. It is simple, but not basic. It has a story.
Beginner Tips That Prevent Common Problems
Air dry clay is friendly, but it has moods. These tips will help your dinosaur survive drying, painting, and handling.
| Problem | What Causes It | Easy Fix |
| Cracks near tail | Tail attached without scoring | Scratch both surfaces, add water, blend the seam. |
| Head droops | Neck is too thin or wet | Make the neck thicker and support the chin while firming. |
| Plates fall off | Bases are too small | Add a tiny clay bead at each plate base. |
| Paint hides texture | Paint is too thick | Use thin coats and build color slowly. |
| Dinosaur wobbles | Legs are uneven | Press feet flat before drying. |
| Clay gets mushy | Too much water | Use barely damp fingers, not wet ones. |
Final Thoughts
The best part of this air dry clay dinosaur is that it teaches more than shaping a cute figure.
You learn how weight, seams, texture, and drying time affect a small sculpture.
That is real craft knowledge, not just decoration.
Dinosaurs are also a fun doorway into curiosity: once you make one, you start noticing body shapes in fossils, museum models, dinosaur pictures, and even old-school dinosaur Illustration styles.
Also, I would say, if your clay craft turns out to be imperfect…keep the imperfections.
They show the hand behind the work, and that is what makes sztuka I rękodzieło feel personal. A tiny uneven dinosaur can still carry a big prehistoric mood.