There is something oddly satisfying about making a bird from a lump of clay and watching it slowly turn into a character with personality.
This clay turkey craft is one of those projects. It isn’t supposed to look factory-made. In fact, the little dents, uneven edges, and tiny fingerprints are what make it special.
If you’ve ever wondered how to make a turkey out of clay, this tutorial breaks everything down into simple steps that even beginners can follow.
I made this project intentionally rustic so it feels homemade and warm, making it perfect as an air dry clay Thanksgiving craft project, classroom activities, family craft time, and even fun turkey DIY crafts for kids.
What Makes This Clay Turkey Different?
Most clay turkeys try to look perfect.
This one doesn’t.
Instead, we’re creating a slightly chunky turkey with visible feather texture, handmade charm, and a cozy harvest-season feel. Think of it as a cross between a woodland figurine and a cute clay bird sculpture.
The finished turkey will have:
- Rounded body
- Short wings
- Layered tail feathers
- Small beak
- Wobbly handmade character
- Natural air-dry clay texture
And honestly, those little imperfections is what gives it life.
Supplies Needed To Make Clay Turkey
- 250 to 300 grams air dry clay
- Small bowl of water
- Clay sculpting tool or butter knife
- Toothpick
- Soft paintbrush
- Acrylic paints
- Brown
- Cream
- Orange
- Red
- Black
- Paper towel
- Smooth work surface
Optional:
- Rolling pin
- Clay dotting tool
- Matte sealer
Step 1: Build The Main Turkey Body
Start by taking a large chunk of air dry clay and rolling it between your palms.
Don’t rush this part.
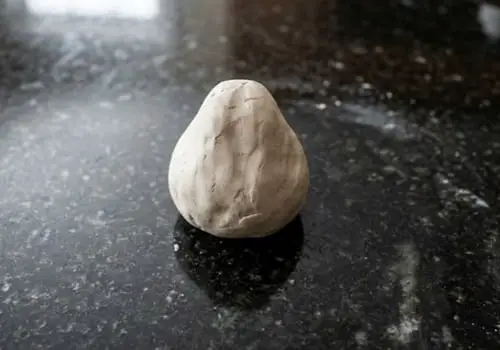
Keep rolling until you have a smooth ball about the size of a small orange. Once it feels fairly round, place it on your work surface and gently press one side.
You are not flattening it completely.
You’re creating a stable bottom so the turkey can sit upright later.
Now use both hands and slightly pull one end forward. This creates a subtle chest shape. The body should resemble a fat teardrop laying upright.
Look closely.
The front should be slightly fuller than the back because that’s where the turkey’s face will eventually sit.
If cracks appear, dip your finger in water and smooth them gently.
Many beginners skip this step and regret it later because cracks grow as clay dries.
At this stage, the sculpture may look boring. That’s normal. Every cute clay bird starts as a simple blob.
Step 2: Shape The Head Directly From The Body
Instead of making a separate head, we’re going to build it into the body.
This makes the turkey stronger.
Take a small amount of clay about the size of a grape.
Roll it into a ball.
Lightly scratch the upper front portion of the body using a toothpick. Add a tiny bit of water and press the clay ball onto that area.
Blend the edges slowly.
Really slowly.
Use your fingers to push the seam away until the head looks naturally connected to the body.
If you can still see a line, keep blending.
Now pinch the front of the head very gently to create a tiny face area where the beak will go later.
The turkey is starting to look like something now.
Not amazing yet, but trust the process.
Step 3: Create Stubby Little Wings
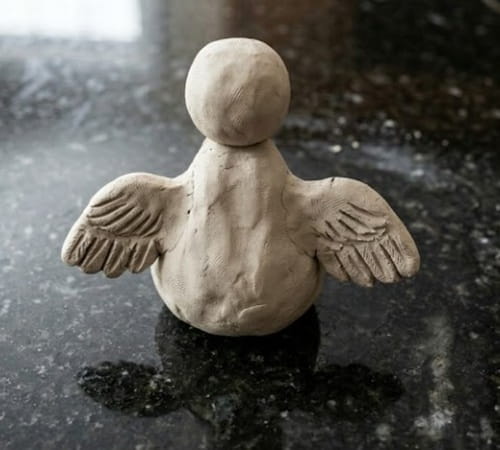
Roll two clay pieces into short oval shapes.
Think chicken nugget size.
Those will become the wings.
Lightly flatten them using your fingers.
Attach one wing to each side of the turkey’s body. Use the same score-and-slip method:
- Scratch both surfaces.
- Add a little water.
- Press together.
- Blend edges.
Once attached, use a toothpick to draw shallow feather lines.
Don’t make perfect lines.
Nature isn’t perfectly symmetrical and neither are handmade crafts.
Mine looked slightly crooked and it actually looked better because of it.
Add 4 to 6 feather grooves on each wing.
The turkey should now have a recognizable silhouette.
Step 4: Build The Layered Tail Feathers
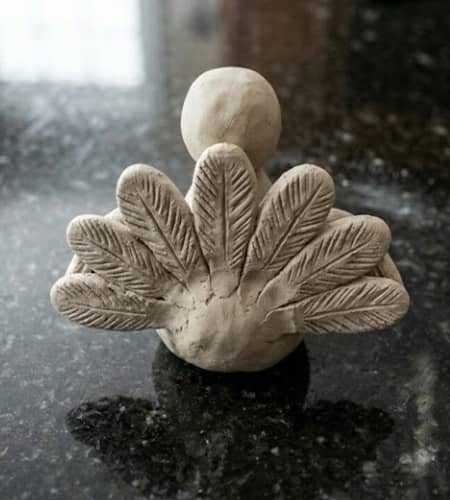
This is where the magic starts happening.
Take a chunk of clay and roll it flat to roughly ¼ inch thick.
Using your clay tool or butter knife, cut out five feather shapes.
Don’t worry if they’re slightly different sizes.
Actually, that’s preferable.
Perfectly identical feathers sometimes look less natural.
Each feather should have:
- Rounded top
- Narrow bottom
- Slightly curved sides
Use a toothpick and lightly score texture lines from bottom to top.
Now arrange them behind the turkey body like a fan.
Start with the center feather.
Then add two feathers on each side.
Overlap them slightly.
The overlap creates depth and makes the project stand out from many basic kids turkey crafts that use flat feather designs.
Press the feathers firmly into the back of the turkey and blend attachment points.
For extra strength, hide a small rolled clay strip behind the connection area.
Nobody will see it later.
But it helps a lot.
Step 5: Add Feather Texture Everywhere

This is the step that transforms a lump of clay into a character.
Grab a toothpick.
Working section by section, add tiny feather marks across the body.
Not deep scratches.
Just enough texture to catch paint later.
Use short curved strokes.
Vary the direction slightly.
Some people rush through texture work and then wonder why their sculpture feels flat. Texture adds shadows, depth, and personality.
Work around:
- Chest
- Back
- Wing edges
- Lower body
Avoid the face area.
Leave that smoother.
A little contrast helps the details stand out later.
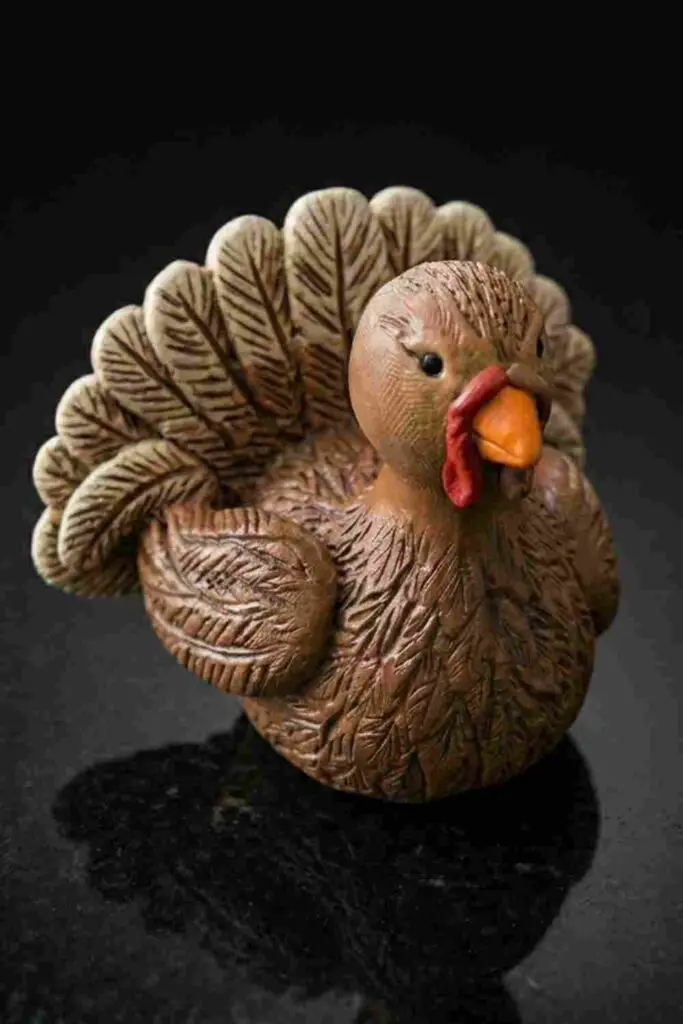
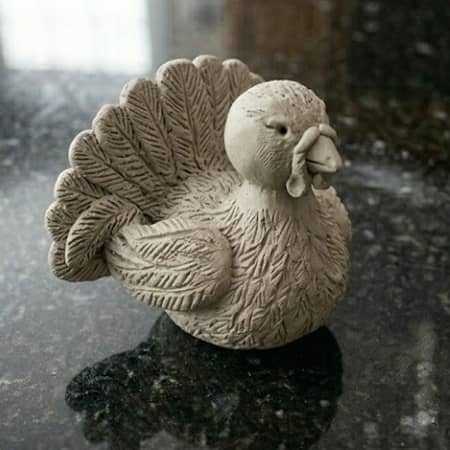
At this point, your turkey should already feel charming. It dont need paint yet to have personality.
The overall shape should closely resemble the final turkey shown in the featured image, just without colors, eyes, beak, and decorative details.
Step 6: Add The Beak

Now we’re getting into the tiny details that make people smile.
Pinch off a very small piece of air dry clay. Roll it into a short cone shape about the size of a pea.
Don’t make it too long.
A giant beak can accidentally make your turkey look like a parrot.
Attach the cone to the center of the face using a tiny amount of water. Gently flatten the base where it meets the head so it looks naturally attached.
Next, use your fingertip to slightly curve the tip downward.
That tiny bend changes everything.
Suddenly the turkey starts looking expressive instead of generic.
Take a step back and look at it from different angles. If the beak feels oversized, trim it now while the clay is still soft.
Step 7: Create The Wattle And Facial Details
Turkeys have a funny little feature hanging near the beak called a wattle.
And honestly, it’s one of the reasons they’re so recognizable.
Roll a tiny snake-like piece of clay. Keep it thin.
Attach it beside and slightly below the beak. Let it drape naturally rather than forcing a perfect shape.
A little wobble looks more realistic.
Now use a dotting tool, pencil tip, or toothpick to create two shallow eye sockets.
Don’t push too deep.
The eyes should sit slightly above the beak.
The turkey finally has a face now.
Its looking much more alive than it did twenty minutes ago.
Let all the details settle for a few minutes before handling the sculpture again.
Step 8: Refine The Tail Feathers
Most tutorials stop once the feathers are attached.
We’re going further.
This extra step is what helps this clay turkey craft stand out from hundreds of similar projects online.
Look closely at each tail feather.
Using a toothpick, add secondary texture lines branching outward from the center groove.
Think of real feather strands.
Some can be longer.
Others shorter.
A few uneven marks are completely fine.
Actually, they help.
You can also gently bend one or two feather tips forward or sideways before the clay dries. This creates movement and prevents the tail from looking stiff.
One feather leaning slightly left while another leans slightly right adds character.
Nature rarely repeats itself perfectly.
Step 9: Allow The Clay To Dry Completely
This might be the least exciting step.
It’s also one of the most important.
Place your turkey somewhere flat and well ventilated.
Leave it alone.
Seriously.
Don’t poke it every hour.
Don’t test whether it’s dry by squeezing it.
Most air dry clay Thanksgiving crafts fail because people rush the drying process.
Depending on your clay brand and local humidity, drying may take anywhere from 24 to 72 hours.
Turn the turkey carefully after the first day so the underside can dry evenly.
If small cracks appear, don’t panic.
Tiny cracks are common with air dry clay animal bird projects.
Fill them using a little fresh clay mixed with water and allow that area to dry again.
By the time drying is complete, the sculpture should feel lighter and harder.
And yes, it may look slightly different than when it was wet.
That’s normal.
Step 10: Paint The Turkey
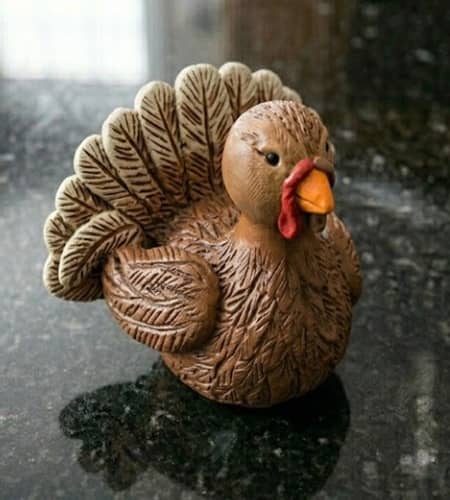
This is where everything comes together.
Start with a medium brown acrylic paint and cover most of the body.
Work slowly into the textured areas.
Don’t flood the grooves.
You want those feather details to remain visible.
Allow the brown paint to dry completely.
Next:
- Paint the beak orange.
- Paint the wattle red.
- Add cream or tan accents to portions of the tail feathers.
- Lightly dry-brush darker brown onto feather texture for depth.
Dry brushing is easy.
Put a tiny amount of paint on your brush.
Wipe most of it off onto a paper towel.
Then lightly sweep the brush across raised surfaces.
The texture instantly becomes more visible.
Finally, add two small black dots for eyes.
Suddenly your turkey goes from sculpture to personality.
And that transformation never gets old.
Optional Finishing Touches
Want to make your turkey even more unique?
Try one of these ideas:
Rustic Harvest Turkey
Dust a tiny amount of dark brown paint into feather grooves for an aged farmhouse look.
Woodland Turkey
Glue the finished turkey onto a small wood slice base.
Mini Thanksgiving Place Card Holder
Insert a wire loop into the back before the clay fully dries.
Guests can slide name cards into the loop.
Pumpkin Patch Turkey
Add a tiny clay pumpkin beside the turkey after painting.
These little details help transform the project from a simple craft into seasonal decor.
Why This Clay Turkey Project Works So Well For Beginners
A lot of people search for how to make a turkey out of clay and immediately find tutorials loaded with complicated sculpting techniques.
This project avoids that.
The shapes are basic.
The parts are forgiving.
And if one feather ends up larger than another, nobody will notice.
That’s the beauty of handmade creations.
It doesn’t demand perfection.
It rewards creativity.
This is also why it’s a favorite among families looking for kids turkey crafts, classroom activities, and simple turkey DIY crafts for kids during the holiday season.
Even adults who have never touched clay before can successfully complete it.
Creative Variations To Try Later
Once you’ve made your first turkey, experiment a little.
You might create:
- Sleeping turkey figurine
- Baby turkey chick
- Cartoon turkey
- Farm-themed turkey
- Thanksgiving centerpiece turkey
- Ornament-sized turkey
- Magnet-backed turkey
- Name-tag turkey
- Woodland clay bird collection featuring turkey, owl, and cardinal
These variations build confidence while helping you explore more advanced sculpting skills.
And honestly, some of the weirdest versions often end up being favorites.
Final Thoughts
One thing I love about projects like this is how they quietly teach observation.
When making a turkey from clay, you start noticing things most people overlook – the layering of feathers, the unusual shape of the beak, even how texture creates the illusion of movement.
That’s why thanksgiving air dry clay ideas are more than just seasonal decorations. They encourage creativity, patience, and problem-solving in a hands-on way.
The next time you finish a clay turkey craft, don’t focus on whether it looks store-bought. Focus on whether it has character.
A perfectly smooth sculpture can be forgotten. A slightly lopsided handmade turkey with personality? People tend to remember those for years.