Cornstarch clay animals have a charm that store-bought crafts simply can’t match.
Maybe it’s the slightly wonky ears. Maybe it’s the fingerprints left behind in the soft clay.
Either way, kids seem to adore making tiny animal friends from homemade clay.
In this list, I wanted to move beyond the usual dog and cat ideas and share animal creations that feel playful, imaginative, and surprisingly easy.
These cornstarch clay animal crafts are beginner-friendly, budget-friendly, and perfect for rainy afternoons, classroom projects, or fun kid activites at home.
Grab your clay, clear a small workspace, and let’s make some cute clay creatures that are full of personality.
1. Sleepy Snail With Swirl Shell
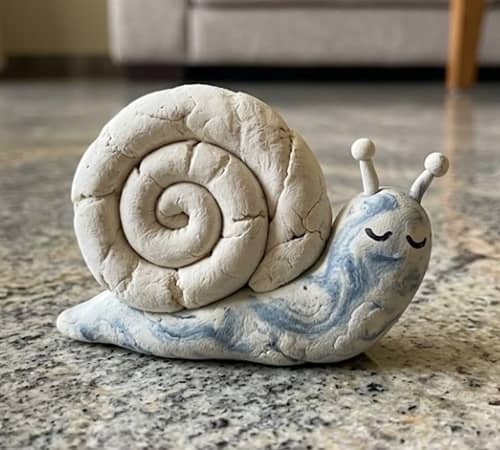
A snail might sound simple, but this version has a sleepy face and a giant spiral shell that makes it look adorable.
Start with a golf-ball-sized piece of cornstarch clay. Roll about two-thirds of it into a thick rope roughly 5 inches long. Don’t worry if it ain’t perfectly smooth.
Curl one end inward to create a large spiral shell. Press gently so the spiral stays in place.
Take the remaining clay and form a short oval shape for the body. Flatten the bottom slightly so it can stand on its own.
Attach the shell onto the back of the body. Blend the connection with your finger so it looks like one piece.
Roll two tiny balls and place them at the front for eye stalks. Stretch them upward slightly.
Instead of open eyes, use a toothpick to press two curved lines that resemble closed sleepy eyes.
Add a tiny smile underneath.
Want extra texture? Press the tip of a pencil lightly around the shell spiral.
Allow the clay animal to dry completely for 24 to 48 hours. Once dry, paint the shell soft lavender, pale blue, or mint green. Keep the body a lighter shade.
The finished result looks gentle and cozy, almost like it needs a blanket.
2. Balloon-Belly Penguin
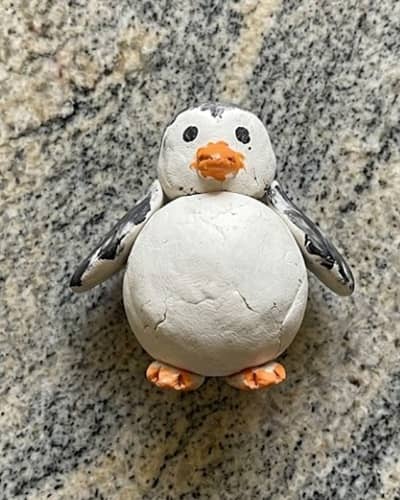
This little penguin has an oversized round tummy that gives it a funny cartoon look.
Roll a large ball from cornstarch clay. This becomes the body.
Gently stretch the top into a smaller rounded head without separating the pieces. Think snowman, but connected.
Flatten the bottom slightly.
To make the white belly section, roll a thin oval of clay and press it onto the front of the body.
Now make two tiny teardrop shapes for wings. Attach one to each side.
For the feet, roll two tiny orange-colored clay pieces if your clay is pre-colored, or paint later.
Press them onto the bottom front.
Create a small triangle beak and attach it carefully.
Use a toothpick to mark eyes. If kids prefer, tiny black paint dots can be added after drying.
Here’s the fun part. Make the belly slightly larger than normal. It looks silly, but thats what makes it memorable.
Let the penguin dry completely before painting. Use black, white, and orange paint while keeping brush strokes slightly imperfect for a handmade look.
These cornstarch clay toys often become favorite desk decorations.
3. Strawberry-Loving Hedgehog
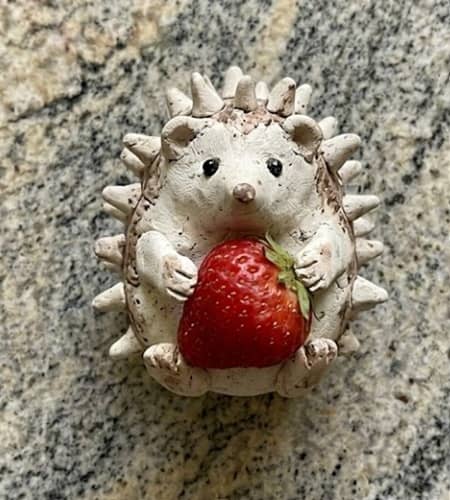
Most clay animals show hedgehogs carrying apples. Let’s switch things up and give ours a giant strawberry.
Begin by rolling an egg-shaped piece of homemade clay.
Place it on the table and gently flatten one side. This becomes the bottom.
Pinch one end slightly to form the nose.
Roll four tiny cylinder shapes for legs and attach them underneath.
Now create dozens of tiny clay spikes. Don’t panic. They don’t need to match.
Roll tiny cones and press them onto the back one by one. The unevenness actually makes the hedgehog look more realistic.
Form a strawberry from a separate piece of clay. Make a rounded triangle shape.
Add a tiny leafy top.
Position the strawberry under one front paw as though the hedgehog discovered a treasure.
To make features for the nose and eyes, use a toothpick.
Leave the project to dry fully.
Paint the spikes warm brown. Paint the strawberry bright red with tiny yellow seed dots.
Kids usually spend more time naming this little guy than making him.
This project works especially well for younger children because the individual steps feel manageable.
4. Wobbly Giraffe With Patchwork Spots
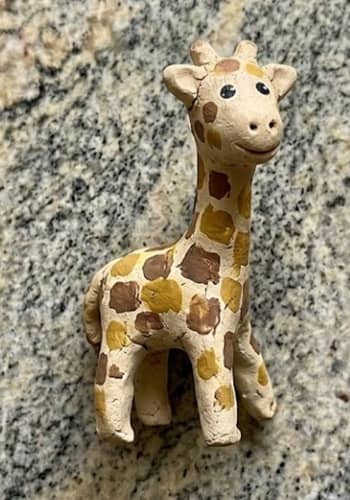
Some giraffes look elegant. This one looks like it just learned how to stand up, and kids absolutely love that.
Start with a large ball of cornstarch clay and shape it into a chunky oval body.
Roll four thick legs. Keep them shorter than a real giraffe’s legs. The slightly goofy proportions are part of the charm.
Attach the legs underneath the body. Press firmly and smooth the joins with your finger.
For the neck, roll a thick cylinder about 3 inches long. Don’t make it too thin or it may sag before drying.
Attach the neck to the body.
Create a small oval head and connect it to the top of the neck.
Roll two tiny horns and attach them on top.
Make small ears using flattened teardrop shapes.
Now for the unique twist. Instead of ordinary spots, create tiny clay patches and stick them randomly across the giraffe. Some can be circles. Others can be squares or odd little blobs.
The mixed shapes make the animal look like a patchwork toy stitched together from scraps.
Use a toothpick to create nostrils and a smiling mouth.
Let the entire piece dry for at least 24 to 48 hours.
Paint the body cream or pale yellow. Paint the patchwork spots in several shades of brown. Some spots can even be orange. There isn’t really a wrong answer here.
If one leg ends up slightly crooked, thats perfectly okay. It actually adds character.
This is one of those cornstarch clay animal crafts that looks different every single time.
5. Tiny Beaver With Giant Front Teeth
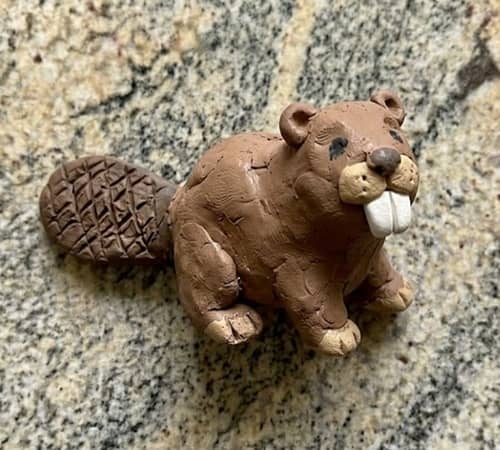
Kids usually laugh the moment the giant teeth are added.
Begin with a large oval piece of soft clay for the body.
Flatten the bottom so the beaver can sit upright.
Create a smaller rounded head and attach it to the front of the body.
Roll four short legs and secure them underneath.
Now make the tail. This is what makes a beaver recognizable.
Flatten a piece of clay into a paddle shape and attach it to the back.
Use a toothpick to draw crisscross lines across the tail surface.
Roll two tiny ears and attach them to the top of the head.
Create a small nose.
Now comes the fun part.
Roll two rectangular clay pieces and place them side by side below the nose to create oversized front teeth.
Make them intentionally larger than normal.
Trust me, it looks funny in the best possible way.
Use a toothpick to add whisker dots.
Allow everything to dry completely.
Paint the body medium brown and keep the teeth bright white.
You can even add a tiny blue clay puddle beneath the beaver after drying if kids want to create a whole woodland scene.
This project feels more like storytelling than crafting, which is why many children get attached to their finished clay animals.
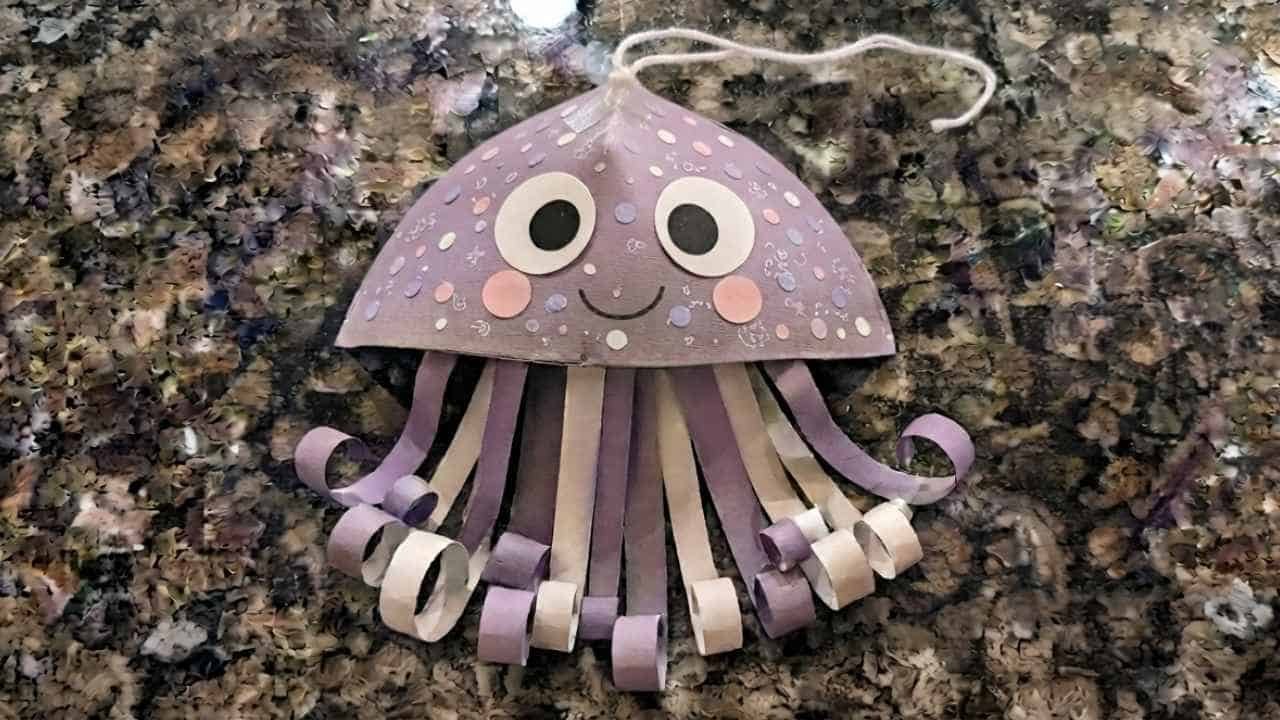
6. Chubby Baby Octopus
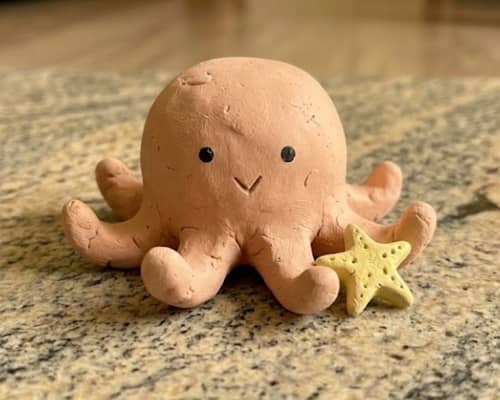
An octopus might sound difficult, but this version is surprisingly beginner friendly.
Start by rolling a large round ball from homemade clay.
This becomes the head and body combined.
Place it on the table and flatten the bottom slightly.
Now roll eight short ropes for the tentacles.
Keep them thick and stubby rather than long.
Attach them around the base of the body.
Curve some tentacles inward and others outward.
Perfect symmetry isn’t needed. In fact, it looks more natural if the tentacles all do their own thing.
Roll two tiny balls for eyes and place them near the front.
Add a small smile underneath.
For extra personality, create a miniature starfish friend and place it beside the octopus.
Use a pencil tip to press tiny suction cup marks underneath each tentacle.
Take your time with this step because it adds lots of visual interest.
Allow the piece to dry fully before painting.
Light blue, lavender, coral pink, or mint green all work beautifully.
One tentacle may accidentally end up shorter than the others. Mine usually does. Nobody notices.
These cute clay creations make fantastic shelf decorations long after craft time is finished.
Among all cornstarch clay toys, this octopus often becomes the favorite because it looks cheerful from every angle.
7. Pancake Turtle With Layered Shell

Most turtle crafts use a simple dome shell. This one looks like a tiny stack of pancakes, which makes it instantly more interesting.
Start by rolling a medium-sized ball of cornstarch clay.
Flatten it gently into a thick circle. This becomes the turtle’s body.
Now create three slightly smaller flattened circles.
Stack them on top of one another like pancakes.
Press very lightly so the layers remain visible.
Attach the stacked shell onto the turtle’s body.
Roll four short chunky legs. Don’t make them identical. Real handmade clay crafts have little imperfections, and those imperfections often look charming.
Attach one leg to each corner underneath the shell.
Create a small rounded head and connect it to the front.
Use a toothpick to press two tiny eyes and a smiling mouth.
For extra detail, add tiny shell patterns using the back of a pencil.
Once dry, paint each shell layer a slightly different shade of green, brown, or tan. The layered effect becomes much more noticeable after painting.
Kids often enjoy counting the shell layers while making this project.
It feels simple at first, then suddenly the finished turtle has loads of personality.
This is one of those cornstarch clay animals that looks surprisingly impressive without requiring advanced sculpting skills.
8. Sleepy Bat Wrapped In Wings
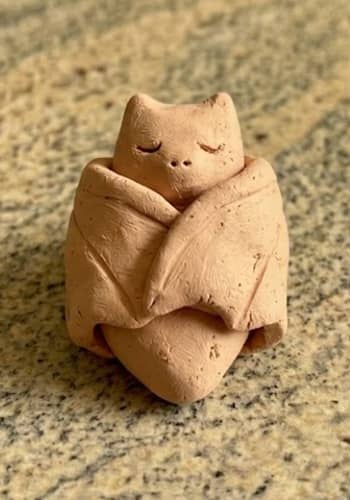
Bats are usually shown flying. This little bat is taking a nap instead.
Begin with an egg-shaped piece of soft clay.
Stand it upright on the table.
Create a smaller rounded head and attach it to the top.
Pinch two pointed ears from tiny pieces of clay and attach them securely.
Now roll two flattened teardrop shapes.
These become the wings.
Wrap the wings around the front of the body as if the bat is covering itself with a blanket.
Leave only a small portion of the face visible.
Using a toothpick, press two curved lines for closed eyes.
Add a tiny nose and a gentle smile.
The wrapped wings make this project look cozy rather than spooky.
For extra texture, lightly draw wing lines using a toothpick.
Allow everything to dry completely.
Paint the bat soft gray, dark brown, or charcoal black.
You can even dry-brush a lighter color across the wings to highlight the texture.
Sometimes kids think bats are scary. After making this little guy, they usually change there minds pretty quickly.
This project works wonderfully for Halloween-themed kid activites that aren’t meant to be frightening.
9. Pocket-Sized Fluffy Alpaca

This alpaca is intentionally tiny and fluffy-looking, making it feel like a miniature farm friend.
Start by rolling a thick oval piece of homemade clay.
This becomes the body.
Roll four short cylinder legs and attach them underneath.
Keep them chunky enough to support the weight.
For the neck, roll a short cylinder and attach it to the front of the body.
Create a small oval head and secure it to the neck.
Pinch two small ears and attach them on top.
Now comes the signature alpaca texture.
Roll dozens of tiny clay balls.
Press them gently across the body without flattening them completely.
These little bumps create a fluffy fleece effect.
It takes a few extra minutes, but wow does it change the final look.
Use a toothpick to create eyes and a tiny mouth.
Allow the alpaca to dry thoroughly.
Paint it cream, white, light brown, or soft caramel.
Leave some texture visible beneath the paint.
The fluffy bumps catch light beautifully and make the animal feel much more realistic.
One side may end up fluffier than the other, and thats honestly part of the fun.
Among all cute clay projects, this one often becomes a favorite because it looks handmade in the best possible way.
These cornstarch clay animal crafts are also great for building miniature farm scenes.
10. Acorn-Hunting Forest Mouse
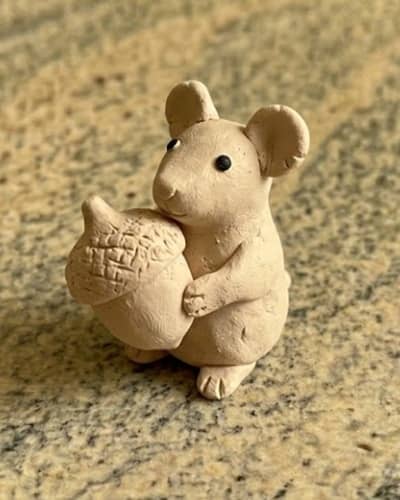
This tiny mouse looks like it just discovered the biggest acorn in the forest. The oversized acorn is what makes this project stand out from ordinary clay animals.
Start by rolling a small egg-shaped piece of cornstarch clay.
Lay it on its side.
Gently pinch one end into a pointed nose.
Roll two medium-sized circles and flatten them slightly for ears.
Attach them near the top of the head.
For the body, create a rounded oval shape and connect it behind the head.
Smooth the connection using your finger.
Roll four tiny legs. They don’t need much detail because the acorn will draw most of the attention.
Now make a long thin tail. Carefully attach it to the back.
For the acorn, roll a ball slightly larger than the mouse’s head.
Shape the bottom into an oval.
Create a small cap and place it on top.
Position the acorn between the mouse’s front paws as if it proudly found lunch.
Use a toothpick to add eyes, whisker dots, and tiny paw lines.
Allow the entire piece to dry fully.
Paint the mouse soft gray or tan. Paint the acorn warm brown with a darker cap.
The oversized acorn makes the scene feel like a page from a storybook.
Many kids end up inventing names and adventures for this little fellow before the paint even dries.
This is one of those cornstarch clay animals that encourages imaginative play long after the craft session ends.
11. Curly-Tailed Seahorse
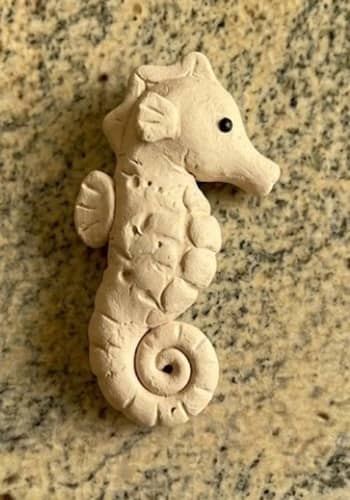
A seahorse already looks magical, so there’s no need to make it complicated.
Start with a ball of homemade clay about the size of a small plum.
Roll it into a thick rope shape.
Curve the bottom end into a spiral.
Instantly, it begins to resemble a seahorse.
Shape the upper section into a rounded head.
Pinch a small snout at the front.
Use your fingers to gently create a curved neck.
Flatten a tiny piece of clay and attach it to the back for a fin.
Add another small fin on the side.
Using a toothpick, press tiny dots and lines along the body.
These little textures make the finished piece far more interesting.
Create a small eye using either a clay dot or a toothpick indentation.
Let the clay dry completely.
Paint it coral pink, turquoise, lavender, pale yellow, or any ocean-inspired color.
You could even dust a little metallic paint onto the fins after drying.
The curled tail creates a beautiful silhouette even from a distance.
Kids are always surprised by how easy this one actually is.
It looks fancy, but it really isn’t difficult at all.
Among cornstarch clay animal crafts, this one feels especially unique because you rarely see seahorses in typical kids craft collections.
12. Dandelion Sheep With Puffy Wool
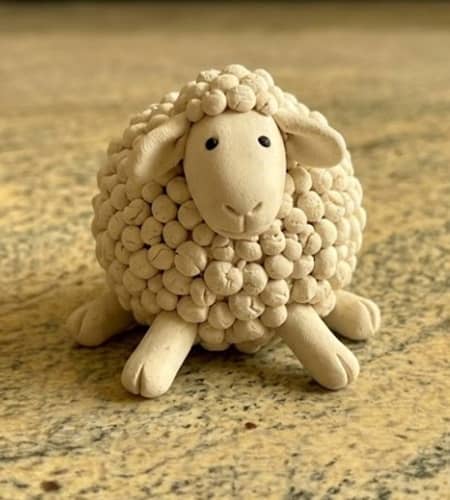
Most sheep crafts use painted texture. This version uses dozens of tiny clay pieces to create fluffy wool that looks almost like a dandelion puff.
Begin by rolling an oval body from soft clay.
Flatten the bottom slightly.
Roll four sturdy legs and attach them underneath.
Create a small rounded head.
Attach it to the front of the body.
Add two tiny ears on either side.
Now comes the fun part.
Roll lots of tiny clay balls.
And yes, quite a lot of them.
Press each one onto the sheep’s body individually.
Cover the entire back and sides.
Leave the face mostly smooth.
The result should resemble a fluffy cloud.
Use a toothpick to create eyes and a nose.
For even more texture, lightly tap the wool balls with a toothbrush before the clay dries.
It sounds strange, but it works surprisingly well.
Allow everything to dry completely.
Paint the wool white, cream, or pale gray.
Paint the face a contrasting shade such as tan or light brown.
One section may have more wool than another. That’s okay. Real sheep aren’t perfectly symmetrical either.
These cute clay projects often become favorite shelf decorations because the texture catches attention immediately.
The finished sheep feels soft and cozy even though it’s made from clay.
Final Thoughts
One thing I love about Cornstarch clay animals is how they quietly teach skills that kids don’t even realize they’re learning.
Rolling, pinching, balancing, shaping, and attaching pieces all help strengthen fine motor control while encouraging patience and problem-solving.
More importantly, homemade clay projects give children something increasingly rare today: permission to create without worrying about perfection.
A crooked leg can become a funny feature. A lopsided ear can turn into a favorite detail. That’s why many of the best clay crafts aren’t the most realistic ones.
They’re the ones filled with imagination, personality, and little imperfections that tell a story all their own.