This is the most comprehensive guide to cleaning a top load washing machine.
In this new guide, you’ll learn how to clean a top load washing machine along with tips to maintain your top load washer.
Here’s what this comprehensive post covers
- Components of the washer that you can clean.
- How to clean them effectively.
- Common Questions around the Top-Load Washer.
- And more…
Let’s dive right into it.
What you will Need
- Distilled White Vinegar OR Baking Soda OR Cleaning Solution.
- Tooth Brush OR Soft Brush
- Micro Fiber cloth
- A bowl of water
- Towel
Preparing the Cleaning Solution
In order to clean the washer, you first need to prepare the cleansing solution.
You can either use a ready-made cleaning solution available at your local hardware OR you can use a homemade cleaner.
In order to make a natural homemade cleaner simply Pour 2 cups of vinegar into a bowl followed by 3 Cups of water and then mix the mixture well.
Your homemade washing machine cleaner is ready.
Keep this mixture aside.
Note: You can use Baking Soda as an alternative to Vinegar if you don’t have the vinegar available.
Cleanable Components of Top Load Washing Machines & Instructions to Clean
A washing machine is made up of various components and each one of them plays a crucial role in maintaining optimum performance.
Therefore, when we talk about cleaning a top load washer it not only involves the outer and the drum but also the other crucial components discussed below.
Let’s take a quick look at the washable part of a top-load washer and how to wash them.
1. The water inlet valve & filter
The water inlet valve is responsible to release filtered water into your washer.
Prolonged usage of the washing machine may lead to a clogged water inlet valve. This is caused due to buildup of debris and other particles into the inlet valve.
Depending on your washer type you may locate these inlet hoses, OR refer to the user manual for the exact location of the inlet valve.
In most cases, these valves are usually located on the top of the washer’s back.
If your washer has a dual supply with hot and cold water, you will have 2 separate valves attached at the back.
How to clean? (Duration 20 minutes)
- Turn off the water supplies and unplug the washer from the power supply.
- By using suitable pliers or with a twist with your fingers, you can easily remove the valves and disconnect the hoses.
- Pull the filter out with your finger.
- Apply a cleaning solution to the hose, valve, and filter using a soft brush.
- Let the solution settle for 10 minutes to soften the residues.
- Place them into a bowl filled with hot water for another 10 mins.
- Rinse with clean water and fix them back.
2. A Washtub
A washtub is one of the major components of a washer as this is where all the cleaning activities are performed.
This area needs appropriate and timely attention because prolonged usage of your washer tends to attract detergent & dirt residues, Limescale, and lint accumulation over time, thereby promoting the growth of molds and bacteria.
Let’s look into the cleaning process.
How to Clean? (Duration: 45 to 90 minutes)

The cleaning process is a bit longer because you will be cleaning a major junk from your washer by running long wash cycles.
In order to clean the washtub, there are several solutions available online or at the local stores in liquid, solid, and powder forms.
You may also clean your washer with homemade solutions such as distilled vinegar, baking soda, bleach, lemon juice, etc.
Let us start with the cleaning process.
- Empty the washer and ensure that you don’t have any clothes inside the washtub.
- Add the cleaning solution (follow label instructions for quantity) either directly to the washtub or to the dispensing trays.
- Set the washer to run with the hottest water temperature.
- Run a clean or empty cycle for about 45 to 60 minutes depending on the intensity of residues and buildups in the washtub.
- You may increase the wash duration by another 30 minutes if the residues are stuck in the washer even after a standard wash.
3. Dispenser Trays
Washing machines have automatic dispensers for detergents, fabric softeners, bleach, etc.
Depending on your washer type and model you may have these dispensers installed on the top of the washtub.
You may refer to the user manual if you are having a hard time locating the dispenser trays.
These dispenser trays can be detached in some washers and some may have a non-detachable dispenser depending on the model.
How to clean? (Duration: 15 to 20 minutes)
There are mainly 2 types of dispensers and the cleaning process will differ due to their make and modus operandi.
Non-Detachable dispensers
- Non-detachable dispensers are Non-removable, it means they stay attached to the washer and you need to clean it without detaching it.
- These dispensers can be simply cleaned by running a clean or empty cycle using cleaning solutions with hot water.
- Alternatively, you may use Baking Soda OR Vinegar to run the clean cycle.
- For manual cleaning, you may apply the cleaning solution to the dispenser’s areas using a toothbrush.
- And then, leave the solution to settle for 10 minutes.
- Pour hot water, and wipe off the dispenser areas using a damp cloth.
(Note: You may follow the manual cleaning process for non-detachable dispensers just before you clean the washtub)
Detachable dispensers (Removable)
- In most cases, even the removable dispensers self-clean during the process of cleaning the washtub.
- Following the user manual of the washer type clean locate and remove the dispenser drawers. These can be easily removed with a gentle push with your fingers.
- Using a cleaning solution scrub the dispensers thoroughly with the help of a toothbrush or a soft brush.
- Leave the application to settle for about 5 minutes and soak the dispensers in a bucket filled with hot water. Give it another rest for about 10 minutes.
- Now rinse it with clean water and fix it back to its location.
4. The Drain Areas
The drain area includes the filter, valve, hose, sewage, etc.
These areas tend to clog very often if not addressed.
Regular cleaning of your washtub also helps to flush mild to moderate amounts of clogging in the drain areas.
At times you may need to specifically clean the drain areas if it is clogged by a stuck foreign object or residue buildups.
Clogged drain areas will affect the washing machine’s basic draining function thereby not allowing you to complete the wash cycle appropriately.
Note: Foreign objects such as coins, pins, screws, etc. are left in the clothes while you add them to your washtub and these items accumulate and build up over time.
Let us look into the cleaning process.
How to Clean? (Duration 20 to 30 minutes)
- For better access to the drain areas, you may unscrew the back panel of the washer.
- The drain hose can be removed by loosening the hose clamps attached to the valve.
- Remove some of the visible clogs with fingers using a hand glove.
- Grab a soft brush or a toothbrush and apply the cleaning solution around the drain areas such as the valve and the hose, followed by giving a thorough scrub.
- Leave the solution for about 10 minutes to settle.
- Rinse it with hot water OR you may soak the drain hose and the valves in a tub filled with hot water for another 10 minutes.
- Now rinse with hot water and fix the components back.
Also Read: How to unclog the fabric softener dispenser?
5. The Filters
Different washer types have different types of filters attached, for example, water inlet valve filter, drain pump filter, lint filter (old washers that use agitators), etc.
Most of these filters are easily detachable for cleaning or replacement purposes.
Here’s how you can clean the filters.
How to Clean? (Duration 15 to 20 minutes)
- Apply the cleaning solution to the filters thoroughly and give a gentle scrub using a soft brush.
- Leave the application to settle for about 5 minutes and soak the filter screen in a bowl mixed with hot water. Let it rest for another 10 minutes.
- Now rinse the filter with clean water and you may fix them back.
6. The outer body
To maintain the appearance of your washer you should not only clean the internal components but also the outer body of your washer.
The uncleaned outer body of the washer will make your washer look dull and old along with ugly patches on the outer surface.
It is the easiest to clean compared to other components.
Let us look into a simple cleaning process:
How to clean? Duration (10 minutes)
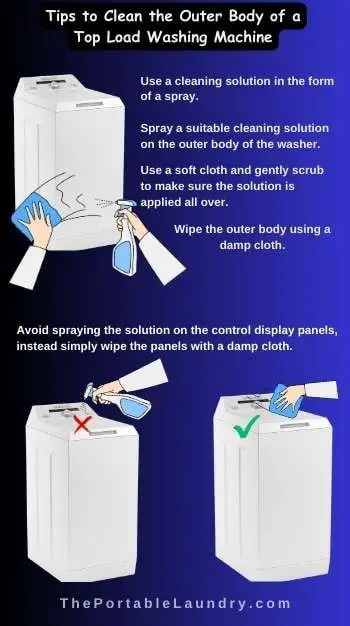
- Wipe the outer body with a clean cloth or a towel before you apply any cleaning solution, this will remove overlying dust from the outer surface.
- Use a cleaning solution in the form of a spray.
- Spray a suitable cleaning solution on the outer body of the washer.
- Use a soft cloth and gently scrub to make sure the solution is applied all over.
- Wipe the outer body using a damp cloth.
Note: Avoid spraying the solution on the control display panels, instead simply wipe the panels with a damp cloth.
Also Read: How to stop a washing machine mid-cycle?
7. The Base surface
It is quite rare for any one of us to inspect the base area of the washer.
But we should not forget that it’s the base area from where the washer tends to wear off very easily, thereby resulting in rusting and leakage.
Washers that are placed on suitable washing machine stands have a protected base surface.
If your washer is placed without a stand then there are chances of damaging its base as it’s exposed to water almost every day.
How to Clean?
Use a suitable stand to avoid any damage caused to the base surface of your washer.
If in case you don’t have the stand OR you don’t use it, then you may need to clean them at regular intervals.
Cleaning the base surface becomes a challenging task as you may have to carefully bend the washer each time you clean.
Here’s how to clean the base area of the washer thoroughly.
- Unplug the washer and turn off the water supply.
- Detach the inlet and the drain hoses if required.
- Lay a carpet on the surface in front of the washer in order to avoid any scratches or minor damage.
- You may require someone to help you in laying down the washer on the carpet by carefully bending it.
- Once you have access to the base area of the washer, wipe the area thoroughly with a towel or a piece of cloth.
- Apply a cleaning solution and scrub using a toothbrush until the bottom area is cleaned.
- Now Sprinkle warm water on the surface and wipe it off with a towel or a damp cloth.
- Clean the floor where the washer was placed and place the washer back in its position carefully.
Common Issues and Solutions when cleaning top loaders
Common issues users might encounter when cleaning a top load washing machine include leaks, unusual smells, or malfunctioning components.
Here are a few common issues that you are likely to face when cleaning top load washer.
Leaks
Leaks are a common issue that may occur during or after cleaning.
They can be caused by loose connections, damaged hoses, or a clogged drain.
Solutions:
- Check Connections: Inspect all hose connections to ensure they are tightly secured. If you find any loose connections, reattach them.
- Examine Hoses: Examine the hoses for any visible cracks or damage. If you notice any, replace the damaged hose.
- Unclog the Drain: If the drain is clogged, remove any debris or foreign objects obstructing the flow.
Unusual Smells
Unpleasant odors can develop if the washing machine’s interior is not cleaned thoroughly.
These smells can transfer to your clothes during washing.
Solutions:
- Clean the Interior: Ensure you clean the drum, dispensers, and filters regularly to prevent the buildup of mold and mildew.
- Use Deodorizers: Consider using washing machine deodorizers or adding baking soda to your cleaning cycle to eliminate odors.
- Leave the Door Open: After using the machine, leave the door ajar to allow air circulation and prevent moisture buildup.
Malfunctioning Components
Components like the water inlet valve, detergent dispensers, or the agitator may malfunction if you do not reattach them proper post cleaning, affecting the washer’s performance.
Solutions:
- Inspect and Replace: Regularly inspect these components for signs of wear and tear. If any part is malfunctioning, consider replacing it.
- Follow Manufacturer’s Recommendations: Adhere to the manufacturer’s maintenance recommendations to prolong the lifespan of the components.
- Consult a Professional: If you are not comfortable with DIY repairs, seek the help of a professional technician.
Preventive Measures
To prevent these issues in the first place, it’s essential to follow a proactive maintenance approach.
Here are preventive measures to reduce the likelihood of future problems:
Regular Cleaning
Regularly clean the interior of the washing machine, including the drum, dispensers, and filters, to prevent the buildup of mold, mildew, and dirt.
Check Hoses and Connections
Periodically inspect hose connections for tightness and the hoses themselves for damage.
Replacing worn hoses can prevent leaks.
Use High-Efficiency Detergents
Using the right detergent, such as high-efficiency (HE) detergents, can prevent detergent buildup and minimize unusual smells.
Leave the Door Open
After each use, leave the washing machine door ajar to allow proper ventilation and prevent moisture-related issues.
Follow Manufacturer’s Guidelines
Adhere to the manufacturer’s recommendations for maintenance and cleaning, as outlined in the user manual.
Final Thoughts
To sustain the efficiency of your washer clean them at regular intervals.
Clean your washer and the internal components at least once a month to prevent clogging and residual buildups.
Regular cleaning prolongs the life of your washer and keeps it fresh by removing odor-causing residues.
Lastly, always consult an expert if you are unable to clean the internal components on your own as there are chances of voiding the warranty if you remove certain components unknowingly.
Also Read: How to troubleshoot a portable washing machine?
Frequently Asked Questions
Here are some common questions that are asked quite frequently.
Is it necessary to manually clean a washer?
Most washers work on self-cleaning technology which means you simply run a clean or empty cycle using cleaning solutions with hot water and you are done.
Having said that manual cleaning makes sense if your washer is heavily clogged and the normal clean cycle is unable to get the job done. Manual cleaning helps you to reach the unreachable areas of the washer which may not be possible without a self-cleaning feature. The reachable areas include inlet valves and hoses, the outer body, the base, etc.
How do I clean a smelly top loader?
Simply use a readily available cleaning solution and you may add it directly to your washtub. Alternately you may add homemade solutions such as 2 cups of distilled vinegar or 2 spoons of baking soda to the washtub and then run an empty or clean cycle using hot water.
Why are my clothes full of patches after a wash?
Patches on the fabrics give a clear indication that the washer needs immediate cleaning. The patches on your clothes may appear due to the buildup of detergent & dirt residues, mold & mildew formation, lint, limescale, etc. Hence you should clean the washer thoroughly at least once a month.