Ever looked at a bland slab of clay and thought, man, I could totally turn that into rent money? You absolutely can.
Dive into the world of polymer clay craft and you’ll quickly realize people go absolutely nuts for handmade, miniature items.
Making Polymer clay charms isn’t just some passing weekend hobby, it’s a legitimate, year-round side hustle if you know exactly what shapes people crave.
Forget the standard, boring hearts and stars everyone else is peddling on Etsy.
We are focusing on unique, high-margin, irresistible pieces that sell like crazy from January to December. Grab your acrylic rolling pins and let’s get baking!
Choose Your Polymer Clay Type
→ Sculpey | FIMO Soft ←
Affiliate Disclaimer: Some of the links in this post may be affiliate links, which means I may earn a small commission if you choose to make a purchase through them – at no extra cost to you. I only share products that genuinely fit this project and can help make your ceramic mug clay craft process easier and smoother. Your support helps keep ideas like this coming.
1. The Glazed Matcha Latte Mug
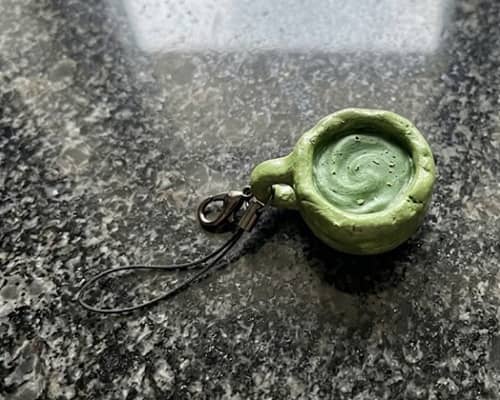
Who doesn’t love a cozy beverage aesthetic? Coffee and tea culture is a permanent personality trait for millions, which makes this miniature mug a guaranteed bestseller.
How to make it:
First up, grab a small lump of sage green polymer clay and condition it thoroughly between your palms until it’s soft and pliable.
Roll it into a smooth, even cylinder about the size of a thimble.
Use a flat-bottomed tool to press slightly into the top, creating a shallow indentation for the “liquid.”
For the handle, roll out a tiny, thin snake of white clay, snip a piece about half an inch long, and curve it into a ‘C’ shape.
Attach it firmly to the side of your green cylinder using a dot of liquid clay so it don’t fall off during baking.
Now for the secret sauce: mix a tiny drop of white acrylic paint with a dollop of liquid translucent clay.
Swirl this mixture into the top indentation of your mug using a toothpick to mimic authentic matcha latte art froth.
Drop an eye pin straight down through the center. Bake at 275°F (135°C) for 25 minutes.
Once cooled, coat the entire mug with a thick layer of high-gloss UV resin to give it that authentic ceramic sheen.
2. Retro Roller Skates
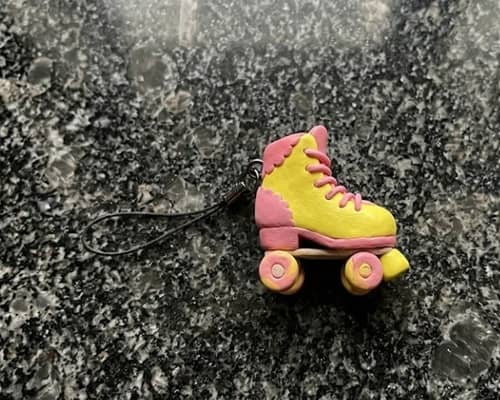
Nostalgia is a powerful drug that sells exceptionally well across every single age demographic. These retro skates tap directly into that vibrant, 70s roller-disco aesthetic.
How to make it:
To kick off this polymer clay craft tutorial, pick two contrasting retro colors – let’s go with pastel pink and mustard yellow.
Condition your pink clay and shape it into a miniature, chunky boot-like L-shape.
Use a needle tool to gently score tiny, straight lines down the front for the laces.
Next, take your mustard yellow clay and roll four tiny, identical spheres for the wheels.
Press these spheres slightly flat so they resemble small pucks.
Attach two wheels to each side of the boot bottom using a tiny smear of liquid clay.
For the toe stopper, roll an incredibly small ball of white clay, flatten it, and press it onto the front tip of the skate.
Gently push a silver headpin up through the bottom of the boot until it exits at the top collar. Bake it at 275°F (135°C) for 22 minutes.
3. Spotted Mushroom Toadstools
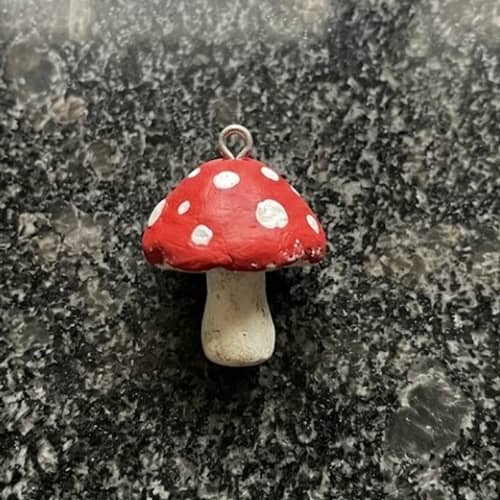
Cottagecore is not a phase, it’s a permanent retail powerhouse.
These whimsical little fungi look incredibly adorable hanging from backpacks, planners, or keychain clasps.
How to make it:
This is an incredibly easy polymer clay charms project for beginners because imperfections actually make the mushrooms look more organic and realistic.
Take a small portion of white clay and roll it into a thick, slightly tapered stump for the stalk.
For the cap, take a vibrant red or terracotta-colored clay ball and press your thumb into the center to form a hollow dome shape.
Push the white stalk firmly into the hollow underbelly of the red cap.
Now, instead of painting the white spots later, roll microscopic dots of white clay and press them flat onto the red surface before baking.
This embeds them beautifully into the cap. Insert an eye pin horizontally through the top dome.
Bake the piece for 20 minutes at 275°F. Give it a matte glaze finish instead of glossy to maintain that rustic, earthy feel.
4. Chunky Terrazzo Geometric Slabs
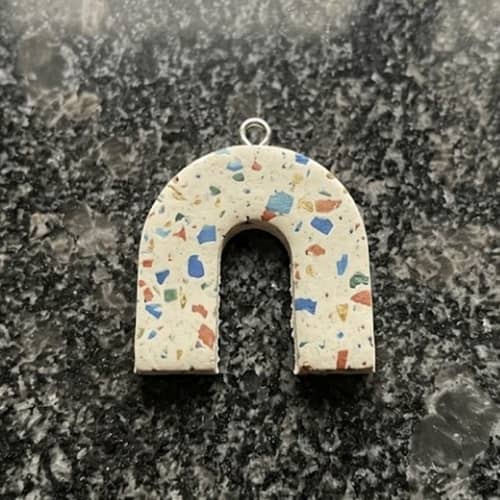
Abstract, artistic, and wildly popular among minimalist fashion lovers. These work incredibly well when converted into trendy earrings or modern statement pendants.
How to make it:
If you want to know how to make diy clay beads and modern jewelry component shapes, this method is foolproof.
Roll out a base sheet of white or cream clay to about 2mm thickness using your acrylic roller.
Now, take tiny scraps of leftover colored clay i.e. think sage, burnt orange, and navy… and chop them into random, microscopic, irregular flakes using a blade.
Scatter these colorful flakes randomly across your white base sheet.
Place a piece of parchment paper over the top and roll gently to press the flakes flat into the base.
Use a small, geometric cookie cutter (like a hexagon or arch shape) to punch out your charms.
Pierce a hole near the top edge using a toothpick so you can attach jump rings later.
Bake on a ceramic tile for 25 minutes at 275°F. Sand the edges slightly with fine sandpaper after baking to clean up any rough spots.
5. Whimsical Pastel Axolotls
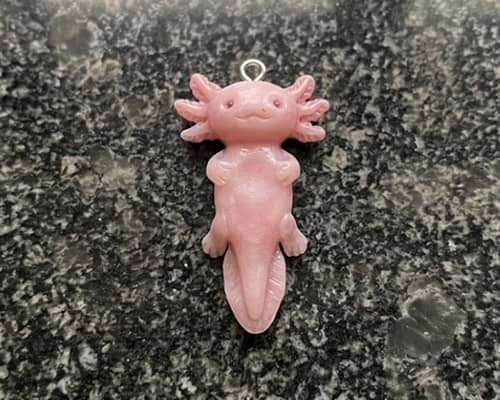
Animal lovers are always looking for something quirky, and the axolotl is currently reigning supreme in internet pop culture.
Their cute little faces are completely irresistible to shoppers.
How to make it:
Creating an easy polymer clay animal doesn’t require master sculpting skills.
Start with a ball of light pastel pink clay for the body.
Roll it into a smooth teardrop shape, then flatten the wider end slightly to form the head.
Roll six small, thin sausages of darker magenta clay for the characteristic exterior gills.
Attach three of these tiny frills to each side of the head using a dotting tool to blend the seams seamlessly.
Roll out an ultra-thin pink snake for the tail and wrap it around the base of the body.
Use a tiny dotting tool dipped in black acrylic paint to stamp two simple eyes onto the face, and draw a tiny curved smile.
Insert an eye pin right between the gills at the top of the head. Bake your little water dragon for 25 minutes at 275°F, then seal with a glossy topcoat.
6. Miniature Avocado Halves
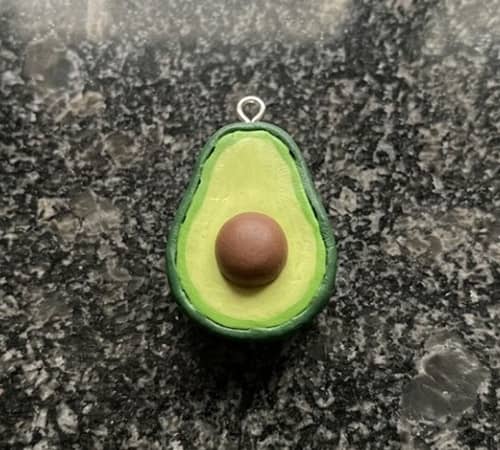
The avocado craze is never going away, making this a reliable all-season staple for best friend necklaces or cute zipper pulls.
How to make it:
This project is excellent for diy clay earrings because they are lightweight and balance perfectly.
Mix a bit of lime green clay and create a small, flat pear shape.
Next, roll a super thin snake of dark forest green clay and wrap it around the perimeter of your lime green pear to create the outer skin.
Smooth the edges together using your fingers so the transition looks natural.
For the pit, roll a small ball of brown clay, press it right into the center of the lower, fatter half of the avocado, and press down firmly so it sticks.
If you want to make a sad face, scratch a little frowning mouth below the pit. Insert a silver eye pin through the top stem area of the fruit.
Bake for 20 minutes at 275°F. Apply a glossy varnish only to the brown pit and a matte varnish to the green flesh for a stunning contrast.
7. Glazed Strawberry Slices
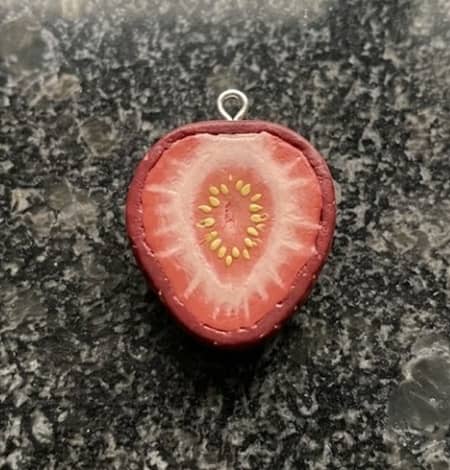
Fruit charms always sell incredibly well during the summer, but their cute aesthetic keeps them relevant as planner accessories all year round.
How to make it:
To build a highly detailed strawberry slice, you’ll want to practice basic caning.
Shape a thick log of white clay, then wrap it in a medium layer of translucent pink clay.
Next, wrap that entire assembly in a bright red clay sheet.
Roll the big log out evenly until it stretches and thins into a long, narrow rope.
Use a sharp razor blade to slice off thin sections from the end of the log… boom, you instantly have perfect strawberry cross-sections!
Use a needle tool to poke tiny, shallow indentations around the red outer rim to mimic tiny seeds.
Carefully push an eye pin into the top edge of each slice before putting them in the oven.
Bake these delicate slices for about 15 to 18 minutes at 275°F. A thick coating of UV resin after baking gives them a juicy, realistic, mouth-watering appearance.
8. Tiny Stacked Pancakes
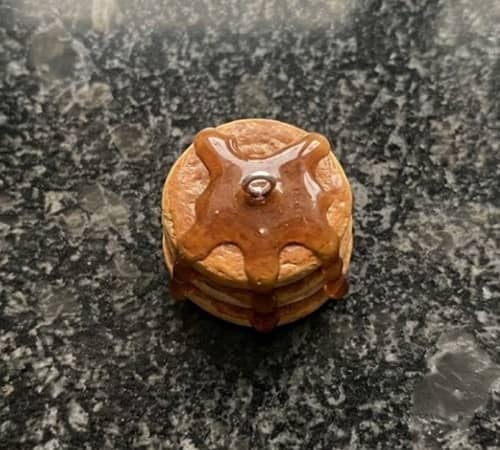
Miniature food replicas have a massive collector base. A stack of buttery, syrupy pancakes looks complex but is incredibly simple to execute.
How to make it:
This is one of the most fun polymer clay charms for beginners to try out.
Roll out a sheet of tan or light beige clay. Use a circular cutter to stamp out three or four identical discs.
Take a toothbrush and gently texture the outer edges of each disc to give it that fluffy, cooked pancake texture.
Stack the discs on top of each other, pressing lightly so they fuse.
Cut a microscopic square of bright yellow clay for a pat of butter and place it right on top.
For the realistic syrup effect, mix a drop of brown alcohol ink or acrylic paint into liquid translucent clay.
Drizzle this gooey mixture over the top pancake, letting it drip naturally down the sides.
Slide an eye pin straight through the center of the stack. Bake for 25 minutes at 275°F.
9. Cosmic Galaxy Crystals
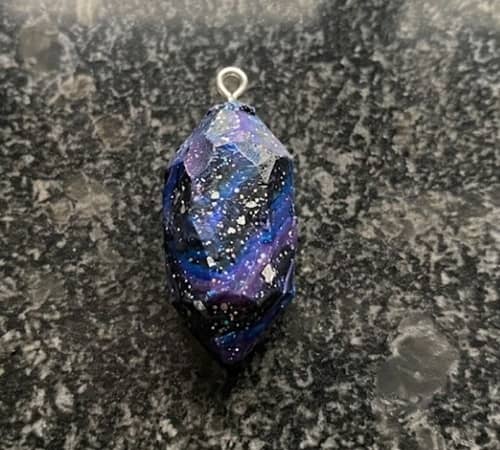
Crystal healing and astrology trends are booming, making these glittering, marbled celestial shards a massive hit at craft fairs.
How to make it:
Gather scraps of translucent, deep purple, navy blue, and black clay.
Roll them into rough snakes, twist them together, and fold the bundle repeatedly to create a gorgeous, marbled galaxy effect.
Do not over-mix, or it will just turn into a muddy gray mass! Roll the marbled mass into a thick log, then use a sharp tissue blade to shave off random, angular slices from the sides to create sharp, crystalline facets.
Roll the tip into a sharp point. Dust a tiny bit of holographic cosmic glitter onto the facets using a soft paintbrush.
Insert a heavy-duty eye pin into the flat base or the top point. Bake for 22 minutes at 275°F. Once it cools down completely, seal it with a super glossy varnish to make the deep colors pop.
10. Chonky Kawaii Narwhals
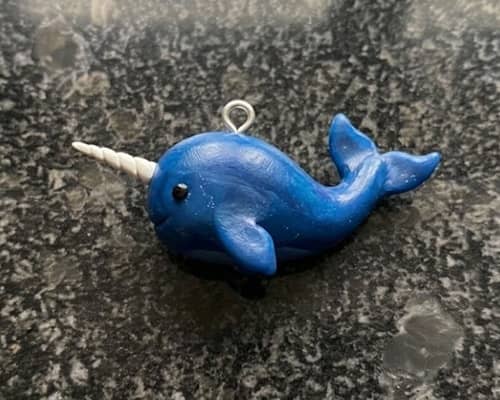
Sea creatures are always a hit, and adding a cute unicorn horn to a whale makes it an instant bestseller for kids and teens.
How to make it:
Take a medium ball of pastel blue or teal clay and shape it into a smooth, plump teardrop.
Pinch the narrow end upward to create a cute, perky tail fin.
For the magical horn, take a tiny speck of yellow clay, roll it into a fine point, and twist it gently to create a spiral texture.
Attach the horn directly to the forehead of your whale body.
Use a tiny dotting tool to push two small indents into the face for eyes, filling them with tiny drops of black paint after baking.
Add two tiny pink circles of clay on the cheeks for a blushing effect. Insert your eye pin vertically behind the horn. Bake for 25 minutes at 275°F.
11. Miniature Book Slabs
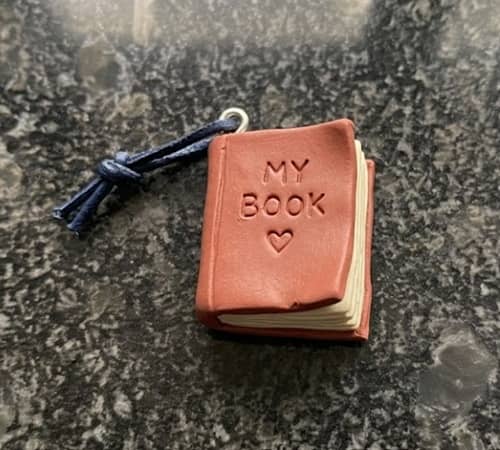
Book lovers (especially the BookTok community) are fiercely loyal and love buying merchandise that represents their favorite passion.
How to make it:
This is a staple for diy polymer clay jewelry for beginners because it uses simple straight lines.
Roll out a slab of white clay to a thickness of about 4mm and cut it into a small rectangle for the book pages.
Take a needle tool and score horizontal lines along three sides of the rectangle to simulate individual pages.
Next, roll a thin sheet of a vibrant color (like royal blue or crimson) for the book cover.
Wrap this colored sheet around the smooth, un-scored back edge of your white rectangle, trimming it so it juts out just slightly past the pages like a real book spine.
Insert an eye pin down into the spine of the book. Bake for 20 minutes at 275°F.
You can use a metallic gold paint pen to sketch a tiny star or cross on the cover once it cools.
12. Celestial Crescent Moons
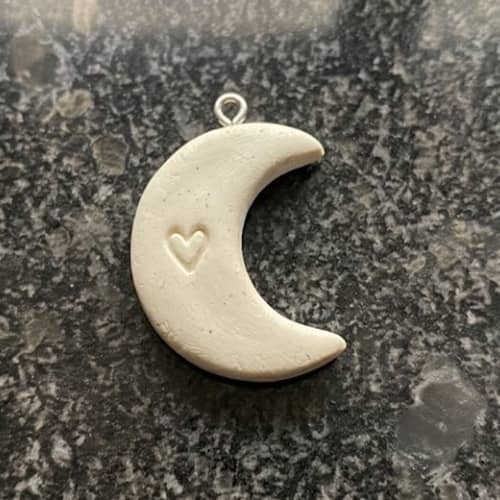
Whimsical, witchy, and bohemian styles are incredibly popular year-round, making celestial designs an absolute must-have for your inventory.
How to make it:
Roll out a sheet of black, dark midnight blue, or metallic gold clay to about 3mm thickness.
Use a circular cookie cutter to punch out a disc, then move the cutter over slightly and punch again to slice off a perfect, elegant crescent moon shape.
Smooth down the sharp cut edges with your fingertip so they look rounded and polished.
To give it a magical touch, press a few tiny, sparkling rhinestones directly into the clay surface before baking, or use a needle tool to stamp tiny starburst indentations.
Pierce a clean hole through the top tip of the crescent moon for your jump ring attachment. Bake on a flat tray for 20 minutes at 275°F.
Final Thoughts
Mastering the art of creating miniature items to sell isn’t just about technical precision, it’s about understanding what triggers an emotional response in your buyers.
Curating a cohesive collection of trendy, nostalgic, and hobby-specific pieces allows you to tap into passionate micro-communities that are eager to support independent makers.
Success in this craft market relies heavily on consistent baking temperatures to avoid brittleness, high-quality finishes like UV resins, and finding your specific stylistic niche.
Keep your designs clean, your branding authentic, and your inventory fresh to turn simple clay slabs into a thriving, profitable business venture.





