There’s something oddly comforting about a good primitive patriotic clay craft.
Maybe it’s the worn paint. Maybe it’s the imperfect shapes that look like they came from a farmhouse workbench instead of a factory.
Whatever it is, these projects bring a little bit of old America into a room without feeling overly polished.
You will adore these ideas if you like vintage-inspired décor, rustic patriotic décor, and character-filled handmade items.
I purposely leaned into imperfections here because that’s what makes primitive art charming.
Some pieces look weathered, some look slightly crooked, and honestly that’s what make them feel authentic.
1. Primitive Stitch Flag Pocket With Hanging Star
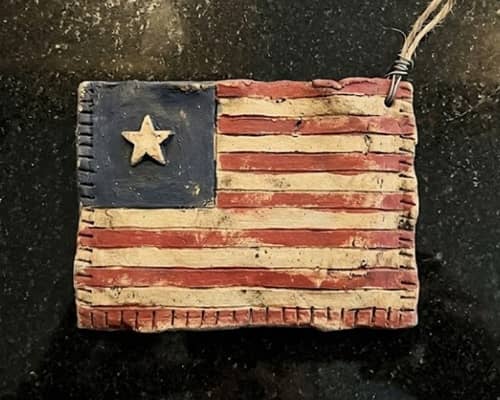
This primitive patriotic clay craft looks like a tiny fabric pocket from an old country store, except it’s made entirely from clay.
Start by rolling air dry clay into a rectangle about 6 inches tall and 4 inches wide. Keep the thickness around ¼ inch. Don’t worry if the edges aren’t perfectly straight. Primitive decor actually benefits from rough edges.
Using a ruler, lightly mark a horizontal line about 2 inches from the bottom. Fold this section upward to create the appearance of a pocket. Press gently so it stays attached.
Now grab a toothpick. Poke small holes around the outside edges. These holes will imitate hand stitching later.
Cut a small star from extra clay using a craft knife. Place it near the upper corner of the pocket.
Allow everything to dry for 24 hours.
Once dry, paint the upper section cream. Paint the pocket section faded barn red. Create thin navy stripes across the cream area. This isn’t suppose to look perfect.
After the paint dries, use brown antiquing wax or heavily watered-down brown paint. Wipe most of it away immediately with a paper towel. The brown settles into cracks and gives an aged appearance.
Thread jute twine through two holes at the top for hanging.
This piece works beautifully beside an american flag themed doll or other fourth of July primitive patterns.
2. Weathered Liberty Sheep With Tiny Flag
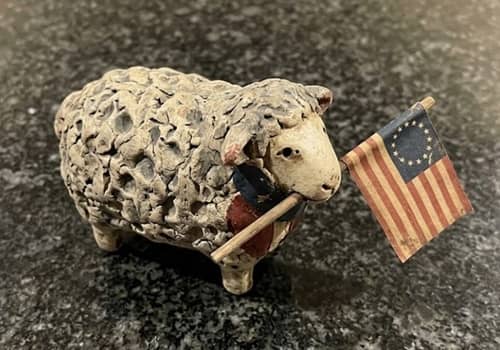
Primitive sheep appear in early American folk art all the time, but this version adds a patriotic twist.
Roll a clay ball about the size of a golf ball. Flatten the bottom slightly so it can stand.
Create the sheep’s body by pressing tiny clay balls onto the surface. Do not smooth them. The bumpy texture creates wool.
For the head, form a small oval and attach it to the front using a little water.
Add four thick stubby legs. Primitive animals often look chunky and awkward. That’s part of the appeal.
Shape two tiny ears and attach them.
Next, make a miniature waving flag. Roll a small rectangle and gently bend it as if blowing in the wind. Attach it to a clay pole.
Let everything dry fully.
Paint the sheep in aged cream tones. Dry brush a little gray around the edges. Paint the flag using muted red, navy, and off-white rather than bright colors.
Mix brown paint with water and lightly brush it over the entire piece. Quickly wipe away excess paint.
The result feels like something discovered in an old country attic.
I seen similar pieces displayed with rustic patriotic decor collections and they always catch attention.
3. Primitive Uncle Sam Boot Vase

This project takes inspiration from old uncle sam doll pattern displays but transforms the idea into a functional clay decoration.
Begin by rolling clay to about ¼ inch thick.
Sketch a large boot shape directly into the clay using a pencil. Instead of a stylish shoe, consider an enormous work boot.
Cut around the outline carefully.
Create a second matching piece.
Roll out a long, one-inch-wide piece of clay. This strip becomes the side wall connecting the front and back boot pieces.
Attach the strip around one boot cutout using water and gentle pressure. Then attach the second cutout to complete the hollow shape.
Leave the top open.
Smooth only the inside seams. Keep the outside slightly rough because primitive designs should feel handmade.
Use a toothpick to add faux stitching around the boot edge. Press small dents where boot laces would normally go.
Allow it to dry completely.
Paint the boot faded navy blue. Dry brush cream over raised areas. Add tiny red stars randomly around the sides.
Once dry, apply diluted brown paint and wipe back immediately.
Fill the finished boot with dried grass, faux berries, or miniature flags.
It’s a fun conversation piece and blends perfectly with patriotic home decor inspiration displays.
There ain’t many patriotic decorations that look quite like this one.
4. Primitive Star-Spangled Crow Shelf Sitter
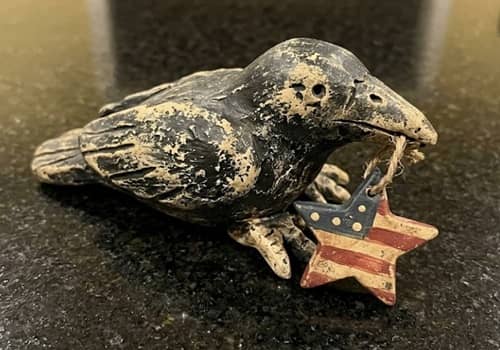
If you’ve ever browsed rustic patriotic decor displays, you’ve probably noticed crows showing up everywhere.
This version turns that classic country bird into a primitive patriotic clay craft with plenty of personality.
To begin, roll a fist-sized lump of air-dry clay. Shape it into a chunky teardrop. The wider end becomes the body and the narrow end becomes the tail.
Flatten the bottom slightly so the crow can sit securely on a shelf.
Create the head by rolling a smaller ball and attaching it to the body using water and gentle pressure.
Pinch a small triangle for the beak. Attach it to the front. Don’t obsess over symmetry. Primitive folk art rarely is perfectly balanced.
Roll two thin clay strips and attach them underneath for legs. Add oversized feet by flattening small clay pieces.
Now make a rustic star. Roll clay to ¼ inch thick and cut a large uneven star shape. Attach it to the crow’s side as if it’s carrying it.
Give everything a minimum of 24 hours to dry.
Paint the crow matte black. Dry brush charcoal gray over raised areas. Paint the star faded cream.
Using a fine brush, add tiny red stripes and navy dots to the star. Keep them intentionally imperfect.
Apply watered brown paint over the entire piece. Wipe most away immediately. The crevices will hold color and create an aged look.
This little crow pairs surprisingly well with a Patriotic american doll with flag display because both share that old-time folk art feel.
5. Rustic Freedom Candle Plate
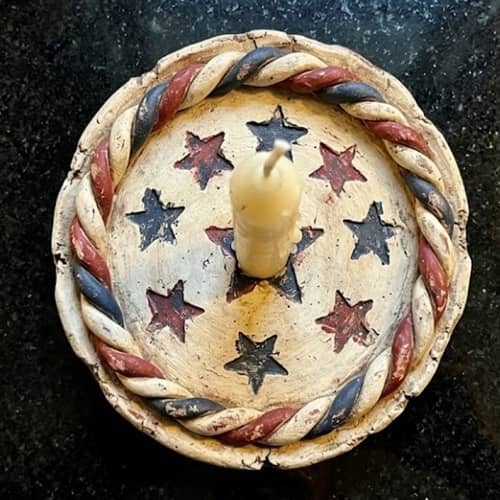
This piece looks like something handed down through several generations. It works as both decor and a candle base.
Roll air dry clay into a rough circle about 7 inches wide.
Don’t use a plate as a template. Hand-shaping creates a more authentic primitive appearance.
Gently press the center down with your palm to create a shallow dish.
Next, use a pencil eraser to stamp stars around the rim. Alternate large and small impressions.
Roll several tiny clay ropes. Twist them loosely and attach them around the edge to form a raised border.
Create three small clay stars and place them randomly inside the dish.
Let the entire piece dry completely.
Paint the plate with a base coat of aged cream.
After drying, lightly sponge faded navy and barn red paint around the border. Avoid solid coverage. The goal is worn and weathered.
Mix dark brown paint with water and brush it over the surface. Immediately wipe away excess.
The antique finish transforms the piece from a simple clay dish into something that feels decades old.
Place a battery-operated candle in the center and it suddenly looks like a flea market treasure.
One thing I really like about primitive decorating is how even small pieces tells a story.
6. Colonial Flag House Ornament
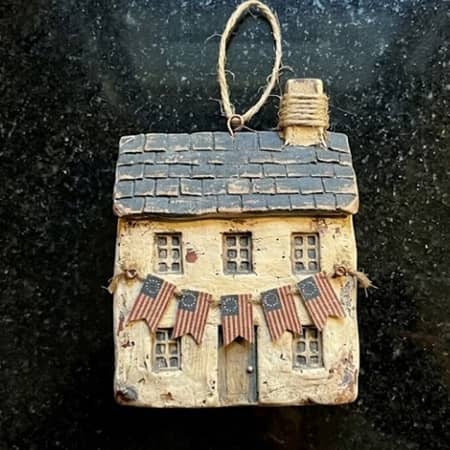
This project combines early American architecture with patriotic charm. It feels right at home among fourth of july decoration ideas without looking overly modern.
Roll clay to approximately ¼ inch thickness.
Sketch a simple house shape directly into the clay. Think small colonial farmhouse rather than a detailed mansion.
Cut out the shape carefully.
Using a craft knife, lightly score windows, a front door, and roof lines.
Roll tiny clay strips and place them around the windows to create trim.
Now create a miniature flag banner draped across the front. Roll three very thin clay strips and arrange them in gentle curves.
Add several tiny stars above the doorway.
Poke a hole at the roof peak if you’d like to hang the finished ornament.
Allow the clay to dry fully.
Paint the house warm cream. Paint the roof faded black or dark brown.
Use muted red and navy for the flag banner.
Dry brush cream over everything once dry to soften the colors.
Finish by applying antiquing glaze or watered brown paint and wiping it back.
The finished ornament feels like it belongs in a collection of fourth of July primitive patterns and vintage Americana decorations.
Honestly, the slightly crooked windows makes it look better.
7. Primitive Americana Watering Can With Flag Blooms
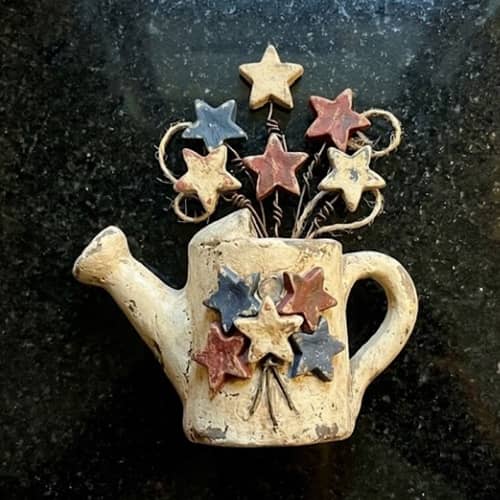
Most patriotic crafts focus on stars and flags. This one sneaks in a garden-inspired twist, and honestly it feels like something you might discover sitting on a dusty farmhouse porch.
Start by rolling air dry clay to about ¼ inch thick.
Draw a simple watering can shape. Keep it chunky and slightly oversized. Primitive pieces usually look better when they’re not too delicate.
Cut out two matching watering can shapes.
Roll a long clay strip about 1 inch wide. This strip will connect the two sides and create depth.
Attach the strip around one watering can piece using a little water. Then press the second piece onto the opposite side.
Leave the top opening exposed.
Roll a thin clay rope and attach it as the handle. Create a curved spout from another rolled piece and secure it to the front.
Next comes the fun part.
Roll three small clay flowers. Instead of traditional petals, shape each flower like a primitive starburst. Attach them so they appear to be growing from inside the watering can.
Allow everything to dry for 24–48 hours.
Paint the watering can faded cream or weathered black. Paint one flower barn red, one off-white, and one muted navy.
Dry brush cream over the entire piece to soften the colors.
Apply a thin wash of brown paint and wipe most of it away.
The aged finish helps the project blend naturally into patriotic home decor inspiration displays without looking store-bought.
I was looking at one after finishing it and the uneven flowers actually looked more charming than the perfect ones.
8. Hanging Liberty Heart With Patchwork Flag
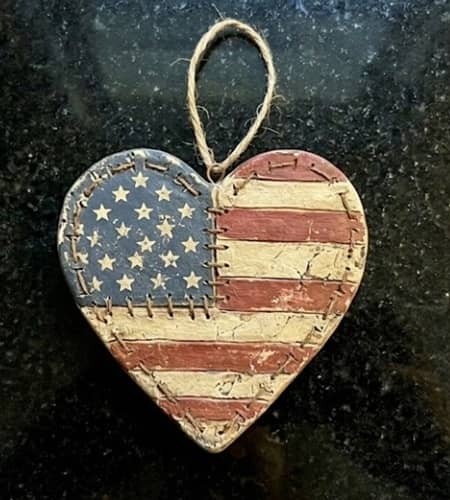
Hearts show up often in primitive folk art. This version combines that traditional shape with a weathered patchwork flag design.
Roll clay to about ¼ inch thickness.
Draw a large heart approximately 6 inches wide.
Cut carefully around the outline.
Using a pencil, lightly divide the heart into several uneven sections. Imagine old fabric scraps stitched together. The sections should not be identical.
Take a toothpick and press tiny holes along every dividing line. These holes imitate hand stitching.
Add a small hole at the top for hanging.
Allow the clay to dry completely.
Paint alternating sections faded red, aged cream, and muted navy.
After drying, use a fine brush to paint tiny stars and stripes inside a few sections.
Do not try making every section perfect. Primitive decor thrives on inconsistency.
Dry brush cream paint over the entire surface.
Finally, apply antiquing glaze or watered brown paint. Wipe most away with a cloth.
The finished piece resembles a treasured family keepsake that has been hanging around for years.
This design works beautifully near an american flag themed doll display because both have that handmade heritage feel.
Sometimes the most imperfect heart ends up being the prettiest one.
9. Primitive Eagle Pocket Hanger
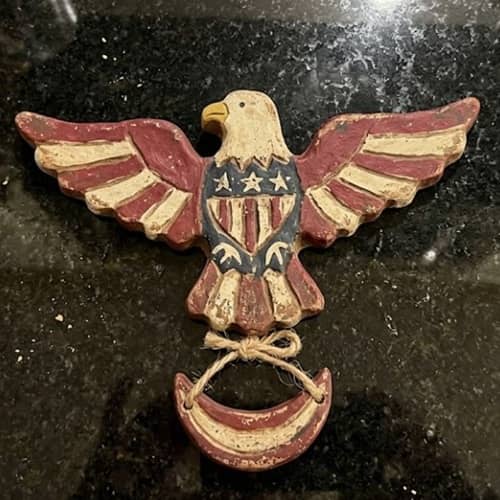
Eagles are common patriotic symbols, but this project gives the bird a folk-art makeover instead of trying to make it look realistic.
Roll clay into a rectangle roughly 5 inches wide and 7 inches tall.
Fold the lower third upward to create a shallow pocket shape. Press gently so it stays attached.
Smooth only the inside seam. Leave the outside slightly rough.
Now create a very simple primitive eagle.
Roll an oval for the body.
Attach a small round head.
Create broad wings using flattened teardrop shapes. Primitive eagles usually look chunky rather than detailed.
Attach the eagle to the front of the pocket.
Add a few hand-pressed stars around the bird using a small star cutter or craft knife.
Poke hanging holes near the top.
Allow everything to dry thoroughly.
Paint the eagle dark brown with cream highlights.
Paint the pocket aged cream.
Add faded red stripes along the bottom edge and a few muted navy stars near the top.
Apply brown antiquing wash and wipe away excess.
The finished piece can hold dried flowers, tiny rolled notes, or miniature flags.
It kinda reminds me of those old Americana pieces people hunt for at antique markets.
This project also complements collections featuring uncle sam doll pattern decorations and other fourth of july decoration ideas.
10. Primitive Firecracker Bundle Shelf Tuck
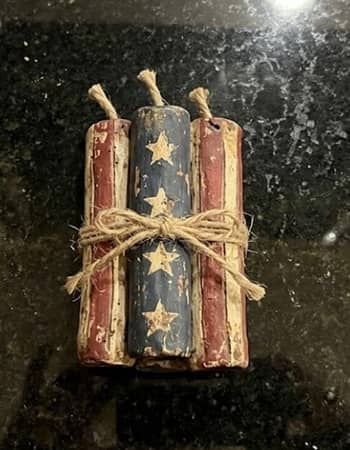
Most firecracker decorations are bright, shiny, and loud. This one goes in the opposite direction. It looks old, weathered, and like it has been sitting in a country cupboard since the last century.
Roll air dry clay into three thick cylinders about 4 inches long.
Don’t make them perfectly identical. One can be slightly shorter. Another can lean a little. Primitive pieces should feel handmade, not manufactured.
Flatten the bottoms very slightly so they don’t roll away while drying.
Take a toothpick and poke tiny random dents into the surface. These dents will catch antiquing later and make the piece look older.
Roll several thin clay ropes. Wrap them around the cylinders to imitate old twine holding the bundle together.
Create a small primitive star and attach it near the center knot.
Allow everything to dry fully.
Paint the cylinders aged cream, faded red, and muted navy. Avoid bright patriotic colors.
Once dry, lightly sand a few areas to expose natural clay underneath.
Brush on watered-down brown paint. Quickly wipe it away with a paper towel.
The finish should look worn rather than dirty.
Arrange the three firecrackers together and glue them into a bundle.
This is one of those fourth of July decoration ideas that doesn’t scream holiday decor, which makes it easy to leave out all summer long.
The first one I made looked a little crooked. Funny enough, it ended up being my favorite.
11. Folk Art Liberty Bell With Stitched Star
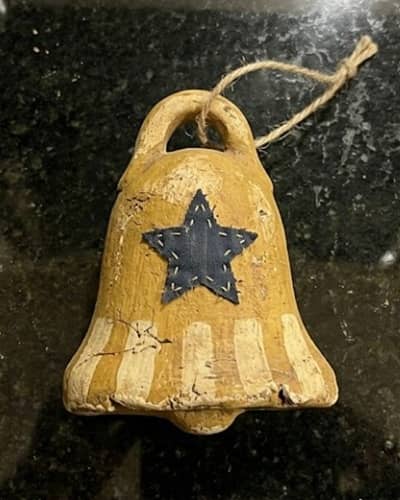
The Liberty Bell is instantly recognizable, but this version gives it the cozy look of old primitive folk art.
Roll clay to approximately ¼ inch thick.
Draw a simple bell shape about 6 inches tall.
Cut it out carefully.
Instead of making a realistic bell, keep the lines soft and slightly uneven.
Roll a thin clay rope and attach it around the bottom edge of the bell. This creates dimension and gives the piece a handmade appearance.
Cut a large primitive star and place it in the center of the bell.
Using a toothpick, poke stitching holes around the star.
Add a hanging hole at the top if desired.
Allow the clay to dry completely.
Paint the bell aged mustard, weathered cream, or antique black. Primitive Americana often uses unexpected colors instead of bright metallic gold.
Paint the star faded navy.
Dry brush cream paint across raised areas.
Finish with a brown antiquing wash.
The stitching holes will become more visible after antiquing and create wonderful texture.
This project fits beautifully among rustic patriotic decor collections because it feels aged without looking fake.
There are lots of patriotic bell crafts online, but not many have this worn folk-art personality.
12. Primitive Uncle Sam Hat With Pocket Star
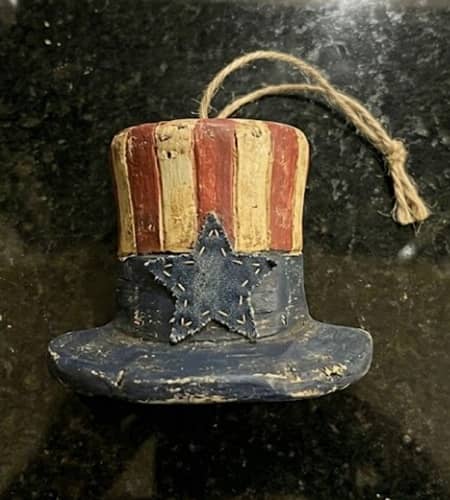
This project takes inspiration from traditional uncle sam doll pattern decorations while giving it a completely different form.
Start by rolling clay into a rectangle approximately 7 inches tall.
Shape the upper section into a tall top hat.
Keep the edges slightly irregular. Primitive pieces should never look laser-cut.
Cut out the entire shape.
Now roll a second smaller rectangle and attach it to the lower front portion of the hat. This creates a small decorative pocket.
Cut a chunky star shape and attach it to the pocket.
Use a toothpick to create stitching holes around the pocket edge.
Add several tiny dents and imperfections around the hat. Trust me, these details make a huge difference after painting.
Allow everything to dry thoroughly.
Paint the hat faded black or dark navy.
Dry brush cream over the raised surfaces.
Paint the pocket barn red and the star aged cream.
Apply a generous brown antiquing wash and wipe away excess.
Thread jute through a hanging hole at the top.
The result feels like something you’d discover in an old general store rather than a craft aisle.
It also pairs nicely with a Patriotic american doll with flag display because both share similar Americana roots.
I think the rough edges are what really make this one work.
Final Thoughts
One thing I’ve noticed about primitive patriotic clay craft projects is that the imperfections become the most memorable part.
A crooked star, uneven paint, or a fingerprint left in the clay often adds more character than perfect craftsmanship ever could.
Early American folk artists weren’t chasing perfection… they were creating with what they had.
That’s a lesson worth borrowing today. Before you seal your finished pieces, consider setting them aside for a day and viewing them with fresh eyes.
You might discover that the tiny flaws you wanted to fix are exactly what gives your rustic patriotic decor its soul and authenticity.