A front load washing machine is usually equipped with two tubs inside them.
They play an equally important role to complete your laundry chores in the machine.
The inner tub is where all the agitation and cleaning task takes place. Whereas the outer tub hold supports the inner tub in the wash process.
Due to prolonged usage, there is always a possibility that the inner tub may break down.
This article will provide you with a step-by-step guide to replacing them, so your washer can be up and running again in no time.
What is an inner tub in a front load washer?
The inner tub is also known as a washtub or an inner drum. When you load the fabrics in your washer it is usually loaded into the inner tub.
As your washer is set to operate, the inner tub agitates and spins. It does this with all the loads inside, therefore delivering clean and fresh fabrics.
If the inner tub breaks down or malfunctions, it can cause the clothes to be wet and heavy. In such a situation replacing them remains the only option.
How do they get damaged?
Break down of any components mainly depends on your usage pattern.
The more you use them with precautions the longer the components last.
Let us look into a few common reasons that may lead to damage to your washer’s inner drum.
Improper Loads
Loading the fabrics unevenly or overloading the washer are the major causes of damage.
Overloading your washer creates immense pressure on the inner drums. But it is not only limited to the inner drums, it also impacts the connected components too.
Other components
If the linked components to the wash drum turn bad then it may impact the inner drum’s performance (Example: Components such as the outer drum, motor, drive belts, screws, bolts, etc.).
Other damages
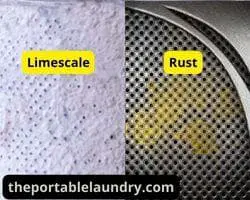
Regular contact with excess hard water can cause limescale formation. These are in the form of white or grey patches that may damage the tub’s material in the long run.
Rusting
Using unwanted chemical compounds can also lead to rusting and other damage to the inner tub layers.
How to replace the inner tub of a Front Load washer?
Replacing the inner drum of a front load washer is not an easy task, it requires a few skills and a lot of patience.
If your washing machine’s inner tub is broken or damaged, you will need to replace it immediately. This process can be time-consuming as you may have to detach some parts of your washer.
Here’s how you can replace the inner tub of a front load washer.
Things needed to complete the task
- Screw Driver
- Wrench Pliers
- Replacement inner drum (Suitable drum)
- Washing Machine User manual.
Instructions to replace the inner tub of a front load washer.
Step 1: Unplug the washing machine from the power outlet and simply, turn off the water supply to the machine.
Step 2: Drain any water that is in the tub by opening the drain valve. You may also consider keeping the drain hoses detached. Move the washer from its place to have better access from all sides.
Step 3: Remove the washing machine cabinet (the outer panel), you may need to remove the front, upper, and back panels. These can be detached or removed by unscrewing the screws from their place.
Note: Secure all the screws accordingly, so that you don’t jumble up while reversing (Re-assembling the washer) the steps.
Step 4: Start by removing the connected components. Components such as the detergent drawer compartment which is usually located on the top left of the washer’s front panel.
Step 5: Pull open the detergent case and unscrew it to remove the drawer. It is usually fixed using two screws.
Step 6: Now detach the top panel using a screwdriver and keep it aside. This is the upper panel of the front load washer.

The upper panel is now removed from your front load washer.
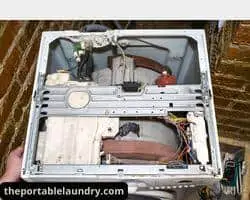
Step 7: Remove the functions panel cover that includes the detergent drawer casing, display pane, and knob. Once you remove it there could be electrical wires, simply remove the harness and separate them from the panel.
In the below image you can see the upper panel is detached including the display panel cover.
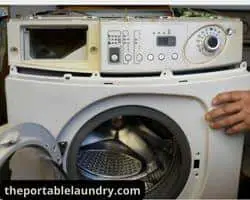
Step 8: Move to the lower part of the front panel and remove the drain pump filter slot.

Step 9: Remove the lower panel that holds the casing of the drain pump filter.
Once the top and lower panel straps are removed it will give you access to detach the front panel that holds the door.
Step 10: Unscrew and remove the front panel carefully and make sure to take the gasket rubber seal off the door frame.
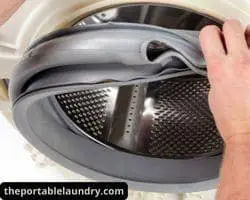
Now you have removed the front and the top panels of your washing machine. You may now need to move towards the back panel of your washer.
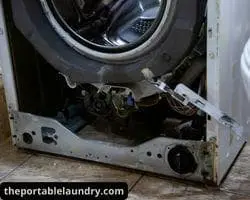
Step 11: Unscrew and remove the back panel and keep it aside. Now disconnect the hoses from the tub. There may be two hoses, one for hot water and one for cold water.

Step 12: You will see a drive belt that you can gently pull and remove.

Step 13: Remove the bolts that hold the tub in place. There may be four or more bolts. Also, loosen the center bolt that holds the inner drum from the back.
Step 14: Walk back to the front of the washer and pull the inner tub out of your front load washer.
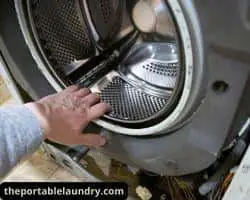
Step 15: Place the new inner tub into the washing machine and bolt it into place from the back.
Step 16: Reconnect the hoses to the new tub. Make sure they are tight so there are no leaks.
Step 17: You may also grease or oil the accessible parts such as the suspension system and bearings. Set the drive belt back and detach all the panels to their place by reversing the steps.
Step 18: Roll the fixed drum with your hands to check if they are moving freely and if there’s no unusual noise.
Step 19: Connect the water supply and plug in your washer.
Step 20: Run a clean cycle using hot water. This will help you to test if the washer functions the way it is supposed to.
You have successfully replaced your front load washer’s inner drum.
Tips to care front load washer’s tub
- Do not overload your washer nor place the loads in an uneven way.
- Use water softening detergents if your location supplies hard water.
- Use an anti-rusting solution in the clean cycle if you notice rusting inside the wash tub.
- Clean your washing machine regularly to avoid and eliminate any damage-causing elements.
- Try to avoid unwanted or unknown chemicals in the washing machine.
Final Thoughts
Now that you know how to replace a washing machine’s inner tub, you can keep your washer running smoothly for years to come.
Although this repair is time-consuming, it cuts down your major expenses. With a little time and effort, you can have your washing machine up and running again.
Always ensure to perform such tasks with proper care and with the required tools. Do not forget to refer to the user manual of your washing machine model type.
For any hesitation in the replacement process, you can simply contact a service professional.
Frequently Asked Question
Here are some common questions that may pop up in your mind when you are replacing the inner drum of your front loader.
Can I use my washer with a rusting drum?
Technically you may continue using the washer with rusts on the inner drum. The rust formation can grow in no time and can lead to rust patches on your fabrics. This can also result in wear and tear on your fabrics and the breakdown of your inner drum. Instead, you may get them clean using available solutions and prolong your washer’s life.
Will any wash drum fit my washing machine?
No, the inner and outer drums of washing machines are designed as per their model type. Always buy a replacement drum that is suitable for your washing machine model.
Can I replace my washer’s existing drum with a plastic drum?
Your washer must be equipped with a metal drum such as stainless steel. It is neither recommended nor the plastic drum will fit your washer. You will have to use the replacement that suits your washer model.
You May Also Like
- How To Replace The Gearbox In a Washing Machine?
- What is a Washing Machine Clutch? (Explained)
- How to Install Waste Pipe for Washing Machine? (Step-by-Step)
- How to Install a Washing Machine Drain Pan?
- How to Install a Clothesline Tightener? (Step-by-Step)
- How to Vent a Washing Machine Drain Pipe? (Step-by-Step)
- How To Loosen Washing Machine Hose Safely? (Easy Guide)
- How to Reset a Washing Machine? (Step by Step)
- How to fix the 4c error in the Samsung washing machine?
- How to Unlock A Washing Machine Door Mid Cycle?
- How to stop a washing machine mid-cycle?
- How to Clean a Portable Washing Machine?
- How to Troubleshoot a Portable Washing Machine?
- How to Use a Portable Washing Machine Effectively?


