Halloween crafting gets a whole different vibe when clay enters the picture.
I love how a simple lump of air-dry clay can turn into something that looks like it belongs on a forgotten witch’s shelf or tucked beside a flickering candle during spooky season.
These witchy clay crafts lean into crooked shapes, imperfect details, and handmade charm rather than perfection. That’s honestly what makes them feel magical.
Whether you’re looking for air dry clay Halloween projects, witchy air dry clay ideas, or beginner-friendly air dry clay crafts for Halloween, these creations are designed so almost anyone can make them.
No fancy tools. No pottery wheel. Just clay, patience, and a little imagination. Ready to make your Halloween decor look a bit more enchanted?
1. Moonlit Spell Stone Set
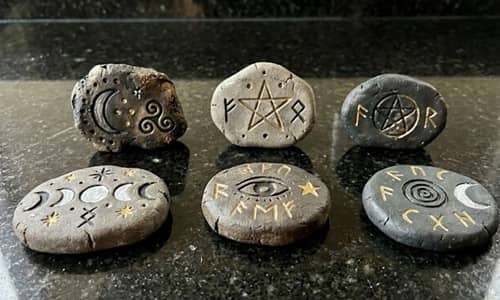
This project creates a collection of magical-looking stones that resemble ancient spell markers.
They look fantastic scattered around an air dry clay altar, displayed in bowls, or used as seasonal decor.
Start by taking a handful of white or gray air-dry clay and dividing it into six equal pieces.
Roll each piece into a rough ball. Don’t worry about making them perfectly round. Actually, slightly uneven shapes looks better for this project.
Press each ball gently against your work surface to create flattened stones about half an inch thick.
Now decide on your symbols. I like using crescent moons, stars, tiny potion bottles, ravens, and simple runes.
Use a toothpick to sketch the design lightly before carving deeper lines. Move slowly here. If the clay drags, dip the toothpick in water first.
After carving, smooth the edges using a damp fingertip. Some cracks are okay. Those little imperfections make the stones appear older.
Allow the stones to dry for 24 hours. Turn them halfway through drying so both sides cure evenly.
Once dry, paint them with matte black acrylic paint. Let the paint dry completely.
Next comes the magic-looking finish. Dry brush metallic silver over the raised areas. Use almost no paint on your brush. You wants the silver catching only the high spots.
For extra age, rub a tiny amount of brown paint into the carved grooves and wipe away the excess immediately.
Seal with matte sealer if desired.
The finished stones look like relics from a witch’s garden path and they photograph beautifully for Halloween displays.
2. Tiny Witch’s Herb Drying Rack Charms
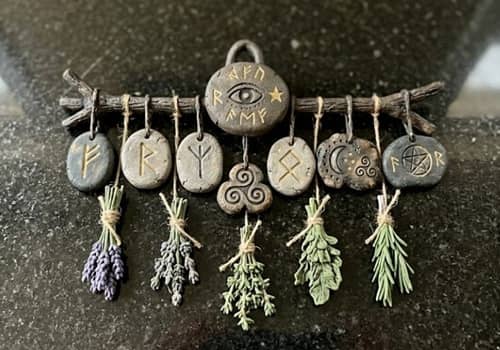
Most witchy air dry clay crafts focus on pumpkins or ghosts. This one takes inspiration from old herbal apothecaries instead.
Roll air-dry clay to about ¼ inch thickness using a rolling pin.
Cut small rectangular pieces roughly 3 inches tall and 2 inches wide.
Round the corners gently with your fingers.
At the top of each rectangle, poke two holes using a straw or pencil tip. These holes will later hold miniature clay twigs.
Create tiny herb bundles from clay. Roll very thin stems. Then pinch tiny leaf shapes and attach them using a small amount of water.
You don’t need botanical perfection. If the herbs look slightly wonky, that’s part of the charm.
Make bundles resembling lavender, sage, rosemary, or entirely fictional magical plants.
Attach the herb bundles to the rectangular base.
Next, create miniature branch rods. Roll thin snake-like clay pieces and add bark texture using a toothpick.
Place these rods through the upper holes.
Let everything dry completely for 24 to 48 hours.
Paint the background with a faded cream, moss green, or muted gray.
Paint the herbs in dusty greens and purples.
Add tiny black labels such as “Moon Sage,” “Crow Herb,” or “Night Bloom.”
I once rushed the drying step and the little branch snapped clean off. Not my smartest crafting moment.
When finished, these look like miniature displays hanging inside a witch’s cottage.
3. Eclipse Potion Bottle Trinket Dish
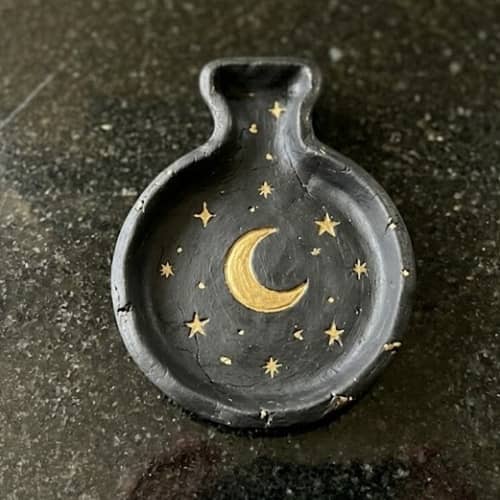
This project combines a trinket dish with a potion bottle silhouette. It’s useful and decorative at the same time.
Take a tennis-ball-sized piece of air-dry clay.
Roll it flat until it reaches about ¼ inch thickness.
Draw a large potion bottle shape directly onto the clay using a pencil. Think old apothecary bottle rather than modern medicine bottle.
Cut around the shape carefully using a craft knife.
Place the cut shape onto a shallow bowl upside down.
Gently press the clay over the bowl so it forms a curved dish shape.
Do not push too hard or the bottle neck may crack.
Smooth all edges with slightly damp fingers.
Now add decorative details. Roll tiny clay snakes and attach them around the edge like raised borders.
Create a large crescent moon for the center.
Add miniature stars around it. Uneven stars actually feels more handmade and mysterious.
Let the entire piece dry slowly for at least 48 hours.
Paint it matte black.
Once dry, lightly sponge metallic gold onto the moon and stars.
Use a thin brush to add tiny speckles across the surface, creating a night-sky effect.
If you like air dry clay witchy projects that are functional, this one is surprisingly useful for jewelry, crystals, keys, or seasonal decorations.
The finished dish feels like something found inside a forgotten potion shop.
4. Crow Feather Moon Hanger
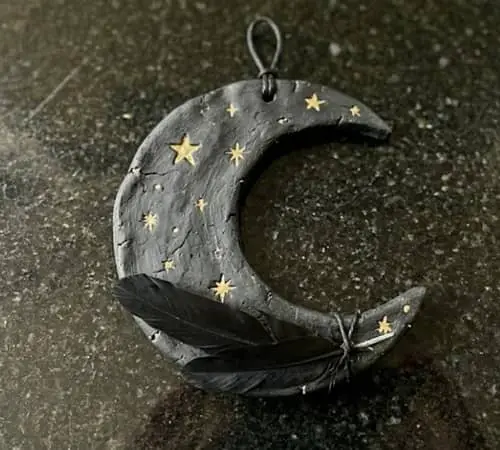
Some witchy clay crafts try very hard to look spooky. This one leans mysterious instead. It combines a crescent moon with layered crow feathers that move slightly when hanging.
Start with a softball-sized piece of air-dry clay.
Roll the clay to roughly ¼ inch thick.
Using a pencil, sketch a large crescent moon shape about 6 inches tall. Cut it out carefully with a craft knife.
Smooth the edges using a damp finger. Go slowly around the moon tips because those areas can crack easily.
Now make the feathers.
Roll more clay and cut 5 to 7 feather shapes ranging from 2 to 4 inches long. They should not all match. Nature rarely does.
Use a toothpick to carve a center vein down each feather. Add smaller angled lines branching outward.
Near the top of every feather, create a hanging hole using a straw.
At the bottom of the moon, poke matching holes where the feathers will eventually attach.
Allow everything to dry completely.
Paint the moon a weathered charcoal gray. Dry brush silver along the edges.
Paint the feathers black with tiny hints of dark purple and midnight blue. The colors should be subtle, not loud.
Once dry, connect the feathers using jump rings, string, or black thread.
Add a loop at the top for hanging.
When it catches a breeze, the feathers shift ever so slightly. It looks way more magical than you’d expect from such a simple project.
5. Crystal Ball Candle Collar
This is one of those witchy air dry clay ideas that instantly makes a plain candle look special. Instead of decorating the candle itself, you’ll create a removable decorative collar that sits around the base.
Take air-dry clay and roll it into a strip approximately 1 inch wide and 12 inches long.
Wrap it loosely around a glass candle jar to measure the size.
Remove it before continuing. Never let wet clay dry directly on the jar because it can stick.
Trim the strip until the ends meet comfortably.
Now create miniature crystal balls.
Roll several marble-sized clay balls.
Flatten the bottom slightly so they sit securely.
Attach them along the collar using water as adhesive.
Between each crystal ball, add tiny stars, moons, mushrooms, or little potion bottles.
The details don’t have to be perfect. Mine looked kinda crooked the first time and somehow that made it better.
Let everything dry flat.
Once hardened, paint the collar matte black.
Paint the crystal balls with metallic silver, pearl white, or iridescent paint.
Use a tiny brush to highlight details with gold accents.
After the paint dries, gently place the finished collar around your candle jar.
The result feels like something from a fortune teller’s table rather than a typical Halloween decoration.
6. Forgotten Witch’s Key Collection
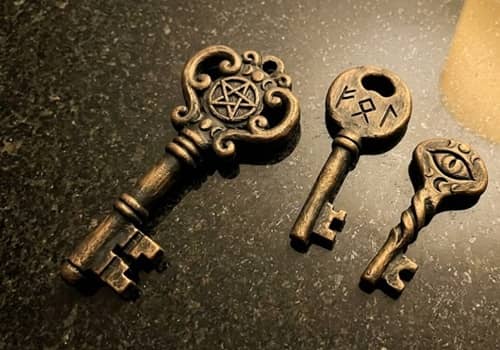
Instead of making modern-looking keys, this project creates decorative keys that appear centuries old. They look wonderful displayed on trays, shelves, or near an air dry clay altar setup.
Start by sketching three different key designs on paper.
Think oversized circles, crescent tops, stars, or unusual magical symbols.
Roll clay to about ¼ inch thickness.
Transfer your key shapes onto the clay and cut them out carefully.
Each key should be around 5 to 6 inches long.
Use a pencil or straw to create decorative openings inside the key heads.
Now add raised details.
Roll tiny clay ropes and attach them around the edges.
Create miniature stars, ravens, moons, or runic symbols for decoration.
Take a toothpick and press tiny dents across the surface. This creates an aged metal effect later.
Allow the keys to dry fully.
Paint everything matte black first.
Once dry, layer dark bronze, antique gold, and tiny amounts of silver using a dry-brush technique.
Don’t cover the black completely. The dark base creates depth.
For extra age, lightly rub watered-down brown paint into the crevices and wipe away excess.
One key might end up looking stranger than the others. That’s fine. A magical key collection shouldn’t feel factory-made.
Display them overlapping on a shelf, hang them from ribbon, or use them as Halloween wall decor.
Among all the air dry clay Halloween projects in this list, this one often gets the most compliments because people assume the keys are actual vintage finds.
7. Lunar Moth Spell Plaque

If you’ve seen enough pumpkins and ghosts already, this one feels refreshingly different. Lunar moths show up often in mystical folklore and they fit beautifully into witchy clay crafts.
Start by rolling air-dry clay to about ¼ inch thick.
Sketch a rounded plaque shape roughly 6 inches wide. Cut it out and smooth the edges.
At the top, create two hanging holes using a straw.
Now lightly draw a large moth in the center. Don’t panic if you can’t draw perfectly. Moths are surprisingly forgiving.
Build the moth using thin layers of clay.
Create an oval body first.
Next, form four wings separately and attach them with a little water.
Use a toothpick to carve delicate wing veins. Work slowly. Small details make a huge difference here.
Add tiny crescent moons around the moth. Scatter a few stars too.
Let the plaque dry completely for 24 to 48 hours.
Paint the background matte black or deep charcoal.
Paint the moth dusty ivory with hints of pale gold.
Use silver paint on the stars and moons.
To create an aged look, lightly brush diluted brown paint into the grooves.
It don’t need to look perfectly symmetrical. Real handmade decor has personality.
Hang it near a bookshelf, seasonal mantel, or entryway for a subtle witch-cottage vibe.
8. Black Cat Familiar Pocket Token
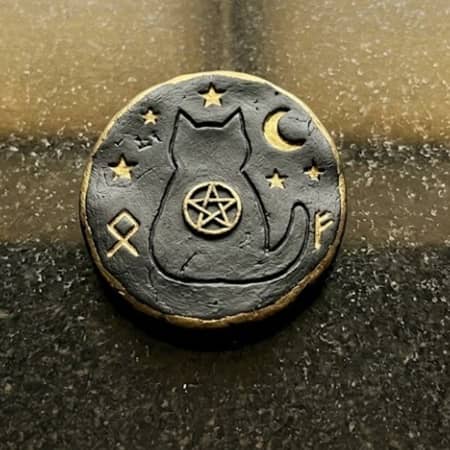
This project creates a small charm that feels like something a witch might carry in her pocket for luck. It’s tiny, simple, and beginner friendly.
Take a golf-ball-sized piece of clay.
Roll it into a slightly flattened oval about 2½ inches tall.
Pinch two pointed ears at the top.
Use your fingers to gently shape the face.
For the eyes, press two almond-shaped indents using a pencil tip.
Add a tiny triangular nose.
Use a toothpick to draw whiskers and subtle fur texture around the cheeks.
Flip the piece over.
On the back, carve a moon, star, rune, or initials if you’d like.
Allow the clay to dry completely.
Paint the cat matte black.
Once dry, use metallic gold or silver paint to highlight the eyes and carved details.
Add a little dry brushing around the ears and whiskers.
The first one I made looked slightly grumpy. Honestly, it ended up being my favorite.
These little tokens are great for Halloween displays, gift baskets, or decorating an air dry clay altar.
Because they’re small, they’re also perfect for using leftover clay from larger air dry clay witchy projects.
9. Potion Ingredient Apothecary Tags
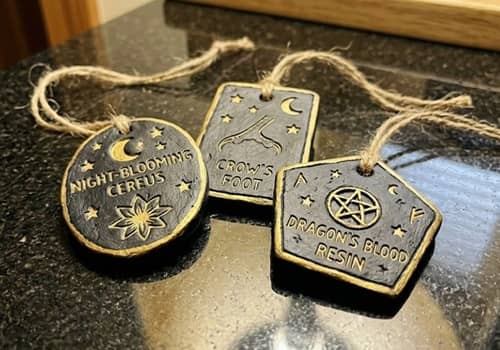
Most air dry clay crafts for Halloween focus on decorations. These tags can actually label jars, baskets, or seasonal displays.
Roll clay until it’s roughly ⅛ inch thick.
Cut out several tag shapes. You can make rectangles, circles, hexagons, or even coffin-shaped tags.
Aim for tags around 3 inches long.
Use a straw to create a hanging hole at the top of each one.
Now carve ingredient names into the clay.
Some examples:
- Moon Dust
- Raven Feathers
- Dragon Root
- Nightshade Leaves
- Stardust Powder
- Crow Bones
Obviously these are decorative labels, not real ingredients.
Press tiny stars, moons, mushrooms, crystals, or botanical patterns around the lettering.
Allow the tags to dry completely.
Paint them with a black base coat.
Dry brush antique gold, silver, or bronze over the raised details.
For extra character, dab a tiny amount of dark brown paint around the edges to mimic age.
Thread black ribbon, twine, or velvet cord through each hole.
When attached to jars, baskets, or potion bottles, they instantly create that old-world apothecary feeling.
These tags pair especially well with other witchy air dry clay crafts because they help tie an entire Halloween display together.
10. Mini Cauldron Trinket Bowl
This little cauldron bowl feels like something that belongs on a witch’s desk beside scattered crystals and handwritten spell notes. Unlike many witchy clay crafts, this one is actually useful long after Halloween ends.
Start with a baseball-sized piece of air-dry clay.
Roll it into a smooth ball.
Press your thumb into the center and slowly pinch outward while rotating the clay. Continue widening the opening until a bowl shape forms.
Aim for walls about ¼ inch thick.
Smooth the inside using damp fingertips.
Now create the cauldron feet.
Roll three small marble-sized balls.
Flatten them slightly and attach them underneath the bowl using water.
Press gently but firmly.
Next, roll a thin clay rope.
Attach it around the rim to create a decorative raised edge.
Use a toothpick to carve tiny moons, stars, runes, or botanical symbols around the outside.
Allow everything to dry for at least 48 hours.
Paint the entire cauldron matte black.
Once dry, lightly dry-brush silver along the raised areas and rim.
The silver should barely catch the texture. Too much can make it look shiny instead of aged.
Mine was drying near a window once and one foot warped slightly. Funny enough, it ended up looking more authentic.
Use the finished bowl for jewelry, crystals, keys, or wrapped Halloween candy.
11. Raven Moon Wall Talisman
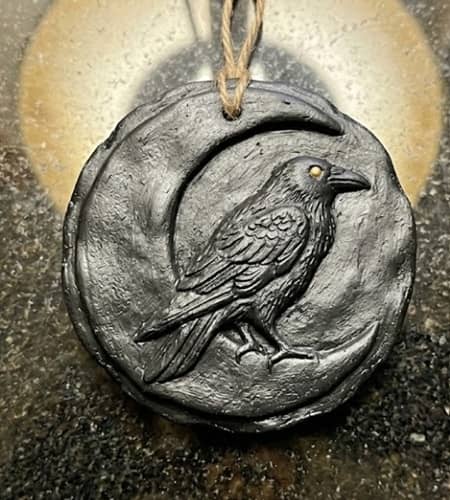
Some air dry clay Halloween projects scream spooky. This one whispers spooky.
Begin by rolling clay to approximately ¼ inch thickness.
Cut out a large circle about 6 inches wide.
Smooth the edges carefully.
At the top, create two hanging holes.
Now sketch a large crescent moon along one side of the circle.
Build the moon using a thin layer of clay attached directly onto the plaque.
For the raven silhouette, cut a simple side-profile shape from rolled clay.
Don’t overcomplicate the bird. Strong simple shapes often look better.
Attach the raven so it appears perched on the moon.
Use a toothpick to add feather texture.
Add tiny stars around the scene.
Let everything dry thoroughly.
Paint the background charcoal black.
Paint the moon antique silver.
Paint the raven matte black.
Use subtle gray highlights along the feather texture.
A tiny bit of dark purple brushed into the wings can add depth without being obvious.
Hang it from black ribbon, velvet cord, or rustic twine.
This piece works especially well for people who enjoy witchy air dry clay ideas that feel elegant rather than cute.
12. Witch’s Moon Garden Marker Set
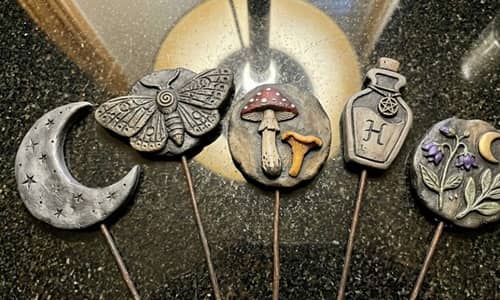
For the final project, let’s make something you don’t see very often. These decorative markers can be displayed in potted plants, seasonal centerpieces, or even on an air dry clay altar.
Roll clay to about ¼ inch thickness.
Cut out several marker tops shaped like:
- Crescent moons
- Moths
- Mushrooms
- Crystal clusters
- Tiny potion bottles
- Black cats
Each shape should be around 3 inches tall.
Next, roll long stake pieces approximately 5 inches long.
Attach one stake to each decorative shape.
Blend the seams carefully using damp fingers.
Reinforce the connection by adding a small clay strip over the joint.
Trust me, this extra step saves heartbreak later.
Use a toothpick to carve details into every design.
Add stars to the moon markers.
Add wing veins to the moths.
Add spots to the mushrooms.
Allow the markers to dry completely.
Paint them using a muted witchy palette:
- Black
- Charcoal
- Moss green
- Dusty purple
- Antique gold
Once dry, seal them if they’ll be displayed outdoors temporarily.
These markers look amazing clustered together in a planter because they create a tiny enchanted garden scene.
There are tons of witchy clay crafts online, but miniature moon garden markers are still surprisingly uncommon and that makes them stand out.
Final Thoughts
The most interesting thing about witchy clay crafts isn’t the finished piece.
It’s how imperfections become part of the design. In most crafts, people chase symmetry and flawless edges.
Witch-inspired creations often do the opposite. Slightly crooked moons, uneven stars, and rough textures can make a project feel older, more mysterious, and far more believable.
If you’re exploring witchy air dry clay crafts for the first time, try resisting the urge to fix every little flaw.
Those handmade details often become the exact reason a piece feels special.
Sometimes the magic isn’t in making something perfect. It’s in making something that couldn’t possibly have been made by anyone else.