Fall always makes me want to slow down and create something with my hands. Maybe it’s the cooler air, maybe it’s seeing pumpkins and colorful leaves everywhere.
Whatever the reason, clay suddenly feels more fun this time of year.
If you’re looking for fall clay crafts for adults that don’t look like the same projects everyone else is making, you’re in the right place.
These ideas lean rustic, slightly imperfect, and handmade in the best possible way.
Some can become seasonal decor, some make tiny gifts, and a few might even become traditions you bring back every autumn. Grab your clay and let’s make something worth displaying.
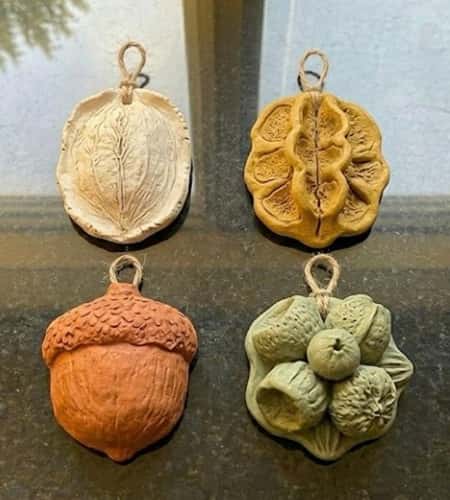
1. Woodland Story Acorn Shelf Charms
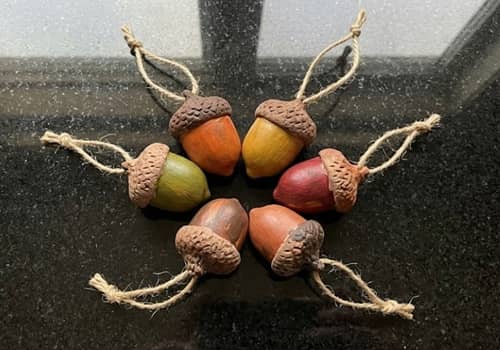
Most people make a single clay acorn and stop there. Instead, let’s build a tiny collection that tells a story.
Start with air-dry clay and divide it into six walnut-sized pieces. Roll each piece into an oval shape. Gently pinch one end to create the bottom of an acorn.
Take a toothbrush and lightly press texture onto the top third of each acorn. This textured section will become the cap. Don’t worry if the texture looks uneven. Nature isn’t perfectly symmetrical anyway.
Now make each acorn different. One can have a tiny carved heart. Another can have a leaf imprint. One can be slightly crooked. That actually makes them look more realistic.
Use a wooden skewer to poke a small hole through the top of each acorn before drying. This step is easy to forget and then your hanging options are gone.
Allow the pieces to dry for 24 to 48 hours. Once dry, paint them in muted autumn shades. Think burnt sienna, mushroom brown, faded mustard, and dusty orange.
Thread jute twine through the holes and create a short hanging display. You can drape them on a shelf, basket handle, or even combine them into an elegant acorn garland.
It looks expensive but it really isn’t.
ALSO READ: 12 Unique Clay Acorn Decor Ideas
2. Pressed Leaf Clay Lantern Wraps
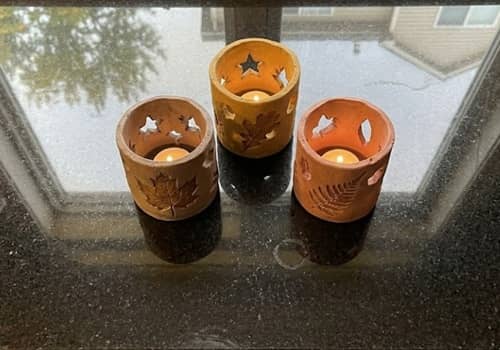
This project creates custom wraps for glass candle jars and honestly, the shadows they cast at night are kinda beautiful.
Roll air-dry clay to roughly 1/8 inch thickness. Place parchment paper underneath so it doesn’t stick.
Collect several real fallen leaves from outside. Smaller leaves work best because large ones sometimes tear the clay. I learned that one the hard way.
Press each leaf firmly into the clay using a rolling pin. Lift carefully to reveal detailed veins and textures.
Use a craft knife to cut long rectangular strips measuring approximately 8 inches by 3 inches.
Now create decorative openings. Cut tiny leaf shapes, circles, or acorn silhouettes throughout the strip. These openings allow candlelight to shine through.
Wrap the clay strip loosely around a glass jar and trim any excess clay. Remove the strip and allow it to dry separately.
After drying, paint with warm neutral tones or leave natural. Secure around the jar using twine.
Place a battery-operated candle inside. These make gorgeous clay candle holders and fit perfectly into seasonal fall decor displays.
The shadows is what really makes this craft special.
3. Tiny Harvest Basket Magnets
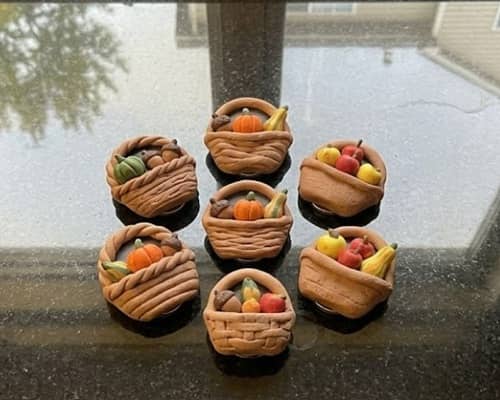
If your refrigerator deserves fall decorations too, this one is fun and surprisingly addictive.
Roll clay into several small circles about 2 inches wide. Flatten each slightly.
Using a sculpting tool or butter knife, create a woven basket pattern across the surface. Don’t rush this part. The basket texture is what sells the illusion.
Next, make miniature harvest items. Create tiny pumpkins, apples, acorns, miniature gourds, and even tiny corn pieces. These should be no larger than a thumbnail.
Attach the miniature pieces onto the basket base using a small amount of water as adhesive.
Add details with a toothpick. Little lines on pumpkins. Tiny stems. Small leaf shapes.
Let everything dry completely.
Paint using rich autumn colors. Layering slightly darker paint into crevices makes the baskets look deeper and more realistic.
Glue strong magnets to the back.
These work wonderfully as clay magnets, seasonal kitchen accents, and thoughtful tiny gifts for neighbors or teachers. They also pair nicely with other easy fall crafts displayed around the home.
Funny thing is, people often think these came from a craft boutique.
4. Pumpkin Patch Name Tags for Autumn Gatherings
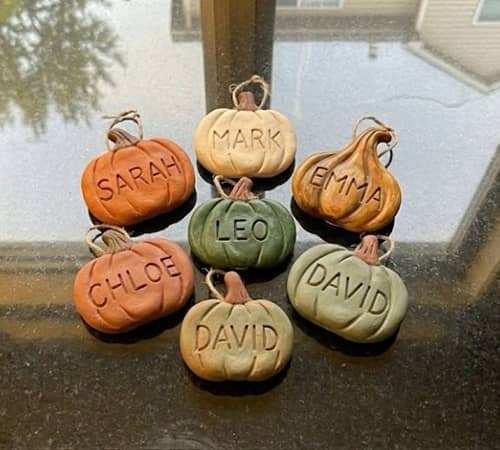
This project started as table decor, but now I use them everywhere. Gift baskets. Place settings. Even on storage bins.
Take air-dry clay and roll it until it is roughly 1/4 inch thick. Thicker clay holds up better when handled repeatedly.
Using a round cookie cutter or drinking glass, cut circles about 2.5 inches wide.
Shape each circle into a squat pumpkin by gently pressing shallow grooves from top to bottom using the back of a butter knife. Rotate as you work. Slow and steady here.
Create a small stem using a tiny piece of clay. Press it firmly onto the top. Blend the seam with your fingertip so it doesn’t pop off later.
Before drying, use a wooden skewer to poke a small hole near the stem if you plan to hang them.
Now comes the fun part. Use alphabet stamps, toothpicks, or even a dull pencil to carve names into the pumpkins. Family names. Guest names. Thanksgiving seating assignments. Whatever fits your setup.
Allow them to dry for at least 24 hours.
Paint with muted pumpkin shades rather than bright orange. Dusty peach, cinnamon brown, faded terracotta, and creamy beige often look more sophisticated.
Thread twine through the hole if desired.
These work beautifully on seasonal tables, and unlike many fall crafts for adults, they can actually be reused year after year.
I made a few slightly crooked on purpose. They looked better than the perfect ones.
5. Fallen Oak Leaf Trinket Dishes
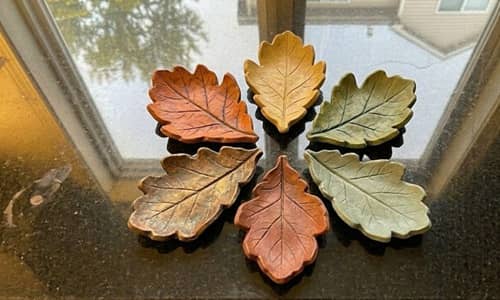
Every fall leaf dish seems to use maple leaves. Let’s switch things up.
Find several oak leaves with strong vein patterns. Freshly fallen leaves usually work best.
Roll air-dry clay into sheets approximately 1/4 inch thick.
Place the oak leaf onto the clay and gently roll over it with a rolling pin. Press firmly enough to capture the details but not so hard that the leaf tears.
Using a craft knife, carefully cut around the leaf outline.
Transfer the clay leaf onto a small bowl. Let the clay rest inside the bowl while drying. This naturally creates a curved dish shape.
Leave it alone for a full day. Seriously. Touching it too soon almost always causes warping.
Once dry, paint lightly. Dry brushing works beautifully here. Use a small amount of paint on the brush and let the raised veins catch the color.
Add metallic bronze or antique gold highlights if desired.
These dishes are ideal for rings, keys, coins, or seasonal display pieces. They also make thoughtful handmade gifts during the holiday season.
Some people make ten at once because they’re that relaxing.
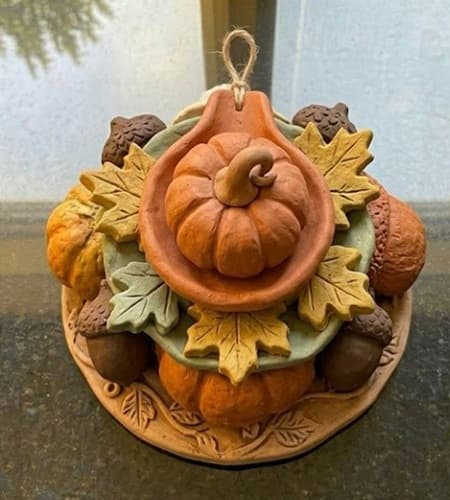
6. Mini Cornucopia Centerpiece Bowl
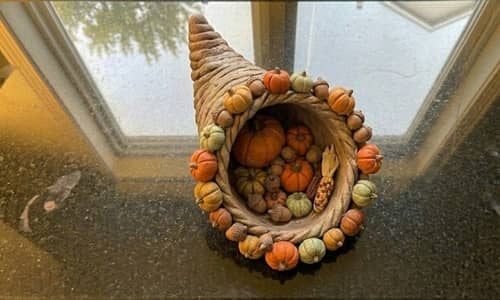
Most people know the idea of a harvest horn, but making one from clay feels surprisingly satisfying.
Start with a softball-sized piece of air-dry clay.
Roll it into a thick cone shape. One end should be wide while the opposite end gradually narrows.
Using your thumb, slowly hollow out the center from the wider opening. Work gently and rotate frequently. If you push too hard, the walls become uneven.
Continue shaping until it resembles a traditional harvest horn.
Now add texture. Press burlap lightly against the outside surface to create subtle fabric-like patterns. The effect looks amazing after painting.
Create tiny decorative accents from leftover clay. Small pumpkins, acorns, miniature pears, leaves, and gourds all work beautifully.
Attach these around the opening of the horn using water as a bonding agent.
Allow everything to dry completely.
Paint with warm harvest tones and use darker paint washes in recessed areas to emphasize texture.
Display it on a dining table, coffee table, or entryway console. This miniature cornucopia centerpiece becomes a conversation starter because people rarely see one made entirely from clay.
And honestly, it feels much more personal than store-bought decor.
This project could also inspire an autumn craft using clay for family gatherings, though younger children may need help with shaping.
7. Cozy Sweater Texture Candle Cups
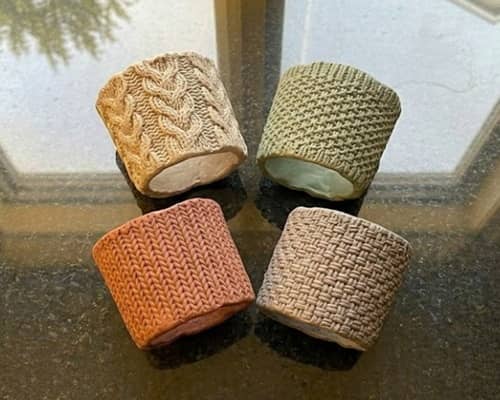
Fall sweaters have a texture that instantly feels comforting. So why not borrow that look for clay?
Take air-dry clay and roll it to about 1/4 inch thickness.
Wrap a piece of parchment paper around a small glass votive holder. Measure the height and circumference. This gives you the size needed for your clay wrap.
Cut a rectangle from the clay based on those measurements.
Now grab an old knitted sweater. Press the knitted fabric firmly into the clay surface. Lift carefully. You’ll see a beautiful woven pattern left behind.
If you don’t have an old sweater, a knitted scarf works too.
Wrap the textured clay around the outside of the glass holder. Trim any excess clay and smooth the seam with your finger.
Remove the clay carefully and let it dry separately.
Once dry, paint with creamy oatmeal, soft taupe, warm caramel, or muted rust colors. Avoid bright colors. The texture deserves all the attention.
After the paint dries, seal with a matte sealer.
Place the clay sleeve around a glass candle holder. Add a battery-operated candle for safety.
These cozy little pieces fit beautifully alongside other clay candle holders and instantly make a room feel more autumn-ready.
Not gonna lie, these looks way more expensive than the materials used.
8. Woodland Mushroom Napkin Rings

Mushrooms have quietly become one of fall’s most charming decorating trends.
Start by rolling several pieces of clay into short cylinders about 1 inch tall.
Shape the tops into rounded mushroom caps. Don’t obsess over making them identical. Real mushrooms certainly aren’t.
Create six to eight mushrooms depending on how many napkin rings you need.
Now roll clay snakes about 5 inches long and roughly pencil thickness.
Form each clay snake into a ring large enough to slide over a folded cloth napkin.
Attach one or two mushrooms onto each ring. Blend the seams carefully so they stay secure after drying.
For extra character, add tiny leaves, acorns, or bark textures around the base.
Allow everything to dry thoroughly.
Paint the mushroom caps in muted cream, cinnamon brown, dusty orange, or earthy red. Add subtle shading underneath the caps to create depth.
Once dry, seal lightly.
These make fantastic Thanksgiving table accessories and often become the detail guests notice first.
They’re decorative but still practical, which isn’t always easy to achieve with seasonal crafts.
And yes, one of mine ended up leaning sideways. Somehow it became my favorite.
9. Vintage Harvest Recipe Tile Magnets
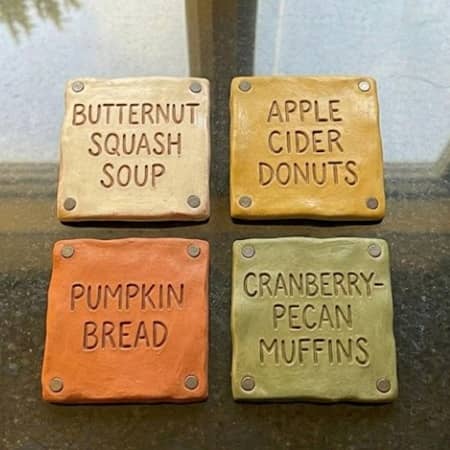
This project combines seasonal decor with family memories. That’s a pretty good combination if you ask me.
Roll air-dry clay to approximately 1/4 inch thickness.
Cut several squares measuring about 3 inches by 3 inches.
Smooth the edges lightly with a damp finger.
Before the clay dries, use alphabet stamps, a toothpick, or a stylus to engrave short recipe reminders. Think things like:
“Apple Crisp”
“Pumpkin Bread”
“Grandma’s Pie”
“Cinnamon Muffins”
Keep the lettering simple and large enough to read easily.
For added detail, press small leaf patterns into the corners. Tiny acorns work beautifully too.
Allow the tiles to dry completely.
Paint with vintage-inspired colors such as cream, faded sage, antique white, dusty pumpkin, or warm beige.
After painting, lightly sand the raised areas. This creates a naturally aged appearance.
Attach strong magnets to the backs using craft adhesive.
These decorative clay magnets look wonderful on refrigerators, memo boards, or coffee stations during autumn.
They also make meaningful tiny gifts because you can personalize each one with favorite family recipes or seasonal traditions.
Funny enough, guests usually start asking about the recipes before they ask about the craft itself.
This idea could even inspire simplified versions for older children looking for fall clay crafts for kids while adults create more detailed versions nearby.
10. Foraged Seed Pod Wall Hanging
Walk outside during fall and you’ll notice something most people overlook. Seed pods are everywhere. They have amazing shapes too.
For this project, we’re recreating those natural forms in clay rather than collecting fragile real ones.
Start by gathering a few seed pods for reference. Milkweed pods, maple helicopters, sweetgum balls, or any interesting shapes you can find.
Roll several golf-ball-sized pieces of air-dry clay.
Shape each piece into a different pod design. Some should be round. Others can be elongated or slightly twisted. Variety makes the finished display look much more natural.
Use toothpicks, old forks, combs, and even crumpled aluminum foil to create surface texture.
Before drying, poke a small hole through the top of each piece.
Make between eight and twelve pods total.
Allow them to dry completely.
Paint using earthy colors like mushroom brown, weathered gray, faded olive, and muted rust. Dry brushing works especially well because it highlights all those tiny textures.
Thread the finished pods onto jute twine, leaving uneven spacing between pieces.
Hang vertically rather than horizontally. It creates a more sculptural look.
Most seasonal wall decor focuses on pumpkins and leaves. This one feels different. Slightly artistic. A little unexpected.
And honestly, guests often ask what they’re made from because they don’t immediately realize it’s clay.
11. Stackable Harvest Totem Sculptures
If you’ve ever stacked stones at a beach, you’ll understand this project immediately.
The goal is to create small decorative towers inspired by harvest season.
Start by rolling several clay balls in different sizes.
Flatten some into pumpkins. Shape others into acorns, gourds, leaves, pinecones, and simple discs.
The pieces should vary in height and width so they stack visually.
Use wooden skewers to create a hole through the center of every piece before drying.
This step matters. Forgetting it means the tower won’t assemble later.
Allow everything to dry thoroughly.
Paint each piece individually using a coordinated fall palette. Burnt orange, wheat gold, deep olive, warm brown, and muted cream work beautifully together.
After drying, slide the pieces onto a wooden dowel secured to a small wooden base.
Mix the order until it looks balanced.
Some towers may lean slightly. That’s okay. Handmade projects should have a little personality.
Place them on bookshelves, entry tables, or mantels. They fit into modern homes, farmhouse spaces, and even minimalist decor because the shapes remain simple.
Among all the fall crafts for adults, this one feels almost like functional art.
You dont need sculpting experience either, which makes it surprisingly beginner friendly.
12. Secret Message Autumn Keepsake Stones
This might be my favorite project in the entire collection.
It’s simple on the surface, but it becomes surprisingly meaningful over time.
Roll air-dry clay into smooth oval stones about 2 to 3 inches wide.
Create enough for family members, friends, or even yourself.
Before drying, carve a short hidden message into each stone.
Ideas include:
“Keep Going”
“Slow Down”
“Call Dad”
“Be Brave”
“Take The Trip”
“Trust Yourself”
You can also use meaningful dates, initials, or family sayings.
Now here’s where things get interesting.
Cover most of the message with a clay leaf, acorn, pumpkin, or woodland design. Leave only small portions visible.
The full message becomes something people discover when they pick up the piece and examine it closely.
Allow the stones to dry completely.
Paint using soft autumn shades. Focus on natural colors rather than bright seasonal tones.
Add subtle antiquing with diluted brown paint to make the details stand out.
Display them in bowls, baskets, bookshelves, or beside seasonal centerpieces.
These make wonderful keepsakes, thoughtful gifts, and meaningful decorations that carry personal stories.
Unlike many seasonal decorations, people often keep these displayed long after fall ends.
And that’s probably the best compliment a craft can receive.
Final Thoughts
One thing I’ve noticed about clay is that it slows people down in a way few hobbies can.
Your hands get involved, mistakes become part of the design, and suddenly perfection matters a whole lot less. That’s especially true with fall clay crafts for adults.
The tiny fingerprints, uneven edges, and slightly crooked shapes often become the details that give a piece character.
If you’re exploring an autumn craft using clay, don’t rush to make everything look store-bought.
Nature isn’t perfect, and fall isn’t either. Lean into the textures, the imperfections, and the handmade charm.
Sometimes the projects we almost throw away end up becoming our favorite seasonal decorations.