Quick Answer
To replace the drum glide in the dryer:
- Locate the drum glides with help of the user manual.
- The drum glides are usually located just inside the door or around the back/door side of the drum depending on the dryer model.
- Remove the access panels to get to the drum glides.
- Pry out the old glide using a flathead screwdriver and replace it with the new one.
- Put everything back by reversing the steps and fastening the glides if applicable in your dryer type.
Key Takeaways
- Drum glides support the smoother movement of the dyer’s drum.
- Drum glides are usually located around the door side (may vary depending on the model).
- These glides or bearing slides are usually made of plastic, nylon, and Teflon and are in the form of thin small strips.
- They are installed to their brackets around the dryer’s drum.
- If they wear out, your dryer will become noisy or move erratically.
- These glides are among the most affordable parts of a clothes dryer and can be replaced at home with tools.
What is a drum glide in a dryer?
A drum glide is also known as a drum bearing slide, and it allows the dryer drum to move smoothly and keeps it in line, especially during tumbling and spinning.
In other words, it’s just a fixture that supports the front of the dryer drum during the rotation.
Drum glides are used in the vast majority of dryer models and types, regardless of whether the dryer is gas or electric.
The drum glides are either made of durable plastic, nylon, or Teflon and are usually attached to the door rim or near the rear of the drum.
You can mount it by aligning the notched edges with the slots or brackets on either side.
Where is a drum glide located in a dryer?
The location of the drum glides is unique to each model, so it is best to check your user manual or the manufacturer’s website.
Most often, these glides are located either in front of the door or around the door side of the drum.
You can usually find a set of glides fixed at the rear, top, bottom, or both sides of the dryer.
You can also locate them by looking for two small strips of metal or plastic on either side of the drum.
Having said that, the best way to find the drum glide is to look in the user manual that came with your dryer.
How do you know if the dryer’s drum glides have worn out?
The drum glides are usually installed to smoothen the movement of the drum during the movement.
A damaged slide might not be able to support the drum’s tumbling movement.
In most cases, your dryer’s drum will make a noise or tumble poorly.
How to replace drum glides on dryer?
To replace a worn-out drum glide from the dryer, you will have to first locate it.
Depending on the model and type of dryer, you may need to take off a few access panels to get to the drum.
Let us look at the steps below to replace the drum glides yourself.
In order to replace the drum glides, you will need a set of screwdrivers, including a flathead screwdriver, the replacement drum glide kit, and the user manual for your dryer’s model.
Instructions to replace the drum glide
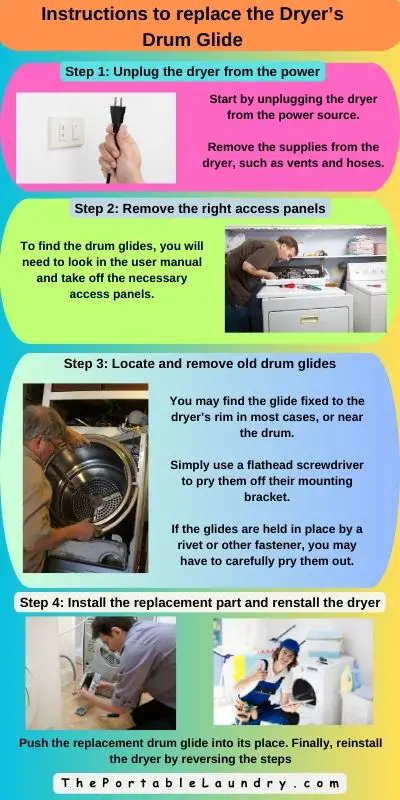
Step 1: Unplug the dryer from the power
Start by unplugging the dryer from the power source.
Now, remove the supplies from the dryer, such as vents and hoses.
This is because if you need to remove the dryer’s back panel, you might need to move it for better access.
Step 2: Remove the right access panels
To find the drum glides, you will need to look in the user manual and take off the necessary access panels.
In most cases, the top panel needs to be removed, and it may also require you to remove the control panel.
Accordingly, unscrew the panels to remove them and gain access to the dryer’s drum.
Note: Remember to disconnect the wires that come in the way and make sure to correctly fix them later. Also, check the website of the manufacturer if you can’t find the user manual or if it doesn’t have any instructions.
Step 3: Locate and remove the old drum glides
Once you have removed the required panels, i.e., front, top, or back panels, you will find the glide fixed to the dryer’s rim in most cases, or near the drum.
Simply use a flathead screwdriver to pry them off their mounting bracket.
If the glides are held in place by a rivet or other fastener, you may have to carefully pry them out.
Remove the excess residue of the fastening glue before installing the replacement glide.
Step 4: Install the replacement drum glide
Finally, push the replacement drum glide into its place or hook it to the bearing tab depending on the mounting style.
If applicable, fasten the drum glide and let it sit for a while, then reassemble the dryer.
Step 5: Reassemble the dryer along wires & switches
Start by aligning the drum and connecting the disconnected wires and switches.
Once the drum is in place, try to move it with bear hands to ensure it’s no longer noisy and moving smoothly.
Now, install the control panel, including the other panels, by reversing the steps.
Step 6: Run a test cycle
Simply, run a normal drying cycle by adding a few damp garments to check if the drum is moving smoothly and without strange noises.
Final Thoughts
Most drum glides are made of strong, high-quality plastic or nylon that can stand up to a lot of use.
Moreover, the drum glides in dryers are usually unique to each model in most cases.
So, you may need to go to the manufacturer’s website, contact the manufacturer, or check for replacement glides online using the model number.
If you are unsure about something, it is always better to contact an appliance service professional to get the job done.
Frequently Asked Questions
What is the cost of the dryer’s drum glide?
The cost will vary depending on your dryer’s model and type. Some dryers may require a set of glides, and a few come with a kit. Accordingly, the price can vary from $10 to $25.
Do all dryers use the same drum glide?
The manufacturers design unique drum glides for most models and types of a dryer. You may find a few that may fit multiple models, but it is always best to get one using the right model number for your dryer.
Can I use a dryer with a broken drum glide?
Using a dryer with a broken glide is not recommended. Your dryer will create a strange noise and the drum may not move correctly. Moreover, this can cause strain on the drive motor, and you will end up damaging other components.
You May Also Like
- How to replace the dryer drum?
- How to Replace the Idler Pulley in a Dryer?
- How to replace the dryer drive motor?
- How to Replace the Control Board in a Dryer?
- How to replace the door switch in a dryer?
- How to replace a dryer door latch?
- How to replace the timer in a dryer?
- How to Replace Gas Valve in a Gas Dryer?
- How to replace the flame sensor in a dryer?
- How to replace the moisture sensors in a dryer?
- How to replace the drive belt in a dryer?
- How to replace the Thermostat in a Dryer? (In-depth guide)
- How to replace a thermal fuse on a dryer?
- How To Replace a Dryer Blower Wheel?
- How To Replace Dryer Heating Element? (Step-by-Step)
- How to replace the Igniter in a Gas Dryer?
- 14 Reasons Why Your Dryer is Squeaking & Solutions
- Why do Korean Homes come with Washers but not Dryers?
- Gas Dryers vs Electric Dryers (Differences Explained)
- Damaged Dryer Vents: 8 signs your dryer vent is damaged
- Dryers & Vents: 20 frequently asked questions
- Why is the dryer not drying clothes?
- Difference Between Stainless Steel and Coated Dryer Drums